Table of Contents
Advertisement
Available languages
Available languages
Quick Links
NOTICE D'INSTALLATION ET D'ENTRETIEN
Installation and care instruction – Guida d'installazione e di mantenimento
British customers, you can download the manual from Aqualux's website.
Clienti italiani, è possibile scaricare il manuale sul sito Aqualux.
NOTESAQX FRGBIT - IND B - 02/2012
Électrolyseur au sel
Salt chlorinator - Electrolizzatore a sale
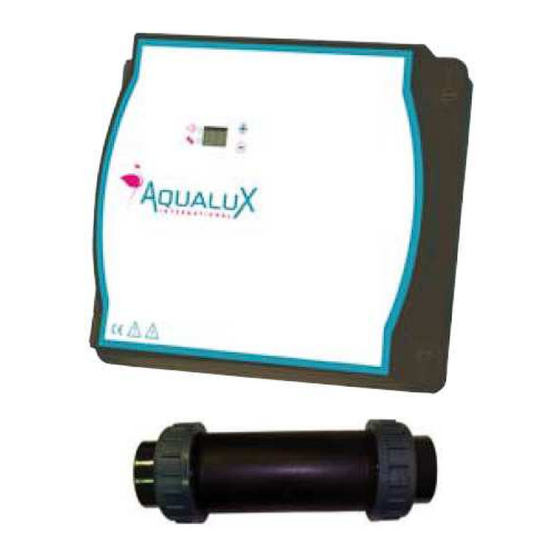
Ref 103646 : Electrolyseur AQUALUX 50 m
Réf 103647 : Electrolyseur AQUALUX 80 m
1 / 36
3
3
Advertisement
Chapters
Table of Contents
Troubleshooting

Related Manuals for AQUALUX 103646


Summary of Contents for AQUALUX 103646
- Page 1 Ref 103646 : Electrolyseur AQUALUX 50 m Réf 103647 : Electrolyseur AQUALUX 80 m British customers, you can download the manual from Aqualux's website. Clienti italiani, è possibile scaricare il manuale sul sito Aqualux. NOTESAQX FRGBIT - IND B - 02/2012...
-
Page 2: Table Of Contents
SOMMAIRE Prérequis 1. Consignes de sécurité 2. Normes / références 3. Spécifications Techniques 4. Liste du matériel livré 5. Installation de l’électrolyseur 5.1. Raccordement hydraulique de la cellule 5.1.1. Corps horizontal, montage en by-pass 5.1.2. Corps vertical, montage en by-pass 5.2. -
Page 3: Prérequis
Pré requis Le manuel de l’électrolyseur AQUALUX à pour but de vous donner toutes les informations nécessaires à une installation, une utilisation et un entretien optimal. Il est indispensable de se familiariser avec ce document et de le conserver dans un lieu sûr et connu de tous pour des consultations ultérieures. -
Page 4: Liste Du Matériel Livré
4. Liste du matériel livré Votre électrolyseur est livré avec le matériel suivant : • 1 cellule complète • 1 coffret électrique de commande • 1 câble d’alimentation cellule • 1 cordon de liaison contact sec (couverture automatique) • 1 kit de fixation murale •... -
Page 5: Préparation De L'installation
5.2 Préparation de l’installation Nous vous recommandons de fixer le coffret à un minimum de 1m60 du sol et hors de portée des enfants. Ne pas obstruer la plaque arrière. Le socle aluminium peut atteindre des températures de 60°C en saison chaude. Retirez tous les matériaux qui pourraient être sensibles à... -
Page 6: Dimensionnement Des Câbles
5.4.3 Dimensionnement des câbles Pour l’alimentation de l’électrolyseur, la section des fils doit être comprise entre 0,75mm² et 2,5mm², la section totale du câble d’alimentation doit être comprise entre 6mm² et 10mm². 5.4.4 Raccordement du coffret de l’électrolyseur Le coffret est équipé de 2 Presse-étoupe (PE) sur le dessous du coffret : à... -
Page 7: Fonctionnement De L'électrolyseur
électroniques. Relier l'électrode à la prise de terre de votre installation. Les électrolyseurs AQUALUX fonctionnent avec inversion de polarité aux bornes de la cellule afin de limiter la formation de tartre sur la cellule Toutes les 4 heures (durée fixe), l’électrolyseur procède à... -
Page 8: Première Mise En Service
Quantité de sel (kg) N’utilisez que du sel pour électrolyse Aqualux conforme à la norme NF T 90-612 ou EN 973 – A. (Réf 100378). Cette qualité de sel assure un traitement et une longévité optimale de la cellule. L’utilisation d’autres qualités de sel dégage de toute responsabilité... -
Page 9: Réglage De La Production De Chlore
Il est important, à mi-saison, d’effectuer une chloration choc de votre bassin. Pour cela : Couper l’alimentation électrique et fermez le by-pass de votre électrolyseur AQUALUX afin de ne pas endommager de façon visible et irrémédiable la cellule de votre électrolyseur lors de la chloration choc. Faites de même pour toute adjonction de produits dans votre bassin. -
Page 10: Foire Aux Questions Faq
Vérifier si la cellule est entartrée. L’électrolyseur AQUALUX est équipé d’un système d’inversion de polarité permettant de limiter l’entartrage de la cellule. Cependant, dans la majeure partie des cas, il est nécessaire d’effectuer un détartrage manuel de la cellule à mi-saison. -
Page 11: Garantie
Les interventions au titre de la garantie ne sauraient avoir pour effet de prolonger la durée de celle-ci. Au titre de cette garantie, la seule obligation incombant à Aqualux sera le remplacement gratuit ou la réparation du produit ou de l’élément reconnu défectueux par les services d’Aqualux. Tous les autres frais seront à... -
Page 12: Fiche De Garantie
Fiche de garantie à renvoyer sous enveloppe suffisamment affranchie à : SAS AQUALUX Service Après Vente BP 135 13533 St Rémy de Provence Cedex – France... - Page 13 INSTALLATION AND CARE INSTRUCTION AQUALUX SALT CHLORINATOR For family swimming pools Ref 103646 : AQUALUX salt Chlorinator 50 m Ref 103647 : AQUALUX salt Chlorinator 80 m NOTESAQX FRGBIT - IND B - 02/2012 13 / 36...
- Page 14 CONTENTS Warning 1 Safety instructions 2 Standards / References 3 Technical specifications 4 List of the equipment supplied 5 Installing the chlorinator 5.1. Hydraulic connections of the cell 5.1.1. Horizontal by-pass configuration 5.1.2. Vertical by-pass configuration 5.2. Preparing the installation 5.3.
-
Page 15: Warning
Warning These sections provide important information concerning the proper operation of the AQUALUX chlorinator. This document is meant to provide you with all the relevant information regarding the installation, the use and the maintenance of your unit. Additionally, in order to feel assured that you have gained a good grasp of every feature provided by your new chlorinator, owner’s manual should be read in its entirety. -
Page 16: List Of The Equipment Supplied
4 List of the equipment supplied Your chlorinator is supplied with the following equipment : • 1 complete electrolysis cell. • 1 electric control unit. • 1 cell power supply cable. • 1 automatic cover contact cable • 1 wall mounting kit. •... -
Page 17: Preparing The Installation
5.2 Preparing the installation It is recommended to install the control unit at a height of at least 1m60 above the ground and out of the reach of children. Be careful not to obstruct the back plate. Leave a 20cm space on sides and a 50cm space above and below the unit to ensure a proper and necessary ventilation. -
Page 18: Connection Of The Chlorinator's Control Unit
5.4.4 Connection of the chlorinator’s control unit The unit is equipped with 2 (PE) cable glands on top of the unit. - The one on the left is dedicated to the cell’s power cable - The one on the right is dedicated to the 230Vac mains supply power cable. 1 yellow female plug CINCH type on the opening part. -
Page 19: Operation Of The Chlorinator
This can perturbate the operation of electronical devices. Connect the electrode to your installation’s ground plug. AQUALUX chlorinators work with a reverse polarity on the cell’s terminals. This limits the apparition of scale on the cell. The duration of the reversal cycle is of 4 hours. -
Page 20: First Start / Preparing The Pool
7 First start / preparing the pool 7.1.1 Preparing the pool • Switch off the electric power supply and close the by-pass to avoid damaging the cell of your AQUALUX chlorinator during intensive chlorination. • Make sure that pH is between 7,0 et 7,4. -
Page 21: Adjusting The Production Of Chlorine
Your chlorinator must operate with a salt rate of 3.5g/L. In enclosed premises, there is no need to add any salt even if some of the salt is eliminated by splashes and when cleaning the filter. Check the salt rate once a month using the adpated Aqualux analysis kit (ref. -
Page 22: Troubleshooting
Checking the cell for scaling The AQUALUX chlorinator is a reverse polarity system that limits the scaling of the cell. However, in most cases, the cell must be manually descaled in mid-season. Always use some spirit vinegar to do so. -
Page 23: Guarantee
No repairs or replacements carried out under guarantee can result in any prolongation of the said period of guarantee. Under the terms of this guarantee, the sole obligation placed on Aqualux is replacement or repair free of charge of the product or element found to be defective by the competent Aqualux department. All other costs must be born by the purchaser. -
Page 24: Guarantee Sheet
Guarantee sheet to be sent in a suitably franked envelope to: SAS AQUALUX Service Après Vente BP 135 13533 St Rémy de Provence Cedex – France... - Page 25 GUIDA D’INSTALLAZIONE E DI MANTENIMENTO Elettrolizzatore a sale AQUALUX Ref 103646 : Elettrolizzatore AQUALUX 50 m Ref 103647 : Elettrolizzatore AQUALUX 80 m NOTESAQX FRGBIT - IND B - 02/2012 25 / 36...
- Page 26 SOMMARIO Avvertenza 1. Consegne di sicurezza 2. Norme / riferimenti 3. Specificazioni tecniche 4. Elenco del materiale consegnato 5. Installazione dell’elettrolizzatore 5.1. Raccordo idraulico della cellula 5.1.1. Corpo orizzontale, montaggio in by-pass 5.1.2. Corpo verticale, montaggio in by-pass 5.2. Preparazione dell’installazione 5.3.
-
Page 27: Avvertenza
Durante l’installazione, vestirsi di un equipaggiamento adattato (scarpe di sicurezza, occhiali, maschera, guanti, vestiti adattati). • Riferirsi alle avvertenze dei materiali e prodotti usati fornite dai fabbricanti. • E’ sconsigliato usare l’elettrolizzatore AQUALUX per le piscine interiore. 2. Norme / riferimenti • Norma elettrica: NF C 15-100, 702 •... -
Page 28: Elenco Del Materiale Consegnato
4. Elenco del materiale consegnato Il suo elettrolizzatore viene consegnato con lo seguente materiale : • 1 cellula elettrolisi completa. • 1 cofanetto elettrico di comando. • 1 cavo di alimentazione cellula. • 1 kit di fissazione murale. • 2 riduzzioni corte 63/50. •... -
Page 29: Preparazione Dell'installazione
5.2 Preparazione dell’installazione Raccomandiamo fissare il cofanetto a 1m60 minimum del suolo e fuori dalla portata dei bambini. Bisogna assicurarsi che la lamiera posteriore non sia ostruita. Lo zoccolo in alluminio puo raggiungere temperature di 60°C durante l’estate. Bisogna rimuovere tutti i materiali che potrebbero essere daneggiati dal calore emesso. -
Page 30: Allacciamento Del Cofanetto Del Elettrolizzatore
Bloccare delicatamente il dado superiore per evitare una fuga irreversibile al livello delle connessioni. 6. Funzionamento dell’elettrolizzatore L’elettrolizzatore AQUALUX è un generatore di cloro elettronico ad inversione di polarità esclusivamente dedicato alle piscine private. Viene composto da un cofanetto di comando e da una cellula di produzione. -
Page 31: Utilizzo Della Tastiera
Collegare l’elettrodo alla presa di terra della vostra installazione. Gli elettrolizzatori AQUALUX funzionano con inversione di polarità ai serrafili della cellula per limitare la formazione di tartaro sulla cellula. -
Page 32: Iniziare
50mg/l sarà imperativo sostituire tutto o parte dell’acqua della vasca da un’acqua nuova. • Aggiungere la quantità di sale richiesta dal suo elettrolizzatore AQUALUX (3.5g/L). Utilizzare solo il sale per elettrolisi del marchio Aqualux, in conformità alla norma EN 973 – Tipo A. (100378) Il T.H. -
Page 33: Guida Di Mantenimento
Controllare il tasso di sale una volta al mese con un test kit specialmente previsto per questo (TASELB). Utilizzare solo il sale per elettrolisi del marchio Aqualux, in conformità alla norma EN 973 – Tipo A. Controllo del tasso di stabilizzante Un tasso di stabilizzante di cloro mantenuto entre 25 e 50 mg/l permette evitare un deterioramento veloce del cloro prodotto dal elettrolizzatore AQUALUX, particolarmente in periodi di forte esposizione ai raggi del sole. -
Page 34: Diagnosi Dei Guasti
Animali nella piscina. clorazione intensiva utilizzando prodotti solidi. Livello di sale basso (meno di 3.5g/L) nella piscina Aggiungere del sale Aqualux per elettrolizzattore. Alto livello di nitrato Contattare un professionale della piscina. Presenza di metalli nella piscina Utilizzare un anti calcare inibitore di deposito Mooncal. -
Page 35: Garanzia
Gli interventi a titolo della garanzia non avrebbero per effetto l’estensione della sua durata. Per quanto riguarda questa garanzia, l’unico obbligo che incombe alla Aqualux sarà la sostituzione gratuita o la riparazione del prodotto o del elemento riconosciuto difettoso da i servizi della Aqualux. Tutte le altre spese saranno al carico dell’acquirente. -
Page 36: Scheda Di Garanzia
Allegare la fotocopia della fattura d’acquisto o della ricevuta indicando chiaramente la designazione del prodotto ed i dati del venditore e dell’installatore. Scheda di garanzia da rinviare sotto busta sufficientemente affrancata a : SAS AQUALUX Service Après Vente BP 135 13533 St Rémy de Provence Cedex – France...
Need help?
Do you have a question about the 103646 and is the answer not in the manual?
Questions and answers