
Related Manuals for wtw Oxi 7310


Summary of Contents for wtw Oxi 7310
- Page 1 Operating manual Oxi 7310 Oxi 7310P Oxi 7310P Oxi 7310 D.O. meter ba75931e03 12/2011...
- Page 2 Oxi 7310 © Weilheim 2011, WTW GmbH Copyright Reproduction in whole - or even in part - is prohibited without the express writ- ten permission of WTW GmbH, Weilheim. Printed in Germany. ba75931e03 12/2011...
-
Page 3: Table Of Contents
Oxi 7310 meter ........ - Page 4 Contents Oxi 7310 Dissolved oxygen ........22 Measuring .
- Page 5 Oxi 7310 Contents 10.1.2 Replacing the batteries......46 10.2 Cleaning......... . 47 10.3 Packing .
-
Page 6: Overview
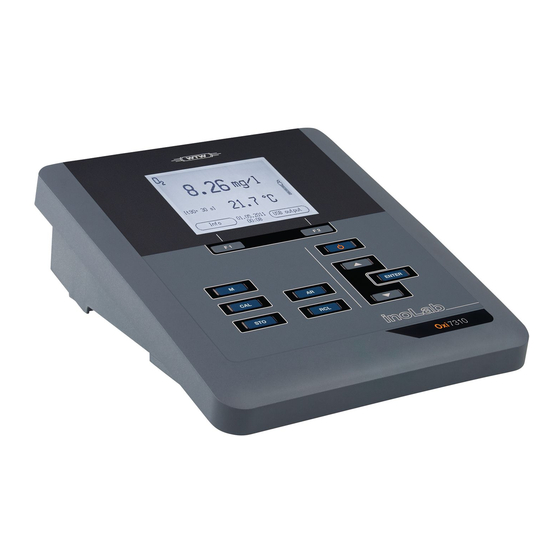
Oxi 7310 Overview Oxi 7310 meter The Oxi 7310 compact precision dissolved oxygen (D.O.) meter enables you to perform D.O. measurements quickly and reliably. The Oxi 7310 provides the maximum degree of operating comfort, reliability and measuring certainty for all applications. -
Page 7: Oxi 7310P Meter
4 Printer 5 Control panel of the printer Sensors A measuring system ready to measure consists of the Oxi 7310 meter and a suitable sensor. Suitable sensors are D.O. (dissolved oxygen) sensors. Information on available sensors is given on the Internet and in the WTW catalog, "Laboratory and field instrumentation". -
Page 8: Safety
Safety Oxi 7310 Safety Safety information 2.1.1 Safety information in the operating manual This operating manual provides important information on the safe operation of the meter. Read this operating manual thoroughly and make yourself familiar with the meter before putting it into operation or working with it. The operating manual must be kept in the vicinity of the meter so you can always find the infor- mation you need. -
Page 9: Safe Operation
Oxi 7310 Safety Safe operation 2.2.1 Authorized use This meter is authorized exclusively for D.O. measurements in the laboratory. Only the operation and running of the meter according to the instructions and technical specifications given in this operating manual is authorized (see section 12 T , page 50). -
Page 10: Commissioning
– comprehensive operating manual – software MultiLab Importer Power supply The Oxi 7310 is supplied with power in the following ways: Mains operation with the supplied power pack. Battery operation (4 x alkaline manganese batteries, type AA) USB operation via a connected USB-B cable. -
Page 11: Inserting The Batteries
Oxi 7310 Commissioning 3.3.1 Inserting the batteries You can operate the meter either with normal batteries or with rechargeable batteries (Ni-MH). In order to charge the batteries, an external charging device is required. 1 Battery compartment Open the battery compartment (1) on the underside of the meter. -
Page 12: Connecting The Power Pack
ECHNICAL DATA page 50). Connect the plug of the power pack to the socket for the power pack on the Oxi 7310. Connect the original power pack to an easily accessible power outlet. 3.3.3 Mounting the stand The stand base can be mounted at the right side of the meter. -
Page 13: Operation
Oxi 7310 Operation Operation General operating principles 4.1.1 Keypad In this operating manual, keys are indicated by brackets <..> . The key symbol (e.g. <ENTER>) generally indicates a short keystroke (under 2 sec) in this operating manual. A long keystroke (approx. 2 sec) is indicated by the underscore behind the key symbol (e.g. -
Page 14: Display
Operation Oxi 7310 4.1.2 Display mg/l 7.92 25.0 °C [Factor][CellOx] HOLD AR 01.07.2011 Menu USB output 08:00 1 Status information (sensor) 2 Measured value (with unit) 3 Measured parameter 4 Sensor symbol (calibration evaluation, calibration interval) 5 Measured temperature (with unit) -
Page 15: Socket Field
Oxi 7310 Operation 4.1.4 Socket field 1 D.O. sensor 2 Mini USB-B interface ® 3 Connection for stirrer (StirrOx 4 Power pack 5 Service interface CAUTION Only connect D.O. sensors to the meter that cannot return any voltages or currents that are not allowed (> SELV and >... -
Page 16: Switching Off
Operation Oxi 7310 Switching off Switch the meter off with <On/Off>. The instrument has an automatic switch-off function in order to save the Automatic switch-off batteries (see section 6.2.1 S , page 32). The automatic switch-off func- function YSTEM tion switches off the meter if no key is pressed for an adjustable period. -
Page 17: Measured Value Display
Oxi 7310 Operation 4.4.2 Measured value display In the measured value display, open the setting menus with the <F1> softkey. The current functions of the softkeys are shown on the display. Use <F1>/[Menu] (short pressure) to open the menu for calibration and measurement settings for the displayed measured parameter. - Page 18 Operation Oxi 7310 General Language: English Beep Illumination Contrast 48 % Switchoff time 30 min 01.07.2011 Back 08:00 Functions Functions are designated by the name of the function. They are immediately carried out by confirming with <ENTER>. Example: Display the Calibration record function.
-
Page 19: Example 1 On Navigation: Setting The Language
Oxi 7310 Operation 4.4.5 Example 1 on navigation: Setting the language Press the <On/Off> key. The measured value display appears. The instrument is in the measuring mode. 7.92 mg/l 25.1 °C [CellOx] 01.07.2011 Menu USB output 08:00 Using <F1_>/[Menu], open the Storage & config menu. -
Page 20: Example 2 On Navigation: Setting The Date And Time
Operation Oxi 7310 Open the General submenu with <ENTER>. General Language: Deutsch Beep Illumination Contrast 48 % Switchoff time 30 min 01.07.2011 Back 08:00 Open the setting mode for the Language with <ENTER>. General Language: Deutsch Beep Illumination Contrast 48 %... - Page 21 Oxi 7310 Operation After a fall of the supply voltage (empty batteries), the date and time are reset to 01.01.2011 00, 00:00 hours. The date format can be switched from the display of day, month, year Setting the date, (dd.mm.yyyy) to the display of month, day, year (mm/dd/yyyy or mm.dd.yyyy).
-
Page 22: Dissolved Oxygen
Dissolved oxygen Oxi 7310 Dissolved oxygen Measuring 5.1.1 Measuring D.O. NOTE When connecting a grounded PC/printer, measurements cannot be performed in grounded media as the values would be incorrect. The USB interface is not galvanically isolated. Connect the D.O. sensor to the meter. - Page 23 Oxi 7310 Dissolved oxygen The stability control function (AutoRead) continually checks the stability of the Stability control measurement signal. The stability has a considerable impact on the reproduc- (AutoRead) ibility of measured values. & HOLD function The measured parameter flashes on the display ...
-
Page 24: Measuring The Temperature
Dissolved oxygen Oxi 7310 Measured Time interval Stability in the time inter- parameter D.O. concen- 10 seconds Δ : better than 0.05 mg/l tration D.O. satura- 10 seconds Δ : better than 0.6 % tion D.O. partial 10 seconds Δ : Better than 1.2 mbar... -
Page 25: Calibration
After connecting a sensor Routinely within the framework of the company quality assurance When the calibration interval has expired 5.2.3 Calibration procedures The Oxi 7310 provides 2 calibration procedures: Calibration in water vapor-saturated air. ® Use an OxiCal air calibration vessel for calibration. -
Page 26: Calibrating With A Comparison Meas. (Oxicomp)
Dissolved oxygen Oxi 7310 0.88 25.1 °C OxiCal 01.07.2011 08:00 Start the measurement with <ENTER>. The measured value is checked for stability (stability control). The [AR] status indicator is displayed. A progress bar is displayed and the display of the measured parameter flashes. - Page 27 Oxi 7310 Dissolved oxygen Start the measurement with <ENTER>. The measured value is checked for stability (stability control). The [AR] status indicator is displayed. The measured parameter flashes. Wait for the end of the measurement with stability control or accept the calibration value with <ENTER>.
-
Page 28: Calibration Data
Dissolved oxygen Oxi 7310 5.2.6 Calibration data The calibration record is automatically transmitted to the interface after calibrating. The calibration record of the last calibration is to be found under the menu item, Displaying the cali- <F1> / [Menu] / Calibration / Calibration record. To open it, press the <CAL_>... - Page 29 Sensors of different types can be calibrated separately from each other. When one sensor type is calibrated, the calibration data of the other type remains stored. The Oxi 7310 recognizes the type of the connected sensor and auto- matically uses the correct calibration data.
-
Page 30: Settings
Settings Oxi 7310 Settings Measurement settings 6.1.1 Changing the settings for D.O. sensors The settings are available in the menu for measurement and calibration set- tings. To open the settings, display the required parameter in the measured value display and press the <F1>/[menu] or <ENTER> key. After completing the settings, switch to the measured value display with <M>. -
Page 31: Calibration Interval
Oxi 7310 Settings Menu item Possible set- Description ting Calibration /Calibra- Calibration interval for the D.O. 1 ... 14 ... 999 sensor (in days). tion interval The meter reminds you to cali- brate regularly by the flashing sen- sor symbol in the measuring screen. -
Page 32: Sensor-Independent Settings
Settings Oxi 7310 The calibration interval is set to 14 days in the factory. Setting the calibra- You can change the interval (1 ... 999 days): tion interval Open the menu for measurement settings with [Menu]<F1>. In the Calibration / Calibration interval menu, set the calibration interval with <><>. -
Page 33: Data Storage
System / Interface / Output of a header for Output Output header format: CSV System / Printer Settings for the integrated printer of the Oxi 7310 P. For details, see section 9 7310P), page RINTER ONLY System /Clock Settings of time and date. -
Page 34: Resetting The System Settings
Settings Oxi 7310 Setting Default settings 1.00 Relative slope (S Salinity (value) Salinity (function) Stability control Temperature unit °C The sensor settings are reset under the Reset menu item in the menu for cali- bration and measurement settings. To open it, press the <F1>/[Menu] or <ENTER>... -
Page 35: Data Storage
Oxi 7310 Data storage Data storage You can transmit measured values (datasets) to the data storage: Manual storage (see section 7.1 M , page 35) ANUAL STORAGE Automatic storage at intervals (see section 7.2 A UTOMATIC STORAGE AT... -
Page 36: Automatic Storage At Intervals
Data storage Oxi 7310 You have the following options: To erase the entire storage, confirm Yes. To cancel the storage process and switch to the measured value display, confirm No. Then you can e.g. transmit the stored data to a PC (see section 7.3.1 D... - Page 37 Oxi 7310 Data storage You can configure the automatic storage function with the following settings: Settings Menu item Possible Description setting ID number ID number for the dataset series. 1 ... 10000 Storage interval. Interval 1 s, 5 s, 10 s,...
-
Page 38: Measurement Data Storage
Data storage Oxi 7310 When the automatic storing function is active, the meter provides an energy Energy saving mode saving mode [Eco mode] to avoid unnecessary energy consumption. The [Eco mode] energy saving mode switches off functions of the meter that are not required for the automatic storage of measurement data (such as the display). - Page 39 Sal = 6.5 01.07.2011 Back USB output 08:00 Representation of a 01.07.2011 09:27:20 dataset inoLab Oxi 7310 Ser. No. 12345678 (USB output) ID number 1 O2 = 7.92 mg/l 25.0 °C, AR, S: +++ Sal = 6.5 ________________________________________ 01.07.2011 09:56:24 inoLab Oxi 7310 Ser.
-
Page 40: Erasing The Measurement Data Storage
AR indicator. Calibration evaluation: +++, ++, +, -, or no evaluation 7.3.4 Storage locations The Oxi 7310 meter has two measurement data storages. The measured values recorded either manually or automatic are stored separately in indi- vidual measurement data storages. -
Page 41: Transmitting Data (Usb Interface)
Oxi 7310 Transmitting data (USB interface) Transmitting data (USB interface) Options for data transmission Via the USB interface you can transmit data to a PC. The following table shows which data are transmitted to the interface in which way: Data... -
Page 42: Connecting A Pc
Transmitting data (USB interface) Oxi 7310 Connecting a PC Connect the Oxi 7310 to the PC via the USB interface. NOTE: When connecting an earthed PC/printer, measurements cannot be performed in earthed media as the values would be incorrect. The USB interface is not galvanically isolated. -
Page 43: Printer (Only Oxi 7310P)
4 Lid of the paper compartment Commissioning / switching the printer on or off Switching on the Connect the power pack to the Oxi 7310 P. printer The LED lights up green. The printer is ready for operation. If the printer was switched off (LED flashing): Switch on the printer with <OFF>. -
Page 44: Operation / Printing
Printer (only Oxi 7310P) Oxi 7310 Operation / printing Data are only output to the printer if the following conditions are met Data are transmitted manually or automatically (see section 8.1 O PTIONS , page 41) FOR DATA TRANSMISSION ... -
Page 45: What To Do If
Oxi 7310 Printer (only Oxi 7310P) Use original WTW rolls of paper only. You will find information on this in the WTW catalog L ABORATORY or on the Internet. IELD NFORMATION The thermal paper will remain legible for at least 7 years if stored appropriately. -
Page 46: Maintenance, Cleaning, Disposal
Maintenance, cleaning, disposal Oxi 7310 Maintenance, cleaning, disposal 10.1 Maintenance 10.1.1 General maintenance activities The only maintenance activity required is replacing the batteries. See the relevant operating manuals of the D.O. sensors for instruc- tions on maintenance. 10.1.2 Replacing the batteries You can operate the meter either with normal batteries or with rechargeable batteries (Ni-MH). -
Page 47: Cleaning
Oxi 7310 Maintenance, cleaning, disposal Close the battery compartment (1). Set the date and time (see section 4.4.6 E XAMPLE ON NAVIGA , page 20) TION ETTING THE DATE AND TIME When the batteries are nearly empty, the status indicator is displayed. -
Page 48: What To Do If
What to do if... Oxi 7310 What to do if... 11.1 Dissolved oxygen More information and instructions on cleaning and exchange of sensors are given in the documentation of your sensor. The measured value is outside the measuring range. Error message,... - Page 49 Oxi 7310 What to do if... Instrument does not Cause Remedy react to keystroke – Operating condition undefined or – Processor reset: EMC load unallowed Press the <ENTER> and <On/ Off> key simultaneously You want to know Cause Remedy which software –...
-
Page 50: Technical Data
Technical data Oxi 7310 Technical data 12.1 Measuring ranges, resolution, accuracy The values quoted in brackets apply especially to the DurOx 325 sen- Measuring ranges, sor. resolution Parameter Measuring range Resolution D.O. concentration 0 ... 20.00 (0 ... 20.0) 0.01 (0.1) [mg/l] 0 ... -
Page 51: General Data
Oxi 7310 Technical data 12.2 General data Oxi 7310: Approx. 240 x 190 x 80 mm Dimensions Oxi 7310 P: Approx. 290 x 190 x 80 mm Oxi 7310: Approx. 0.8 kg Weight Oxi 7310 P: Approx. 1.0 kg Type of protection... - Page 52 Technical data Oxi 7310 FCC Class A Equipment Statement Note: This equipment has been tested and found to comply with the limits for a Class A digital device, pursuant to Part 15 of the FCC Rules. These limits are designed to provide reasonable protection against harmful interference when the equipment is operated in a commercial environment.
-
Page 53: Firmware Update
a free USB interface (virtual COM port) on the PC the driver for the USB interface (on the enclosed CD-ROM) the USB cable (included in the scope of delivery of the Oxi 7310). Install the downloaded firmware update on a PC. -
Page 54: Glossary
Pressure caused by the oxygen in a gas mixture or liquid. D.O. partial pressure Short name for the "relative D.O. saturation". D.O. saturation ® WTW name for a procedure to calibrate D.O. measuring systems in OxiCal water vapor saturated air. The absolute salinity S of seawater corresponds to the relationship Salinity of the mass of dissolved salts to the mass of the solution (in g/kg). - Page 55 Oxi 7310 Glossary The standard solution is a solution where the measured value is Standard solution known. It is used to calibrate a measuring system. Name of a mathematical function expressing the temperature behav- Temperature function ior of a test sample, a sensor or part of a sensor.
- Page 56 Glossary Oxi 7310 ba75931e03 12/2011...
-
Page 57: Index
Oxi 7310 Index Index Air calibration beaker ....25 Print ......41 Automatic switch-off . - Page 58 Index Oxi 7310 ba75931e03 12/2011...
- Page 60 Wissenschaftlich-Technische Werkstätten GmbH Dr.-Karl-Slevogt-Straße 1 D-82362 Weilheim Germany Tel: +49 (0) 881 183-0 +49 (0) 881 183-100 Fax: +49 (0) 881 183-420 E-Mail: Info@WTW.com Internet: http://www.WTW.com...
Need help?
Do you have a question about the Oxi 7310 and is the answer not in the manual?
Questions and answers