
Related Manuals for Ripmax WOT4-E


Summary of Contents for Ripmax WOT4-E
- Page 2 WOT4-E Instructions / WOT4-E Anleitung Chris Foss Chris Foss The Designer / Der Designer The fascination of flight captured Chris's imagination early on in his life when he started building, from kits and plans, simple free flight gliders and rubber powered models.
- Page 3 WOT4-E Instructions / WOT4-E Anleitung Introduction / Einführung Congratulations on your purchase of the WOT 4-E ARTF - an 'Electric' Almost Ready to Fly version of this timeless classic. Described as the most fun sports aerobatic model of all time, it can be assembled in the minimum of time.
- Page 4 WOT4-E Instructions / WOT4-E Anleitung Stage 1 / Schritt 1 The wings and ailerons are supplied with the hinges loose fitted, ready for installation. Remove both ailerons and ensure that the hinges are inserted mid-way in their slots. Using thin cyano, pour a couple of drops onto each hinge - above and below - ensuring the glue soaks into the hinge and the surrounding wood.
- Page 5 WOT4-E Instructions / WOT4-E Anleitung Stage 6 / Schritt 6 Check that your choice of servo fits the servo apertures in the underside of the wing. Adjust the size of the mounting holes with a sharp knife if required. Pilot drill the mounting holes.
- Page 6 WOT4-E Instructions / WOT4-E Anleitung Stage 11 / Schritt 11 Locate a threaded wire aileron pushrod and attach a nylon clevis to the end. Connect it to the aileron horn and mark the position the control rod passes over the servo’s output arm.
- Page 7 WOT4-E Instructions / WOT4-E Anleitung Stage 16 / Schritt 16 Epoxy the incidence locating dowel in position in one wing panel. Kleben Sie den Dübel an seine Position in der Flügelhälfte mit Epoxid ein. Stage 17 / Schritt 17 Using a sharp knife, prepare the wings for joining by trimming off any excess film that has overlapped the root ribs during manufacture.
- Page 8 WOT4-E Instructions / WOT4-E Anleitung Stage 21 / Schritt 21 Now spread sufficient epoxy over the opposite panel joiner slot, wing joiner and root rib. We suggest using 30 minute or 1 hour epoxy for this. Mischen Sie genügend Epoxid an, und bestreichen damit den gegenüberliegenden Schlitz für den Flächenverbinder, und Flügelrippe...
- Page 9 WOT4-E Instructions / WOT4-E Anleitung Stage 26 / Schritt 26 Prepare the fuselage for fitting the tailplane by carefully trimming the covering away from the precut tailplane slot. Also cut away the covering over the exit slots for the Rudder and Elevator pushrods/ closed loops.
- Page 10 WOT4-E Instructions / WOT4-E Anleitung Stage 31 / Schritt 31 Fit the brass ferrules and rubber grommets supplied with your servos, then screw them in position as shown. Befestigen Sie die Messinghülsen, und Gummiösen, die bei Ihren Servos mitgeliefert wurden, dann schrauben Sie diese an ihre Position, wie gezeigt.
- Page 11 WOT4-E Instructions / WOT4-E Anleitung Stage 35 / Schritt 35 Slot the tailplane into position and check the alignment again (like step 33). When satisfied run thin cyano into the joint to secure in place. Take care to ensure it runs fully into the joint on both sides on both the top and bottom of the tailplane.
- Page 12 WOT4-E Instructions / WOT4-E Anleitung Stage 41 / Schritt 41 Insert two hinges in each elevator half, ensuring they are located mid-way in their slots. Using thin cyano, pour a couple of drops onto each hinge - above and below - ensuring the glue soaks into the hinge and the surrounding wood.
- Page 13 WOT4-E Instructions / WOT4-E Anleitung Stage 46 / Schritt 46 Now slide the rudder in place making sure that both hinges are located in their slots in the fin and that the tail wheel wire fits neatly into its recess in the rudder. Wipe off any excess epoxy. Ensure that the rudder is aligned to the top of the fin and there is free movement left and right plus a gap-free hinge line.
- Page 14 WOT4-E Instructions / WOT4-E Anleitung Stage 51 / Schritt 51 Feed the ends of the pushrod out of the fuselage sides through their precut slots. Using a couple of lengths of scrap snake tube to help guide the pushrods out of the fuselage makes this a simple task.
- Page 15 WOT4-E Instructions / WOT4-E Anleitung Stage 56 / Schritt 56 Connect the two clevises to the closed loop horn then slide the closed loop wires into the fuselage from the rear slots under the tailplane. Ensuring that they remain untwisted, shake the wires down into the radio bay.
- Page 16 WOT4-E Instructions / WOT4-E Anleitung Stage 61 / Schritt 61 Tighten the propeller and fit the spinner nose cone taking care not to overtighten the screws. Schrauben Sie den Propeller an und befestigen die Spinnernase, und achten darauf, dass Sie die Schrauben nicht überdrehen.
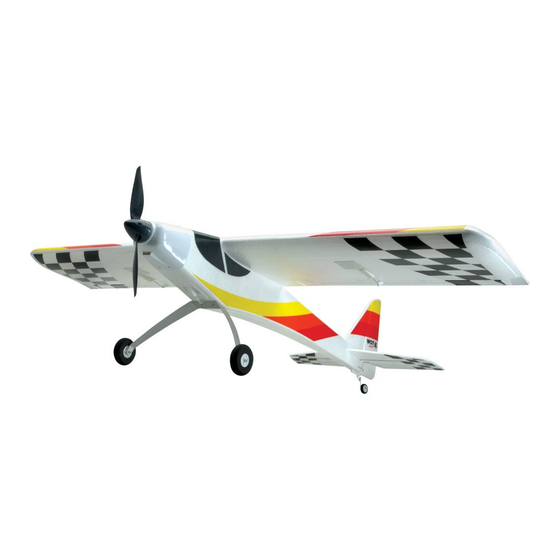
- Page 17 WOT4-E Instructions / WOT4-E Anleitung Completed Model / Fertiges Modell You are now ready to apply the supplied decals. One at a time, carefully remove the precut decals from their backing sheet, apply to the model in the correct position and gently smooth down.
- Page 18 Pre-Flight Checks / Vorflug Checks While the WOT4-E is not a trainer, it does make an excellent first aileron model with reduced control throws. In this case, we recommend that your completed model is checked over and test flown by a competent pilot first. Subsequent flights should also be supervised, and assisted where necessary, by an experienced pilot.
- Page 19 Spare Parts / Ersatzteile Spare parts are available for the WOT4-E from all Ripmax stocked model shops. In case of any difficulty, any product queries, or to locate your local Ripmax stockist, please write to the address below or visit www.ripmax.com Ripmax Ltd.241 Green Street, Enfield,EN3 7SJ United Kingdom (England)
- Page 20 Made in China Distributed to your local model shop by Ripmax Ltd., 241 Green Street, Enfield, EN3 7SJ. United Kingdom.
Need help?
Do you have a question about the WOT4-E and is the answer not in the manual?
Questions and answers