
Subscribe to Our Youtube Channel
Related Manuals for Ripmax WotsWot XL


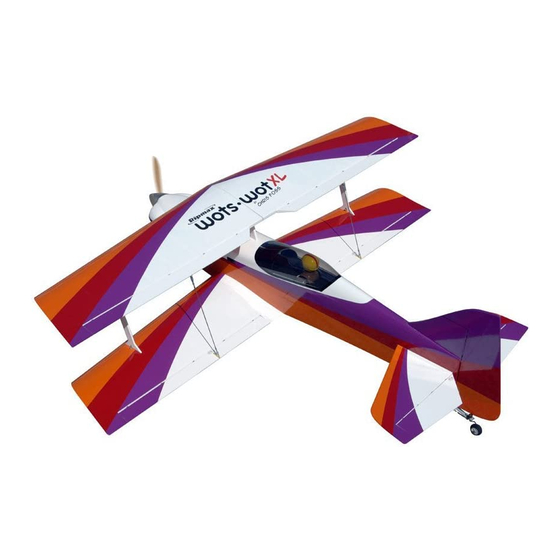
Summary of Contents for Ripmax WotsWot XL
- Page 2 WotsWot XL Instructions | WotsWot XL Anleitung Chris Foss Chris Foss The Designer / Der Designer The fascination of flight captured Chris's imagination early on in his life when he started building, from kits and plans, simple free flight gliders and rubber powered models.
- Page 3 WotsWot XL Instructions | WotsWot XL Anleitung Stage 1 / Schritt 1 Check the fit of the aileron to the wing panel. If there is any misalignment the holes in the trailing edge of the wing can be slotted as required for the hinges. Mix up enough epoxy for all of the hinges on one aileron and run some into the holes in the aileron.
- Page 4 WotsWot XL Instructions | WotsWot XL Anleitung Stage 6 / Schritt 6 Use the cord to pull the servo extension lead through the wing panel. Carefully cut away the covering over the servo lead hole in the upper surface of the wing panel at the root and feed the extension lead through this hole.
- Page 5 WotsWot XL Instructions | WotsWot XL Anleitung Stage 11 / Schritt 11 The complete aileron linkage is shown here, note the use of fuel tube keepers on both clevises for security, Do ensure that the locking nuts are firmly tightened against the clevises to avoid the pushrod unscrewing itself due to vibration.
- Page 6 WotsWot XL Instructions | WotsWot XL Anleitung Stage 16 / Schritt 16 Fit the steel upper wing mounting plates to the left upper wing panel as shown, using threadlocking compound on all of the screws. Also glue into place the interplane pushrod horns on both upper wing panels.
- Page 7 WotsWot XL Instructions | WotsWot XL Anleitung Stage 21 / Schritt 21 Carefully cut away the covering over the undercarriage mounting holes in the underside of the fuselage. An der Unterseite des Rumpfes entfernen Sie mit einem scharfen Messer die Folie für die Fahrwerks- Befestigungsschrauben.
- Page 8 WotsWot XL Instructions | WotsWot XL Anleitung Stage 26 / Schritt 26 Carefully cut away the covering over the upper wing mount slot in the fuselage. Mit einem scharfen Messer entfernen Sie die Folie über dem Schlitz der oberen Flügelbefestigung am Rumpf.
- Page 9 WotsWot XL Instructions | WotsWot XL Anleitung Stage 31 / Schritt 31 Run thin cyano around the joint to secure the upper wing mount in place. Verwenden Sie dünnflüssigen Sekundenkleber um die Verbindung der oberen Flügelhalterung an ihrem Platz zu sichern.
- Page 10 WotsWot XL Instructions | WotsWot XL Anleitung Stage 36 / Schritt 36 Slide the tailplane into its pre-cut slot in the rear of the fuselage. Ensure that it is square to the fuselage, level against the wings and centred in its slot using a long ruler or string as shown in the diagram on the right.
- Page 11 WotsWot XL Instructions | WotsWot XL Anleitung Stage 41 / Schritt 41 Slide the fin into place, check alignment and when satisfied run thin cyano around the top of the fin slot. Schieben Sie die Finne an ihre Position und überprüfen ob diese korrekt ausgerichtet wurde.
- Page 12 WotsWot XL Instructions | WotsWot XL Anleitung Stage 46 / Schritt 46 Install the elevator and rudder servos. Used the included plywood spacers to lift up the rudder servo, this allows for clearance to ensure the cables do not bind with the elevator servo arm.
- Page 13 WotsWot XL Instructions | WotsWot XL Anleitung Stage 51 / Schritt 51 Now connect one of the clevises to the rudder servo and feed the wire down the corresponding guide tube in the rear fuselage and out of the exit. Repeat for the second wire on the alternate side of the servo horn and second guide tube.
- Page 14 WotsWot XL Instructions | WotsWot XL Anleitung Stage 56 / Schritt 56 Ensure the clunk tube lengths are cut to allow the clunks to move around the tank without catching on the tank's base. Note use of locking wire to secure the tubing.
- Page 15 WotsWot XL Instructions | WotsWot XL Anleitung Stage 61 / Schritt 61 Fit engine to the stand-offs and mount the silencer - use threadlock compound on all bolts. Montieren Sie den Motor auf den Abstandshaltern und befestigen den Schalldämpfer. Verwenden Sie für alle Schrauben Sicherungslack.
- Page 16 WotsWot XL Instructions | WotsWot XL Anleitung Stage 66 / Schritt 66 Pilot drill the cowl and retain with four self tapping screws, two on each side of the model. Bohren Sie die Löcher vor und schrauben die Motorhaube mit den 4 selbstschneiden Schrauben fest.
- Page 17 WotsWot XL Instructions | WotsWot XL Anleitung Stage 71 / Schritt 71 Fit the throttle and choke servos to the radio plate as shown. Montieren Sie das Gas- und Choke Servo auf der Radioplatte, wie gezeigt. Stage 72 / Schritt 72 Install the servo adapters onto the servo arms for both the throttle and choke servos.
- Page 18 WotsWot XL Instructions | WotsWot XL Anleitung Stage 76 / Schritt 76 Each of the four wings needs the strut mounting brackets attached. Cut the film away and bolt them in place using threadlock. An jedem der vier Flügel müssen Befestigungswinkel für die Streben angebracht werden.
- Page 19 WotsWot XL Instructions | WotsWot XL Anleitung Control Throws / Ruderausschläge For initial flights, we recommend the following control throws - each measured at the widest point of the surface: Elevator: 30mm Up (20% Expo) Rudder: 70mm Left (No Expo)
- Page 20 Leistungsgrenze befindet. - dieser ist perfekt für den anspruchsvollsten Piloten. Spare parts are available for the Wots Wot Foam-E from all Ripmax stocked model shops. In case of any difficulty, any product queries, or to locate your local Ripmax stockist, please write to the address below or visit www.ripmax.com Made in China Distributed to your local model shop by Ripmax Ltd., 241 Green Street, Enfield, EN3 7SJ.
Need help?
Do you have a question about the WotsWot XL and is the answer not in the manual?
Questions and answers