Table of Contents
Advertisement
Advertisement
Table of Contents

Related Manuals for AQUAPHOR RO-101S


Summary of Contents for AQUAPHOR RO-101S
- Page 1 AQUAPHOR RO-101S REVERSE OSMOSIS SYSTEM OWNER’S MANUAL...
-
Page 2: Table Of Contents
8. Slotted plug installation..................13 9. Starting RO-101S .................... .15 10. -
Page 3: Introduction
Thank you for your purchase of this Reverse Osmosis system AQUAPHOR RO-101S. With proper installation and maintenance, this system will provide you with premium quality drinking water. The technology used in the Aquaphor RO enriches the filtered water with minerals in controlled quantities. -
Page 4: Safety Instructions
58.02 87.02 ATTENTION The efficiency of RO-101S depends on the incoming tap water mineralization and tap water pressure (please see Table 1). The recommended operation of RO-101S requires tap water pressure of at least 29.01 psi / 2 bar. When tap water pressure is less than illustrated in the Table 1, it is highly recommended to install a booster pump in order to obtain drainage ratio. -
Page 5: Product Assembly
2.2. Reverse Osmosis membrane block: Replacement membrane cartridge Aquaphor RO-50S (4) ......1 pc 2.3. -
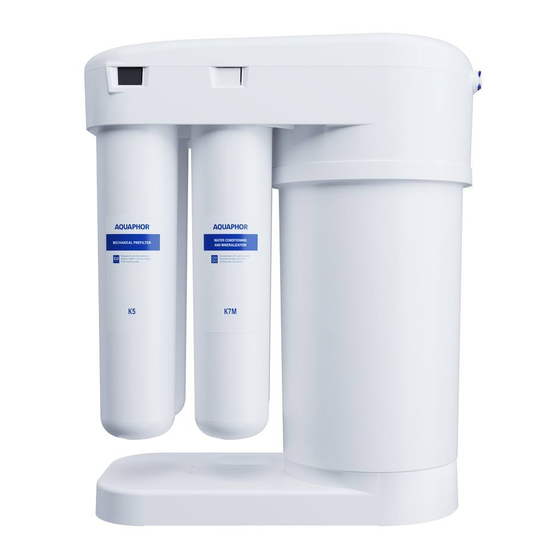
Page 6: Ro-101S Design And Operation Principles
5 – Water conditioning block; 6 – Storage tank RO-101S housing (1) consists of an upper plate, with four collectors fixed onto it, to place the ‰ replacement cartridges and the RO-hydro automatic unit RO-101S. The upper lid comes with a decorative cover, fixed in place with three plastic latches. - Page 7 When the storage tank is full, the automatic check valve cuts off the water intake into RO-101S. When the clean water faucet is opened, water from the mains enters the technical chamber via the shutoff valve and forces treated water from the storage chamber through the faucet via the conditioning block.
-
Page 8: Ro-101S Installation
Locate the appropriate installation place for the faucet and RO-101S. Take care to ensure that the delivery tubes are pulled freely, without over bending. RO-101S must be installed on a flat, even solid surface as instal- lation on an uneven surface may cause vibration or noise. Additionally, RO-101S must be located away from heat sources, such as kitchen ovens, hot water supply pipes, dishwashers or washing machines, or at least isolated from such heat sources. - Page 9 Connect JG tube (follow the instructions below to correctly connect the JG tubes). ‰ ATTENTION! The sealing O-Ring is located correctly in its place and not damaged during installation. AQUAPHOR RO-101S REVERSE OSMOSIS SYSTEM...
- Page 10 Pull the locking clip (2) off the plastic plug (1), then pull the tube (3) out by applying pressure on the face of the connecting piece. To apply pressure, use the tube disconnection key (4) included in the water filter set. Figure 7. Disconnection of JG tubes AQUAPHOR RO-101S REVERSE OSMOSIS SYSTEM...
-
Page 11: Clean Water Faucet Installation
Put on the captive-nut (9) on the plastic pipe (10) with pressed metal bushing (8) (fig. 8) and screw on the ‰ nut onto the tail end of the faucet. ∅ 12 mm Figure 8. Tube connecting to the clean water faucet procedure AQUAPHOR RO-101S REVERSE OSMOSIS SYSTEM... -
Page 12: Drain Saddle Installation
20 mm (see figure 9b). To eliminate any noise from the water in the drain saddle, push the JG tube deeper into the pipe. Figure 9b. Drain saddle installation AQUAPHOR RO-101S REVERSE OSMOSIS SYSTEM... -
Page 13: Slotted Plug Installation
Attention! The set includes three slotted plugs: one for installation and two are for spares. 9. Starting RO-101S To start RO-101S, you must connect the supply tube and carry out the flushing procedure of filter and membrane cartridges. Step 1. Connect the incoming tubes according to the diagram below (figure 11). - Page 14 Repeat these steps two more times. ‰ Close the clean water faucet. ‰ When the tank is full, RO-101S is ready for operation. ‰ Note: In total, the general flushing of filter and membrane cartridges and startup time will take you about 3 hours.
-
Page 15: Replacing Cartridges
Set the shutoff valve on the connection node into the open position and close the clean water faucet. Figure 13. Installation of the membrane Make sure that RO-101S connections are cartridge service plug sealed. AQUAPHOR RO-101S REVERSE OSMOSIS SYSTEM... - Page 16 ATTENTION! To avoid any incorrect installation of the membrane cartridge and the resulting loss of sealing of the RO-101S connections, it is not recommended to dissemble it without a fully qualified maintenance specialist. If the RO-101S connections are leaking, immediately close the tap on the connection unit and check the cartridges for correct installation.
-
Page 17: Recommended Filter Replacement
Note: The installation of the RO-101S appliance on a pre-treated water supply will greatly in- crease the life of its filters. Table 3. Recommended filter replacement Filter Cartridges Recommended Replace ment (months) Replacement filter cartridge K5 (1) Replacement filter cartridge K2 (2) -
Page 18: Warranty
If you have any claims regarding the operation of your DWM, please contact the seller or manufacturer. Manufacturer is not responsible for operational faults occurred due to inappropriate installation or maintenance. Manufacturer is not responsible for the operational faults occurred due to inappropriate replacement cartridges. AQUAPHOR RO-101 REVERSE OSMOSIS SYSTEM... -
Page 19: Troubleshooting
If any other faults are identified, please contact our customer service department at +1 (855) 855 2299 or email sales@aquaphor.com, support@aquaphor.com Manufacturer: Westaqua-Invest OU division of Aquaphor Corp., L. Tolstoi 2A, 40231, Sillamäe, Estonia. www.aquaphor.com AQUAPHOR Corp. division of ELECTROPHOR, Inc., Pyonerskaya Str., 27 lit.A, 197110, St.-Petersburg, Russia. - Page 20 Warranty coupon RO-101S Serial # Warranty PIN-code Date of Sell Seller’s stamp Seller’s signature Please visit our website and register your RO-101S at aquaphor.com/register for manufacturer’s warranty. Installation information Installation is carried out: Name of the company which carried out installation: Name of the service engineer: Service engineer’s signature:...
Need help?
Do you have a question about the RO-101S and is the answer not in the manual?
Questions and answers