
Related Manuals for AQUAPHOR RO-101S


Summary of Contents for AQUAPHOR RO-101S
- Page 1 OWNER’S MANUAL AQUAPHOR RO-101S, RO-102S, RO-101S EU, RO-102S EU, RO-101S IL, RO-102S IL (in further RO) REVERSE OSMOSIS SYSTEM...
-
Page 2: Table Of Contents
Contents 1. Operational parameters .................. 3 2. Safety instructions ................... 4 3. Product assembly .................... 5 4. RO design and operation principles ............6 5. RO installation ....................7 6. Clean water faucet installation ..............8 7. Drain saddle installation ................. 9 8. -
Page 3: Operational Parameters
Save the manual for future reference. Thank you for your purchase of this Aquaphor RO. With proper installation and maintenance, this system will provide you with premium quality drinking water. The technology used in the Aquaphor RO enriches the filtered water with minerals in controlled quantities. -
Page 4: Safety Instructions
Table 1. The dependence of mini- CAUTION: Reverse Osmosis water should not be run through copper tubing as the purity of mum necessary operating pressure the water will leach copper and cause an objec- of the water purifier from tionable taste in the water. Additionally, it will mineralization. -
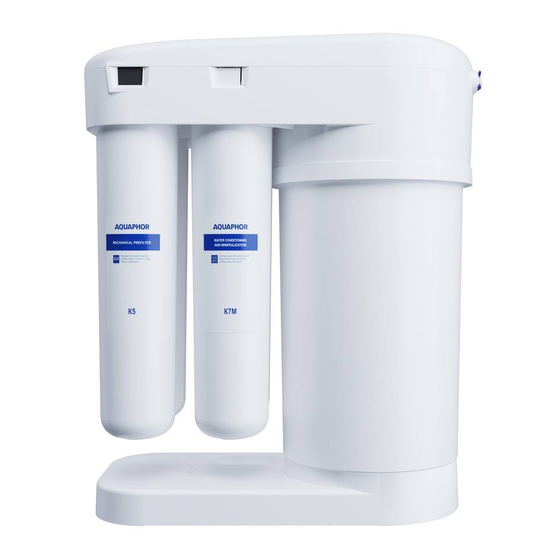
Page 5: Product Assembly
Replacement filter cartridges K5 (for Aquaphor RO-101S, Aquaphor RO-102, Aquaphor 3 pc RO-101S IL, Aquaphor RO-102S IL), К1 (for Aquaphor 101S EU, Aquaphor 102S EU), K2, K7М (for Aquaphor RO-101S, Aquaphor RO-102S, Aquaphor RO-101S IL), K7BМ (for Aquaphor RO-101S EU, Aquaphor RO-102S EU, Aquaphor RO-102S IL) (10a) Membrane cartridge (pre-installed in housing) (10b) 1 pc... -
Page 6: Design And Operation Principles
The water coming from the cold water mains Aquaphor RO-101S IL, Aquaphor RO-102S IL) (3) enters RO and passes through the preliminary or cartridge K1 (for RO-101S EU, RO-102S EU) (3) and K2 (2). The preliminary water treatment water treatment block. From there, water enters... -
Page 7: Installation
Pressure via the conditioning block. The automatic check valve then triggers and opens water supply to Incoming the RO-storage tank. tap water 5. RO installation ATTENTION! Only install your RO by a qualified Reverse plumber who is certified to perform the instal- Osmosis lation in accordance with state law. -
Page 8: Clean Water Faucet Installation
Connection node assembly Make sure that the tube (3) is tightened correctly: the tube should not be pulled out by force greater • Turn the water off at the cold water main. than 8-10 kgf. • Open the kitchen faucet to discharge pressure into the water line. -
Page 9: Drain Saddle Installation
7. Drain saddle installation • Underneath the sink, put plastic (5) and metal (6) lock washers on the thread bushing and Figure 9a. Drain saddle components screw on the fastening nut (7); • Put on the captive-nut (9) on the plastic pipe (10) with pressed metal bushing (8) (fig. -
Page 10: Slotted Plug Installation
8. Slotted plug installation Step 2 Preparing RO for operation Figure 10. Slotted plug installation • Rotate the three latches 90 degrees in a coun- terclockwise direction and remove the water filter cap (figure 2). Slotted plug Table 2. Positions of RO cartridges in preparation for operation Stop button colors Cartridge type... -
Page 11: Replacing Cartridges
Figure 12. Cartridge installation • Let the water flush through RO for 1 hour.* • Close the clean water faucet. Stop button Step 4 Flushing the conditioning cartridge К7М / К7ВМ • Close the clean water faucet and fill in the storage tank. -
Page 12: Recommended Filter Replacement
Replacing the conditioning connection unit and check the cartridges for correct installation. cartridge K7M / К7ВМ 1. Set the shutoff valve on the connection node 11. Recommended filter into the closed position; then open the clean water faucet to discharge pressure. replacement 2. -
Page 13: Warranty
Reduces dirt and other sediment particle matter maintained. The manufacturer is not responsible of 5 micron or larger in the incoming water. for operation of the Aquaphor RO and possible Replace the К5 / К1 filter cartridge every three consequences, in case if: months. -
Page 14: Troubleshooting
If water runs slower than 50 ml/min, then the membrane needs to be replaced. Turn off the shutoff valve and open it every time you replace each cartridge If any other faults are identified, please contact our customer service department at or email sales@aquaphor.com... - Page 15 Warranty coupon AQUAPHOR RO Date of Sell Seller’s stamp Seller’s signature Please visit our website and register your RO at aquaphor.com/register for manufacturer’s warranty. Installation information Installation is carried out: Name of the company which carried out installation: Name of the service engineer: Service engineer’s signature:...
- Page 16 Manufacturer: Aquaphor International OÜ, L. Tolstoi 2A, Sillamäe, Estonia, 40231. www.aquaphor.com The model number, date of manufacture and quality control are shown on the product’s serial number label. The manufacturer reserves the right to make improvements to the design of the water purifier withoutreflecting them in the passport.
Need help?
Do you have a question about the RO-101S and is the answer not in the manual?
Questions and answers