
Related Manuals for ALC AWFB15


Summary of Contents for ALC AWFB15
- Page 1 Wireless SAPP Camera Installation and Operating Instructions Model: AWFB15 Version 1.2 PLEASE READ THESE INSTRUCTIONS CAREFULLY BEFORE USING THIS PRODUCT AND KEEP THIS MANUAL FOR FUTURE REFERENCE.
-
Page 2: Table Of Contents
CONTENTS INTRODUCTION ....................1 Please Read Before You Start ..................1 Wireless Devices Operating Range ................1 Installation/Camera Setting Tips ................2 Important Safety Precautions ..................3 FCC/CE ........................4 KIT CONTENT ....................5 CAMERA OVERVIEW ..................6 CAMERA INSTALLATION ................7 DOWNLOAD AND SETUP THE APP ............... 8 MAIN PAGE OVERVIEW ................ -
Page 3: Introduction
INTRODUCTION PLEASE READ BEFORE YOU START Always use discretion when installing CCTV equipment, especially when there is perceived policy. Enquire relevant local regulations applicable to the lawful installation of video recording/ surveillance. Third party consent may be required. WIRELESS DEVICES OPERATING RANGE Ensure the signal reception viewed from the wireless camera(s) is the best reception between the camera(s) and the Wi-Fi router. -
Page 4: Installation/Camera Setting Tips
INSTALLATION/CAMERA SETTING TIPS For optimum detection, we suggest the camera is to be mounted 7 to 8 feet (2.1m to 2.4m) from the floor, and: • On a rigid vibration-free surface. • The expected movement of an intruder is across the fields of the detection pattern. To avoid false alerts, please note the camera is equipped with a PIR Motion Sensor that operates by detecting temperature changes in the area in front of the camera;... -
Page 5: Important Safety Precautions
IMPORTANT SAFETY PRECAUTIONS Damages caused by non-compliance with this operating manual will void the warranty! We will not assume any liability for damages to items or persons caused by improper handling or non- compliance with the safety notices! Any warranty claim will be null and void in such cases. 1. -
Page 6: Fcc/Ce
FCC Compliance Statement: This Products with CE Marking comply device complies with Part 15 of the w i t h E M C D i r e c t i v e ( 2 0 0 4 / 1 0 8 / FCC rules. -
Page 7: Kit Content
KIT CONTENT Portable Event Camera Mini-USB Cable* CR123 Battery Quick Start Guide Tools Required: ‧Electric drill ‧5mm masonry drill bit ‧15mm masonry drill bit ‧No. 2 Philips screwdriver For best system performance: - iOS: iPhone5 / iPad2 / Mini iPad with iOS 7.0 or above. - Android: 1.5G dual core processor dual core procesor with 1G RAM or above. -
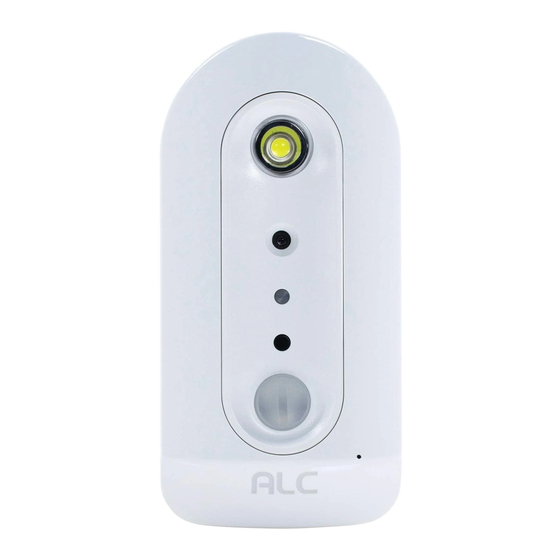
Page 8: Camera Overview
CAMERA HARDWARE OVERVIEW White-Light LED Stand Mounting (Rear) HD Camera Battery Compartment Status LED (CR-123A x 4*) Light Sensor Memory Card Slot (Support up to 32GB) Motion Sensor Reset Key - Press and hold the reset button for 5 seconds, the camera will be restored to default setting. -
Page 9: Camera Installation
CAMERA INSTALLATION 1. Secure the camera stand on a stable surface Tighten the screw inside the stand with screw driver or coin to fix the T-bolt Position if needed 2. Loosen up the thumb screw 3. Adjust proper view angle, then secure the joint with T-bolt. -
Page 10: Download And Setup The App
IMPORTANT Please Notice Below Before You Setup The SensorCam: - SensorCam offers public cloud storage function, to use this function please have Google Drive or Dropbox account information ready. Note: The cloud storage function is optional and may set up at a later time. Without the cloud storage, captured video files will store in the MicroSD card. - Page 11 App Download From your smart-device, go to App Store or Google Play to search and download "SensorCam". △ BEFORE LAUNCH the APP at the FIRST TIME ‧ MUST power on the camera before launching the APP at the first time. ‧...
- Page 12 1. Launch SensorCam app and tap 2. Tap Scan DID Label to scan for DID or manually type in the DID information. Camera DID: COXX-123456-ABCDE (example) Default Security Code: 123456 3. Name your camera (max. 20 characters). 4. Enter default Security Code: 123456. 5.
-
Page 13: Main Page Overview
MAIN PAGE OVERVIEW The MAIN PAGE section offers you an overview for all cameras registered and access to different management functions. Camera List - List of all registered cameras. You can quickly access preferred camera in the list even when multiple cameras are registered by scrolling the list up or down. - Page 14 ADD CAMERA to add camera to app. Please refer to page-9 - "APP Setup" section for more details. SETTING Tap the and additional setup selection icons will appear. Tap to exit. Additional setup selection (iOS) (Android) CAMERA INFORMATION : Change camera name, reset Wi-Fi router setting and access camera's Advanced Setting section (see page-21).
- Page 15 SETUP PIN LOCK MUST enter PIN code when you have enable PIN lock function with launching the APP. 1. Enable "Enable lock when starting" and enter your PIN code. 2. Confirm PIN code entered. (iOS) (Android) Note: If you forgot the PIN code, please delete and reinstall the app. NOTIFY (PUSH NOTIFICATION) The WAPP camera supports motion detection.
- Page 16 For Android If you want to enable/disable it, please follow the steps below. Note: The internet connection and wireless network interference may influence the performance of push notification service. ABOUT APP/API Version Info (iOS) (Android) Tap the ABOUT icon to check the APP Version when necessary.
-
Page 17: Live View / Snapshot / Recording
LIVE VIEW / SNAPSHOT / VIDEO RECORD Main page System Name & View Mode Connection Status Camera Mode Battery Video Resolution Video Record Return Snapshot Function Description System Name & View Mode Display the name of the camera assigned by user and current view mode (Live-View or Playback). - Page 18 Live View The app allows you to access real-time streaming video (Live-View) from the main page, where you could select the camera preferred. In Live-View section you can take snapshots and record video by demand. For full screen display simply position the phone horizontally. Full screen Live View...
-
Page 19: Viewing Your Snapshots
VIEW SNAPSHOTS For iOS Your snapshots will be named with the time stamp and saved into the Camera Roll location of your mobile device. For Android Your snapshots will be named with the time stamp and saved into the Photo Gallery > snapshot folder on your mobile device. - Page 20 and the Date-Time filter would appear. User may define the period for system to display all available recorded file(s) for playback. The app offers two different type of event list, (A) Local Memory Card Event List and (B) Cloud Storage Event List. Tap on the icon to view available event list. All available triggered events will be stored in the memory card.
- Page 21 For playback, select the file from either local or cloud event section. During the playback you can tap the Pause icon to pause/resume the playback. The local network environment condition (example: upload/download speed) may cause improper video playback, such as black screen.
- Page 22 Note: This function allows user to conveniently retrieve important event files. It is best to download the event For iOS system, please use "Oplayer Lite" APP for playback downloaded video files(s). files using Wi-Fi network (WLAN), where minimum 1Mbps (upload/download) bandwidth is available. You can find "Oplayer Lite"...
-
Page 23: Advanced Setting
ADVANCED SETTING This chapter explains the advanced settings for administrator. Administrator is the one who owns the administration password and has the full control to the WAPP camera. The administrator can access all WAPP functions and settings, while general users can receive the surveillance images for live view/screen capture/video recording and may not manage the camera settings. -
Page 24: Admin Password
ADMIN PASSWORD This is the password for entering camera advanced setting section and by default the password is 123456. This password can have absolute control over the detail settings. It is required to enter this password everytime accessing the camera advanced setting. If you have multiple cameras register to the app, each camera can have its own admin password. -
Page 25: Cloud Setting
2. Type in the new password and confirm the new password again. 3. Tap OK to save the setting. Note: I f y o u f o r g e t t h e a d m i n password, MUST reset the camera default security code (Please refer to page- 6). -
Page 26: Video Quality
Edit Account Enter here to modify your cloud account password. Device Management E n t e r h e r e t o s e e a l l t h e cameras registered under the cloud account. You can unbondle the selected camera with existing Google Drive or DropBox and then bondle the... -
Page 27: Brightness
BRIGHTNESS To adjust the brightness level, with level 1 being the lowest and level 7 being highest. Android WI-FI Here you can manage the setting of Wi-Fi network (available for Android version app). The app will automatically scan for available W-Fi router (SSID). Select the one you prefer to make the connection and enter router's password if necessary. -
Page 28: Notify Enable
NOTIFY ENABLE By disable the notification alert here all user will not be able to receive push notification on their smart-device, even if they have push notification enabled. MOTION DETECT While the app is connected with the camera, you can disable/enable the motion detection function here. -
Page 29: Record Mode
RECORD MODE You can take snapshots or video after detecting motion. Android RECORD CYCLE TIME You can define the length of video record here. The longer length of video record will consume more battery power and take longer to upload to cloud, which also consume additional battery power. -
Page 30: Video Framerate
VIDEO FRAMERATE You can define the frame rate of the video record here. The higher the frame rate will result in larger video file data, but better playback quality. Android VIDEO RESOLUTION You can define the resolution quality of snapshots and video record in VGA (640*480) or HD (1280*720). -
Page 31: Device Information
DEVICE INFORMATION This section contains information about the camera, such as firmware version, total and available space of the memory card inserted. Android... -
Page 32: Trouble Shooting
TROUBLE SHOOTING SOLUTION App cannot connect to the ‧Make sure the router is powered on. camera ‧Make sure the camera is powered on. ‧Make sure the router supports DHCP protocol. Wi-Fi router is not shown ‧ Make sure SSID broadcasting function is enabled in the Wi- in the drop down list Fi router. - Page 33 Push notification is not ‧ Make sure the push notification is enabled (including Admin functioning setting). ‧ Make sure the motion detection function is enabled. ‧ Make sure the camera is powered on. ‧ Make sure the router is powered on. Bright white spot(s) ‧...
-
Page 34: Product Specification
PRODUCTION SPECIFICATION Networking Parameter Wireless Technology IEEE 802.11 b/g/n Network Connection Wi-Fi Network Protocols TCP/IP, UDP, SMTP, NTP, DHCP, ARP Simultaneous Viewers 3 concurrent sessions Security WEP/WPA/WPA2 (TKIP. 128 bit AES) Camera Parameter Image Sensor ¼” Mega Pixel Antenna Internal 3dBi Dipole Housing ABS Plastic Environment Rating (Ingress) -
Page 35: Appendix: Compatible List
APPENDIX: COMPATIBLE LIST WiFi Compatible Router List Brand Product Name ASUS RT-N53 BUFFALO WIR-HP-C300NH2 BUFFALO WZR-HP-G450 Cisco ERT120 D-Link DIR-816L Huawei WSR20 INTELBRAS WRN300 NETGEAR Wndr3700v4 NETGEAR WGR614 Tenda FS395 TP-link TL-WR941N...
Need help?
Do you have a question about the AWFB15 and is the answer not in the manual?
Questions and answers