
Subscribe to Our Youtube Channel
Related Manuals for WANHAO DUPLICATOR I3 MINI


Summary of Contents for WANHAO DUPLICATOR I3 MINI
- Page 1 I3 MINI DUPLICATOR DESKTOP 3D PRINTER INSTRUCTION MANUAL MODEL NUMBER:DUPLICATOR I3 MINI...
- Page 3 If you experience any issues with this product, or it’s performance is not what you had expected, please contact us at WANHAO before returning the item to the store. It is likely that we can resolve any problems for you via phone or email.
-
Page 4: Warranty Details
The benefi ts conferred by this warranty are in addition to all rights and remedies in respect of the product that the consumer has under the China laws. In case you purchase from WANHAO distributor, your warranty shall be covered by distributor’s Warranty and honored by WANHAO distributor too. -
Page 5: Safety Instructions
WANHAO 3D Printer. • The WANHAO 3D Printer is not intended for use by persons with reduced physical and / or mental capabilities, or lack of experience and knowledge,unless they have been given supervision or instruction concerning the use of the appliance by a person responsible for their safety. -
Page 6: Table Of Contents
4.8 Storage 4.9 Creating and Printing your Own Models 4.9.1 Saving Files to MicroSD Card 4.9.2 Creating a WANHAO File Using Cura 4.9.3 Installing Cura 4.9.4 Adding your WANHAO 3D Printer to Cura 4.9.5 Loading a 3D Design into Cura... - Page 7 Servicing 5.1 Servicing your Duplicator I3 MiNi 5.1.1 Replacting the Print Mat 5.1.2 Nozzle Cleaning 5.1.3 Routine Component Check 5.1.4 Storing Finishing 6.1 Finishing Techniques 6.1.1 Useful Tools/Equipment 6.1.2 Removing Support Material 6.1.3 Sanding 6.1.4 Surface Coating Maintenance Disposal of Packaging...
-
Page 8: Parts List
Parts List 1 x WANHAO 3D Printer 1 x Hex Key Set 1 x Getting Started Guide 1 x Filament Spool Stand 1 x Cable Ties (Not Shown) 1 x Power Cable 1 x 10m PLA Filament 1 x Warranty Card... -
Page 9: Technical Specifications
Single Extruder Nozzle Diameter: 0.4mm Print Speed: 10mm/s - 70mm/s Travel Speed: 10mm/s - 70mm/s Supported Print Materials: WANHAO Branded PLA, PLA Wood Temperature Ambient Operating Temperature: 15°C – 30°C Operational Extruder Temperature: 170°C - 260°C Software Slicer Software: Cura Wanhao Edition Cura Input Formats: .STL, .OBJ, .DAE, .AMF... -
Page 10: Introduction
3D object. 1.2 From 3D Design to Printed 3D Object 3D Design Slice to GCODE Setup WANHAO 3D Printer 3D Printing Process 3D Printed Object 3D Design Having a 3D design is the first step to creating a 3D Object. - Page 11 INTRODUCTION support material. Setup WANHAO 3D Printer It's important to check your printer before every print.We've included some steps on page 21 in section 4.2 Good 3D Printing Practices for you to quickly refer to each time. 3D Printing Process Now that you've loaded a GCODE file onto the printer,it will commence heating up the Extruder, then start printing.
-
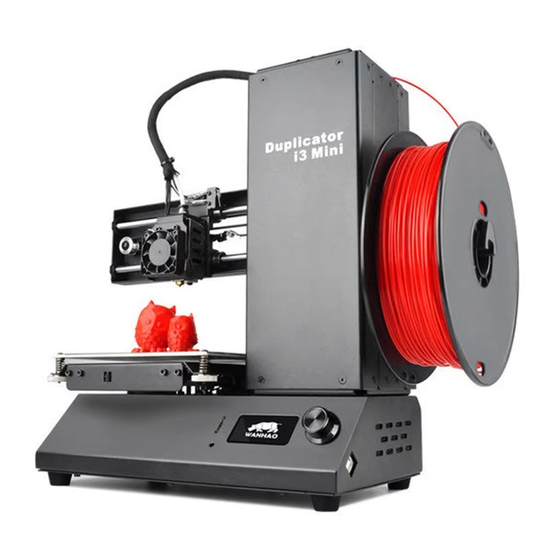
Page 12: Product Overview
Product Overview 2.1 Printer Front View 1. Filament Tuble 5. Print Bed 9. Tower Frame 2. X-Axis Frame 6. Front Thumbwheels 10. Spool Holder 3. Cooling Fan 7. Control Panel 4. Nozzle 8. Filament Clamp... -
Page 13: Printer Rear View
Product Overview 2.2 Printer Rear View 1. Power Switch 3. Rear Thumbwheels 2. Plug Socket 4. Extruder Assembly... -
Page 14: Control Panel
Product Overview 2.3 Control Panel 1. MicroSD Card Slot 3. LCD Display Screen 5. USB Port 2. Restart Button 4. Dial Button... -
Page 15: Unboxing And Assembly
PRODUCT ASSEMbLY& INITIAL SETUP 3.1 Unboxing and Assembly Your WANHAO 3D Printer is carefully packed to avoid damage in transit. Take your time unpacking it. The printer is preassembld and requires only minimal set up before powering on. Carefully remove the 3D printer from the box and place on a clean, level work space. -
Page 16: Home Screen
SETUP 3.2 Home Screen * Printer Status: Current printer status or memory card status if removed or inserted * Elapsed Time: Length of time the current model has been printing (if applicable) * Progress: Displays percentage of model completed (if applicable) * Speed:Current printing speed - 100 % is full speed NOTE: The initial pringting speed is defined in the GCODE file, not by the printer * Extruder Temperature: The temperature shown above the... -
Page 17: Menus Tree
SETUP 3.4 Menu Tree Home Screen Main Menu Quick Settings Advanced Settings... -
Page 18: Adding Filament
SETUP 3.5 Adding Filament 1. Place your roll of filament on the Filament Spool Holder 2. Turn on the 3D Printer with the power switch located at the back of the printer 3. Push the Dial Button to access the main menu and navigate to Quick Settings Change Filament Add Filament. - Page 19 SETUP 3.5 Adding Filament Clean off any excess filament residue from the tip of the nozzle using the scraper Enter the main menu and select Quick Settings Move Home XYZ to move the nozzle to the home position in the front right corner NOTE: Immediately turn off the machine any motors are jamming pr forcing against the chassis.
-
Page 20: Printing And Removing Models
PRINTING AND REMOVING MODELS 4.1 Printing a file The I3 MiNi only accepts and prints GCODE files.The included microSD Card has sameple model GCODE available to get you started.See section 4.9 Creating and Printing your own models on page 25 to load your own models. Check the print bed has been levelled correctly Insert the included microSD Card into the memory card slot next to the LCD screen with the lablel facting to the left as shown... -
Page 21: Good 3D Printing Practices
PRINTING AND REMOVING MODELS 4.2 Good 3D Printing Practices Please refer to these steps during every print to ensure the best quality. Before Printing Ensure your GCODE fi le is correctly setup, fi lament diameter is set to to 1.75mm and correct temperature settings for the material you are using.The I3 MiNi prints PLA fi lament. -
Page 22: Removing 3D Objects From The Bed
PRINTING AND REMOVING MODELS 4.3 Removing 3D objects from the bed Once the I3 Mini has completed printing your 3D printed object follow these steps to remove it from the print bed. Once the print is completed,wait for the extruder to cool and then turn off your 3D printer Using the supplied, carefull'wedge'under one of the edges of the 3D object.Take care to keep the scraper flat with the bed to preven damaging the print mat As one edge begins to lift,gently maneuver the scraper forward to continue to'wedge... -
Page 23: Quick Settings
PRINTING AND REMOVING MODELS 4.5 Quick settings To access the quick settings,press the dial button and select quick settings in the main menu Move: Move X,Y,Z: Manually move the X,Y,Z axes by 1mm increments Extruder: Manually extrude or retract filament by 1mm increments IMPORTANT NOTE: You must preheat the extrude or retract filament,180 °C minimum Home XYZ: Return to the home position is the front right corner Change filament:... -
Page 24: Filamnent
SETUP 4.7 Filament The WANHAO Duplicator I3 Mini is designed to be only used with PLA(Polylactic Acid BioPlastic) fialment.Only use genuine WANHAO filaments as using generic filaments may damage your 3D printer and may void your warranty. Extra filament including multiple colours and PLA types are availabe from the online store at id.aliexpress.com/store/120824V... -
Page 25: Creating And Printing Your Own Models
A GCODE file provides the essential temperature settings and movement information for your WANHAO I3 Mini. A number of 'Slicer' software programs exist which convert a 3D model file into a series of 3D printable layers. Cura is free open source slicer software relesed on the AGPLv3 license.It is available on MacOS X and windows. -
Page 26: Adding Your Wanhao 3D Printer To Cura
Machine settings Add new Machine Select Other Select Custom... Enter Machine name as 'Duplicator I3 Mini', or your desired name Input Machine width as 120mm Input Machine depth as 135mm Input Machine height as 100mm Change Nozzle size to 0.4mm... -
Page 27: Servicing
5.1 Servicing your Duplicator I3 Mini 5.1.1 Replacing the print mat The Duplicator I3 Mini includes 2 x extra prin mats. Additional print mats are available for purchase from https://www.wanhao3dpriner.com Remove the current print mat by slowly peeling from one corner... -
Page 28: Routine Component Check
X Axis and Y Axis rods. Nuts and Bolts Loose nuts and bolts could affert the geometry of the Duplicator I3 MiNi . Check that all nuts and bolts remain firmly tightened.If required,retightern using the hex wrench. -
Page 29: Finishing
FINIShING 6.1 Finishing Techniques 6.1.1 Useful Tools/Equipment • Safety Goggles • Mask • Long-nose Pliers • Wire cutters • Sandpaper (100,200,300,400,500,600 Grit) • Medium, fi ne and extra fi ne sanding sponges • Acrylic based primer spray paint • Acrylic based spray paint (colour of your choice) •... -
Page 30: Surface Coating
The maintenance of Duplicator I3 Mini should be conducted by skilled person only.Always unplug the printer before doing maintenance or modifications. In order to have a smoothly working Duplicator I3 Mini it is important to maintain it correctly.Please follow the safety/ deterioration checks during maintenance:... -
Page 31: Disposal Of Packaging
DISPOSAL OF PACKAGING This product has been packaged to protect it against transportation damage.Unpack the appliance and keep the original packaging carton and materials in a safe place.It will help prevent any damage if the product needs to be transported in the future,and you can use it to store the appliance when it is not in use. -
Page 32: Troubleshooting
TROUbLEShOOTING 10.1 Troubleshooting If having any troubles when using the Duplicator I3 MiNi,please refer to the troubleshooting guide below,or call customer support on +86-571-23290996 You can also visit https://www.wanhao3dprinter.comfor support videos and advanced tutorials 10.1.1 Printing Problems Clicking sound from one of the stepper motors One of your stepper motors may not be connected properly. -
Page 33: Commectivty Problems
Model appears very ‘stringy’ • Ensure that the filament diameter is set to match your filament spool (1.75mm), then try creating a new GCODE before printing again • Check you are using the correct temperature for the filament used Print stopped halfway •... -
Page 34: Other Problems
3D Printer and potentially void your warranty. What types of filament can my 3D Printer Print? The WANHAO 3D Printer accepts various types of filaments including PLA, ABS, PVA, HIPS and specialty filaments such as wood, flexible, luminous and conductive. For our full range of... -
Page 35: Useful Terms
DC motors that move in discrete steps. This allows for precise positioning and/or speed control .stl A common file format for 3D Designs/Models USB Cable This cable allows communication between the WANHAO 3D Printer and a computer, using the USB port of the computer... -
Page 36: Appendix
Appendix References Some of the 3D Models used in this manual and other included materials were sourced from the below:... -
Page 37: Repair And Refurbished Goods Or Parts Notice
Please be assured though, refurbished parts or replacements are only used where they meet WANHAO’s stringent quality specifi cations. If at any time you feel your repair is being handled unsatisfactorily, you may escalate your complaint.
Need help?
Do you have a question about the DUPLICATOR I3 MINI and is the answer not in the manual?
Questions and answers