Table of Contents
Advertisement
Advertisement
Table of Contents

Related Manuals for WANHAO D12 500


Summary of Contents for WANHAO D12 500
- Page 1 D12 300/400/500 user manual...
- Page 2 You will be able to set up with ease www.wanhao3dprinter.com https://groups.google.com/forum/#!forum/wanhao-printer-3d Google Forum Technical support: support@wanhao3dprinter.com Product feedback and partnerships: hello@wanhao3dprinter. com Purchase orders: sales@wanhao3dprinter.com If the product is not performing up to your expectations or you experience any issues, please contact us before returning the item.
- Page 3 The benefits conferred by this warranty are in addition to all rights and remedies in respect of the product that the consumer has under the China laws. In case you purchase from WANHAO distributor, your warranty shall be covered by distributor’s Warranty and honored by WANHAO distributor too.
- Page 4 Read the instructions carefully. Keep this docu-ment for you to dangerous voltage points or other risks. future reference. Follow all warnings and instructions Refer all repairs to qualified service personnel. marked on the product. Observe the following guidelines Please send an email to your national supplier when connecting and discon-necting power to the or contact techincal service at: external power supply unit:...
- Page 6 Before you get started, please read these safety instructions. CAUTION : WANHAO 3D Printers include moving parts that can cause injury. Never reach inside the WANHAO 3D Printer while it is in operation, and allow time for the printer to cool down after operation.
- Page 7 The box contains POWER CABLE USB CABLE FILAMENT FEEDING TUBE D12 300 SHOVEL SCREW FILAMENT 3D PRINTER SHAFT NOZZLE FILAMENT HEXAGON SPRING MAT CLEANER DETECTOR WRENCH TWEEZERS MICRO SD CARD AND READER...
- Page 8 Technical Specifications Software WANHAO Cura Extruder system MK12 Material support PLA,PETG,SILK Max printable area 300*300/400mm/ 400*400*400mm/ 500*500*500mm Filament diameter/light 1.75MM Max printing speed 30 mm/s-150mm/s Case material Steel case Extruder quantity 13.2kg/ 19.4kg/ 20.5kg Net weight(kg) Gross weight(kg) 16.2kg/ 23.4kg/ 24.5kg...
- Page 9 Read this manual carefully, it will bring you great convenience...
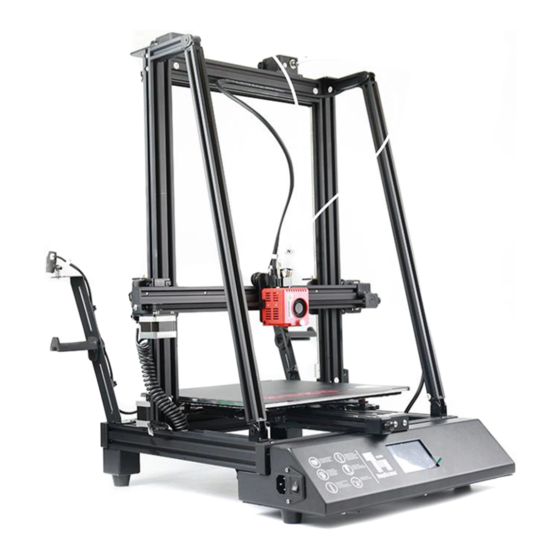
- Page 10 1. Extruder data cable 6. X axis belt 2. Filament tube 7. Movable bed sheet 3. Extruder assembly 8. Z axis end stop switch 4. Z axis cable pack 9.Touching screen 5. X axis belt tension adjuster 10. Leveling nut...
- Page 11 16 15 11. Filament detector 14. Y axis motor 12. X axis roller 15. SD card slot 13. Filament holder 16.Reinforcing rib...
- Page 12 Thanks for choosing Wanhao 3D Printer D12/300. It’s important that you follow these steps carefully to ensure correct setup of your 3D Printer. You can also visit https://wanhao3dprinter.com/Vedio/ ShowArticle.asp?ArticleID=136 unboxing for step by step guide on unboxing and setup, levelling, filament installation and printing.
- Page 13 Remove the Place the printer protection components onto foam and tape a flat table. Please from position. handle with care. Put the printer base on it’s side. Install the printer tower onto the base. Then use 4pcs M5 x 40mm bolt to lock the tower onto the base.
- Page 14 Find the E1 extruding Install the mechanism. Install it filament plastic onto the left side holder onto the ( near the Z axis screw) left stand and of tower by inserting twist the nut to the block into the lock it. Then aluminum slot and twist install the the bolt Mushroom...
- Page 15 Note: Please connect every wire according to it’s Number which match to the corresponding connector. Congratulation! You have complete the installation of D12/300. You are now ready to boot up and print.
- Page 16 Insert the J male Find the E2 extruding connector onto the J mechanism. Install it onto female Motor connector. the right side ( on the other side of E1) of tower by inserting the block into the aluminum slot and twist the bolt clockwise.
- Page 17 Our software is tailor-made for your D12 300 machines. Multiple language support. Using rapid iterations, we’ve included many popular requests from our community.The two-color writing model can be uploaded to the SD card connected to the printer through wifi after merging.
- Page 18 This is the main screen of Cura. Here you can choose which object or objects to print. And how you want them to be printed. 1. Load file 5. Print type profiles 9. Scale model options Click this button to load an 3 options to choose a print Option to change the scale of object to your print area.
- Page 19 The following mouse actions are used to work, navigate and view the 3D model: Leftmouse button Scrollwheel button Select objects. Hold and move Use the scroll wheel to zoom the mouse to drag in or out. object on the 3D print area. Rightmouse button + Rightmouse button Shift...
- Page 20 WIFI router. 3 . Open Cura WANHAO edition. Click Wifi. Enter the IP address which you record from your printer. Click Connect. Now your computer would connect to your printer. Once you finish slicing, you can click Send Job to send the printing file to your printer for printing.
- Page 21 RESUME PRINTING after power break. If you experience the Power break during printing. Once the power come back. The machine would initiate and back to resume page. You can just click RESUME to resume printing or you can stop to cancel the print.
- Page 22 3D Printing is a process whereby a real object is created from a 3D Design. Fused Filament Fabrication (FFF) is one of the most common technologies used by 3D Printers to achieve this. FFF works on an ‘additive’ principle by laying down material, such as PLA or ABS filament, in layers to create a 3D object.
- Page 23 3D models ranging from simple to complex. The WANHAO 3D Printer is compatible with a broad range of filament types and is capable of printing 3D models ranging from small and simple to complex objects with moving parts. What you...
- Page 24 It is important to ensure the Heated Print Bed is level and set to approximately 0.1mm distance prior to printing. Press Tool → Move → Z Axis → + to Riaise the extruder.So that you can easily access the heated print bed. Turn off your 3D Printer Check the Z axis level.
- Page 25 The WANHAO 3D Printer uses high quality PLA and ABS filaments. Only use quality WANHAO filaments as using generic filaments may damage your 3D Printer, affect the print quality and may void your warranty. Extra filament including multiple colours and types are available from the online store at id.aliexpress.com/store/120824 For beginners, we recommend using PLA materials as they are easy to print and does not produce fumes when printing.
- Page 26 These PLA Alternatives require advanced knowledge of the 3D Printer. Please visit www.wanhao3dprinter.com for details of filament types and parameters. NOTE: Only use WANHAO Filament with your 3D Printer, using other filaments may damage your 3D Printer and may void your warranty.
- Page 27 With the printer initialised, press the Navigation Dial to enter the menu system. Navigate to, and select Tool > Preheat PLA or Preheat ABS depending on the material. Check the temperature of the Extruder and plate on the LCD. When the temperatures are within a few degrees of the target, you are ready to remove the filament.
- Page 28 Navigate to and select SD Card > Print > Print File Navigate to your desired GCODE File, then press the Dial to commence printing Your WANHAO 3D Printer will now heat up the Extruder and Heated Print Bed before printing your 3D object NOTE: If pressing print shows no files, t is likely that the SD card has not been mounted.
- Page 29 A GCODE file provides the essential temperature settings and movement information for your WANHAO 3D Printer. A number of ‘Slicer’ software exists, which convert a 3D model file into a series of 3D printable layers. Cura is a free Open Source slicer software released on the AGPLv3 license.
- Page 30 Follow the instruction and click install and next. The software has already embedded all the basic settings for your Wanhao D12 300. Clear the platform using File > Clear platform… Then, load your 3D Design file onto the platform using File >...
- Page 31 Rotate The Rotate button will give you the ability to orient your model in along all three axes. Once you click the rotate button, three circles will surround your model. The red circle will allow you to rotate around the Z axis. The Yellow circle will rotate around the Y axis. The Green circle will rotate around the X axis.
- Page 32 Using Cura View Mode This mode allows you to view your model in a variety of different ways. This can be helpful for spotting issues before the print even starts. Normal This is the standard view and shows the solid outer surfaces of the model. Overhang Overhang mode shows where your model may need support material.
- Page 33 Material Selection Choose your desired filament. The WANHAO 3D Printer includes a 10 metre sample of PLA to be used in your first print. Other filaments are available for purchase at id.aliexpress.com/store/120824 Diameter Ensure this is always set to match the filament diameter.
- Page 34 Open your CURa software and import the two-color print model file. For example, TIP: We can merge the 2 files by using automatic merging. Click on one file, left click and choose < Dual Extrusion Merge>. The 2 file would merge into one. To print one file with another support material.
- Page 35 Support type: Type of support structure build. "Touching buildplate"is the most commonly used support setting. None: Touching buildplate: Everywhere: None does not do only creates support Creates support even any support. where the support on top of part of the structure will touch model.
- Page 36 Shell Thickness (mm) This defines the number of vertical walls that comprise the outside of your model. We recommend keeping this set to multiples of your nozzle width. Your WANHAO 3D Printer is equipped with a 0.4 mm nozzle.
- Page 37 Enable Retraction Retraction tells your printer to pull filament out of the Extruder upon travel moves. Travel moves are when your print head moves from one area of the print, to another without laying down filament. We recommend keeping this on for all filament types, and adjusting the retraction length and speed for the specific filament.
- Page 38 Using Cura SUPPORT Support Type Some models will require support material in order to print properly. This will usually occur when an object has an angle in relation to the Heated Print Bede between 0 to 45 degrees. It is highly recommended to orient your object so that it minimizes or eliminates the need for support.
- Page 39 Nozzle Size (mm) This defines your nozzle size. The slicing engine uses this value combined with your other settings to determine how quickly to feed filament into your Extruder. The WANHAO 3D Printer uses a 0.4mm nozzle. RETRACTION Speed (mm/s)
- Page 40 This will control how thick your first printed layer height is printed onto the Heated Print Bed. Having a larger initial layer height will help prevent your part from popping off the plate. Your WANHAO 3D Printer auto levelling system could be affected if you change this from the standard profiles. Adjust at your own risk.
- Page 41 Using Cura Outer Shell Speed (mm/s) This will be the outermost surface of the model. This is the most important setting, as it controls the speed of your print head on the visible layers. As a general rule of thumb, the slower you go the better looking print you will get.
- Page 42 Using Cura Plugins Tab Plugins are custom settings which will alter your print at specific points. The two that come pre-loaded with Cura are Tweak at Z, and Pause at Height. More plugins and information can be found here: http://wiki.ultimaker.com/Category:CuraPlugin To activate one of these highlight the desired plugin and click the drop-down arrow directly below the Plugins box.
- Page 43 Using Cura Expert Settings Expert settings will give you more specific options for your retraction, skirt, active cooling, infill, support, brim, raft, and special settings. To gain access to this section you go to Expert > Open Expert Settings or on your keyboard press Control + E. Retraction Retraction pulls filament out of your nozzle when it is not extruding to prevent your print head from dripping on your object.
- Page 44 Using Cura Skirt Skirt creates a line around the outside of your object. This is most commonly used to prime the Extruder. In order to prevent missed filament at the beginning of a print, we recommend you leave this setting on. Line Count This will define the number of loops the Skirt creates around the outside of your object.
- Page 45 Using Cura Support You define how your support material is generated here. You must have a support type in the ‘Basic Settings; in order for these support settings to have an effect. Structure Type You can choose between a ‘Grid’ or a ‘Line’ pattern for your support material. The grid will be a checkerboard pattern in the X and Y direction.
- Page 46 Using Cura Brim Brim circles the base of the print while making contact, helping adhere the print to the Heated Print Bed. This is only one layer thick, and can be easily removed post-print. This section defines how the brim is formed when brim is activated in ‘Basic Settings’. Brim Line Amount This will determine the distance the brim will cover around the outside of your object.
- Page 47 Using Cura Airgap This will define the distance between your raft and your print. A larger gap will make your part easier to remove, but will make the bottom of your print look worse. Surface Layers This will determine the number of layers that create the ‘platform’ of your raft. If you have a wide line spacing, you may want to increase this number to ensure a solid platform.
- Page 48 SOME 3D MODELS AND OTHER MATERIALS ARE REFERENCED FROM THE FOLLOWING WEBSITE Human Jaw by gebrin Aug 14, 2015 www.thingiverse.com/thing:968975...
- Page 50 Creative Make the color dual most sprinkler sincere good product printer DISPOSAL INSTRUCTIONS Do not throw this electronic device into the waste when discarding. To minimize pollution and ensure utmost protection of the global environment, please recycle or return to Photocentric for recycling.
Need help?
Do you have a question about the D12 500 and is the answer not in the manual?
Questions and answers