Table of Contents
Advertisement
Quick Links
Advertisement
Table of Contents

Subscribe to Our Youtube Channel
Related Manuals for REED ST-156


Summary of Contents for REED ST-156
- Page 1 Black ST-156 Model Pantone 534 Blue - 100/80/30/5 Ultrasonic Thickness Pantone 485 Red - 10/100/100/5 Pantone 123 Yellow - 0/27/100/ Gauge Instruction Manual reedinstruments 1-877-849-2127 | info@reedinstruments.com www.reedinstruments.com...
-
Page 2: Table Of Contents
Table of Contents Features .................... 3 Specifications ................3-4 Instrument Description ..............5 Operating Instructions ..............6-17 System Menu Arrangement ............6 Basic Settings ................7 Measuring Modes ................ 7 Probe Operating ................7 Unit Settings ................7 Total-Reset................... 8 Backlight ..................8 Statistic View ................ -
Page 3: Features
Features • Dual technology provides automatic recognition for ferrous and non- ferrous metal substrates • Magnetic induction for ferrous metal substrates • Eddy current measurement for non-ferrous metal substrates • One or two point calibration • User-settable high/low alarms • Easy Zero calibration •... - Page 4 Yellow - 0/27/100/0 Pantone 123 Yellow Red - 10/100/100/5 Pantone 485 Red For service on this or any other REED product or information on other Yellow - 0/27/100/0 Pantone 123 Yellow REED products, contact REED Instruments at info@reedinstruments.com Blue - 100/80/30/5 Pantone 534 Blue 1-877-849-2127 | info@reedinstruments.com...
-
Page 5: Instrument Description
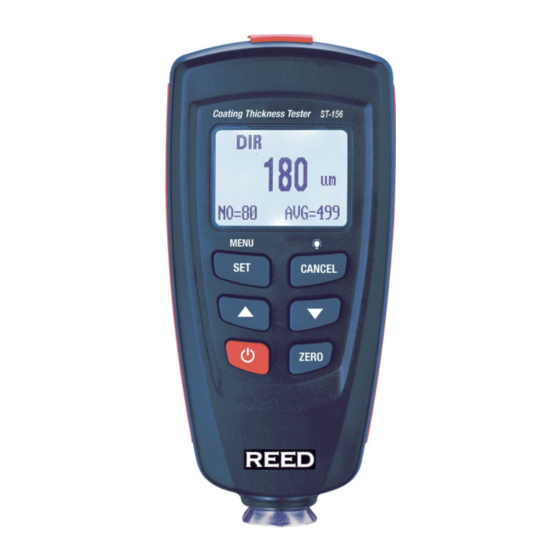
Instrument Description 1. Probe 2. Power ON/OFF Button 3. Zero Calibration Button 4. Down/Right Button 5. Blue Bar Button 6. Main display 7. Measuring unit 8. NFe (non-ferrous)/ Fe (ferrous) 9. Indicates the probe working principle: AUTO, Magnetic induction, or Eddy current 10. -
Page 6: Operating Instructions
Operating Instructions System Menu Arrangement Press the Power Button to turn the meter on; the gauge will default to measuring mode. Press the Red Bar Button to enter Menu. The following illustrates how the Menu system is arranged: Menu (Continued under Options) >Statistic view >>LCD Statistic >>Average view... -
Page 7: Basic Settings
Basic Settings Please refer to the Menu arrangement. Press the Red Bar Button to enter the Menu. Press the Up and Down Buttons to scroll through the Menu. Press the Red Bar Button for OK/Yes/Menu/Select functions, and the Blue Bar Button for Esc/No/Back functions. Measuring Modes Continuous Mode: In Continuous Mode, the probe is not lifted off the surface being measured. -
Page 8: Total-Reset
Total-Reset The Total-Reset function erases all data from memory. This includes all sets of readings of all work modes plus their associated statistics, calibra- tion values and tolerance limits. 1) Switch off meter. 2) Press the Zero Calibration Button and the Power Button simultane- ously. -
Page 9: Direct And Group Mode
Direct and Group Mode This meter offers two operating modes: Direct and Group Mode. In the Menu, choose “Options”, and select “Working mode” to select to work in either Direct Mode or to select a Group. Direct Mode is intended for quick and occasional readings. In this mode, individual readings are logged to the memory provisionally. -
Page 10: Storing Calibration Values
Two-point calibration (using a set of two calibration foils): a) Recommended for measurements on rough surfaces b) Recommended for precise measurements on smooth surface if the thickness to be expected lies between that of the two calibration foils Storing Calibration Values If the meter is calibrated for a particular purpose, the calibration values will be stored in memory until changed. -
Page 11: High-Accuracy Calibration
High-Accuracy Calibration To achieve high-accuracy readings, it is advisable to log calibration values (both zero values and calibration foil values) several times in succession. In this way, the gauge will automatically establish a mean calibration value. For more details see Calibration Tips. The high-accuracy calibration is an obvious advantage when calibrating on uneven, e.g. -
Page 12: One-Point Calibration
2) The LCD screen will display <x.x um>. Operating is different in Continuous Mode and Single Mode, see the “Measuring Mode” section for more details. Then, raise the probe at least 10cm (4”) away from the metal substrate. 3) Press and hold the Zero Calibration Button for about 1.5 seconds. When the LCD screen displays “0.0 um”, the calibration is finished. -
Page 13: Two-Point Calibration
NOTE: The meter calculates the mean of a max of 5 calibration readings. When full, the newest calibration value will replace the oldest calibration value. Press Blue Bar Button to exit current calibration, or after 30 seconds the calibration will be become effective automatically. -
Page 14: Shot-Blasted Surfaces
Shot-blasted Surfaces The physical nature of shot-blasted surfaces results in coating thickness readings that are too high. The mean thickness over the peaks can be determined as follows (not that the statistics program is of great benefit in this procedure). Method A: The meter should be calibrated according to One or Two- point Calibration procedures. -
Page 15: General Remarks On Measurement
General Remarks on Measurement After the calibrations have been made, all subsequent measurements will lie within the guaranteed measuring tolerance. Strong magnetic fields near generators or live rails with strong currents can affect the reading. When using the Statistics Function for obtaining a mean value, it is advisable to place the probe several times at a typical measuring spot. -
Page 16: Statistical Terms
NO.: Number of readings in Work Mode AVG: Average value Sdev.: Standard deviation MAX: Maximum reading MIN: Minimum reading Statistical Terms Average Value The sum of readings divided by the number of readings: Standard Deviation (Sdev.) The sample standard deviation is a statistic that measures how “spread out”... -
Page 17: Delete Function
Delete Function In the Menu, you can find following functions: Delete Current Data: If you find the last measured reading is wrong, you can delete it via this function. At the same time, the statistics will be updated. Delete All Data: You can delete all data and statistics of the Current Work Mode. - Page 18 Notes _________________________________________ ________________________________________________ ________________________________________________ ________________________________________________ ________________________________________________ ________________________________________________ ________________________________________________ ________________________________________________ ________________________________________________ ________________________________________________ ________________________________________________ ________________________________________________ ________________________________________________ ________________________________________________ ________________________________________________ ________________________________________________ ________________________________________________ Blue - 100/80/30/5 Pantone 534 Blue Yellow - 0/27/100/0 Pantone 123 Yellow ________________________________________________ Red - 10/100/100/5 Pantone 485 Red Yellow - 0/27/100/0 Pantone 123 Yellow Blue - 100/80/30/5 Pantone 534 Blue...
- Page 19 Notes _________________________________________ ________________________________________________ ________________________________________________ ________________________________________________ ________________________________________________ ________________________________________________ ________________________________________________ ________________________________________________ ________________________________________________ ________________________________________________ ________________________________________________ ________________________________________________ ________________________________________________ ________________________________________________ ________________________________________________ ________________________________________________ ________________________________________________ Blue - 100/80/30/5 Pantone 534 Blue Yellow - 0/27/100/0 Pantone 123 Yellow ________________________________________________ Red - 10/100/100/5 Pantone 485 Red Yellow - 0/27/100/0 Pantone 123 Yellow Blue - 100/80/30/5 Pantone 534 Blue...
- Page 20 Notes _________________________________________ ________________________________________________ ________________________________________________ ________________________________________________ ________________________________________________ ________________________________________________ ________________________________________________ ________________________________________________ ________________________________________________ ________________________________________________ ________________________________________________ ________________________________________________ ________________________________________________ ________________________________________________ ________________________________________________ ________________________________________________ ________________________________________________ Blue - 100/80/30/5 Pantone 534 Blue Yellow - 0/27/100/0 Pantone 123 Yellow ________________________________________________ Red - 10/100/100/5 Pantone 485 Red Yellow - 0/27/100/0 Pantone 123 Yellow Blue - 100/80/30/5 Pantone 534 Blue...
Need help?
Do you have a question about the ST-156 and is the answer not in the manual?
Questions and answers