
Related Manuals for REED CM-8822


Summary of Contents for REED CM-8822
- Page 1 INSTR CM-8822 Model Coating Thickness Gauge INSTR Instruction Manual GlobalTestSupply www. .com Find Quality Products Online at: sales@GlobalTestSupply.com...
- Page 2 Table of Contents Features ..................3 Specifications ................3 Instrument Description ..............4 Operating Instructions ..............5-6 Measuring Procedure ..............5 Zero Adjustment ..............5-6 Calibration Foils ................6 Battery Replacement ..............6 GlobalTestSupply www. .com Find Quality Products Online at: sales@GlobalTestSupply.com...
-
Page 3: Specifications
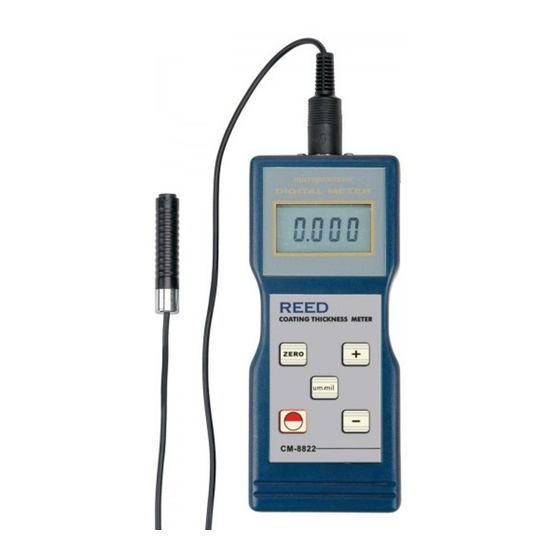
Features • Measures the thickness of non-magnetic coatings on magnetic or non- magnetic metal substrates • User selectable μm/mils • Probe allows for readings in tight spaces • Large, easy-to-read LCD display • Automatic probe recognition • Zero adjustment button • Automatic calibration • Low battery indicator • Includes ferrous probe, non-ferrous probe, calibration standards, battery and hard carrying case Specifications Measuring Ranges: 0 to 40mils (0 to 1000μm) Accuracy: <100μm: ±2μm, >100μm: ±3% of rdg. Resolution: 0.1μm (0 to 99.9μm), 1μm (<100μm) Sampling Time: 1 second Display: 4-digit, LCD Zero Button: Length of Probes: 3' (36") Power Supply: 4 x "AA" Batteries Low Battery Indicator: Product Certifications: Operating Temperature: 32 to 104°F (0 to 40°C) - Page 4 Instrument Description Sensor Zero Button Power Button LCD Screen Plus Button µm/mil Button Minus Button Battery Compartment F Probe Description Measures the thickness of non-magnetic materials (example: paint, plastic, porcelain enamel, copper, zinc, aluminum, chrome, ect.) on magnetic materials (example: iron, nickel, ect.). Common uses include measuring thickness of galvanizing layer, lacquer layer, porcelain layer, phosphide layer, copper tile, aluminum tile, some alloy tile, and paper. N Probe Description Measures the thickness of non-magnetic coatings on non-magnetic metals. Common uses include measuring the layer of varnish, paint, enamel, plastic coatings, or powder applied to aluminum, brass, non-magnetic stainless steel. GlobalTestSupply www. .com Find Quality Products Online at: sales@GlobalTestSupply.com...
-
Page 5: Operating Instructions
Operating Instructions Measuring Procedure Plug in the F-probe or NF-probe and place it away from any substrate or other metal materials. Press the power button to turn on the meter and to perform the auto calibration, which takes 3 seconds. The meter will recognize the probe and display F or NF on the LCD screen. Select the measurement unit by pressing µm/mil button, which will appear on the LCD screen. Place the probe on a coating layer to be measured. The LCD screen will display the thickness of the coating layer. The reading can be corrected by removing the probe from the layer and by pressing the plus or minus button. To take another measurement, lift the probe to more than 1 centimeter and then repeat steps 5-7. Turn the meter off by pressing the Power button. The meter will also turn off after 2 minutes of inactivity. Zero Adjustment Plug in the F-probe or NF-probe and place it away from any substrate or other metal materials. Press the power button to turn on the meter and to perform the auto calibration, which will last 3 seconds. Place the probe on a substrate. Press the Zero button and ‘0' will appear on the display. Do not press the Zero button if the probe is not placed on a substrate. Select an appropriate calibration foil according to your measurement range. Place the standard foil onto the substrate. Place the sensor gently onto the standard foil and lift. GlobalTestSupply www. .com Find Quality Products Online at: sales@GlobalTestSupply.com... -
Page 6: Battery Replacement
• • • 0-500 • • • • 0-1000 • • • • • 0-2000 • • • • • Battery Replacement When the low battery symbol appears in the display, it is time to replace the batteries. Turn the meter off, open the battery compartment, and remove the batteries. Install 4 new AA batteries verifying you are following the correct polarity. For service or information on this or any other REED product, contact REED Instruments at info@reedinstruments.com. GlobalTestSupply www. .com Find Quality Products Online at: sales@GlobalTestSupply.com...
Need help?
Do you have a question about the CM-8822 and is the answer not in the manual?
Questions and answers