Tait TM9300 User Manual
Hide thumbs
Also See for TM9300:
- User manual (150 pages) ,
- Installation manual (62 pages) ,
- Quick start manual (10 pages)

Related Manuals for Tait TM9300


Summary of Contents for Tait TM9300
- Page 1 TM9300/TM9400 Mobile Radio User’s Guide DRAFT MMB-00001-01 · Issue 1 · August 2012...
-
Page 2: Table Of Contents
Contents For your safety ............... 5 About this guide ........12 Safety warnings used in this guide ......12 Related documentation ..........12 Getting started .......... 13 About your digital radio ..........14 Lack of static noise........... 14 Coverage ..............14 About the radio controls .......... - Page 3 Tait Limited. The word TAIT and the TAIT logo are trademarks of Tait Limited. All trade names referenced are the service mark, trademark or registered trademark of the respective manufacturers.
- Page 4 Tait WEEE website at www.taitradio.com/weee. Please be environmentally responsible and dispose through the original supplier, or contact Tait Limited. Tait Limited also complies with the Restriction of the Use of Certain Hazardous Substances in Electrical and Electronic Equipment (RoHS) Directive in the European Union.
-
Page 5: For Your Safety
For your safety Before using your radio, please read the following important safety and compliance information. Radio frequency exposure information For your own safety and to ensure you comply with the Federal Communication Commission’s (FCC) radio frequency (RF) exposure guidelines, please read the following information before using this radio. - Page 6 110 W mobiles, the minimum safe distance is 44 inches (1.1 m). ■ Use the radio only with Tait-approved antennas and attachments, and make only authorized modifications to the antenna otherwise you could damage the radio and violate FCC regulations.
-
Page 7: Radio Frequency Emissions Limits In The Usa
This radio complies with the IEEE and ICNIRP exposure limits for occupational/controlled RF exposure environments at operating duty factors of up to 50% talk to 50% listen. Radio frequency emissions limits in the USA Part 15 of the FCC Rules imposes RF emission limits on receivers. -
Page 8: Declaration Of Conformity
A signed and dated paper copy of the declaration of conformity can be obtained from Tait Communications. Interference with electronic devices Some electronic devices may be prone to malfunction due to the lack of protection from RF energy that is present when your radio is transmitting. -
Page 9: Potentially Explosive Atmospheres And Blasting Areas
Consult the manufacturer (or its representative) of any such electronic devices to determine whether electronic circuits in those devices will perform normally when the radio is transmitting. If you have a pacemaker, immediately turn off the radio if you suspect it is interfering with the pacemaker. If there is interference between your hearing aid and the radio, please discuss an alternative solution with the hearing aid manufacturer. -
Page 10: Electromagnetic Compatibility In European Vehicles
The radio is designed to satisfy the applicable compliance regulations. Do not make modifications or changes to the radio that are not expressly approved by Tait Limited. Failure to do so could invalidate compliance requirements and void the user’s authority to operate the radio. - Page 11 High radio surface temperatures Warning The bottom surface of the radio and the heatsink fins can become hot during prolonged operation. Do not touch these parts of the radio. EN 60950 requirements (25 watt mobiles) This radio complies with the European Union standard EN 60950 when operated up to the rated 33% duty cycle of two minutes transmit and four minutes receive, and with ambient temperatures of 30 °C or lower.
-
Page 12: About This Guide
Related documentation The following documentation is also available for your Tait radio, which you can access from the Tait Technical Support website (http://support.taitradio.com): ■ Safety and Compliance Information—supplied with each radio. -
Page 13: Getting Started
Getting started This section describes your radio’s controls and indicators. This section covers: ■ About your digital radio ■ About the radio controls ■ Understanding the radio display ■ Understanding the radio indicators ■ Using function keys to access frequently used features ■... -
Page 14: About Your Digital Radio
About your digital radio Your digital radio may have some channels programmed as either analog or dual mode. Dual mode channels are able to receive both digital and analog calls. You may notice differences between your radio’s analog and digital channels in terms of: ■... -
Page 15: About The Radio Controls
About the radio controls The radio controls are the PTT key, volume control, on / off key, scroll keys, selection keys and function keys. Some keys have functions assigned to both short and long key presses: ■ a short key press is less than one second, and ■... -
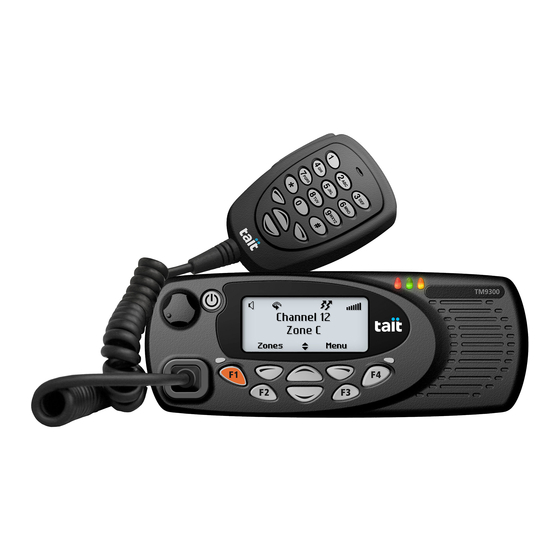
Page 16: About The Keypad Microphone
About the keypad microphone Your radio may have a keypad microphone installed. The keypad microphone has a PTT key as well as alphanumeric keys, two scroll keys, and left and right selection keys. The PTT key, the scroll keys and the selection keys all work in the same way as those on the radio control head (see “About the radio controls”... -
Page 17: Understanding The Radio Display
Understanding the radio display The messages and icons you see on your radio display depend on the mode in which your radio is operating and the way it is programmed. Radio display icons These are some of the icons you may see on your radio display: Icon Meaning... - Page 18 Icon Meaning Conventional mode icons Monitor or squelch override: monitor or squelch override is turned on Repeater talkaround: your radio is operating in repeater talkaround mode, or you are on a simplex channel Trunked mode icons Call queuing: call queuing is turned on Call queuing: there are calls in the call queue Service: your radio is operating on a DMR or MPT trunked network...
-
Page 19: Understanding The Radio Indicators
Understanding the radio indicators The status LED indicators and the radio’s audible tones—together with the radio display—all combine to give you information about the state of your radio. The most common way the indicators work is described in the following sections. Notice The way these indicators behave may be affected by the way your radio is programmed. -
Page 20: Audible Tones
Audible tones The radio uses audible tones to alert you to its status: ■ Radio controls and keypress tones—the tones and beeps you hear when you press your radio’s keys or use the controls. ■ Incoming call tone—when the radio is receiving a call. -
Page 21: Using Function Keys To Access Frequently Used Features
Using function keys to access frequently used features The function keys provide access to some of the features you use most often. These features are assigned to the function keys when the radio is programmed. Some keys may have a feature associated with both a short key press and a long key press. -
Page 22: Navigating The Radio's Menus
Navigating the radio’s menus Your radio has a number of menus, each containing lists or submenus. The menus available depend on the way your radio is programmed. Using the Main menu To access the Main menu, press the right selection key whenever Menu appears above it. - Page 23 Using the scroll key Quick Access menu There are two ways to use this Quick Access menu: ■ Use the scroll keys to scroll through a list of zones or channels. ■ Press the scroll keys and the Quick Access menu appears.
-
Page 24: Locating A Menu
Locating a menu The following diagrams shows the menus and submenus that may be programmed for your radio, in either conventional or trunked mode. Main menu (conventional mode) Channels Display settings Backlight level Zones Backlighting Address book Contrast adjust RSSI Local calls Radio info Set status... - Page 25 Main menu (trunked mode) Preset calls Radio settings Functions Set zone Scrambler Set workgroup Lock radio Go to homegroup VOX sensitivity Scanning Call settings Send Call queuing Status Do not disturb Text message Alert settings Preset message External alert Edit message Indicator level New message Keypress tones...
-
Page 26: Basic Operation
Basic operation This section describes the basic operation of your radio. This section covers: ■ Turning the radio on and off ■ Adjusting the speaker volume ■ Locking and unlocking the keypad ■ Changing your operating mode ■ Making and receiving calls Basic operation... -
Page 27: Turning The Radio On And Off
Turning the radio on and off Long press the on/off key to turn the radio either on or off. volume control on/off key When the radio is first turned on, the red, green, and orange LEDs flash briefly, and the radio gives two short beeps. -
Page 28: Adjusting The Speaker Volume
Adjusting the speaker volume Rotate the power/volume control clockwise to increase the speaker volume and counterclockwise to decrease the volume. The raised dot indicates the current volume setting. Notice The volume control also changes the volume level of the radio’s audible indicators. Locking and unlocking the keypad The keypad lock feature prevents you from pressing a... -
Page 29: Changing Your Operating Mode
Changing your operating mode The way your radio performs basic functions, such as sending and receiving calls, depends on the operating mode of your network. The two operating modes that are available on your radio are: ■ conventional mode, and ■... -
Page 30: Making And Receiving Calls
Making and receiving calls Conventional mode Making a call 1 Select the required channel or scan group. You may need to select the zone you want first, then select the channel or group from that zone. 2 Check that the channel is clear. If the green LED is glowing, the channel is busy and you may not be able to transmit. -
Page 31: Trunked Mode
Trunked mode Making a call 1 Select a preset call from your list of preset calls, and select Send. Alternatively, you may be able to dial the call using your keypad microphone. While the call is being set up, you can select Clear to cancel the call. -
Page 32: Troubleshooting
Troubleshooting This section describes troubleshooting procedures and basic maintenance. This section covers: ■ Troubleshooting ■ When your radio won’t turn on ■ Checking the version of your radio ■ Removing the microphone ■ General care ■ Cleaning the radio Troubleshooting... - Page 33 About troubleshooting If you are experiencing difficulty operating your radio, you may find the following sections helpful. Consult your radio provider for assistance, if necessary. When your radio won’t turn on If the red, green and orange LEDs on the control head do not light up when the radio is turned on, it is probable that power is not reaching the radio.
-
Page 34: Troubleshooting
Identifying the radio’s audible tones The radio’s audible tones can help you identify a potential problem: Audible tone Meaning One short, high- The radio has been made inoperable pitched beep (‘stunned’ or ‘inhibited’) by your service provider. Two short beeps The radio has been made operable (‘revived’... -
Page 35: Troubleshooting
Removing the microphone Notice For information on installing or removing your radio from a vehicle, refer to the TM9300/TM9400 Installation Guide. 1 Using your thumb or forefinger, lift up one of the corners of the microphone grommet and firmly (but gently) pull that corner until the seal comes away from the cavity. -
Page 36: General Care
General care Your radio requires no regular maintenance other than ensuring that all the cables and connections are secure, and that no damage has occurred to the antenna or wiring. To prevent permanent damage to the radio cover, do not allow the radio to come into contact with detergents, alcohol, aerosol sprays or petroleum-based products. -
Page 37: Removing The Microphone
Index distress beacons 7 function key settings 21 green LED 19 alert tones 20 grommet see also audible tones functions of 37 antenna removing 37 safe distance, from antenna audible tones meaning of 36 hardware version, identifying types of 20 calls incoming call tone. - Page 38 microphone removing 37 safety microphone, keypad 16 information 5 monitor warnings used in user’s radio icon for 18 guide 12 scrolling indicator 17 short key press 15 speaker volume, adjusting 28 on/off key 27 orange LED 19 time-out timer 31 transmission time, limited 31 power up radio 27 transmit timer 31...
-
Page 39: Tait Software Licence Agreement
Agreement. “Person” means any individual, partnership, “Designated Products” means products corporation, association, joint stock provided by Tait to Licensee with which or for company, trust, joint venture, limited liability which the Software and Documentation is company, governmental authority, sole licensed for use. - Page 40 Components contained in Tait products and releases of the software provided by Tait; and the related Open Source licenses, see: (iii) may contain one or more items of http://support.taitradio.com/go/opensource software owned by a third-party supplier.
- Page 41 5 OWNERSHIP AND TITLE ECTION Licensee substitute Software which will Tait, its licensors, and its suppliers retain all of accomplish the same objective, or terminate their Intellectual Property Rights in and to the the license and refund Licensee’s paid license Software and Documentation, in any form.
- Page 42 Agreement, Licensee must certify in carried portable radio products and Licensee writing to Tait that all copies of the Software transfers ownership of the Tait mobile or have been removed or deleted from the...
- Page 43 Agreement. and total liability for any such claim shall be 11.7. ORDER OF PRECEDENCE. In the event limited at the option of Tait to the repair or of inconsistencies between this Agreement replacement of the Software or the refund of and any other Agreement between the the purchase price of the Software.
- Page 44 Tait and Licensee to the contrary, this is the complete and exclusive statement of the Agreement between it and Tait in relation to the Software. This Agreement supersedes any proposal or prior agreement, oral or...
Need help?
Do you have a question about the TM9300 and is the answer not in the manual?
Questions and answers