Table of Contents
Advertisement
Advertisement
Table of Contents

Related Manuals for KROHNE OPTICHECK


Summary of Contents for KROHNE OPTICHECK
- Page 1 OPTICHECK OPTICHECK OPTICHECK OPTICHECK Handbook Handbook Handbook Handbook In-situ verification for field devices (electromagnetic, mass and vortex flowmeters and level devices) Electronic revision: ER1.1.0_; SW 4.0.0_ © KROHNE 04/2017 - 4003706304 - MA OPTICHECK R04 en...
- Page 2 All rights reserved. It is prohibited to reproduce this documentation, or any part thereof, without the prior written authorisation of KROHNE Messtechnik GmbH. Subject to change without notice. Copyright 2017 by KROHNE Messtechnik GmbH - Ludwig-Krohne-Str. 5 - 47058 Duisburg (Germany) www.krohne.com 04/2017 - 4003706304 - MA OPTICHECK R04 en...
-
Page 3: Table Of Contents
4.5.1 Connection of MFC 300 / MFC 400..................53 4.5.2 Connection of MFC 300 / MFC 400 compact and field versions ........... 55 4.5.3 Connection of MFC 300 wall version ..................59 04/2017 - 4003706304 - MA OPTICHECK R04 en www.krohne.com... - Page 4 6.7 Returning the device to the manufacturer..............92 6.7.1 General information......................92 6.7.2 Form (for copying) to accompany a returned device............93 6.8 Disposal .......................... 93 7 Technical data 7.1 Technical data......................... 94 www.krohne.com 04/2017 - 4003706304 - MA OPTICHECK R04 en...
-
Page 5: Safety Instructions
Mass flowmeter MA OPTICHECK R02 verification added 09/2016 ER 1.1.0_; SW 3.0.1_ Vortex flowmeter MA OPTICHECK R03 verification added 03/2017 ER 1.1.0_; SW 4.0.0_ Radar level verification MA OPTICHECK R04 added 04/2017 - 4003706304 - MA OPTICHECK R04 en www.krohne.com... -
Page 6: Intended Use
OPTICHECK is not Ex certified and must not be used in areas with an explosive atmosphere. Do not connect the OPTICHECK to a sensor or a signal converter if an explosive atmosphere may exist. Signal converters intended for Ex configurations can only be verified in a safe area. -
Page 7: Certification
The manufacturer certifies successful testing of the product by applying the CE mark. An EU declaration of conformity regarding the directives in question and the associated harmonised standards can be downloaded from our website. 04/2017 - 4003706304 - MA OPTICHECK R04 en www.krohne.com... -
Page 8: Safety Instructions From The Manufacturer
The manufacturer reserves the right to alter the content of its documents, including this disclaimer in any way, at any time, for any reason, without prior notification, and will not be liable in any way for possible consequences of such changes. www.krohne.com 04/2017 - 4003706304 - MA OPTICHECK R04 en... -
Page 9: Product Liability And Warranty
This document is provided to help you establish operating conditions, which will permit safe and efficient use of this device. Special considerations and precautions are also described in the document, which appear in the form of icons as shown below. 04/2017 - 4003706304 - MA OPTICHECK R04 en www.krohne.com... -
Page 10: Warnings And Symbols Used
In general, devices from the manufacturer may only be installed, commissioned, operated and maintained by properly trained and authorized personnel. This document is provided to help you establish operating conditions, which will permit safe and efficient use of this device. www.krohne.com 04/2017 - 4003706304 - MA OPTICHECK R04 en... -
Page 11: Device Description
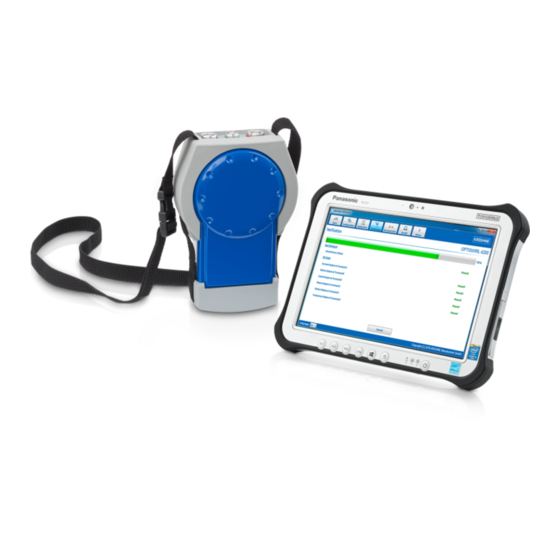
Figure 2-1: Available versions 1 Complete version (incl. tablet) 2 Version with ONLY the verification box (incl. suitcase with cabling) INFORMATION! For details on specific demands or choice of version please contact the manufacturer. 04/2017 - 4003706304 - MA OPTICHECK R04 en www.krohne.com... -
Page 12: Theory Of Operation
(for the sequential tests performed by the verification box) • USB connection cable to connect the verification box with the tablet / laptop • Different adapters to connect various KROHNE field devices (DUT) to the verification box www.krohne.com... - Page 13 2 Galvanically isolated power supply (via the USB interface from the tablet) 3 GDC connection (galvanically isolated) - interface connects the OPTICHECK to the internal communication interface of the field device 4 I/O connections - connects (and if required supplies) to the I/O circuitry of the field device via a multiplexer...
-
Page 14: Scope Of Delivery
Complete version The complete version of the OPTICHECK is delivered with all connection cables, adapting tools and all necessary software installed on the tablet, together with the documentation, in a shock- proof suitcase which is specially designed for the OPTICHECK. -
Page 15: Example Nameplate
4 Electronic/electric device waste marking (WEEE dustbin symbol) 5 Year of manufacturing 6 Website of manufacturer 7 Electronic revision, reference to documentation and bar code 8 Information about production batch, serial number and production order 04/2017 - 4003706304 - MA OPTICHECK R04 en www.krohne.com... -
Page 16: Installation
• Small screwdriver 3.3.1 General notes on installation INFORMATION! The installation of the OPTICHECK verification tool always has to be done on the signal converter side. CAUTION! Avoid extensive humidity and/or direct entry of rain, when measuring / working with the OPTICHECK, during the verification process or when the housing of the signal converter is open. -
Page 17: Magnetic Field
Figure 3-1: Avoid magnetic fields CAUTION! In order to use OPTICHECK with compatible field devices, their housing has to be opened for required cable connections. In this case, OPTICHECK and the connected field device are to some extend sensitive to high electromagnetic radiation. If this temporary disturbance influences the operation or verification process, a device reset or power cycle can become necessary to restore normal operation. -
Page 18: Electrostatic Discharge
3.3.5 Software installation The tablet delivered with OPTICHECK comes with a pre-installed Windows and the OPTICHECK application and drivers. If OPTICHECK should be used with a different tablet or notebook, 32 bit or 64 bit versions for © Microsoft Windows can be selected depending on the target system. -
Page 19: Signal Converter Specific Information
• cable requirements, cable preparation and lengths • explanation of data and markings on nameplates or CG numbering • mechanical mounting of signal converters • software and electronics versions and revisions • menu and operating actions 04/2017 - 4003706304 - MA OPTICHECK R04 en www.krohne.com... -
Page 20: Electrical Connections
OPTIMASS as well as the radar level family OPTIWAVE. There is no need for an external power connection since the OPTICHECK verification box itself is fully powered over USB. However, the device under test (DUT) must be externally powered during verifications (except the battery powered device IFC 070 and the loop-powered devices). -
Page 21: Connection To The Tablet
The HDMI cable and connectors shall not be used with other equipment than the OPTICHECK • verification box (e.g. TVs) The OPTICHECK verification box is connected via USB to the delivered tablet or a Windows based laptop. Figure 4-1: USB connection cable (blue marking) 4.3 Connection of device... - Page 22 3 I/O connection cable for built-in diagnostic interface (IFC 050) 4 I/O adapter for IFC 300 and MFC 300 / 400 In order to connect OPTICHECK to the sensor and sensor electronics (if supported by the measurement device) the standard sensor connection cable (black marking) is connected to one...
- Page 23 3 HDMI connector for standard sensor connection cable (black marking) 4 Connectors for the display unit of the VFC 200 5 Sensor adapter for VFC 200 (back) 6 Connection for the sensor cable of the measurement device 04/2017 - 4003706304 - MA OPTICHECK R04 en www.krohne.com...
- Page 24 • Step 1: Overview and access to the housing versions (compact, remote and wall) • Step 2: Cabling instructions for signal converter / sensor combinations • Step 3: Conducting the verification • Step 4: Reconnecting the device after verification www.krohne.com 04/2017 - 4003706304 - MA OPTICHECK R04 en...
-
Page 25: Connection Of Optiflux / Tidalflux / Waterflux Flowmeters
IFC 050) are removed from the process environment and the flow sensor, including installations of the electronic inserts (IFC 300). In this case, OPTICHECK connects to all terminals (GDC, flow sensor and I/O's) in order to perform a full electrical verification of the signal converter's measurement accuracy. - Page 26 Connecting to OPTICHECK Connecting to OPTICHECK To connect the required OPTICHECK test cables on the IFC 050 (remote and compact version), the housing has to be opened. The following steps illustrate how to open the housing of the IFC 050 and connect/disconnect the necessary cables for all connections.
- Page 27 • Press "Connect" on page "Start" on the screen of tablet / laptop if the device identification does not start automatically. The device information and status are then collected and the product image should be displayed. 04/2017 - 4003706304 - MA OPTICHECK R04 en www.krohne.com...
- Page 28 STEP 2: Configuration STEP 2: Configuration STEP 2: Configuration STEP 2: Configuration In combination with the IFC 050 the OPTICHECK supports two different options for sensor verification which can be chosen in the OPTICHECK application. 1. Verification without without without dedicated sensor tests (only internal diagnostic functions are used) without 2.
- Page 29 • Connect the standard sensor connection cable (black marking) with the IFC 050 sensor connection adapter. INFORMATION! If OPTION 2 is used the OPTICHECK application will force the user to detach the flow sensor cable from the IFC050 adapter (4/6) and attach it to the sensor connection of the IFC 050 (3/5), again.
- Page 30 • After connection of the GDC, sensor and I/O cabling, check if all cables are fitted properly in the terminals. • Make sure that the OPTICHECK verification tool and tablet are placed / mounted securely. • Connect the GDC, sensor and I/O cables to the OPTICHECK.
-
Page 31: Connection Of
OPTIFLUX 2000 OPTIFLUX 2070 C OPTIFLUX 2070 F WATERFLUX 3000 WATERFLUX 3070 C WATERFLUX 3070 F INFORMATION! OPTICHECK only supports IFC 070 signal converters with electronic revision ER 4.0.0 and above. 04/2017 - 4003706304 - MA OPTICHECK R04 en www.krohne.com... - Page 32 The IFC 070 in custody transfer operation can't be verified without breaking the seal. To connect the required OPTICHECK test cables and adapters on the IFC 070 (remote and compact version), the housing has to be opened. The following steps illustrate how to open the housing of the IFC 070 and connect / disconnect the necessary cables and adapters for all connections.
- Page 33 • Attach the blue connector of the sensor cable coming out of the IFC 070 signal converter to the black connector of OPTICHECK's IFC 070 / 100 / 300 adapter 2. • Plug the blue female connector 1 of OPTICHECK's IFC 070 / 100 / 300 adapter into the sensor terminal of the signal converter insert.
- Page 34 • Disconnect the I/O cables and use the I/O parking plug to safely place the I/O wires and prevent short circuiting. • Use OPTICHECK’s standard I/O cable with the pin plugs to connect to the I/O terminals of the IFC 070 signal converter with the following assignment:...
- Page 35 • Wait until the reconnection process is finished and the connections are successfully checked. • Remove the GDC cable (green marking). • Dismount the OPTICHECK verification tool (and tablet) and place them in a safe location. • Close the covers after checking that all connections are properly made.
-
Page 36: Connection Of
3 Flow sensor with connection box 4 Wall-mounted housing In combination with the available OPTIFLUX and WATERFLUX flow sensor types, the following combinations of signal converter and flow sensor can be verified with OPTICHECK: Flow sensor Flow sensor + signal converter IFC 100 Compact (0°/45°... - Page 37 Connecting to OPTICHECK Connecting to OPTICHECK To connect the required OPTICHECK test cables and adapters on the IFC 100 (remote and compact version), the housing has to be opened. The following steps illustrate how to open the housing of the IFC 100 and connect / disconnect the necessary cables for all connections.
- Page 38 OPTICHECK: Figure 4-24: IFC 100 – connection of sensor cable 1 Blue female sensor connector and black male sensor connector 2 Sensor adapter for IFC 070, IFC 100 and IFC 300 www.krohne.com 04/2017 - 4003706304 - MA OPTICHECK R04 en...
- Page 39 • Attach the blue connector of the sensor cable coming out of the IFC 100 signal converter to the black connector of OPTICHECK's IFC 070 / 100 / 300 adapter. • Connect the blue female connector of OPTICHECK’s IFC 070 / 100 / 300 adapter into the sensor terminal of the signal converter electronics.
- Page 40 • After connection of the GDC, sensor and I/O cabling, check if all cables are fitted properly in the terminals. • Make sure that the OPTICHECK verification tool and tablet are placed / mounted securely. • Connect the GDC, sensor and I/O cables to the OPTICHECK.
-
Page 41: Connection Of
3 Wall-mounted housing 4 19" rack-mounted housing In combination with the available OPTIFLUX, TIDALFLUX and WATERFLUX flow sensor types, the following combinations of signal converter and flow sensor can be verified with OPTICHECK: Flow sensor Flow sensor + signal converter IFC 300... -
Page 42: Connection Of Ifc 300 Compact And Field Versions
The IFC 300 in custody transfer operation can't be verified without breaking the seal. To connect the required OPTICHECK test cables on the IFC 300 (compact and field version), the housing has to be opened, and the signal converter electronics insert has to be partially disconnected. - Page 43 STEP 1: Start STEP 1: Start DANGER! Before connecting the OPTICHECK to the device, make sure to discharge yourself (e.g. by wearing a wrist strap or touching a metal surface that is grounded). Electrostatic discharge can damage electronic parts. Figure 4-28: IFC 300 field version – removing cover and display •...
- Page 44 • Pull the two metal pullers 3 at the left and right using a suitable tool to remove the signal converter electronics insert. CAUTION! Please pay attention that the same amount of force is applied on both pullers, otherwise the connector at the backside can be damaged. www.krohne.com 04/2017 - 4003706304 - MA OPTICHECK R04 en...
- Page 45 • Pull out the blue sensor connector 1 from its terminal on the signal converter electronics. To connect with the OPTICHECK, use the IFC 070 / 100 / 300 sensor connection adapter: Figure 4-32: IFC 300 – connection of sensor cable 04/2017 - 4003706304 - MA OPTICHECK R04 en www.krohne.com...
- Page 46 ELECTRICAL CONNECTIONS OPTICHECK • Plug the blue female connector 1 of OPTICHECK’s IFC 070 / 100 / 300 adapter into the sensor terminal of the electronics insert. • Attach the blue connector of the sensor cable coming out of the IFC 300 signal converter to the black connector of OPTICHECK's IFC 070 / 100 / 300 adapter.
- Page 47 • After connection of the GDC, sensor and I/O cabling, check if all cables are fitted properly in the terminals. • Make sure that the OPTICHECK verification tool and tablet are placed / mounted securely. • Power on the flowmeter.
-
Page 48: Connection Of Ifc 300 Wall Version
OPTICHECK 4.4.6 Connection of IFC 300 wall version To connect the required OPTICHECK test cables to the IFC 300 wall version, the housing has to be opened, and the signal converter electronics has to be partially disconnected. The following steps illustrate how to open the housing of the IFC 300 wall version and connect / disconnect the necessary cables for all connections. - Page 49 • Press "Connect" on page "Start" on the screen of tablet / laptop if the device identification does not start automatically. The device information and status are then collected and the product image should be displayed. 04/2017 - 4003706304 - MA OPTICHECK R04 en www.krohne.com...
- Page 50 Continue with the following procedure to connect the flowmeter’s input / output connections with OPTICHECK: • Unplug the Phoenix connectors of the I/O connections. • Connect OPTICHECK’s I/O cable for wall versions to the connectors of the signal converters I/O compartment. STEP 3: Verification...
- Page 51 • Wait until the reconnection process is finished and the connections are successfully checked. • Remove the GDC cable (green marking). • Dismount the OPTICHECK verification tool (and tablet) and place them in a safe location. • Close the covers after checking that all connections are properly made.
-
Page 52: Connection Of Optimass Flowmeters
2 verification is possible if all input and output connections of the signal converter are removed from the process environment. In this case, OPTICHECK connects to the GDC and all I/O terminals in order to perform a full electrical verification of the signal converter's I/O interface accuracy. -
Page 53: Connection Of Mfc 300 / Mfc 400
OPTIMASS 7300 F OPTIMASS 7300 W OPTIMASS 7300 R/L OPTIMASS 8000 OPTIMASS 8300 C OPTIMASS 8300 F OPTIMASS 8300 W OPTIMASS 8300 R/L * Please contact your local KROHNE service for further information! 04/2017 - 4003706304 - MA OPTICHECK R04 en www.krohne.com... - Page 54 OPTIMASS 2000 OPTIMASS 2400 C OPTIMASS 2400 F OPTIMASS 3000 OPTIMASS 3400 C OPTIMASS 3400 C OPTIMASS 6000 OPTIMASS 6400 C OPTIMASS 6400 F OPTIMASS 7000 OPTIMASS 7400 C OPTIMASS 7400 F www.krohne.com 04/2017 - 4003706304 - MA OPTICHECK R04 en...
-
Page 55: Connection Of Mfc 300 / Mfc 400 Compact And Field Versions
The MFC 300 / MFC 400 in custody transfer operation can't be verified without breaking the seal. To connect the required OPTICHECK test cables to the MFC 300 / MFC 400 (compact and field version), the housing has to be opened, and the signal converter electronics insert has to be partially disconnected. - Page 56 STEP 1: Start STEP 1: Start DANGER! Before connecting the OPTICHECK to the device, make sure to discharge yourself (e.g. by wearing a wrist strap or touching a metal surface that is grounded). Electrostatic discharge can damage electronic parts. Figure 4-40: MFC 300 / MFC 400 field version – removing cover •...
- Page 57 • Disconnect the I/O cables and use the I/O parking plug to safely place the I/O wires and prevent short circuiting. • Use OPTICHECK’s standard I/O cable with the pin plugs or OPTICHECK's I/O adapter for IFC 300 and MFC 300 / 400 to connect to the I/O terminals of the MFC 300 / MFC 400 signal converter.
- Page 58 • Wait until the reconnection process is finished and the connections are successfully checked. • Remove the GDC cable (green marking). • Dismount the OPTICHECK verification tool (and tablet) and place them in a safe location. • Close the covers after checking that all connections are properly made.
-
Page 59: Connection Of Mfc 300 Wall Version
OPTICHECK 4.5.3 Connection of MFC 300 wall version To connect the required OPTICHECK test cables to the MFC 300 wall version, the housing has to be opened, and the signal converter electronics has to be partially disconnected. The following steps illustrate how to open the housing of the MFC 300 wall version and connect / disconnect the necessary cables for all connections. - Page 60 • Press "Connect" on page "Start" on the screen of tablet / laptop if the device identification does not start automatically. The device information and status are then collected and the product image should be displayed. www.krohne.com 04/2017 - 4003706304 - MA OPTICHECK R04 en...
- Page 61 Continue with the following procedure to connect the flowmeter’s input / output connections with OPTICHECK: • Power off the flowmeter. • Unplug the Phoenix connectors of the I/O connections. • Connect OPTICHECK’s I/O cable for wall versions to the connectors of the signal converters I/O compartment. STEP 3: Verification STEP 3: Verification...
-
Page 62: Connection Of Optiswirl Flowmeters
2 verification level 2 verification from the process environment. In this case, OPTICHECK connects to the GDC service interface and the flow sensor via the OPTISWIRL sensor connection adapter and all I/O terminals in order to perform a full electrical verification of the signal converter's measurement accuracy. -
Page 63: Connection Of Vfc 200
ELECTRICAL CONNECTIONS OPTICHECK 4.6.1 Connection of VFC 200 Vortex flowmeters equipped with VFC 200 signal converters can be verified with OPTICHECK in following versions: • Compact version (the signal converter is mounted directly on the flow sensor) with or without pressure sensor Figure 4-46: VFC 200 –... -
Page 64: Connection Of Vfc 200 Compact Version
OPTICHECK 4.6.2 Connection of VFC 200 compact version To connect the required OPTICHECK test cables tothe VFC 200, the housing has to be opened, and the display electronics has to be partially disconnected. The location of the connection terminals is shown in the following figure (exemplarily for the compact version without pressure sensor). - Page 65 • Press "Connect" on page "Start" on the screen of tablet / laptop if the device identification does not start automatically. The device information and status are then collected and the product image should be displayed. 04/2017 - 4003706304 - MA OPTICHECK R04 en www.krohne.com...
- Page 66 • Press "Connect" on page "Start" on the screen of tablet / laptop if the device identification does not start automatically. The device information and status are then collected and the product image should be displayed. www.krohne.com 04/2017 - 4003706304 - MA OPTICHECK R04 en...
- Page 67 • Disconnect the I/O cables and use the I/O parking plug to safely place the I/O wires and prevent short circuiting. • Use OPTICHECK’s standard I/O cable with the pin plugs 1 to connect to the I/O terminals of the VFC 200 signal converter 2. The indication on the separate pin plugs must match the...
- Page 68 • Connect sensor and I/O cables to the OPTICHECK. • Make sure that the OPTICHECK verification tool and tablet are placed / mounted securely. • Follow up instructions shown on the screen of the tablet to perform a verification.
-
Page 69: Connection Of Optiwave Level Meter
2 verification is possible if all electrical connections of the signal converter are removed level 2 verification level 2 verification from the process environment. . In this case, OPTICHECK connects to the GDC service interface and all I/O terminals in order to perform a full electrical verification of the signal converter's measurement accuracy. -
Page 70: Connection Of Rlc 400 Compact Version
OPTIWAVE 7500 4.7.2 Connection of RLC 400 compact version To connect the required OPTICHECK test cables to the RLC 400, the housing has to be opened and the display electronics has to be disconnected. The location of the connection terminals is shown in the following figure. - Page 71 • Press "Connect" on page "Start" on the screen of tablet / laptop if the device identification does not start automatically. The device information and status are then collected and the product image should be displayed. 04/2017 - 4003706304 - MA OPTICHECK R04 en www.krohne.com...
- Page 72 • Disconnect the I/O cables and use the I/O parking plug to safely place the I/O wires and prevent short circuiting. • Use OPTICHECK’s standard I/O cable with the pin plugs 1 to connect to the I/O terminals of the signal converter 2. The indication on the separate pin plugs must match the following pin...
- Page 73 • Connect sensor and I/O cables to the OPTICHECK. • Make sure that the OPTICHECK verification tool and tablet are placed / mounted securely. • Follow up instructions shown on the screen of the tablet to perform a verification.
-
Page 74: Start-Up
OPTICHECK 5.1 Quick start of software This section gives an overview on the elements of the OPTICHECK PC application and how to perform verifications. The following table gives an overview about the steps to be performed for a device verification:... -
Page 75: Launch Application
START-UP OPTICHECK 5.2 Launch application Switch on the tablet or notebook. The icon to launch the OPTICHECK application will be shown up on the desktop. Start the software with a double-click. Figure 5-1: Application icon on desktop After starting the application, the main window (refer to next figure) will be shown. -
Page 76: Start Page
Connect the verification box After the system check, a message 1 will inform the user if a connected verification box is recognised and ready for operation. If OPTICHECK is not ready, please establish the USB connection and press "Connect". After device recognition 2 information about the verification box as manufacturer, calibration date, serial number, PC application version and supported field device families are displayed. - Page 77 After connecting and identifying a field device, a product image of the recognised device will be shown 2. Information such as calibration and manufacturing date, the serial number, the electronic revision as well as the user tag will be shown in 1. Figure 5-5: System ready 04/2017 - 4003706304 - MA OPTICHECK R04 en www.krohne.com...
-
Page 78: Configuration Page
• Signal converter type: For IFC 300 and MFC 300 / 400 applications in a W, C or F version, the type has to be selected. This information is important for the connection support printed in 3. www.krohne.com 04/2017 - 4003706304 - MA OPTICHECK R04 en... -
Page 79: Application Page
The information is applied by pressing button 4. The data is stored in the internal database of the OPTICHECK and used for the certificate generation. The content of this page is in the same look and feel as the fields on the certificate. Not filled in fields remain empty on the certificate. -
Page 80: Verification Page
The information area provides information on the steps performed during verification as well as hints on occurred errors on the left-hand side 3. On the right-hand side of the information area, the results of the completed tests are shown 4. www.krohne.com 04/2017 - 4003706304 - MA OPTICHECK R04 en... -
Page 81: Reconnection Page
"Failed". This means that the corresponding connection was not restored correctly. In this case, please check for proper reconnection. The related step has to be performed again before it is possible to print the report. 04/2017 - 4003706304 - MA OPTICHECK R04 en www.krohne.com... -
Page 82: Result Page
Factory For more information about the buttons "Factory settings" and "History" refer to settings Verification history on page 83 and refer to on page 84. www.krohne.com 04/2017 - 4003706304 - MA OPTICHECK R04 en... -
Page 83: Factory Settings
• From Server: From Server: From Server: From Server: OPTICHECK will automatically load the calibration data from the KROHNE Pick server (internet connection required) • From File: From File: opens a file dialogue to load a file that was previously downloaded from the... -
Page 84: Verification History
(for details refer to Factory settings on page 83) later on. If an already generated certificate/report exists, the PDF is loaded from the database. www.krohne.com 04/2017 - 4003706304 - MA OPTICHECK R04 en... -
Page 85: Description Of The Certificate
1 User input specified under "Application" (for details refer to on page 79). 2 Automatically generated data. Verification page 3 OPTICHECK generated databased (for details refer to on page 80) or ( refer Factory settings on page 83). 4 Automatically generated messages in case of failures (e.g. additional information for the user in order to clarify the issue or give hints to eliminate the error source). -
Page 86: Description Of The Verification Report
The detailed test results are divided into categories and sub-categories which can also be found on the certificate (front page of the generated PDF) in the table entitled "Test Results" (3 in figure on section before). www.krohne.com 04/2017 - 4003706304 - MA OPTICHECK R04 en... - Page 87 - Warning: Action of the user is necessary, but does not influence the overall test result - Remark: The performed test passed the test criteria successfully, but is near specification limits 04/2017 - 4003706304 - MA OPTICHECK R04 en www.krohne.com...
-
Page 88: About Page
On this page, standard information regarding copyright, data protection and disclaimer as well as the contact information for the customer is listed. Furthermore, the version of the application and a button to check for updates is available. Figure 5-14: About page www.krohne.com 04/2017 - 4003706304 - MA OPTICHECK R04 en... -
Page 89: Service
These updates can be obtained via 1. the "Check for updates" button on the "About" page in the OPTICHECK application or 2. the KROHNE Downloadcenter at the KROHNE website (http://krohne.com/en/dlc). 6.2 Calibration of the verification box The verification box must be calibrated annually. -
Page 90: Spare Parts
This regulation only applies to spare parts which are subject to wear and tear under normal operating conditions. The following table shows spare parts available for OPTICHECK: Part number Description Cables... -
Page 91: Availability Of Services
For more precise information, please contact your local sales office. INFORMATION! In case a verification fails or generates "Remark" as result you may consult KROHNE service to perform additional tests to confirm the actual status of the device under test in addition to the verification results. -
Page 92: Returning The Device To The Manufacturer
• such dangerous substances, to enclose a certificate with the device confirming that it is safe to handle and stating the • product used. www.krohne.com 04/2017 - 4003706304 - MA OPTICHECK R04 en... -
Page 93: Form (For Copying) To Accompany A Returned Device
The user must dispose of the WEEE to a designated collection point for the recycling of WEEE or send them back to our local organisation or authorised representative. 04/2017 - 4003706304 - MA OPTICHECK R04 en www.krohne.com... -
Page 94: Technical Data
Windows 10 32 / 64 bit Proper functionality of OPTICHECK is guaranteed if the included tablet is used. Other combinations of tablet / laptop and Windows operating systems should work very likely, but proper functionality cannot be guaranteed. Report output... - Page 95 The manufacturer certifies successful testing of the product by applying the CE mark. For full information of the EU directives & standards and the approved certifications, please refer to the EU declaration of conformity or the manufacturer website. 04/2017 - 4003706304 - MA OPTICHECK R04 en www.krohne.com...
- Page 96 • Process Analysis • Services Head Office KROHNE Messtechnik GmbH Ludwig-Krohne-Str. 5 47058 Duisburg (Germany) Tel.: +49 203 301 0 Fax: +49 203 301 10389 info@krohne.com The current list of all KROHNE contacts and addresses can be found at: www.krohne.com...
Need help?
Do you have a question about the OPTICHECK and is the answer not in the manual?
Questions and answers