Table of Contents
Advertisement
Quick Links
Advertisement
Table of Contents

Related Manuals for KROHNE OPTICHECK


Summary of Contents for KROHNE OPTICHECK
- Page 1 OPTICHECK OPTICHECK OPTICHECK OPTICHECK Quick Start Quick Start Quick Start Quick Start In-Situ verification for electromagnetic flowmeters (EMF) Electronic Revision ER 1.0.0_ (Version 1.0. _) © KROHNE 06/2014 - 4003706601 - QS OPTICHECK R01 en...
-
Page 2: Table Of Contents
3.3 Device variants and connections..................10 4 Start-up 4.1 Start tablet ( notebook)....................11 4.2 Starting measuring......................11 4.3 Connect flowmeter ......................12 4.4 System ready ........................13 5 Operation 5.1 Overview verification process ..................14 www.krohne.com 06/2014 - 4003706601 - QS OPTICHECK R01 en... -
Page 3: Safety Instructions
In general, devices from the manufacturer may only be installed, commissioned, operated and maintained by properly trained and authorized personnel. This document is provided to help you establish operating conditions, which will permit safe and efficient use of this device. 06/2014 - 4003706601 - QS OPTICHECK R01 en www.krohne.com... -
Page 4: Installation
DANGER! OPTICHECK is not Ex certified and must not be used in areas with an explosive atmosphere. Do not connect OPTICHECK to a flow sensor or a converter if an explosive atmosphere could be preset. -
Page 5: Scope Of Delivery
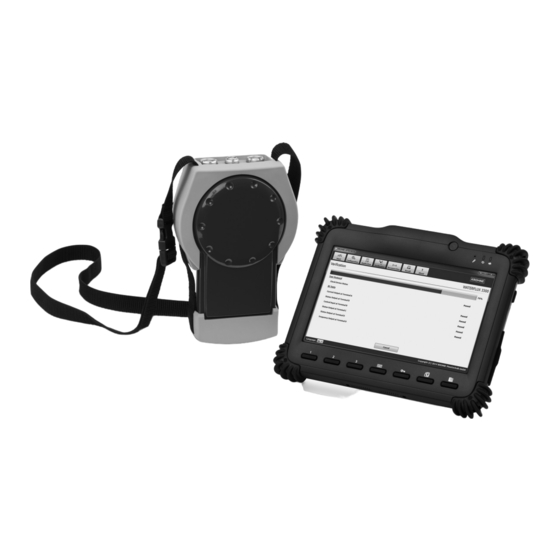
Complete version The complete version of the OPTICHECK is delivered with all connection cables, adapting tools and all necessary software installed on the tablet, together with the documentation, in a shockproof suitcase which is specially designed for the OPTICHECK verification tool. -
Page 6: Storage
• Avoid heavy mechanically shocks or impacts on the device. 2.5 General notes on installation INFORMATION! The installation of the OPTICHECK verification tool always have to be done on the signal converter side. CAUTION! Avoid extensive humidity and/or direct entry of rain, when measuring / working with the OPTICHECK, during the verification process or when the housing of the signal converter is open. -
Page 7: Magnetic Field
Figure 2-3: Avoid high impacts or vibration CAUTION! The OPTICHECK setup has been designed to be as robust as possible. To ensure reliable, accurate and long life time the following has to be respected: Be carefull, not to drop the device, and take special attention on the way the device is attached and/or placed on a particular surface. -
Page 8: Electro Static Discharge
2.5.3 Electro Static Discharge CAUTION! The OPTICHECK is connected to the converter of the flow meter. The housing of the flow meter has to be opened for these connections. Extensive humidity and direct rain has to be avoided during verification. -
Page 9: Electrical Connections
Check for the correct supply voltage printed on the nameplate. 3.2 Connection of tablet The tablet (or Windows based laptop) can be connected to the OPTICHECK with a USB cable. Figure 3-1: Lemo USB cable 1 USB connector notepad laptop... -
Page 10: Device Variants And Connections
OPTICHECK 3.3 Device variants and connections The OPTICHECK is supplied with all the connection cables for IFC050 - IFC070 - IFC100 - IFC300 and a USB cable for connection to the tablet. Additionally there are two adaptors, the I/O "parking" adaptor for the I/O field cable and the "parking"... -
Page 11: Start-Up
After starting the application, the Start Window will show and will point out which connections have to be made. Start Window: (no cables connected) 1. Navigation tabs 2. Status of connections 3. Message action to be taken 4. Illustration what needs to be done 06/2014 - 4003706601 - QS OPTICHECK R01 en www.krohne.com... -
Page 12: Connect Flowmeter
After the system check, messages will show under 2 and 3, if the system is correctly connected. As example in the figure (on previous page) is shown that the OPTICHECK verification tool must be connected first. -
Page 13: System Ready
Support (on how to connect the flowmeter), will be shown in the window ( by hovering and selecting the possibilities), and displayed on the right side of the window 2. The OPTICHECK software application will show the necessary information for the user, to connect the flowmeter selected. -
Page 14: Operation
5.1 Overview verification process Step Description (navigation tab) Tablet/laptop start up OPTICHECK software by double clicking the desktop symbol Start converter is powered on selected at startup of the software ; OPTICHECK shows a picture how to connect connect tablet/laptop to the verification box and press "Connect"... - Page 15 Step Description Result OPTICHECK shows the completion of the above steps and three buttons Factory settings: flowmeter calibration data are compared to factory calibration data Create report: the certificate and the detailed report are generated as History: pressing this button shows all verification runs;...
- Page 16 Measuring systems for the marine industry Head Office KROHNE Messtechnik GmbH Ludwig-Krohne-Str. 5 47058 Duisburg (Germany) Tel.:+49 203 301 0 Fax:+49 203 301 103 89 info@krohne.com The current list of all KROHNE contacts and addresses can be found at: www.krohne.com...
Need help?
Do you have a question about the OPTICHECK and is the answer not in the manual?
Questions and answers