Table of Contents
Advertisement
Quick Links
Advertisement
Table of Contents

Related Manuals for KROHNE optiplex 1300 c


Summary of Contents for KROHNE optiplex 1300 c
-
Page 2: Table Of Contents
Handbook OPTIFLEX 1300 C Content Introduction......................................4 General ..........................................4 0.1.1 Description of device......................................4 0.1.2 Legal matters ......................................... 4 Safety ............................................. 5 0.2.1 Use in hazardous areas ......................................5 0.2.2 Documentation symbols......................................5 Visual inspection ........................................6 0.3.1 Instrument Integrity ........................................ 6 0.3.2 Material compatibility ...................................... - Page 3 Handbook OPTIFLEX 1300 C Service and maintenance................................. 79 General notes........................................79 Signal converter replacement ....................................79 Technical data....................................80 Technical data........................................80 7.1.1 Technical data extract......................................80 7.1.2 Blocking distance ......................................... 82 7.1.3 Hazardous areas........................................83 Dimensions and weights ...................................... 83 Measuring principle..................................
-
Page 4: Introduction
Responsibility as to suitability and intended use of these devices rests solely with the user. Improper installation and operation may lead to loss of warranty. In addition, KROHNE Group's Standard General Conditions of Sale and Delivery, found on the back of the invoice and forming the basis of the purchasing contract, are applicable. -
Page 5: Safety
Handbook OPTIFLEX 1300 C 0.2 Safety • Follow all instructions carefully to make sure that you install the device correctly • Observe special conditions for installations requiring approved equipment. • Check that the information on the device nameplate conforms to the on-site data. •... -
Page 6: Visual Inspection
Handbook OPTIFLEX 1300 C 0.3 Visual inspection 0.3.1 Instrument Integrity The meter withstands corrosive environments. Visually inspect the meter before installation to ensure that it has not been damaged in transit. 0.3.2 Material compatibility Check that the flange, gasket and probe materials are compatible with the product in the tank. Use the information from the following sources: •... -
Page 7: Versions And Nameplates
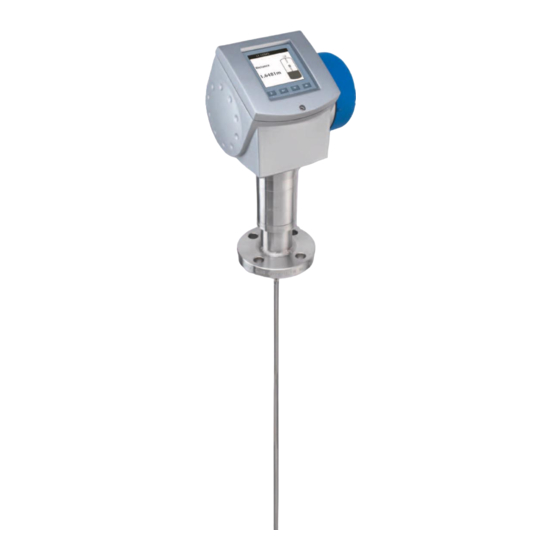
Handbook OPTIFLEX 1300 C 0.5 Versions and nameplates 0.5.1 Non-Ex and Ex versions 1 Cover without display (standard) 2 Wiring compartment cover 3 Socket head set locking screw for either rotating or removing the housing 4 Coaxial probe 5 Nameplate 6 Twin cable probe 7 Spacer 8 Counterweight... -
Page 8: Items Supplied
• a CD-ROM containing this handbook, special manuals for supplementary Ex data, data sheets, certificates, device return form for repairs and servicing, PACTware software for remote configuration and data display, links to KROHNE internet for further information such as telephone, fax and Email numbers of all KROHNE companies and representatives worldwide. - Page 9 Handbook OPTIFLEX 1300 C Fragile - avoid hard blows, impacts and jolts! Storage Storage temperature Avoid bending rod and coaxial probes! Avoid over bending cable probes! Risk of measurement errors from kinking and fraying! OPTIFLEX 1300 C...
-
Page 10: Location
Handbook OPTIFLEX 1300 C 1.2 Location 1.2.1 All applications General notes This section covers positioning the process connection and installing the device. Mount the OPTIFLEX 1300 C gauge on a suitable process connection on a tank or sump. Check the following: •... - Page 11 Do not use nozzles that extend into the tank! This will create disturbances - especially for single probes! where h = nozzle height and d = nozzle diameter Contact KROHNE for assistance if this relationship cannot be respected. False readings Do not let the probe touch the side of the nozzle.
- Page 12 Handbook OPTIFLEX 1300 C Product build-up Product can accumulate under the nozzle: this may weaken the measurement pulse. Avoid cavities that permit the build-up of deposits. You can configure the level meter to attenuate the effects of this build-up. For further information, refer to section 4.2.4: Setup, advanced setup. Follow the procedures for modifying Gain and voltage amplitude of the level and/or interface thresholds.
- Page 13 Handbook OPTIFLEX 1300 C Probe straightness and avoiding entanglement • The cable must be straight once inserted into the tank. • The cable counterweight should not touch the bottom of the tank. • The cable must be far from other objects (e.g. mixers) to avoid entanglement. Rigid length, Lr, of single and twin cable probes Installation relative to other tank components Objects near to the probe that influence measurement accuracy...
- Page 14 Handbook OPTIFLEX 1300 C Refer also to the diagram below. Guided-radar (TDR) level meters generate electromagnetic fields when a measurement pulse is emitted. This field is affected by any nearby (metallic) objects and these will weaken and potentially disturb the emitted pulse.
- Page 15 Handbook OPTIFLEX 1300 C Minimum recommended free space around probe, by type There is no beam angle for any probe type - the limits of the EM field run parallel to the probe because the measurement pulse emitted by the device is guided. Single probe Double probe Coaxial probe...
-
Page 16: Liquid Applications
Handbook OPTIFLEX 1300 C Installing two devices on the tank Single or double probes: Install at least 1 meter or 3.3 feet from each other to avoid interference from neighboring electromagnetic fields. Coaxial probes No minimum distancing restrictions. Two devices fitted close together: single cable probes (left) and coaxial probes (right) 1.2.2 Liquid applications General notes Follow these instructions and those given in section 1.2.1: location, all applications. - Page 17 Repeatability is unaffected. insert the two rods if short circuit is present. Centre the probe with plastic spacers supplied by KROHNE to avoid contact between the tube wall and the probe. Double cable A turnbuckle may be fitted underneath As for double rod.
-
Page 18: Solid Applications
Handbook OPTIFLEX 1300 C Ø4mm or 0.15" single cable Coaxial Products with foam The presence of foam (especially if highly conductive) may require the installation of a stilling well or bypass chamber. For further information, refer to section 1.3.3: Stilling wells and section 1.3.4: Bypass chambers. Petroleum products These products may be stocked in vessels with moving roofs. - Page 19 The Ø 8mm or 0.3" single cable will fail at loads greater than 3.5 T or 7700 lbs. There is also a risk of damage to pressure-bearing components inside the housing assembly. If loads exceed the maximum design load, please contact KROHNE immediately. Estimated traction on the cable according to application...
-
Page 20: Typical Installations
Handbook OPTIFLEX 1300 C Tank roof deformation Ensure that the tank roof supports loads up to 3.5 metric tones or 7700 lbs. 1.3 Typical installations 1.3.1 General notes Electromagnetic compatibility The OPTIFLEX 1300 C conforms to European EMC standard EN 61326-1 A1+A2 and fulfills Immunity and Emissions requirements for industrial environments. - Page 21 Handbook OPTIFLEX 1300 C Outdoor installations Fit a sunshade on the gauge for outdoor installations: this is supplied on demand. Procedure - fitting a sunshade 1. The sunshade is delivered separately; attached to a metal tube (A) to prevent deformation of the mounting bracket.
- Page 22 Handbook OPTIFLEX 1300 C 5. Remount the screws and washers. 6. Remount bracket and tighten the screws slightly. 7. Raise the sunshade as high as possible up the housing support pillar by bracing it with one hand. Screw the two bolts tightly so that the sunshade does not slip down the pillar. Procedure - opening the sunshade 1.
-
Page 23: Tanks With Concrete Roofs
Handbook OPTIFLEX 1300 C 1.3.2 Tanks with concrete roofs Concrete roof thickness Install the device according to this rule; Ød => t where Ød is hole diameter and t is concrete thickness. If this rule cannot be obeyed, install the device in a recessed mounting as shown below on the right. 1.3.3 Stilling wells Applications Use a stilling well for these applications:... - Page 24 Handbook OPTIFLEX 1300 C Installation requirements • the stilling well must be electrically conductive • stilling well wall must be straight and smooth (surface roughness ±0.1 mm or 0.004") • no abrupt changes in well diameter greater than 1 mm or 0.04" •...
-
Page 25: Bypass Chambers
Handbook OPTIFLEX 1300 C Tanks with floating roofs Commonly used for petro-chemical applications. Install a stilling well. 1. Stilling well 2. Tank 3. Floating roof 4. Petroleum products 5. Well is fixed to tank base-no roof deformation 6. Sediment 1.3.4 Bypass chambers Use bypass chambers for applications where there are: •... -
Page 26: Horizontal Cylindrical Tanks
Handbook OPTIFLEX 1300 C Installation requirements • Install on top of the tank, following instructions given in section 1.2: Location • If the top platform is in the form of a nozzle, install the device fitting far from the wall, at least the distance recommended according to probe type in section 1.2.1: Location, all applications - installation relative to other tank components Refer to section 4.2.2: Setup, device display - conversion setup mode for configuring the meter to measure... -
Page 27: Other Important Information
Handbook OPTIFLEX 1300 C 1.4 Other important information 1.4.1 Process conditions Flange temperature Process pressure Observe process connection operational limits! Risk of injury and damage to device! The operating pressure allowed depends on the temperature at the process connection. The mechanical properties of the process connection are influenced by temperature. -
Page 28: Electrical Connection
Handbook OPTIFLEX 1300 C Installation requirements Earth the tank (entry pipe...), product and probe installation. It is the customer's responsibility to prevent ESD. ESD cannot be solved by OPTIFLEX 1300 C ESD protection. Dismounting the device Danger of injury from electrostatic discharge! The probe may become electro statically-charged during operation. -
Page 29: Wiring Procedure
Handbook OPTIFLEX 1300 C Device protection • If overcurrent is expected, install an overcurrent protection device • earth the device according to local applicable installation standards: EN 60079-14 in Europe American and Canadian installations • the device must be installed by a qualified electrician in accordance with the latest version of the National Electric •... - Page 30 Handbook OPTIFLEX 1300 C 4. Loosen the power supply/current output 1 terminal block (d). Insert the wires into the terminals as per the wiring diagram below. Make sure that the polarity is correct. Retighten screw. 5. Non-Ex devices only: loosen ground terminal screw (e) and insert wire. Retighten screw. See section 2.2.3: Power supply, Ex versions for earth connection (equipotential bonding system) for Ex-approved devices.
-
Page 31: Power Supply
Handbook OPTIFLEX 1300 C 9. Grease the thread (f) of the wiring compartment cover. 10. Screw on the wiring compartment cover (c). Remount cover lock (b). 11. Go to section 3.1: Commissioning, power-on and start-up before energizing the device to make sure that the device is correctly installed and connected. -
Page 32: Non-Ex Versions
Handbook OPTIFLEX 1300 C 2.2.2 Non-Ex versions Non-Ex or general purpose version One output (standard) Two outputs (option) 2.2.3 Ex versions Please refer to special manuals supplied with the device if it is approved for use in potentially explosive atmospheres. OPTIFLEX 1300 C... -
Page 33: Connection, I/Os
Handbook OPTIFLEX 1300 C 2.3 Connection, I/Os Output options One output (standard) Two outputs (option) Network options There are 3 output versions • current output HART®, passive, HART® protocol • current output Ex-ia HART® intrinsically safe; passive, HART® protocol • current output Ex-d ia HART® explosion-proof; passive, HART® protocol Two network modes are available •... - Page 34 Handbook OPTIFLEX 1300 C Multi-drop (non-Ex) RL = resistor, approx. 250 ohms HART® communication protocol In accordance with the Rosemount Standard, HART® communication can be used with this level meter. It is used as a point-to-point connection between the slave (this level meter) and the HART® master or for multi- drop networks for up to 15 devices.
-
Page 35: Commissioning
Other means of network communication Each OPTIFLEX is supplied ex-factory with the appropriate DTM for PACTware. The latest version is available from the download centre on the KROHNE website. A user manual is supplied on a CD-ROM with the device. -
Page 36: Display Screen
Handbook OPTIFLEX 1300 C 4.1.2 Display screen Screen layout The device has an optional 160 by 160 pixels, 9-line display. It has a 4-button pressure-sensitive keypad for selecting display functions and configuring the device. 1 Right button 2 Enter button 3 Down button 4 Up button, 5 Esc (ESCAPE) function: right and up... -
Page 37: Normal Mode
Handbook OPTIFLEX 1300 C 4.1.3 Normal mode Description For displaying measurement data on the screen. Anybody can select what measurement information is displayed (level, volume and types of data) and how it is presented (display style). This is the instrument's default mode. 1 Header bar - shows device tag number in normal mode 2 Measurement function... - Page 38 Handbook OPTIFLEX 1300 C Screens available for a device with one output Interface measurement You can only choose screens with red borders when the device is configured for interface applications Mass measurement Select mass units and calibrate using conversion table functions in program mode to display mass instead of volume.
- Page 39 Handbook OPTIFLEX 1300 C Screens available for a device with two outputs Interface measurement You can only choose interface measurement screens when the device is configured for interface applications. Mass measurement Select mass units and calibrate using conversion table functions in program mode to display mass instead of volume.
- Page 40 Handbook OPTIFLEX 1300 C Special note: signal screen This shows a line graph of voltage amplitude of return signals against distance. It is used for visually identifying level and interface. The top 5 to 10 peaks - representing the level, interface and interference signals - will be displayed and the user can move to the next value to the right using the Right key.
-
Page 41: Normal Mode Hot Keys
Handbook OPTIFLEX 1300 C 4.1.4 Normal mode hot keys Hot key activation Pressing the screen keypad buttons for 3 seconds will activate hot key functions. Functions Item Key Action description Right Enters program mode** Enter Enters signal screen edit mode*** Down Screen displays English text (default option) - Page 42 Handbook OPTIFLEX 1300 C 2. If the password function has been activated, the device will prompt the user to whether access is required to the supervisor or service menu items. Make a choice from list by scrolling with the up and down buttons and then press enter to confirm. 3.
- Page 43 Handbook OPTIFLEX 1300 C Functions Types of parameters Two types of parameters can be edited: • lists • values (numerical or alpha-numerical digits) Editing lists 1 Header bar - shows function name 2 Tick - shows which parameter is currently used by the device 3 Selection bar - shows which parameter is selected by the user.
- Page 44 Handbook OPTIFLEX 1300 C Online help Unsure of the next step? Wait 15 seconds and a definition of the menu item will appear. Return to the menu screen by pressing escape (right and up buttons). 1 Press down to read the end of the message 2 Menu reference number.
-
Page 45: Program Mode Hot Keys
Handbook OPTIFLEX 1300 C 4.1.6 Program mode hot keys Hot key activation Pressing the screen keypad buttons for 3 seconds will activate hot key functions. Functions Item Action description Right Defines function being used as a quick link** Enter Not used Down Not used Screen displays English text... - Page 46 Handbook OPTIFLEX 1300 C Finding setup mode The illustration below shows how to find quick setup menus from normal mode. OPTIFLEX 1300 C...
- Page 47 Handbook OPTIFLEX 1300 C Complete setup mode Using the complete setup mode option, you can configure all the items in the application, installation, conversion and output setup modes. Application setup mode For defining the tank contents and setting the device up for level, interface or level and interface measurement.
- Page 48 Handbook OPTIFLEX 1300 C Installation setup mode For defining the process connection and tank height. * blocking distance. Refer to section 7.1.2: Technical data; blocking distance. Conversion setup mode For creating a conversion table for displaying volume, mass or user-defined unit measurements. Due to the numerous possibilities available, a procedural tree diagram is given for each of the following: 1.
- Page 49 Handbook OPTIFLEX 1300 C 1. Volume measurement of liquids OPTIFLEX 1300 C...
- Page 50 Handbook OPTIFLEX 1300 C 2. Volume measurement of solids OPTIFLEX 1300 C...
- Page 51 Handbook OPTIFLEX 1300 C 3. Mass measurement of liquids or solids OPTIFLEX 1300 C...
- Page 52 Handbook OPTIFLEX 1300 C 4. Measurement using user-defined length and conversion units Horizontal cylindrical tanks Type in "90°" under angle of inclination. Calibrate volume as for other tanks. No. of LVM Entries This refers to the number of lines generated for typing in level and equivalent volume in the volume/mass table.
- Page 53 Handbook OPTIFLEX 1300 C Outputs setup mode For defining the measurement function and range, digital network address and signal on alarm. * if "interface" is factory-set or selected in Application Setup Mode. OPTIFLEX 1300 C...
- Page 54 Handbook OPTIFLEX 1300 C Displaying volume measurements Select a volume output function. Advanced setup menu Using this menu, the supervisor can modify individual functions. These functions are grouped under: • Installation setup • I/O • Output 1 (HART) • Output 2 (Passive) •...
-
Page 55: Summary Of Menu Items
Handbook OPTIFLEX 1300 C Using quick links 1. Select the suitable line in the Quick Setup menu 2. Press the right button to go directly to the function 4.2.3 Summary of menu items Quick setup functions Function (Fct.) Input Range Description A.0.0.0 Quick Setup... - Page 56 Handbook OPTIFLEX 1300 C Advanced setup functions Function (Fct.) Input Range Description C.0.0.0 Advanced setup This menu optimizes the configuration of the device. This includes parameters for installation and application conditions. Also for defining conversion operations. C.1.0.0 Installation setup C.1.1.0 Installation type Socket, nozzle or Defines the device tank mounting...
- Page 57 Handbook OPTIFLEX 1300 C Function (Fct.) Input Range Description C.1.15.0 Gas ε 0.8 to 115. 1 A major parameter for TDR level measurement devices. This manually sets the ε value of the air/gas inside the tank. C.1.16.0 Level threshold 7 Gains, 0 to +1.25V. Enables distinction between disturbances Dependant on Gain in the measurement signal and the actual...
- Page 58 Handbook OPTIFLEX 1300 C Function (Fct.) Input Range Description C.3.1.0 Output 1 (OP1) Level, level Pick the output function from the list. This function volume/mass, distance, is independent of the measurement interface level*, interface function being displayed. distance*, interface volume, ullage volume/mass, layer or layer volume.
- Page 59 Displayed mass unit in normal mode. tons. C.5.1.7 Customer length unit 9 characters max. Customer-defined length unit to be Krohne displayed. C.5.1.8 Customer length ratio 0.0001 to 99999. Enter the factor between C.5.1.4 Length unit selected and C.5.1.7 Customer length unit.
- Page 60 Handbook OPTIFLEX 1300 C Function (Fct.) Input Range Description C.6.0.0 Reset C.6.1.0 Factory Reset Confirm to reset. Resets all parameters to their original values. Device settings before the reset will be lost. Service personnel only. C.6.2.0 Customer Reset Confirm to reset. Resets parameters for all functions listed in the table to their original values.
-
Page 61: Advanced Setup: Further Notes
Handbook OPTIFLEX 1300 C 4.2.4 Advanced setup: further notes General notes The menu items listed below may only be re-configured by a user with supervisor rights. Using the advanced setup menu, you can: • change the parameters for one or more functions without going through a quick setup procedure •... - Page 62 Handbook OPTIFLEX 1300 C Finding the advanced setup menu OPTIFLEX 1300 C...
- Page 63 Handbook OPTIFLEX 1300 C How to protect your gauge settings Protect your settings by following this path to the Passwords menu: Advanced Setup > Device Setup > Passwords Using this menu, you can: • switch on or off restricted access to program mode for which a supervisor password is needed. If switched off, all users will be able to display device information and change quick setup and advanced setup settings.
- Page 64 Handbook OPTIFLEX 1300 C Distance measurement Distance measurement depends on a number of factors, covered in the menu items below: • tank height • blocking distance • reference offset These will influence the effective measuring range of the device and the point from which measurements are taken.
- Page 65 Handbook OPTIFLEX 1300 C Scaling the current output The current output setup mode is used to create current output scales for the first and second (if ordered) outputs that meet your requirements. You must define: 1. Output function function C.3.1.0 (output 1-level) function C.4.1.0 (output 2-interface level) 2.
- Page 66 Handbook OPTIFLEX 1300 C Blocking distance function C.1.9.0 As for distance measurement above. Tank bottom offset function C.1.11.0 Configure the device to measure product level using a reference point other than the configured tank height (position of tank bottom in relation to the tank flange). Move the reference point below the tank bottom by typing in a positive value (up to 3000 m or 9843 ft.
- Page 67 Handbook OPTIFLEX 1300 C Volume or mass measurement Volume/Mass table function C.1.21.0 Other relevant menu items are: • Length unit [for table] function C.1.19.1 • Conversion unit [for table] function C.1.19.2 • Length unit [display] function C.5.1.4. • Volume unit [display] function C.5.1.5 •...
- Page 68 Handbook OPTIFLEX 1300 C Shortening the probe Probe Length Modif. function C.1.6.0 Shorten the probe if the length does not correspond exactly to your needs. Procedure: Single rod and coaxial probes 1. Cut probe to the correct length 2. Reconfigure probe length in the device program mode. This can be found on the following path Advanced Setup >...
- Page 69 Handbook OPTIFLEX 1300 C Measuring mode function C.1.13.0 The supervisor can use this function to measure products with low dielectric constants (ε ≤ 1.6). For further information regarding the measuring modes, please refer to the section 8: Measuring principle. Three modes are available: •...
- Page 70 Handbook OPTIFLEX 1300 C OPTIFLEX 1300 C allows three thresholds to be modified manually: • Menu C.1.16.0 Level Threshold: for identifying the top product surface, • Menu C.1.17.0 Interface Threshold: for identifying the interface when there is more than one product in the tank and •...
- Page 71 Handbook OPTIFLEX 1300 C The diagram below shows what the user would see if the return signals were displayed on an oscilloscope. The interface threshold function is active from the flange return signal and is used to ignore interference signals. 1 initial pulse 2 flange reflection 3 level reflection...
-
Page 72: Error Messages And Troubleshooting (Device Display Wizard)
Handbook OPTIFLEX 1300 C 4.3 Error messages and troubleshooting (device display Wizard) Error display When the device detects a problem, an error or alert signal is shown on the left of the display's header bar. How to troubleshoot errors Go to menu item B.2.12.0 Error records to find out which errors have been logged. Program Mode >... - Page 73 Handbook OPTIFLEX 1300 C List of possible errors The two types of errors are logged 1. Fatal (F): the measured value is not correct. 2. Warning (W): if the problem persists the measured value will no longer be correct. Error Message Type of Fault Action...
- Page 74 1.2.3: Location; solid where ESD occurs. applications. Reference pulse lost F Reference amplitude falls Contact KROHNE to check electronics is below threshold 2. Fault still functioning correctly common to solid applications where ESD occurs. Flange pulse lost...
- Page 75 Contact KROHNE for information on how to reconfigure the device. Hardware status Front end out of The device hardware is faulty. Contact KROHNE. order 5 volts faulty The device hardware is faulty. Contact KROHNE. Time base faulty or The device hardware is faulty. Contact KROHNE.
- Page 76 "Dielectric constant out of the given range. range" Check if "Probe end pulse lost" is displayed. Contact KROHNE for information on how to reconfigure the device. * When "interface" or "level and interface" is selected in application setup mode. OPTIFLEX 1300 C...
-
Page 77: Functional Checks
Quick setup menu is displayed here. B.2.5.0 TAG number 9 characters max. The TAG number can be seen and updated Krohne here B.2.6.0 Probe length From C.1.9.0 Blocking The distance from the flange face/thread distance to 60 m or 197 ft. - Page 78 Handbook OPTIFLEX 1300 C Function (Fct.) Input Range Description B.2.10.0 Deposit correction Read only. This displays the correction factor needed factor to account for measurement errors due to deposit on the probe. B.2.11.0 Application mode Read only…Configured in This displays the application description of setup mode: Level: air/1 the measurement algorithm applied for the liquid, Level: air/>1 liquid,...
-
Page 79: Service And Maintenance
• removal and replacement of the housing containing the potted signal converter. Can be detached from the flange system under process conditions. Refer to section 6.2. Other repairs must be done by KROHNE-authorized service staff. 6.2 Signal converter replacement Procedure... -
Page 80: Technical Data
Handbook OPTIFLEX 1300 C 7. Technical data 7.1 Technical data 7.1.1 Technical data extract Input Time Domain Reflectometry (TDR ) Function: Level, distance, volume and/or interface Parameter: Max. measuring range: Double rod Ø8 mm/ 0.3" 4 m/ 13 ft Single rod Ø8 mm/ 0.3" 4 m/ 13 ft Coaxial Ø22 mm/ 0.9"... - Page 81 Handbook OPTIFLEX 1300 C Environment Ambient temperature: -40…+80°C/ -40…+175°F; EExi: ** Storage temperature: -40…+85°C/ -40…+185°F Accuracy: 0,05%/ rel. 20 mA; 20°C/ 70°F Resolution: ± 2µA Temperature drift: Typically 50 ppm/K Electromagnetic Conforms to Directive 89/336/CEE in conjunction with EN 61326 (1+2) - compatiblity: immunity and emissions Process...
-
Page 82: Blocking Distance
Handbook OPTIFLEX 1300 C 7.1.2 Blocking distance Definitions A1, the top blocking distance The minimum distance from the flange to the top limit of the measuring range. The measurement displayed on the gauge will freeze below this distance and an error warning will indicate that the level has reached the blocking distance. -
Page 83: Hazardous Areas
Handbook OPTIFLEX 1300 C 7.1.3 Hazardous areas Please refer to the relevant special manual supplied on CD-ROM or in printed form for devices approved for use in potentially explosive atmospheres. 7.2 Dimensions and weights Level meter dimensions Dimensions in mm and inches Ø4mm or 0.15"... - Page 84 Handbook OPTIFLEX 1300 C Ø4mm or 0.15" double cable probe end versions Dimensions in mm and inches Weights Housing and connection (stainless steel 316) Weight [kg] [lb] Housing Flange connection DN 25…80 / ANSI 1"…3" 4…7 8.8…15.4 Flange connection DN 100...150 / ANSI 4"…6" 7…12 15.4…26.5 Thread connection...
-
Page 85: Measuring Principle
Handbook OPTIFLEX 1300 C 8. Measuring principle 8.1 General principle This Guided-Radar (TDR) level meter has been developed from a tried and tested technology called Time Domain Reflectrometry (TDR). Other modern applications include checking for and locating damage along telecommunication cable lines. The device sends low-power electromagnetic pulses of one nanosecond width along a rod or cable conductor. -
Page 86: Measuring Modes
Handbook OPTIFLEX 1300 C 8.2 Measuring modes General notes This level meter can track product level using three measuring modes Mode Description Automatic The device determines automatically which is the most suitable mode (direct or TBF) for measuring Direct Measurement is made from the reflection direct from the product surface Tank bottom following (TBF) Used for products with low dielectric constants, by measuring indirectly using the reflection from the probe end... - Page 87 Handbook OPTIFLEX 1300 C The waveform below the diagram shows a snapshot of what the user would see on an oscilloscope. TBF mode Level measurement This measuring mode is used when an insufficient amount of EM pulse energy is reflected back from the product surface (dielectric constant <...
- Page 88 Handbook OPTIFLEX 1300 C The waveforms below the diagrams shows a snapshot of what the user would see on an oscilloscope. where V1 = speed of light in a gas and V2 = speed of light through the product. OPTIFLEX 1300 C...
-
Page 89: Approvals
Approvals for the CE-marking are standard. When ordered with the appropriate options, the device can be approved for use in hazardous areas. All approvals and certificates are available on the KROHNE internet site under www.krohne.com. CE declaration of conformity OPTIFLEX 1300 C... -
Page 90: Glossary
Handbook OPTIFLEX 1300 C 10. Glossary Blocking distance A minimum distance from the device signal converter where it is impossible to for the gauge to measure. Dependant on probe type. Refer to section 7.1.2: Technical data; blocking distance for further information. Cable Wire rope. - Page 91 Handbook OPTIFLEX 1300 C Emulsion Small particles of one liquid that readily disperse in another liquid. Usually emulsions involve a dispersion of water in an oil or a dispersion of oil in water. Possible causes are mixing or tank filling. Emulsions normally separate back into their constituent parts over time.
- Page 92 Handbook OPTIFLEX 1300 C Layer Thickness of top product. Should be > 50mm or 2" for accurate measurement of level and/or interface. See following diagram. Level Height from the bottom of the tank (user-defined) to the surface of the top product (Tank height – distance). See following diagram.
- Page 93 Handbook OPTIFLEX 1300 C Time domain reflectometry. The principle used by the OPTIFLEX 1300 to measure level and interface. See also section 9.1 General principle. Threshold A number of limits set either manually or automatically by the signal converter to identify the level, interface and probe end return signals.
-
Page 94: Device Return Form
We cannot service this device unless accompanied by such a certificate. This means that KROHNE can only service this device if it is accompanied by the following certificate confirming that the device is safe to handle. S P E C I M E N certificate Company:………………………………………………. - Page 95 Handbook OPTIFLEX 1300 C Note OPTIFLEX 1300 C...
Need help?
Do you have a question about the optiplex 1300 c and is the answer not in the manual?
Questions and answers