BullFrog A7L Owner's Manual
Hide thumbs
Also See for A7L:
- Owner's manual (92 pages) ,
- Installation manual (19 pages) ,
- Owner's manual (59 pages)
Table of Contents
Advertisement
Advertisement
Table of Contents
Troubleshooting

Related Manuals for BullFrog A7L


Summary of Contents for BullFrog A7L
- Page 1 BULLFROG SPAS OWNERS MANUAL...
- Page 2 QUICK REFERENCE To assist you with the installation and maintenance Electrician service of your new spa, please fill out the following 1. Name: information and keep it on hand for future reference. Telephone: 2. Name: Telephone: Spa Information Concrete, Decking, and Masonry Model: 1.
-
Page 3: Table Of Contents
TABLE OF CONTENTS Quick Reference: Table of Contents: Important Overview: Safety Instructions: Getting to Know Your Spa: Equipment Compartment: Filling Your Spa: STIL/A Series Touch Control Panels: A Series Spas (A900) Control Panels: R Series Spas (R600) Control Panels: X Series Spas Control Panels: Jetpaks and Jets: Water Care and Chemistry: Spa Maintenance:... -
Page 4: Important Overview
IMPORTANT OVERVIEW Congratulations on your purchase of a Bullfrog Spas A Series, R Series, STIL, or X Series hot tub†. NOTE: In this document, the terms “Spa” and “Hot Tub” are used interchangeably. Take a moment to read this manual carefully as you set up and use your new spa. -
Page 5: Save These Instructions
IMPORTANT SAFETY INSTRUCTIONS Save these instructions Water temperature in a spa should never exceed 104˚F (40 ˚ C). Water temperatures between 100˚ F (38˚C) and Safety Instructions 104˚F (40˚C) are considered safe for a healthy adult. Water temperature in excess of 104˚ F (40˚ C) may be harmful to your health. - Page 6 Non-Approved Accessories. Using Included with the spa is a warning sign to inform users accessories not approved by Bullfrog International, LC could and guest of the risks involved with using a spa. This void your warranty or cause other problems. Please consult your authorized Bullfrog Spa dealer.
- Page 7 REDUCE THE RISK OF ELECTROCUTION REDUCE THE RISK OF ELECTROCUTION 1. NEVER PLACE AN ELECTRIC APPLIANCE WITHIN 5 FEET OF SPA 1. NEVER PLACE AN ELECTRIC APPLIANCE WITHIN 5 FEET OF SPA REDUCE THE RISK OF CHILD DROWNING 2. DO NOT INSTALL UNDER SPA SKIRT OR WITHIN AN ENCLOSURE THAT WOULD RESTRICT VENTILATION. 3.
-
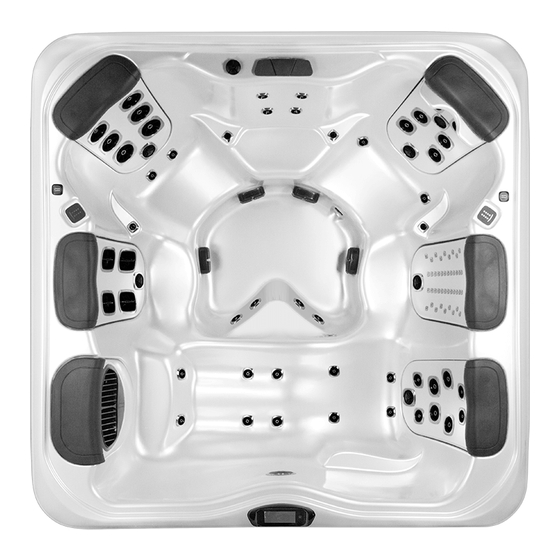
Page 8: Getting To Know Your Spa
GETTING TO KNOW YOUR SPA Spa Overview [A7L Pictured] Hip & Wrist Jets Water Feature Control Valve Water Feature Stereo Speakers (Optional) Suction Fitting Comfort Pillow SnapCap Auxilliary Control Pad (A Series Only) Drain Lighted Cup holder (A Series Only) -
Page 9: Equipment Compartment
Spa Overview [X7L Pictured] Water Feature Control Valve Therapy Jets Stereo Speakers Water Feature (Optional) Suction Fitting Comfort Pillow Perimeter Lights Light Cup Holder Drain Ozone Jet Weir Door/Filter Plate Foot Jets Equipment Compartment Control Pad Calf Jets... - Page 10 EQUIPMENT COMPARTMENT Ozone* Control Box Light Safety Certificate Water Heater Pump 1 Pump 2 Drain Outlet *Optional...
-
Page 11: Filling Your Spa
Step 4: Using a garden hose with a nozzle or other high-pressure authorized Bullfrog Spas Dealer). If your water is extremely device, clean cartridge(s). Work first from the inside, top to bottom hard, it is preferable to either dilute the water’s hardness by on each pleat then from the outside, top to bottom on each pleat. -
Page 12: Control System
Control System IMPORTANT: Your Bullfrog Spa is equipped with one of 3 types of control pads: R600 (5 or 6 Button), X300 (3 or 4 Button) or Touch Screen. Locate the control system on your spa by matching it with the photo provided under each control panel section and follow the specific instructions for operation of your specific control system. -
Page 14: Stil/A Series Touch Control Panels
STIL/A SERIES TOUCH CONTROL PANELS IMPORTANT: A pump should not be allowed to run without priming (water flowing out of the jets) for more than 2 minutes. Under NO circumstances should a pump be allowed to run without priming beyond the end of the 4-5 minute priming mode. -
Page 15: Quick
Light Settings Settings he spa lights are activated by pressing the icon. Pressing this icon turns off or on your interior or exterior lights manually. By turning the light off and then on again, you can choose the light color and display properties. Each time the light is turned off and on it will advance according to the following sequence: 1. - Page 16 In order to maintain sanitary conditions and protect against To set the light timer, from the main menu, select and then freezing, your spas pumps will purge water from their respective . To change the interior/exterior setting or to set the light plumbing by running all pumps at the beginning of each filter timer, from the main menu, select and then...
- Page 17 The end-user must be trained to expect this one-time test Stereo Controls (Optional) to occur and how to properly reset the GFCI. If your spa is equipped with Bullfrog’s “Elite” Audio system, refer Invert Display to its separate manual for operating instructions. If your spa has Bullfrog’s “Life”...
- Page 18 Turn the reminder messages (like “Clean Filter”) On or Off. Bluetooth devices list. Select “PPXXXX” from your device’s list to connect and “pair” your device to Bullfrog’s Life Audio system. Cleanup Cleanup Cycle Duration is not always enabled, so it may not After a few seconds the pairing will complete and audio from appear.
- Page 19 can correct the problem. Forcing the GFCI Trip Test (North America Only). The installer can cause the GFCI Trip Test to occur sooner by initiating it using the above menu. The GFCI should trip within several seconds and the spa should shut down. If it does not, shut down the power and manually verify that a GFCI breaker is installed and that the circuit and spa are wired correctly.
-
Page 20: Priming The Pumps
R SERIES (R600) CONTROL PANELS turn it on high. The pumps will now be running in high-speed to facilitate priming. IMPORTANT: A pump should not be allowed to run without priming (water flowing out of the jets) for more than 2 minutes. -
Page 21: Main Menu
Temperature and Temp 1. Color wheel: Color changes quickly through available Range solid colors. 2. Color fade: Colors fade through spectrum A colors. Adjusting the Set Temperature 3. Random Color Change: Random color changes occur in quick succession. Pressing the buttons (Temperature buttons) will 4. -
Page 22: Filtration Cycles
use or temperature adjustments. This lock feature prevents most 4. Press button. Minutes will be flash. Press button functions on the controller from being used, while all automatic button to adjust duration of the pump cycle in 15 functions remain active. “TEMP” locks the temperature selection, minute increments. - Page 23 Turn on your Bluetooth device and place within 20 feet (6 window. Press , “F/C” will appear. Press several times meters) of your spa. The device must have “line of sight” to the until “CLN—UP” displays in the window. Press , the current spa control panel / equipment door area.
-
Page 24: Series Spas Control Panels
X SERIES SPA CONTROL PANELS Spa Operating Modes A multi-button sequence is used to switch between Standard, Jets 1 Economy, and Sleep modes. Press temp + light buttons repeatedly to cycle through modes. Standard Mode (St): Jets 2 When in Standard mode, the pump that circulates water through the heater (heat pump) Temp will turn on every 1/2 hour to measure water temperature, heat if... - Page 25 Color options: is equipped with more than one pump, the additional pumps will run for the first few minutes of each filter cycle to purge Each time the light is turned on and off it will advance according the plumbing. The factory filter cycle duration is 2 hours. Filter to the following sequence: duration can be set to 2,4, 6, or 8 hours.
-
Page 26: Jetpaks And Jets
JETPAKS & JETS Interchanging JetPaks- Jets A Series,R Series, and STIL Jet Types A unique combination of the finest jets available are chosen Step 1: Put the spa in “Hold”, this will prevent the pump(s) to optimally balance each JetPak with ideal performance and from activating (see Control Systems). -
Page 27: Water Care And Chemistry
For each additional use, test the water one additional time. • Use an accurate test kit to perform all chemical tests. Test kits and supplies are available from your authorized Bullfrog • Add chemicals directly to the spa, evenly spreading the dealer. -
Page 28: Troubleshooting
If the • Chlorine Level: 3.0 to 5.0 PPM (parts per million) spa water has high CH, contact your authorized Bullfrog Spas • Bromine Level: 3.0 to 6.0 PPM (parts per million) dealer. -
Page 29: Spa Maintenance
Replace the filter cartridge(s) After multiple cleanings, worn filter cartridges will need to be replaced. To maintain warranty protection, use only genuine Bullfrog Spas Filter Cartridge replacements. To clean or replace Step 3: your filter cartridge(s), complete the following: Pull the drain out with a slight clockwise turn. Use pliers if needed. - Page 30 For normal cleaning, use a mild dishwashing soap, window cleaner, or other products recommended by your local authorized Bullfrog Spas Dealer. For stubborn stains, use a mild acrylic cleaner or a mild detergent. To apply these cleaners, use a soft, damp cloth or sponge.
- Page 31 During periods of freezing temperatures, a spa (never petroleum based) to condition the area per your Bullfrog that has malfunctioned may be subject to damaged plumbing Spas Dealer’s instructions.
- Page 32 loosen all PVC pipe unions in the equipment compartment. Do not replace the plugs or tighten the unions until the spa is de- winterized. Step 5: Clean the spa shell and JetPaks (if equiped). Step 6: Remove filter cartridge(s), clean, and reinstall. Step 7: Secure the cover to the spa utilizing the tie downs and locking system.
- Page 33 Step 3: Step 3: Corner – Slip the upper lip of the corner into the top Electrical Disconnect – be sure to disconnect any groove of the spa. Starting from the top force the first snap into lighting or any other electrical wiring that is mounted onto the place, if the corner has slipped down and is not flush with the door before completely removing it.
-
Page 34: Spa Location
Electrician must perform the electrical installation and GFCI test procedure. Each Bullfrog Spa is manufactured and In addition to handling the water from the spa, it is tested to a standard that provides maximum protection against recommended that the room be properly ventilated. - Page 35 When leveling your spa, there should be no Water Drainage: Your spa contains an equipment voids beneath it. Contact your authorized Bullfrog Spas Dealer compartment, which houses all of its electrical components. before making any leveling adjustments. Structural damage to...
- Page 36 Delivery Basics Pea Gravel or Crushed Rock To prepare for the delivery of your spa, make sure the delivery path is clear and no obstructions are present. Occasionally a crane is required to install the spa by lifting it to its final destination.
-
Page 37: Electrical Requirements
Electrician. The installation of all spas must be in accordance with national and local wiring rules. Always have a licensed 31.58 31.58 Electrician perform the electrical installation. Each Bullfrog Spa is manufactured and tested to a standard that provides maximum protection against electrical shock. Improper wiring may prevent 86.20 the spa from operating safely which could result in electrical shock, injury or death. - Page 38 Drilling Conduit Hole: Service Disconnect: Based upon your area, a disconnect All dimensions are at the bottom base. device must be incorporated into the fixed wiring in accordance 1” (2.54cm) Conduit Drill 1-3/8” (3.49cm) hole 3/4” (1.91cm) with national and local wiring rules. If the national and local Conduit Drill 1-1/8”...
- Page 39 Electrician or your authorized Bullfrog Spa both a 120V~/60Hz pump and a 120V~/60Hz power cord. The dealer.
- Page 40 The electrical hook-up is complete. Connecting the electrical Note: To conform with electrical codes, and to create a barrier against pests, any holes created in the base of your Bullfrog Spa service to the spa should be fitted with an appropriate connector. IMPORTANT:...
-
Page 41: Gfci Wiring Diagrams
GFCI WIRING DIAGRAMS White-neutral Green-ground Neutral wire from spa must attach to GFCI breaker. 60Hz install (typical US/Canada) - Page 42 Hardware Setup Wiring Diagram Hardware Setup/Wiring Diagram BFBP20S (60 Hz STIL Model) BFBP20S – PN 56706 01-23-15 PUMP 2 IS USED IN SETUPS 1 & 2 ONLY J25=HTR1 J26=HTR2 J27=HTR3 IR Receiver TP (MAIN) PANELS J30=TEST J31=CE J34 OR J35 RF Receiver WiFi J5 (A1-A4)
- Page 43 Hardware Setup Wiring Diagram Hardware Setup/Wiring Diagram BFBP21S (50 Hz STIL Model) BFBP21S – PN 56708 01-23-15 PUMP 2 IS USED IN SETUPS 1 & 2 ONLY 2.5HP (10.3A MAX) PUMPS REQUIRE 1þ / 3x16A J25=HTR1 SERVICE WHEN SYSTEM IS CONFIGURED IN SETUP 1 OR 2. J26=HTR2 J27=HTR3 TP (MAIN) PANELS...
- Page 44 Hardware Setup/Wiring Diagram BFBP20 (60 Hz A&R Series Models) Hardware Setup Settings Settings SW I TC H BAN K S1 O FF SW I TC H BAN K S1 O N LO C ATI O N D EVI C E VO LTS M AX AM PS FR O M...
- Page 45 Hardware Setup/Wiring Diagram BFVS501 (60 Hz X Series Models) BFVS501 — PN 56717 CONNECT ONLY TO CIRCUITS PROTECTED BY A CLASS A GFCI. A DISCONNECTING MEANS MUST BE INSTALLED WITHIN SIGHT FROM 01-20-2015 THE EQUIPMENT AND AT LEAST 5 FEET (1.52 M) FROM THE INSIDE WALLS OF THE POOL, SPA, OR HOT TUB.
- Page 46 Hardware Setup Hardware Setup/Wiring Diagram BFBP21 (50 Hz A Series, R Series, and Wiring Diagram X Series models.) BFBP21 – PN 56342 11- 28- 12 PU M P 2 I S U SED I N SETU PS 1 & 2 O N LY J25=H TR 1 24082_E J26=H TR 2...
- Page 47 DISPLAY MESSAGES & ERROR MESSAGES General Messages Most messages and alerts will appear on the main screen. Several alerts and messages may be displayed in a sequence. Some messages can be reset by pushing the “jets” button. – – –°F – – –°C Water Temperature is Unknown After the pump has been running for 1 minute, the temperature will be displayed.
- Page 48 Sensor-Related Messages Sensors are out of sync The temperature sensors MAY be out of sync by 2°F or 3°F. Call for Service. Sensors are out of sync -Call for service* The temperature sensors ARE out of sync. The fault above has been established for at least 1 hour. Call for Service. Sensor A Fault, Senor B Fault –...
- Page 49 Reminder Messages‡ General maintenance helps. Reminder Messages are suppressed from the factory, but can be activated in the settings by using the Preferences Menu. See Page 14. Clean the filter May appear on a regular schedule, i.e. every 30 days. Clean the filter media as instructed in the owner’s manual. See Filter Maintenance.
- Page 50 Too Cold - Freeze Protection A potential freeze condition has been detected, and all pumps and blower are activated. All pumps and blower are ON for at least 4 minutes after the potential freeze condition has ended. In some cases, pumps may turn on and off and the heater may operate during Freeze Protection. Heater-Related Messages This is an operational message, not an error indication.
- Page 51 Sensor-Related Messages Sensor-Related Messages Sensor-Related Messages Sensor-Related Messages Sensor-Related Messages Sensor-Related Messages Sensor-Related Messages Sensor Balance is Poor Sensor Balance is Poor The temperature sensors MAY be out of sync by 2°F or 3°F. Call for Service. Sensor Balance is Poor The temperature sensors MAY be out of sync by 2°F or 3°F.
- Page 52 Memory Warning - Persistent Memory Reset* System-Related Messages program) and requires a service call. Appears after any system setup change. Contact your dealer or service organization if this message appears on more than Memory Warning - Persistent Memory Reset* one power-up, or if it appears after the system has been running normally for a period of time. Appears after any system setup change.
- Page 53 The Ground Fault Circuit Interrupter (GFCI) is an important safety device and must be tested on a regular basis to The Ground Fault Circuit Interrupter (GFCI) is an important safety device and must be tested on a regular basis to verify its reliability.
-
Page 54: Troubleshooting Guide
Solution: Turn on or reset the GFCI circuit breaker. If this does not solve the problem, have a qualified Electrician check the electrical service. Cause #2: The 20 or 30A fuse, depending on the system, has blown. Solution: Contact your authorized Bullfrog Spas Dealer. GFCI breaker trips repeatedly: Cause #1: Improper wiring to spa or GFCI breaker is defective. -
Page 55: Limited Warranty
Bullfrog warrants the Bullfrog Spa shell not to leak for ten years from the original spa purchase date. 7 Year Warranty Shell Surface Bullfrog warrants the surface finish of the Bullfrog Spa not to crack, wrinkle, blister, peel or delaminate for seven years from the original spa purchase date. 5 Year Warranty Equipment •... - Page 56 Bullfrog warrants the Bullfrog Spa shell not to leak for seven years from the original spa purchase date. 5 Year Warranty Shell Surface Bullfrog warrants the surface finish of the Bullfrog Spa not to crack, wrinkle, blister, peel or delaminate for five years from the original spa purchase date. 5 Year Warranty Equipment •...
- Page 57 • Spa covers and all other spa accessories attached to the Bullfrog Portable Spa after date of manufacture are not covered by this limited warranty. Please refer to the manufacturer of such products for information regarding warranty coverage.
- Page 58 After seven years from the original spa purchase date the defective spa must be sent to Bullfrog for repair in the event of a structure or frame failure. Bullfrog reserves the right to use either new or reconditioned replacements components.
- Page 59 ANY DEFECT COVERED BY THIS LIMITED WARRANTY, INCLUDING WITHOUT LIMITATION, LOSS OF USE OF THE SPA AND COST FOR REMOVAL OF DEFECTIVE PRODUCT, EVEN IF BULLFROG HAS BEEN ADVISED OF THE POSSIBILITY OF SUCH DAMAGE. THE LIABILITY OF BULLFROG UNDER THIS LIMITED WARRANTY, IF ANY, SHALL NOT EXCEED THE ORIGINAL AMOUNT PAID FOR THE DEFECTIVE PRODUCT.
- Page 60 Legal Rights This Limited Warranty gives you specific legal rights. You may also have other rights which vary from state to state. Some states do not allow limitations on how long an implied warranty lasts, so this limitation may not apply to you. Prompt return of a completed warranty registration form protects your warranty rights.
- Page 61 Bullfrog International, LC 668 W. 14600 S. Bluffdale, UT 84065 T: 801.565.8111 F: 801.565.8333 E: info@bullfrogspas.com v 2.01 Register your spa online by visiting: bullfrogspas.com/register North America 2017 Bullfrog International, LC...
Need help?
Do you have a question about the A7L and is the answer not in the manual?
Questions and answers