
Related Manuals for M2TECH Young MKIII


Summary of Contents for M2TECH Young MKIII
- Page 1 M2TECH YOUNG M HIGHEST RESOLUTION DIGITAL-TO-ANALOG CONVERTER DIGITAL PREAMPLIFIER USER MANUAL REV. P A – 8/2017...
- Page 2 M2Tech YOUNG M DIGITAL-TO-ANALOG CONVERTER AND PREAMPLIFIER REVISION P A – AUGUST 2017 www.m2tech.biz Copyright © 2017, M2Tech Srl...
- Page 3 For a proper operation of this unit, all connections to other equipment in the system must be done when all equipment are off. Failing to comply with this advice may lead to damage to the Young MkIII. The label above, printed on the product case, indicates that the product, when no more usable, can’t be...
- Page 4 A – AUGUST 2017 www.m2tech.biz Dear customer, Thank you for purchasing YOUNG MKIII. You are the owner of a very high quality digital-to- analog converter with many unique features designed to obtain the best performance in every hi-fi system. YOUNG MKIII implements a specific set of technological and functional solutions, from the ®...
-
Page 5: Table Of Contents
8.3.4. Using the YOUNG MKIII as Windows predefined audio device ......49 8.3.5. Configuring the player: FooBar and JRiver Media Center.........50 9. Controlling the Computer Player by Using the Young MkIII Remote Control ....57 10. Updating Young MkIII Firmware...................59 11. Specifications.......................61... - Page 6 M2Tech YOUNG M DIGITAL-TO-ANALOG CONVERTER AND PREAMPLIFIER REVISION P A – AUGUST 2017 www.m2tech.biz Copyright © 2017, M2Tech Srl...
-
Page 7: Unpacking And Placing The Unit
Should one or more item be missing, please contact your retail dealer. Remove the YOUNG MKIII from the box and place it onto a stable base, far from heat sources. Avoid full sunlight on the unit. Allow for ample room around the unit for venting. - Page 8 M2Tech YOUNG M DIGITAL-TO-ANALOG CONVERTER AND PREAMPLIFIER REVISION P A – AUGUST 2017 www.m2tech.biz Copyright © 2017, M2Tech Srl...
-
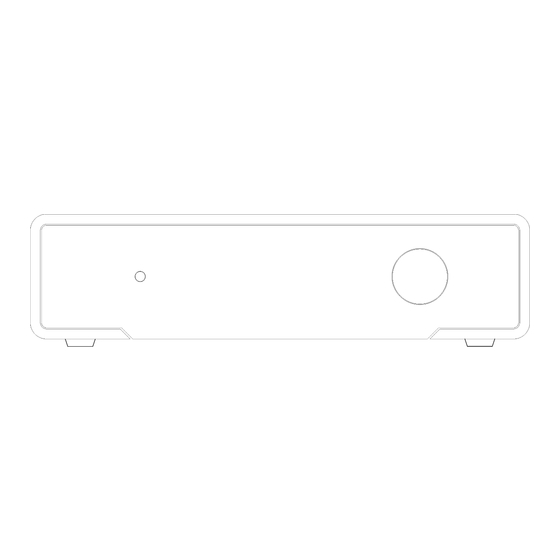
Page 9: Front Panel
1) Power on/power off/mute/menu exit button. Press this button to switch the YOUNG MKIII on when it’s off. When the YOUNG MKIII is on, a short press will toggle mute, unless the menu is active: in this case a short press will cause the menu to exit discarding any configuration change. - Page 10 M2Tech YOUNG M DIGITAL-TO-ANALOG CONVERTER AND PREAMPLIFIER REVISION P A – AUGUST 2017 www.m2tech.biz Copyright © 2017, M2Tech Srl...
-
Page 11: Back Panel
YOUNG MKIII outputs and then connect the YOUNG MKIII to the amplifier using coaxial interconnect terminated with RCA plugs. The YOUNG MKIII is provided with Gold- plated male XLR sockets. - Page 12 14) Power supply input. Connect the connector from the stock 15V-1.2A adaptor or from the Van Der Graaf MkII. 5.5/2.1mm jack with positive on tip. 15) Trigger output. Connect to the trigger input of any other device accepting 12V Female 3.5mm jack. Copyright © 2017, M2Tech Srl...
-
Page 13: Remote Control
F+/F-: Functions setting, to set various parameters including balance. FUNC: Functions recall. Player Controls: these buttons are dedicated to the control of an audio player running on the computer attached to the YOUNG MKIII. The following commands can be sent: Play/pause, stop, next, track, Figure 3 previous track Copyright ©... - Page 14 M2Tech YOUNG M DIGITAL-TO-ANALOG CONVERTER AND PREAMPLIFIER REVISION P A – AUGUST 2017 www.m2tech.biz Copyright © 2017, M2Tech Srl...
-
Page 15: Connecting And Powering The Unit
Connect your computer to the YOUNG MKIII USB input (Figure 2, 11). If you want to use the YOUNG MKIII as a preamplifier, connect the analog outputs to the inputs of a power amplifier; otherwise connect the outputs to a pair of inputs on an integrated amplifier or preamplifier (Figure 2, 6). - Page 16 M2Tech YOUNG M DIGITAL-TO-ANALOG CONVERTER AND PREAMPLIFIER REVISION P A – AUGUST 2017 www.m2tech.biz Copyright © 2017, M2Tech Srl...
-
Page 17: Cleaning The Unit
6. Cleaning the Unit The YOUNG MKIII should be cleaned with a soft, slightly damp cloth. Do not use alcohol or any other types of cleaning fluids as they could damage the unit. Avoid fluids from dropping or leaking inside the unit. Fluids of any type poured into the unit will void your warranty. - Page 18 M2Tech YOUNG M DIGITAL-TO-ANALOG CONVERTER AND PREAMPLIFIER REVISION P A – AUGUST 2017 www.m2tech.biz Copyright © 2017, M2Tech Srl...
-
Page 19: Using The Young Mkiii
7. Using the Young MkIII At activation, the YOUNG MKIII spends a little time to ensure that all supplies reach their nominal levels, during which the model name is displayed. After the activation delay is expired, some general operational information is shown on the YOUNG MKIII display: the selected source, the format (not for analogue input), the volume level and the phase setting. -
Page 20: Choosing The Signal's Phase
7.3. Choosing the Signal’s Phase The YOUNG MkIII allows user to choose the phase of the outgoing analog signal. This feature is useful in various ways. For example, it’s known that some recordings were made with inverted phase. Absolute phase can therefore be restored applying a second phase inversion into the DAC. -
Page 21: Balance Setting
Following is a description of all menu items. 7.6. Balance Setting The YOUNG MkIII allows for setting the balance (that is, the relative level between left and right channel) within a +/-6dB range in 1dB steps. To set balance it is necessary to access the first menu item. -
Page 22: Setting The Display's Backlight Intensity
A – AUGUST 2017 www.m2tech.biz 7.8. Setting the Display’s Backlight Intensity The YOUNG MKIII display’s backlight intensity can be set on four different levels. An automatic mode is also available which keeps the display always off, except when a command is executed As for balance, this feature is applied in real-time to give user the possibility to immediately see the results. -
Page 23: Using The Remote Control Function Keys For Quick Access To Menu Items
Depending on the setting of the rear panel switch (item 13, Figure 2) The YOUNG M III can be powered off by a prolonged push on the front panel’s left button (item 1, Figure 1). After a couple seconds the unit switches off, reducing its current draw to zero. Copyright © 2017, M2Tech Srl... - Page 24 NOTE: When the power mode switch is set for immediate activation, it is not possible to completely switch the YOUNG M III off: the prolonged press of the front panel button will only lead to the standby. Copyright © 2017, M2Tech Srl...
-
Page 25: Using A Computer As Digital Source
Apple OSX since the 10.6.4 release, without the need for any driver: It is sufficient to connect the YOUNG MKIII to own Mac with the stock USB cable to have it recognized by the Mac, which will then include it in the audio output device list, as shown in Fig. - Page 26 Figure 4 To send the computer audio to the YOUNG MKIII it is necessary to select it in the “Sound” window as shown in Fig. 4. It’s possible to set some parameters related to the YOUNG MKIII operation (specifically, the sampling frequency at which the Mac will send audio samples to the DAC) by the MIDI Audio window, as shown in Fig.
- Page 27 Figure 5 It is now possible to listen to music by simply selecting the USB input on the YOUNG MKIII and using iTunes. Please note that even when the chosen playlist includes tracks with different sampling frequencies, the YOUNG MKIII will always display one sampling frequency that is the one selected in the MIDI Audio panel (Fig.
-
Page 28: Dsd Files Playback With Mac
8.1.1. DSD files playback with Mac The YOUNG MKIII is able to play music files recorded with the DSD format. A player able to send DSD data to the YOUNG MKIII in a standard format handled by the DAC must be used. - Page 29 USB Audio Device Class support. When in doubt, ask the creator of your Linux distribution for more information. As with Apple OSX, with Linux it is necessary to choose the YOUNG MKIII as the output device. This can be done accessing the audio management window and setting the various parameters as shown in Fig.
-
Page 30: Dsd Files Playback With Linux
As explained in the introductory paragraph to the present chapter, no Microsoft operating system natively supports USB Audio Device Class 2. To listen to music files with the YOUNG MKIII connected to a computer running Windows it is therefore necessary to install a driver. The following paragraph describes the driver installation procedure. -
Page 31: Installing The Windows Driver
NOTE: The YOUNG MKIII is designed to implement the HID interface for remote control of the player running on a computer attached by USB (see chapter 9). This could lead to compatibility problems with Windows XP. - Page 32 A – AUGUST 2017 www.m2tech.biz Figure 11 Once the files are extracted, open the temporary folder or the folder you have designated and run the setup application by double-clicking on “setup.exe” (Fig. 12). Figure 12 Copyright © 2017, M2Tech Srl...
- Page 33 “OK” button to let the setup program free to proceed. Connect the YOUNG MKIII to the computer and switch it on. Then, click on the “Next” button to proceed with installation. The window shown in Fig. 14 will appear.
- Page 34 When the Young is off YOUNG MKIII or when the computer doesn’t recognize the connection to the YOUNG MKIII, then window shown in Fig. 15b may appear. In this case, follow the instructions displayed in red and then click on the “Next” button.
- Page 35 M2Tech YOUNG M DIGITAL-TO-ANALOG CONVERTER AND PREAMPLIFIER REVISION P A – AUGUST 2017 www.m2tech.biz Figure 15a Figura 15b Copyright © 2017, M2Tech Srl...
- Page 36 Figure 16 At the end of installation, the windows will show the complete list of installed files and will enable the buttons located in the lower right angle of the window border, as shown in Fig. Copyright © 2017, M2Tech Srl...
- Page 37 REVISION P A – AUGUST 2017 www.m2tech.biz Figure 17 As suggested by the instructions, click on the “Next” button to confirm the installation. The final setup window will appear as shown in Fig. 18. Figure 18 Copyright © 2017, M2Tech Srl...
-
Page 38: Windows Driver Uninstall
NOT complete with setup end. In fact, the operating system will recognize a new USB device (the YOUNG MKIII, of course) and will begin a search for the best driver (which is the one just installed) to create an instantiation associated to the specific port to which the DAC is attached. - Page 39 When launching the Windows’ applications installation utility from the Control Panel, the window shown in Fig. 21 appears, this also lists YOUNG MKIII driver. Figure 21 By double-clicking “USB Audio Driver for M2Tech…” the uninstall application is launched, which shows itself like in Fig.
- Page 40 REVISION P A – AUGUST 2017 www.m2tech.biz Figure 22 It’s sufficient to click on the “Uninstall” button to start uninstall. A windows appears that shows the uninstall progress, like as shown in Fig. 23. Figure 23 Copyright © 2017, M2Tech Srl...
- Page 41 Fig. 24. Figure 24 Click on the “Next” button to confirm uninstall completion and to close the uninstall utility. One last window will appear as shown in Fig. 25. Copyright © 2017, M2Tech Srl...
- Page 42 Clock on the “Finish” button to close the application. At this point if the user launched uninstall from the Control Panel, it is possible to verify that the driver has really been uninstalled by checking for its absence from the applications list, as shown in Fig. 26. Copyright © 2017, M2Tech Srl...
-
Page 43: Windows Driver Panel
Windows bar or in the peripherals window, depending on the operating system version installed on your computer. When the YOUNG MKIII or any other M2Tech device is not connected to the computer, the window shown in Fig. 27 will appear. - Page 44 M2Tech YOUNG M DIGITAL-TO-ANALOG CONVERTER AND PREAMPLIFIER REVISION P A – AUGUST 2017 www.m2tech.biz Figure 27 Figure 28 Copyright © 2017, M2Tech Srl...
- Page 45 As a general rule, a small buffer is to be preferred when low latency is required (e.g. when the YOUNG MKIII is used to listen to a movie’s audio). In any event, a small buffer needs frequent data transfers, which may result in “holes” in the audio stream when the CPU is heavily loaded or when one of the active drivers doesn’t comply with the time...
- Page 46 For every device associated to a driver instantiation, a setting window is available. In these sub-chapter figures, only one device has been detected (“Device 0”). In Fig. 31 its associated window is shown. Figure 31 Copyright © 2017, M2Tech Srl...
- Page 47 The XMOS-based system used in the YOUNG MKIII allows for digital volume setting. Anyway, we suggest not to use this feature as the YOUNG MKIII has a built-in analogue volume control which has much better sonic performance. It’s important to be aware that, in case of the absence of sound, the total mute in this window may be enabled (one or both “M”...
- Page 48 M2Tech YOUNG M DIGITAL-TO-ANALOG CONVERTER AND PREAMPLIFIER REVISION P A – AUGUST 2017 www.m2tech.biz Figure 33 Figure 34 Copyright © 2017, M2Tech Srl...
-
Page 49: Using The Young Mkiii As Windows Predefined Audio Device
It is also possible to tell the operating system which sampling frequency and resolution are to be used to operate the YOUNG MKIII. To this purpose, it is sufficient to click on the “Properties” button, thus opening the window shown in Fig. 36. -
Page 50: Configuring The Player: Foobar And Jriver Media Center
Should the user need the operating system not to process the audio to be sent to the YOUNG MKIII, or when the limits of system settings need to be overcome, it is necessary to use a player able to directly interface to the driver, using a transfer mode like Kernel Streaming, WASAPI or ASIO, all are “bit-perfect”... - Page 51 “ASIO”: The window shown in Fig. 37 will appear. Select “ASIO: MUSBAudio ASIO Driver” in the dropdown menu called “Device”. FooBar is then ready to use the YOUNG MKIII as the output device in ASIO mode, to play bit-perfect PCM audio up to 384kHz and 32 bit.
- Page 52 SACD ISO files, plus a proxy file to send DSD to a compatible audio device provided with an ASIO compliant driver, like the YOUNG MKIII. After installing DLL and proxy, in the “ASIO” section of “Output” two ASIO objects will appear (Fig.
- Page 53 “ASIO” in the “Audio” section as “Output mode” (Fig. 40). Figure 40 Then, open the window for the configuration of the output mode (“Output mode settings”), which is obviously dedicated to ASIO, and select the “MUSBAudio ASIO Driver”, as shown in Fig. 41. Copyright © 2017, M2Tech Srl...
- Page 54 From the dropdown menu which is selected by clicking on “Bitstreaming”, select “Custom…” as shown in Fig. 42 Figure 42 A window will automatically appear in which the user can manually set the bitstream configuration parameters (Fig. 43). Set parameters for DSD. Copyright © 2017, M2Tech Srl...
- Page 55 192kHz as in Fig. 44. Figura 44 JRiver configuration is complete and the user can now listen to PCM files up to 384kHz and DSD files up to DSD256. Copyright © 2017, M2Tech Srl...
- Page 56 M2Tech YOUNG M DIGITAL-TO-ANALOG CONVERTER AND PREAMPLIFIER REVISION P A – AUGUST 2017 www.m2tech.biz Copyright © 2017, M2Tech Srl...
-
Page 57: Controlling The Computer Player By Using The Young Mkiii Remote Control
The USB interface of the YOUNG MKIII implements the HID protocol, which allows for sending commands to the player running on the computer to which the YOUNG MKIII is connected. This feature is very useful whenever the computer is placed close to an audio system, therefore away from the user, who can now conveniently use the YOUNG MKIII remote control. - Page 58 M2Tech YOUNG M DIGITAL-TO-ANALOG CONVERTER AND PREAMPLIFIER REVISION P A – AUGUST 2017 www.m2tech.biz Copyright © 2017, M2Tech Srl...
-
Page 59: Updating Young Mkiii Firmware
MKIII, whenever this is required, using the driver panel installed with the driver itself on any Windows computer. On the M2Tech website, in the YOUNG MKIII product page, a list of upgrades that can be downloaded is available. To do a firmware upgrade, the following steps must be done: 1. - Page 60 M2Tech YOUNG M DIGITAL-TO-ANALOG CONVERTER AND PREAMPLIFIER REVISION P A – AUGUST 2017 www.m2tech.biz Copyright © 2017, M2Tech Srl...
-
Page 61: Specifications
Automatic switch-off......10 to 240 minutes in 10 minutes steps, plus disabled Supply:..........15V 300mA Power consumption: ......4.5VA Size:..........200x50x200mm (w x h x d) Weight..........2kg (device and ancillaries) 2.5kg (packed) * USB Only Copyright © 2017, M2Tech Srl...
Need help?
Do you have a question about the Young MKIII and is the answer not in the manual?
Questions and answers