
Related Manuals for ZERO-X Atlas ZX-ATL


Summary of Contents for ZERO-X Atlas ZX-ATL
- Page 1 High-Performance Drone + Full-HD Camera DRONE USER MANUAL Capture the skies.™ PRODUCT CODE: ZX-ATL...
-
Page 3: Table Of Contents
WELCOME ......................4 BEFORE YOU GET UP IN THE AIR ..............4 GENERAL SAFETY ..................... 4 BATTERY SAFETY ....................5 INTRODUCTION ..................6 2.1 PACKAGE CONTENTS ................. 6 2.2 PRODUCT OVERVIEW ................. 7 ATLAS DIAGRAM ..................7 REMOTE CONTROL ..................8 SETTING UP YOUR ATLAS ................. -
Page 4: Welcome
WELCOME Thanks for purchasing a Zero-X Atlas, get ready to have the time of your life! We’re sure your Zero-X Atlas will bring you a world of great experiences in the air. Please take the time to read the following safety warnings and operating instructions carefully. -
Page 5: Battery Safety
BATTERY SAFETY When handled incorrectly, Lithium polymer batteries can be dangerous and can potentially harm and do damage to persons or property. Zero-X does not accept any liability for damage to persons or property if the battery is not correctly charged, stored or protected. -
Page 6: Introduction
INTRODUCTION 2.1 PACKAGE CONTENTS Atlas Drone Remote Control USB Charger Battery Drone Feet AC wall charger Rotor Blades Rotor Guards Screwdriver 10. User Guide Capture the skies.™... -
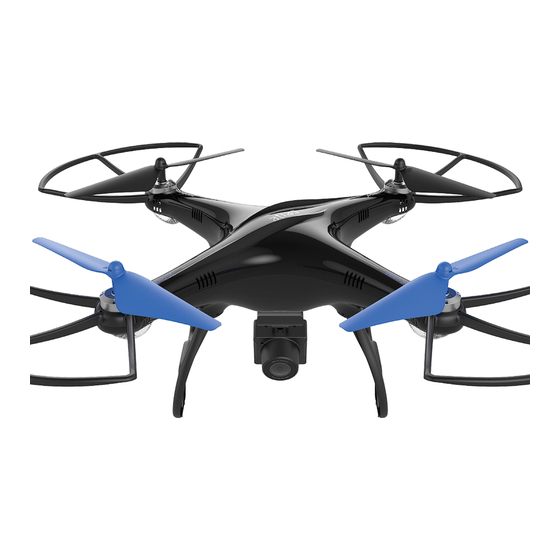
Page 7: Product Overview
2.2 PRODUCT OVERVIEW ATLAS DIAGRAM Capture the skies.™... -
Page 8: Remote Control
YOUR ZERO-X DRONE COMES WITH A CERTIFIED ZERO-X USB AC CHARGING ADAPTER FOR 240v CHARGING OF YOUR DRONE BATTERY. USE OF A NON ZERO-X CERTIFIED USB AC CHARGING ADAPTER WILL VOID YOUR WARRANTY AND MAY DAMAGE BOTH YOUR BATTERY AND DRONE. -
Page 9: Setting Up Your Atlas
To keep the battery life as long as possible avoid removing the battery from the charging cable before charging is complete. If you have just finished flying your Atlas drone, please allow the battery to cool down for at least 30 minutes before recharging. •... -
Page 10: Camera Connection Guide
3.1.3 CAMERA The camera for the Atlas will need to be connected. Once installed, it is advised that this camera is not removed and reconnected as this can potentially damage the camera connection. 1. To attach the camera align the notches on the top of the camera with the slots on the under side of the Atlas drone and slide the camera back into position ensuring that the camera is secure. -
Page 11: Remote Control Battery
This is done during the set up and launching of the Atlas and requires you to have the Zero-X Atlas App installed. 1. To find the Zero-X Atlas App search ‘Zero-X Atlas’ on the Apple App store if you are using an iPhone, or on the Google Play store if you are using an Android phone. -
Page 12: Using The Remote Control Smart Phone Holder
2. Once on, the LED lights on the arms of the Atlas should flash signalling no connection to the Remote Control. 3. On your Android or Apple Smart-phone, open your WiFi settings and connect to the ZX Atlas WiFi connection. Once connection is made, open the Zero-X Atlas app on your Smart-phone. Capture the skies.™... - Page 13 4. Position your phone in the remotes smart phone holder. 5. Switch the remote controls power switch to the up On position. The remote control should beep once to indicate power up has been successful. 6. To activate the connection between the remote control and the Atlas, move the Left Thumb stick (Acceleration/Yaw) on the Remote Control to the lowest (down) position hold for one second and...
-
Page 14: Troubleshooting
Once the remote has been paired with the Atlas drone, do not approach the drone until the remote has been powered off. 4.1.0 TROUBLE SHOOTING Do not approach the drone again until the remote has been powered off. If for any reason the Atlas does not work after following the launching steps, please check the following. -
Page 15: One Button Take Off/Landing
4.1.1 ONE BUTTON TAKE OFF/LANDING The one button take off and landing button allows you to easily get your drone off the ground and land. TO TAKE OFF: Follow the powering up and pairing instructions in this manual. Once the drone is paired to the controller press the one button take off/ land button, and the drone will take off and hover at about shoulder height. -
Page 16: Directional Lock
4.1.4 DIRECTIONAL LOCK Directional lock allows you to lock the controllable forward direction so that no matter which way the drone is facing, pressing forward on the right thumb stick will always send the drone in the direction you have assigned as forward. To set directional lock follow the instructions below. -
Page 17: Motor Lock Down
Once you have connected your Smart-phone to the Atlas via WiFi and launched the Zero-X Atlas App , you will be able to access the App’s Control screen. This screen has all of the control options and settings, as well as access to the on screen control system. -
Page 18: App Control Screen
the ‘App Control’ setting and press the button to show the on screen emergency H:100m 00:00 100% controls. To use the App to assist the controls on the remote control, use the ‘Control Assist’ setting and press the button to show the on screen controls. In this mode the controller must be used for take-off. - Page 19 Only use this in the case of an emergency. MICRO SD CARD This will show is a micro SD card is inserted in the Atlas’s on board camera. When there is no Micro SD Card detected the icon will be displayed. When a Micro SD Card is detected the icon will be displayed.
- Page 20 MEDIA This will take you to all recorded files both on your phone and saved to the Micro SD Card installed in your Atlas drone (Micro SD Card not included). SPEED MODE Select your required speed mode. ONE BUTTON TAKE OFF This button will launch the drone.
-
Page 21: Viewing And Transferring Photos And Videos
VIEWING AND TRANSFERRING PHOTOS AND VIDEOS To view your photos and videos select the Media setting from the home screen. From this screen, you can select whether you want to view the files recorded to the inserted Micro SD Card, or the files that have been transferred to your phone. -
Page 22: Replacing Rotor Blades
To thank you for your support of Zero-X and your drone purchase, we would like to help you build you confidence in learning how to fly your drone. We would like to offer you 50% off your first two orders of any spare parts, by using the codes in the coupons below. -
Page 23: Warranty
The retailer will then return the goods to Zero-X. Zero-X will repair, replace or refurbish the product at its discretion. The retailer will contact you when the product is ready for collection. - Page 24 Capture the skies.™ www.zero-x.com.au | www.zero-x.co.nz...
Need help?
Do you have a question about the Atlas ZX-ATL and is the answer not in the manual?
Questions and answers