Advertisement
Quick Links
Instructions
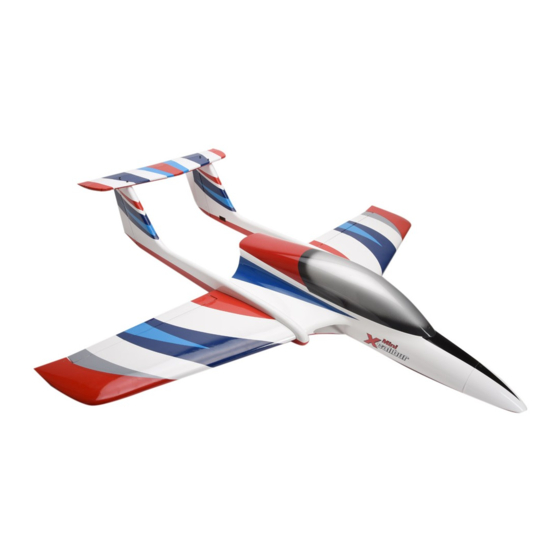
Specification:
Wingspan: 1310mm (51.6")
Length:
1340mm (52.8")
Weight:
4.2Kg (9.3lbs) (Approx.)
Radio:
7x Channel (Required)
Servos:
7 Mini (Required)
Fan/Motor: 90mm & 8S Brushless Motor (Required)
ESC:
100A HV Brushless (Required)
LiPo:
8S (2 x 4S) Hi-Energy 4500mAh
(Recommended)
Bauanleitung
Technische Daten:
Spannweite:
1.310mm
Länge:
1.340mm
Abfluggewicht ca: 4.200g
RC-Anlage:
ab 7+ Kanäle (empfohlen)
Servos:
7 Stück (empfohlen)
Impeller:
90mm Brushless (empfohlen)
Regler:
100 A HV Brushless (empfohlen)
Antriebsakku:
2x LiPo 4s 14,8 V 4.500mAh
(empfohlen)
Advertisement

Related Manuals for Ripmax Mini Xcalibur E Jet


Summary of Contents for Ripmax Mini Xcalibur E Jet
- Page 1 Bauanleitung Instructions Specification: Technische Daten: Wingspan: 1310mm (51.6”) Spannweite: 1.310mm Length: 1340mm (52.8”) Länge: 1.340mm Weight: 4.2Kg (9.3lbs) (Approx.) Abfluggewicht ca: 4.200g Radio: 7x Channel (Required) RC-Anlage: ab 7+ Kanäle (empfohlen) Servos: 7 Mini (Required) Servos: 7 Stück (empfohlen) Fan/Motor: 90mm & 8S Brushless Motor (Required) Impeller: 90mm Brushless (empfohlen) ESC:...
-
Page 2: General Notices
Use only recommended battery chargers and recharge your battery use/operation. Ripmax shall not be liable for any loss, consequential loss, only until the specified charging time/level. Excess or incorrect damage or expense arising from the improper use or operation in anyway. -
Page 3: Wichtige Hinweise
Ihre Haustiere! Haftungsausschluss: Fliegen Sie grundsätzlich, ob mit Modellflugzeugen-, Hubschraubern- Ripmax Produkte sind häufig nur ein Teil einer ganzen Funktionskette. Diese oder Multicoptern, nie in Augenhöhe direkt auf sich oder andere Funktionskette, wie auch die Einhaltung der Montage und Betriebsanleitung Personen oder Tiere zu, es besteht erhebliche Verletzungsgefahr. -
Page 4: Required To Complete
Introduction Congratulations on your purchase of the Mini Xcalibur E Jet. The Mini Xcalibur E takes all of the best flying characteristics from its bigger counterparts and incorporates them into a compact and practical package. This high performance model is ideal for use as a first EDF or as a sports EDF model and is practical to store and transport. - Page 5 Einführung Herzlichen Glückwunsch zum Kauf der Mini Xcalibur E Jet. Die Mini Xcalibur E vereinigt die großartigen Flugeigenschaften seiner größeren Brüder in einem kompakten und praktischem Paket. Dieses Hochleistungs- Modell ist Ideal für den Einsatz als erstes Jet- oder Sport Jetmodell geeignet, und ist durch die geringen Abmessungen einfach zu lagern und zu transportieren.
- Page 6 Step 1 | Schritt 1 Glue the hinges into the aileron as shown, using epoxy or a similar high quality, high strength glue, whilst protecting the hinge point with a drop of oil or grease. Allow to cure. Kleben Sie die Scharniere mit Epoxid, oder einem hochqualitativen, festen Klebstoff in die Querruder, wie gezeigt.
- Page 7 Step 5 | Schritt 5 Install the aileron servo hatch using 4 screws supplied taking care to ensure it is fitted on the correct side and the colour scheme matches. Nun befestigen Sie den Servodeckel mit den vier mitgelieferten Schrauben. Achten Sie darauf, dass dieser an der richtigen Seite angebracht ist, und zum Farbschema passt.
- Page 8 Step 10 | Schritt 10 Connect a suitable extension lead to the rudder servo and secure the leads together. Feed the extension lead down the boom using the same process as the wing and screw the servo into position. Befestigen Sie ein passendes Verlängerungskabel am Ruderservo und verbinden und sichern die Kabel miteinander.
- Page 9 Step 15 | Schritt 15 Screw the flap servo in position and assemble the short linkage as shown. Schrauben Sie das Klappen- Servo an seinen Platz, und montieren die Anlenkung, wie gezeigt. Step 16 | Schritt 16 Slot the main wing spar through the fuselage. If the spar is a tight fit then a light dust of talc will reduce friction.
- Page 10 Retract Guide | Anleitung für das Einziehfahrwerk The Mini Xcalibur E includes a suitable set of Ripmax Electric retracts as standard. There are two optional operation methods explained in this guide. Each unit is designed to primarily use the power supplied through the receiver from the main flight battery.
- Page 11 Step 19 | Schritt 19 Assemble the nose leg as shown (use a thread locking compound), fitting the wheel, retaining collet and cable arm. Then cut the closed loop cable in half and attach the end of each cable to the arm and crimp the brass tubes to secure.
- Page 12 Step 23 | Schritt 23 Screw the nose wheel steering servo in place and attach the horn. Feed the nose leg closed loop wire through the adjusters and secure the wire using the brass crimps ensuring the servo & wheel are centred. Schrauben Sie das Lenkservo für das Bugrad an seinen Platz und befestigen das Horn.
- Page 13 Step 27 | Schritt 27 Now slide your 90mm fan unit into the glass intake about 2-3mm and secure to the fan unit to the mounting rails as shown, you may need to put plywood packers under your fan unit to achieve the right level and thrustline.
- Page 14 Step 31 | Schritt 31 Temporarily install your radio battery next to the steering servo. Its final position may need to be changed after balancing the model to achieve the correct balance point. Legen Sie vorübergehend den Empfängerakku an den Platz neben dem Servo. Der entgültige Platz wird erst beim Einstellen des Schwerpunktes festgelegt.
- Page 15 Control Throws | Ruderausschläge Use the following control throws as a starting point, when you have experience and are comfortable with the model then you can increase or decrease them to suit your flying style. Verwenden Sie folgende Einstellungen als Ausgangspunkt. Wenn Sie Erfahrung haben und mit dem Modell vertraut sind, können Sie die Einstellungen erhöhen, oder verringen, passend zu Ihrem Flugstil.
- Page 16 Balancing | Schwerpunkt The balance point of the Mini Xcalibur E is 115mm back from the leading edge at the root of the wing panels with the undercarriage extended and the batteries in position. 115mm Der Schwerpunkt der Mini Xcalibur E sollte bei 115mm liegen.
- Page 17 elevator is all that is required to allow the model to lift off, whereupon we suggest that the landing gear be retracted and the model allowed to climb to circuit height. Once at a comfortable height power should be reduced, generally around 75% power is ample to maintain a comfortable cruise speed.
- Page 18 empfehlen wir Ihnen ein paar Manöver in sicherer Höhe durch zuführen. Z.B. In beide Richtungen drehen, Langsamflug, ein sauberes Ausweichmanöver, usw. Wenn Sie mit der Handhabung des Modells zufrieden sind, empfehlen wir Ihnen, dieses zu verlangsamen, das Fahrwerk auszufahren und die Landeklappe zu setzen, um in die Landekonfiguration zu kommen. Ein simulierter Landeanflug wird in sicherer Höhe geflogen, so dass Sie die Sinkgeschwindigkeit und die Fluglage bei verschiedenen Gaseinstellungen beobachten können.
- Page 19 Preflight Checks | Vorflug Checks • Completely charge your transmitter, flight and receiver batteries before flying. • Carefully check your model over to ensure that all screws are tight and everything is well bonded. • Double-check the Centre of Gravity. •...
- Page 20 Copying or reproduction, even in parts require schriftlicher Genehmigung der Ripmax Ltd. written permission of Ripmax Ltd. Made in China Manufactured for and distributed to your local model shop by: Ripmax Ltd., 241 Green Street, Enfield, EN3 7SJ. United Kingdom.
Need help?
Do you have a question about the Mini Xcalibur E Jet and is the answer not in the manual?
Questions and answers