
Related Manuals for ZERO-X RAPTURE HD ZX-RHD


Summary of Contents for ZERO-X RAPTURE HD ZX-RHD
- Page 1 •• • R A P TU RE ••• DRONE USER MANUAL PRODUCT CODE: ZX-RHD www.zero-x.com.au • www.zero-x.co.nz...
-
Page 3: Table Of Contents
Fig 2.2.2 ....................8 Remote Control .................... 8 Fig 2.2.3 ....................8 Remote Control LCD Screen ................ 9 Fig 2.2.4 ....................9 Setting up you Zero-X Rapture ..............9 3.1 Charging the Battery ..................9 3.2 Installing the Rapture Battery ..............10 Fig 3.2.1 .................... - Page 4 4.6 360° Flipping ....................15 4.7 Using you Camera ..................15 Shooting Video ................... 15 Fig 4.7.1 ....................15 Shooting Photos ..................16 Fig 4.7.2 ....................16 4.8 First Person View Display ................16 Interface ..................... 16 Fig 4.8.1 ....................16 Brightness ....................
-
Page 5: Welcome
Australian CASA guidelines, please read carefully and understand this information as operating a drone outside of these guidelines may result in legal issues. Zero-X takes no responsibility for operation of this product outside of what is legally permissible in your local area. -
Page 6: Battery Safety
BATTERY SAFETY When handled incorrectly, Lithium polymer batteries can be dangerous and can potentially harm and do damage to persons or property. Zero-X does not accept any liability of damage to persons or property if the battery is not correctly charged, stored or protected. -
Page 7: Introduction
INTRODUCTION 2.1 PACKAGE CONTENTS Rapture Drone Rapture Battery Rapture Battery Charger Remote Control Remote Control Battery Remote Control Batttery Charger Spare Motors Rotor Blades Rotor Guards 10. Screwdriver 11. User Guide 12. USB Wall Charger *Fig 2.1.1... -
Page 8: Product Overview
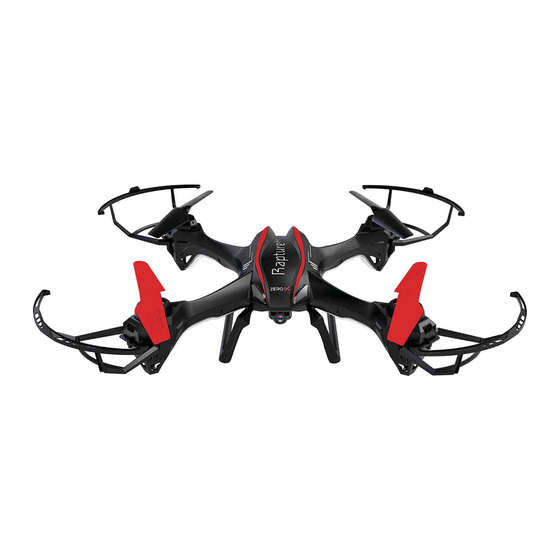
2.2 PRODUCT OVERVIEW RAPTURE DIAGRAM Under Side Top View View *Fig 2.2.1 *Fig 2.2.2 Front Rotor Blades LED Lights Rear Rotor Blades Feet Power Switch Camera Battery Micro SD Card Slot * * Micro SD Card not included REMOTE CONTROL DIAGRAM Power Switch Left Thumbstick (Acceleration/Yaw) -
Page 9: Remote Control Lcd Screen
Micro SD Card in FPV icon SETTING UP YOUR ZERO-X RAPTURE 3.1 CHARGING THE BATTERY Fully unwind the included USB charging cable and plug the USB end into the included USB wall charger. Only use the USB charging cable and wall charger included with the Rapture . -
Page 10: Installing The Rapture Hd Battery
3.2 INSTALLING THE RAPTURE BATTERY • Ensure that the Rapture ’s power switch is in the OFF position. ( Refer to Fig 2.2.2 on page 8 - number 5) • Connect battery cable Rapture ’s power cable ensure that the plug is inserted in the correct orientation. -
Page 11: Remote Control
• Line up the guide pegs on the Rotor Guards with the holes on the arms of the Rapture so that the screw in the Rotor Guard matches up with the screw hole in the Rapture (Refer to Fig 3.5.1) •... -
Page 12: Fig 4.1.1
3. With the Left Thumbstick (Acceleration/Yaw) (Refer to Fig 2.2.3 on page 8 - in the lowest (down) position, power on the Remote Control, the number 2) remote should beep once to indicate power up has been successful. 4. To activate the connection between the Remote Control and the Rapture move the Left Thumbstick (Acceleration/Yaw) (Refer to Fig 2.2.3 on page 8 - on the Remote Control to the highest (up) position, hold for one... -
Page 13: Controlling Your Rapture
4.3 CONTROLLING YOUR RAPTURE BASIC CONTROLS Lift / Descent Push up the Throttle Rudder Stick and the drone will fly up. Push down the Throttle Rudder Stick and the drone will fly down. Yaw Left / Right Push the Left Rudder Stick to the left or to the right, the drone will rotate in the corresponding direction. -
Page 14: Mid Speed
Push the Speed Button once and the (Refer to Fig 2.2.3 on page 8 - number 14) Remote Control will quickly beep twice indicating that the Rapture is now in the medium Speed Mode. In this mode the sensitivity of both the acceleration, and directional control of the Rapture will be increased, making the Rapture more nimble and... -
Page 15: 360° Flipping
4.6 360º FLIPPING The Rapture is capable of performing 360° flips. This is possible by using the Flip button (Refer to Fig 2.2.3 on page 8 - number 15) To Perform a forward flip push the Flip Button (Refer to Fig 2.2.3 on page 8 - on the back side of the Remote Controls Right handle. -
Page 16: Fig 4.7.1
SHOOTING PHOTOS: To shoot a photo with your Rapture press the Snap button (Refer to Fig 4.7.2) on the left side of the FPV screen. “JPG” will be displayed at the top of the FPV screen in red indicating that a photo has been taken. -
Page 17: Directory Screen
DIRECTORY SCREEN The Directory Screen is used to playback and delete Videos and Photos. 1. Delete (View Button) 7. Back Navigation 2. OK / Select (Record Button) 8. Playable File 3. Back (Photo Button) 9. Folder 4. Up Button 10. File Size 5. -
Page 18: Fig 4.8.4
DELETING VIDEOS AND PHOTOS With the delete function you can delete videos and photos taken with the Rapture To delete a file from a Micro SD Card select the file that is required to be deleted and push the Delete button (View). (Refer to Fig 2.2.3 on page 8 - number . -
Page 19: Motor Replacement Guide
5.3 MOTOR REPLACEMENT GUIDE The Rapture uses brushed motors similar to what is used in remote control cars. These motors do need to be replaced from time to time to keep your drone up in the air. The following instructions will take you through how to replace your motors when they are not working like new. -
Page 20: Fig 5.4.8
(Refer to Fig 5.4.9) *Fig 5.4.9 PARTS AND ACCESSORIES To purchase parts and accessories for your Zero-X Rapture , please visit your nearest Zero-X retailer or visit us online at www.zero-x.com.au ZXRBSRBW Rotor Blades: Rapture, Rapture &... -
Page 21: Warranty
The retailer will then return the goods to Zero-X. Zero-X will repair, replace or refurbish the product at its discretion. The retailer will contact you when the product is ready for collection. - Page 22 This page was intentionally left blank...
- Page 23 This page was intentionally left blank...
- Page 24 www.zero-x.co.nz...
Need help?
Do you have a question about the RAPTURE HD ZX-RHD and is the answer not in the manual?
Questions and answers