
Related Manuals for Sunjoy Windsor L-GZ717PST-C


Summary of Contents for Sunjoy Windsor L-GZ717PST-C
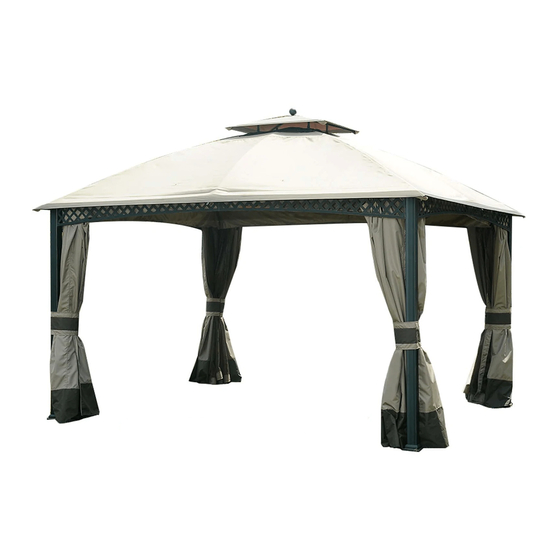
- Page 1 Windsor 10'x12' Dome Gazebo Instruction Manual Item #: L-GZ717PST-C SKU #: 810213583...
- Page 2 IMPORTANT: Please read and follow all safety statements, warnings, assembly instructions, use & care directions before attempting to assemble. WARNING: 1. When installing and assembling your gazebo, it is recommended that 2 or more adults are involved. 2. This product is intended for outdoor use only and should be placed on flat, horizontal ground.
-
Page 3: Parts List
Parts List Post GZ0717XXC01 Long side left beam GZ0717XXC02 Long side right beam GZ0717XXC03 Short side left beam GZ0717XXC04 Short side right beam GZ0717XXC05 Cant beam GZ0717XXC06 Long middle beam GZ0717XXC07 Middle beam down tube GZ0717XXC08 Short middle beam GZ0717XXC09 Middle beam down connector GZ0717XXC10... -
Page 4: Hardware Pack
Hardware Pack 1 M6*15 Screw 8 PCS SM06015C M6 Flat washer 40 PCS UD06C M5*15 Bolt 24 PCS BM05015C M6*15 Bolt 24 PCS BM06015C M6 Nut 8 PCS LM06C M5 Flat washer 24 PCS UD05C Wrench 2 PCS W10D8D... - Page 5 Fig.2: Insert long side right beam Fig.1: Put base cover (P) into Fig.3: Attach beam to post (A1) pipe into left beam, then attach post (A1), then attach base slice by bolt (DD) and flat washer long side right beam (B2) to long (Q) to post (A1) by screw (AA) (BB).
- Page 6 Fig.6-1: Insert long middle beam Fig.6-2: Insert hook (M) into big Fig.7: Attach middle beam down (E4) into middle beam down tube top connector (I), then insert tube (E3) to middle beam down (E3). Insert F3 into E3. long middle beam (E4) and connector (G) by screw (FF), flat short middle beam (F3) into washer (BB) and nut (EE).
- Page 7 Fig.14: Put the big canopy (S) onto big top, do not spread, insert small top cant beam (J) into the pipe of cant beam (D1) assembled small top. Hardware Pack 3 Plastic ring 104 PCS R40V ¢6X230 Stake 16 PCS QD06230C...
- Page 8 Fig.15: Spread out big canopy (S), Fig.16: Attach big top netting (V) Fig.17: Put mosquito netting (T) attach four corners to cant beam to the big canopy (S) by sticking curtain onto long down tube (H1), then stick the tippet the hook-and-loop fasteners.
-
Page 9: Customer Service
If you are within or beyond the return policy that most stores have, and need tech. assistance or replacement parts, please call Sunjoy Group at 1(866) 578-6569 from 8:00 am to 8:00 pm eastern standard time or e-mail to Biglots@sunjoygroup.com or fax your parts replacement...
Need help?
Do you have a question about the Windsor L-GZ717PST-C and is the answer not in the manual?
Questions and answers
I have a windsor L-GZ717PST-C. I'm just looking for a price on a complete replacement list for this gazebo.
I need a part cant beam down tube
are replacement parts available for 10x12 Windsor dome gazebo besides canopy? for example part #GZ0717XXC12 big top connector