
Subscribe to Our Youtube Channel
Related Manuals for Commax CDV-51AM


Summary of Contents for Commax CDV-51AM
- Page 1 513-11, Sangdaewon-dong, Jungwon-gu, Seongnam-si, Gyeonggi-do, Korea Int’l Business Dept. Tel. : +82-31-7393-540~550 Fax. : +82-31-745-2133 Web site : www.commax.com Printed In Korea / 2010.11.103...
-
Page 2: User Manual
User Manual COLOR VIDEO DOOR PHONE CDV-51AM • Thank you for purchasing COMMAX products. • Thank you for purchasing COMMAX products. • Please carefully read this User’s Guide (in particular, precautions for safety) before using a product and follow • Please carefully read this User’s Guide (in particular, precautions for safety) before using a product and follow instructions to use a product exactly. -
Page 3: Table Of Contents
Contents 1. Location............4 2. -
Page 4: Warnings And Caution
Warnings and caution Make sure to follow the instructions to prevent any danger or property losses. It indicates prohibition. It indicates prohibition of disassembly. Warning Death or serious It indicates prohibition of contact. injury is expected. It indicates dos and don’ts. It indicates that the plug should be pulled out from the socket. - Page 5 Install the product in a flat and Pull the plug if the product is If the product generates strange stable place. not used for a long time. sound, make sure to pull the Otherwise, it may not function plug immediately and contact properly. Commax service center.
-
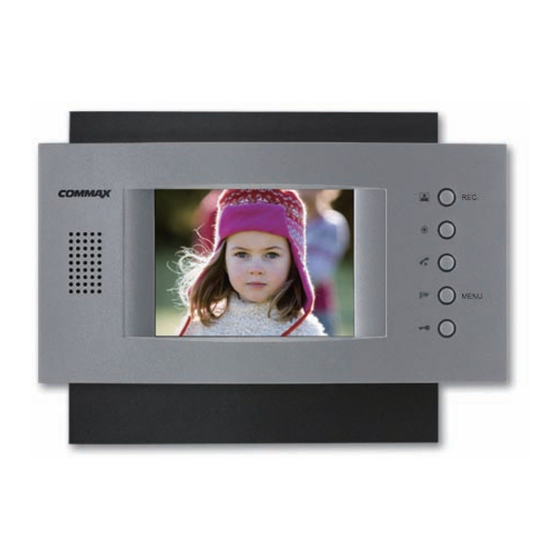
Page 6: Location
1. Location Front view ▶ ① ③ ⑧ ④ ⑨ ⑭ ⑤ ⑩ ⑥ ⑪ ⑦ ⑫ ② ⑬ Rear view ▶ ⑲ ⑮ ⑯ ⑰ ⑱ Description Description Description Status LED Volume control dial for 15 CAM 1 Connection Terminal conversation 16 CAM 2 Connection Terminal Monitoring(REC) Button... -
Page 7: Operation Methods
(Connect camera first and turn it on. If you do not connect camera or connect camera after the Video phone is turned on, it will malfunction) * Caution: CDV-51AM is designed to be used with a color door camera. Coupling with a B/W camera occur a technical problem in use. - Page 8 2 Color adjustment (Available in monitoring or conversation mode) ● •Brightness : Adjust brightness by using the switch on the right side of CDV-51AM •Contrast : Adjust contrast by using the switch on the right side of CDV-51AM...
- Page 9 Press and hold the PTT button for 1 second in standby mode. Then the screen will be displayed like below CDV-51AM do not have touch screen function. Therefore, please use the button next to each icon. (Please press the PTT button for more than 1 second to return to Standby mode.) Display save images.
- Page 10 ● •Press and hold the PTT button for 1 second in standby mode. Then the screen will be displayed like below CDV-51AM do not have touch screen function. Therefore, please use the button next to each icon. Press buttons to turn 4 pages at a time.
- Page 11 Setting menu : system configuration menu. Time setting menu. Language setting. (Korean, English, Russian, Spanish, Persian, Turkish, Polish) Save menu setting: Auto save, manual save, delete all saved images. Move to previous menu. Time setting ●...
- Page 12 Move to desirable sub-menu button. (Year/Month/date/hour/minute) Enter the desirable menu button. Adjusting time button. Move back to previous menu. (Press the “MENU” button to exit this menu.) Language setting ● Korean / English /Russian / Spanish / Turkish / Persian / Polish selectable Select language by clicking buttons.
- Page 13 Recording visitor's image (Auto / Manual) ● Press the icon. Press the button to move to the recording menu. Press the button to move to the setting menu. Move to Auto or manual save by pressing the button. Complete setting by pressing the button. Return to previous menu by pressing the button.
-
Page 14: Wiring Diagram
Delete all ● Click the icon. Move to delete all menu with buttons. Move to setting menu. Select “Yes” or “No” by pressing the buttons. Select “Delete all” by pressing the buttons. (If “Yes” is selected, another window will appear for your reconfirmation) Move back to previous menu. -
Page 15: Installation Method
4. Installation Method 1) Monitor Installation 2) Standard Height of Monitor SCREW T4X18 (2EA) Unit : cm SCREW M3X6 (2EA) Unit : cm 5. Part list Monitor Manual Braket T4X18(2EA) Monitor Connector Wall bracket Fixing Screw 4p(2EA) Mounting Screw M3X6(2EA) -
Page 16: Trouble Shooting
6. Trouble shooting. If you think that the product has trouble, please first check below contents before you ask a repair. Troubles Check Point Actions 1. Please connect the The power supply is 1.The power supply ● power supply cord not on. -
Page 17: Specifications
7. Specifications CDV-51AM Wiring Polarity CAMERA 4-wires, INTERPHONE 4-wires Power Voltage 100-240V~, 50/60Hz (FREE VOLTAGE) Power Consumption CDV-51AM Maximum : 15W, Standby : 5W Call Method HANDS FREE Calling (Voice Switch circuit) Equipment Specs 12.7Cm(5”) DIGITAL COLOR TFT-LCD Camera : electric chime Sol, Mi, Do (twice) Call sound Interphone : “Beep”... - Page 18 Memo...
Need help?
Do you have a question about the CDV-51AM and is the answer not in the manual?
Questions and answers