
Related Manuals for Commax CDV-50


Summary of Contents for Commax CDV-50
- Page 1 Wide Color Video Doorphone Model No. CDV-50/50D Use and Care Guide Before operating the unit, please read this manual thoroughly and retain it for future reference.
-
Page 2: Introduction
Introduction The model number is located on the bottom and record the serial number in the space provided below. Refer to these numbers whenever you call upon your Commax dealer regarding this product. Model No. Serial No. To prevent fire or shock hazard, do not expose the unit to rain or moisture. -
Page 3: Important Safeguard
Important Safeguards Read Instructions - All safety and operating Damage Requiring Service - Unplug this instructions should be read before the unit is equipment from the power source and refer operated. servicing to qualified service personnel under the following conditions: Retain Instruction - The safety and operating a. - Page 4 Important Safeguards Lightning - For added protection for this Servicing - Do not attempt to service this product before a lightning storm, or when it product yourself as opening or removing is left unattached and unused for long covers may expose you to dangerous voltage periods of time, unplug it from the wall outlet or other hazards.
-
Page 5: Table Of Contents
Table Contents Introduction ....................2 Before You Begin Important Safeguard .................. 3 Table Contents ................... 5 Preparations ....................6 Location and function of controls (For Monitor) ..........7 Location and function of controls (For Camera) ..........8 Operating Operation Operating And Function Of Control ............. 9 1. -
Page 6: Preparations
Preparation ·Operate the unit on free volt AC(100~240V), 50/60Hz On Safety · Should any solid object or liquid fall into the cabinet, unplug the unit and have it checked by qualified personnel before operating it any further. · One blade of the plug (for 120V Version, only) is wider than the other for the purpose of safety and will fit into the power outlet only one way. -
Page 7: Front/Side View
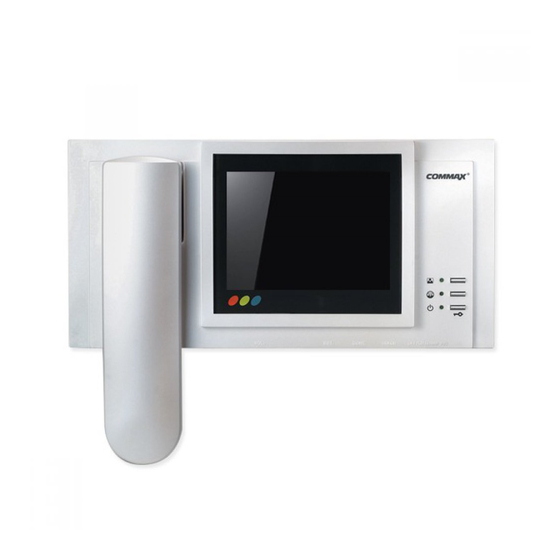
Location And Function of Control (For Monitor) Front View Side View L.E.D Indicator Monitoring Button Interphone Button Release(Open/Close) Button VOLume Adjust Controller BRightness Adjust Controller CONTrast Adjust Controller COLOR Adjust Controller POWER OFF/ON(Stand By) Handset Speaker ‐ 7 ‐... - Page 8 Location And Function of Control (For Camera) DRC-4CA ① ② ⑨ ③ ④ ⑩ ⑪ ⑥ ⑤ ⑦ ⑧ DRC-40CS Microphone Screw Hole When Turn on the[CALL] button on the panel, and Use the assembly panel. Note:Before connection, conversation with residents. contact to technical engineer.
- Page 9 Operation Communication Functions 1. Communicate with the Video Doorphone Turn on the [CALL] button on the camera of the door Calling sound from the monitor and LED indicator flicker Pick up the handset, communicate with visitor on the door. (Monitor screen operating about 90 seconds and then picture is off automatically). Your visitor with communicated off.
-
Page 10: How To Installation (For Monitor)
How To Installation(For Monitor) For Flush Box Installation For Semi-surface on the wall Installation Monitor Standard Installation Main Unit Installation Rectifier DC 18V CDV-50D Rectifier 1Amp Power Camera Interphone Notice : 1. 4wires and polarity 2. For connect 1, 2, 3, and 4 that monitor and camera as order. Caution : 1. -
Page 11: How To Installation (For Camera)
How To Installation (For Camera) For Flush Box Installation For Semi-surface on the wall Installation Camera Flush Box Camera Screw Bracket Fixed Screw Camera Screw Camera Screw Camera Standard Installation(For Height/Up/Down/Horizontal Angular) Down Notice : If you have questions connection the wires for installation following up, Contact to seller or qualified service personnel before not operating. -
Page 12: Part List
Camera ..........................1unit Camera Bracket ........................1unit Camera Fixed Screw ......................1unit Fixed Screw for Camera ......................2unit Notice:Checking accessories as the below pictures Connector Fixed Screw (4p-2 EA) Manual CDV-50 Bracket Monitor Handset Bracket Fixed Screw Manual A Type Camera (DRC-4CA) Camera Screw... -
Page 13: Troubleshooting
Troubleshooting Symptom Possible Cause And Corrections - The power cord is not disconnected. - Make sure that check your AC outlet for The unit does not turn on. Power power line - Make sure that unit is plugged in. - Make sure that power switch on the front the Power But No monitor ON. -
Page 14: Specifications
Specifications Camera for DRC-4CA/40CS Monitor for CDV-50 AC 100 ~ 240V, Flush Mount Type Power Source Mounting Type Picture Tube 5” Color TFT-LCD Mount (DRC-4CS) 4 Wires (Polarity) Power Consumption Wiring Operating 23 Watts Power Source DC 13V (Power Normal 5.5 Watts... - Page 15 Commax User Manual Jul 2002 CDV-50 Rev.A 513-11, Sangdaewon-dong, Jungwon-ku, Seongnam-city, Kyungki-do, Korea Tel.; +82-31-7393-540~550 Fax.; +82-31-745-2133 Web site; www.commax.co.kr Printed In Korea...
Need help?
Do you have a question about the CDV-50 and is the answer not in the manual?
Questions and answers