Advertisement
User Manual
Color video door phone CDV-70MF
• Thank you for purchasing COMMAX products.
• Thank you for purchasing COMMAX products.
• Please carefully read this User's Guide (in particular, precautions for safety) before using a product and follow
• Please carefully read this User's Guide (in particular, precautions for safety) before using a product and follow
instructions to use a product exactly.
instructions to use a product exactly.
• The company is not responsible for any safety accidents caused by abnormal operation of the product.
• The company is not responsible for any safety accidents caused by abnormal operation of the product.
Advertisement
Table of Contents

Related Manuals for Commax CDV-70MF


Summary of Contents for Commax CDV-70MF
- Page 1 User Manual Color video door phone CDV-70MF • Thank you for purchasing COMMAX products. • Thank you for purchasing COMMAX products. • Please carefully read this User’s Guide (in particular, precautions for safety) before using a product and follow • Please carefully read this User’s Guide (in particular, precautions for safety) before using a product and follow instructions to use a product exactly.
-
Page 2: Table Of Contents
8. Specifications ······························································· 22 9. Safe operation guide ······················································ 22 Greetings ● Thank you for Purchasing COMMAX Products ● Please carefully read this User,s Manual (In particular, pre cautions for safety) before using a product and follow instructionsto use a product exactly. -
Page 3: Warnings And Cautions
2. Warnings and caution Please follow the things described below in order to prevent any danger or property damage. Prohibition. Warning No disassembly It may cause a serious damage or injury if violated. No touch Must follow strictly. Caution Shows plugging out the power cord It may cause a minor damage or injury if violated. - Page 4 Warning Please don’ t disassemble, If an abnormal sound, burning Please don’t insert any Please use only the designated repair or rebuild this product smell or smoke is coming out metallic or burnable materials batteries for the products of arbitrarily (please contact the of the product, please plug out into the ventilation hole.
-
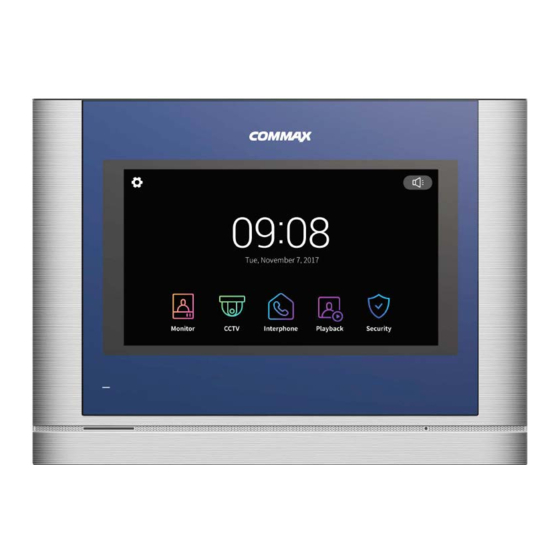
Page 5: Part Names
3. Parts names Parts Parts Parts Touch LCD Speaker Power LED Microphone Power switch Micro SD card slot Connection terminal... -
Page 6: How To Use The Product
4. How to use the product 4-1 Main screen Menu Details Monitor View the door camera - You cannot use it if door camera is not connected CCTV Monitoring CCTV - You cannot use it if CCTV is not connected Interphone Move to Interphone menu Playback... - Page 7 4-2 Monitor - The following screen will be shown when calling from door camera or touching the button ’Monitor' (CCTV1 with Door1, CCTV2 with Door2 are displayed as PIP.) (When CCTV is connected) - Max. time : Monitoring (30 sec.), Call and Talk (60 sec.) - If the camera is not installed, it cannot be executed.
- Page 8 Call connection: To call & answer the call. - After call is connected, 7 & 8 buttons will be changed as follows. Door open (No.7): To open the door. End call (No.8): To end a call. - When you set opening mode from 1 door to 2 doors, the door open icon will be shown as below.
- Page 9 is connected. When you press a call-end button, the call is end. And the main screen will be shown. * Calling of Interphone In case of installing additional interphone, when a visitor calls from door camera, a calling tone(sound) will be ringed in the interphone as well. - Max 60 seconds for call and talk time When you pick up the handset, it’s available to talk with door camera.
- Page 10 - If you want to stop storage, you should touch the icon. Image storage: To store (save) a still-cut image. - When you touch a button, you can store images. And the below icon will be shown during storage. * Reference (Door camera and CCTV are same in the below issues.) Video-clip cannot be stored while SD card is not inserted.
- Page 11 Volume control : To control receiving volume (1-3 level). Call end : To finish call connection and talk. Interphone call : The interphone is called only while pressing the call button. (A ringtone sounds only while you are pressing and holding) 4-5 Playback - When you touch Playback button, the below screen will be shown.
- Page 12 Date &Time : Current date and time will be indicated. Delete files: To delete images. - To verify video-clip. CD Storage source & file No. CT Left/Right movement: To move the previous/next file. Playing the file: To play the current video-clip. During playback, the icon is changed by the pause button.
- Page 13 - When the function is active (red), the corresponding function is activated. (You can turn off it by click.) - CCTV1 is recorded in case of sensor 1 emergency, and CCTV2 is automatically recorded in case of sensor 2. (If there is no SD card, it will be replaced with steel cut image. If CCTV is not connected to the sensor, it will not be recorded.) 2) During Security mode : The LED light of unit is flickering on red.
- Page 14 Recording 1) Auto recording - To set the auto save mode. (Select between Photo / Video) However, if there is no SD card, video mode cannot be selected. - This function is only available when a call comes from a door camera (entrance). And you cannot save photos and video-clip manually until the automatic saving is started.
- Page 15 Volume 1) Volume - When individual door camera (entrance) and intercom calls, you can change the calling tone and receiving tone individually. - You can change the calling tone from 0 (mute) to 3 level and the receiving tone from 1 to 3 level.
- Page 16 - If you start initialization of SD card, it is not possible to stop it. In case of inevitable ending initialization, it is necessary to start again from the beginning. Date/Time 1) System time - To Set-up Date and Time. - The changed time will be displayed on the main screen afterward.
- Page 17 (In this case, you can adjust the display of door camera.) - The range for adjustment is 0-20 level. There is a button located on the right upper for initialization. 2) Enter standby mode - Various standby modes can be set. LCD OFF(After 30sec) : To set screen off function when entering standby mode (Activated in 30 seconds after setting) Open Frame : Enable the Openframe mode while entering standby mode...
- Page 18 - Image of background : Set the background image to use when applying the wallpaper frame function. -No background image : The selected screen is displayed without background images. -Basic image : The background is set randomly among the images stored in the internal memory.
- Page 19 - To select the languages.(8 languages.) English le français русский español Język polski Türkçe 2) Door-opening method - To set up door-opening method. Standard: To open the door during/after the calling. Fast: To open the door before the calling. (You do not need to make a call connection to open the door) 3) Opening mode of the door 1 - You can set 2 door mode for the door1 camera.
-
Page 20: How To Install
2) When the saving capacity of Image is over, then it automatically deletes the oldest Image and saving the newest Image instead. 3) The saving capacity of video-clip may vary depending on the environment being stored. 4) If memory is full, when you are saving old files may be deleted. (Please back up your data when FULL icon is displayed.) 5) If you use a bad Micro SDHC card, you may experience problems with your product. -
Page 21: Wiring Diagram
6. Wiring diagram Note: 1. In case, if there is a high-voltage power line in the area of installation, use metal tube coaxial cable for wiring. 2. Beware of wrinkling of line coating and cable stick-outs as it may cause circuit shortage and operation inconvenience. -
Page 22: Package Contents
7. Package contents ① Monitor(CDV-70MF)---------------------------------------- 1EA ② Wall bracket for monitor------------------------------------ 1EA ③ User Manual------------------------------------------------- 1EA ④ Wall bracket mounting screw------------------------------- 4EA ⑤ Monitor fixing screw----------------------------------------- 1EA ⑥ Connector 2P------------------------------------------------- 4EA Connector 4P------------------------------------------------- 3EA ⑦ CORE EMC OR29*7.5-19H----------------------------------- 1EA * Connecting Devices... -
Page 23: Specifications
8. Specifications Model CDV-70MF Camera 4 wire (polarity), CCTV 2 wire (polarity) Transmission Method Interphone 4 wire (polarity), Sensor 2 wires(non polarity) Power Source 100V-240V~, 50/60Hz Stand-by : 3.5 W Consumption Max : 15 W Intercom system HANDS FREE type (Voice switch circuit) - Page 24 513-11, Sangdaewon-dong, Jungwon-gu, Seongnam-si, Gyeonggi-do, Korea Int’l Business Dept. Tel. : +82-31-7393-540~550 Fax. : +82-31-745-2133 Web site : www.commax.com PM0771UM0010 Printed In Korea / 2014.08.104...
Need help?
Do you have a question about the CDV-70MF and is the answer not in the manual?
Questions and answers