Table of Contents
Advertisement
User Manual
Col o r Vi d eo Door Phone CDV-1024MA
• Thank you for purchasing COMMAX products.
• Thank you for purchasing COMMAX products.
• Please carefully read this User's Guide (in particular, precautions for safety) before using a product and follow
• Please carefully read this User's Guide (in particular, precautions for safety) before using a product and follow
instructions to use a product exactly.
instructions to use a product exactly.
• The company is not responsible for any safety accidents caused by abnormal operation of the product.
• The company is not responsible for any safety accidents caused by abnormal operation of the product.
Advertisement
Table of Contents

Related Manuals for Commax CDV-1024MA


Summary of Contents for Commax CDV-1024MA
- Page 1 User Manual Col o r Vi d eo Door Phone CDV-1024MA • Thank you for purchasing COMMAX products. • Thank you for purchasing COMMAX products. • Please carefully read this User’s Guide (in particular, precautions for safety) before using a product and follow •...
-
Page 2: Table Of Contents
Greetings ● Thank you for choosing COMMAX. ● Please read this manual carefully before you use the product. Table of contents Greetings···························· 1 Table·of·contents························ 1 1.·Warnings·and·caution· · ··················· 2 2.·Parts·Names························· 4 3.·How·to·use·the·product· ·················· 5 4.·How·to·install· ······················ 22 5.·Installation·diagram· · ··················· 23 6.·Wiring·diagram·... -
Page 3: Warnings And Caution
1. Warnings and caution Please follow the things described below in order to prevent any danger or property damage. Prohibition. Warning No disassembly It may cause a serious damage or injury if violated. No touch Caution Must follow strictly. Shows plugging out the power cord It may cause a minor damage or injury if violated. - Page 4 Warning Please don’ t disassemble, If an abnormal sound, burning Please don’t insert any Please use only the designated repair or rebuild this product smell or smoke is coming out metallic or burnable materials batteries for the products of of the product, please plug out arbitrarily (please contact the into the ventilation hole.
-
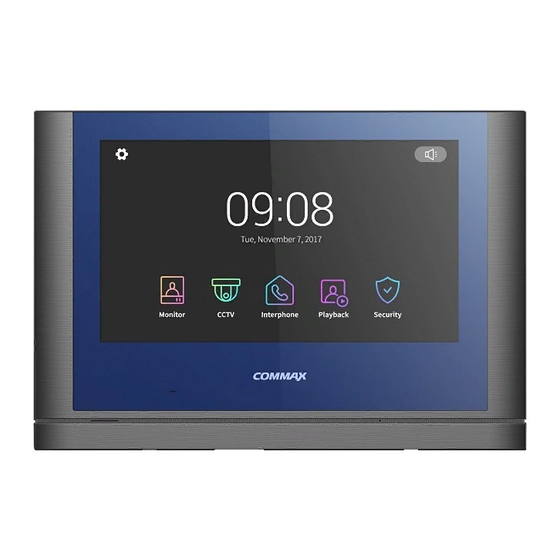
Page 5: Parts Names
2. Parts Names... -
Page 6: How To Use The Product
3. How to use the product View the door camera - You cannot use it if door camera is not connected Monitoring CCTV - You cannot use it if CCTV is not connected Move to Interphone menu Move to the list of recorded images and videos Security Move to Security menu. - Page 7 When you use a one monitor, you cannot use other monitors for monitoring/ CCTV/ Interphone. SD card status: Insertion / Full memory Video quality adjustment: Door camera Display setting...
- Page 8 If you set 'Fast mode’ in the menu option 'Open door mode’, there will be shown only 'Door open’ icon. In this case, opening door is possible only. CCTV monitoring : To check CCTV video during call or monitoring. ( If CCTV is not connected, the icon is not displayed. ) ⑩...
- Page 9 7. Installation ⑤ When you touch a call connection button at additional monitors (ID2/ID3/ID4), the master monitor (ID1) will stop any of operating functions (Saving of images/video-clips, etc.,) and will display the main screen.
- Page 10 When you use a one monitor, you cannot use other monitors for monitoring/ CCTV/ Interphone. Video quality adjustment: To change Brightness/Light & Shade/Chroma. of CCTV...
- Page 11 ① Video-clip cannot be stored while SD card is not inserted. - The images can be stored in the monitor's embedded memory. (Max 50 images). - You can use as below when you need back-up of images which are stored in the monitor's embedded memory.
- Page 12 9. Specifications and Features...
- Page 13 - When you touch Playback button, the below screen will be shown. - Select the image. (Selected image will be enlarged and video will be displayed.)
- Page 14 ① Page information : Current page / Total page ② Move the page: ◀ : previous page / ▶ : next page ③ File information :Image file, : Video file, : New file ④ Emergency Recording: File saved when emergency occurs by sensors. - When 'Auto Rec' is set in Security menu, CCTV video is recorded for 10 secs when emergency occurs.
- Page 15 3-6. Security (Can be used with security sensor) Touch the Security button to display the following screen. Using this function, the door is detected when the sensor is connected. This function setting (On and Off/ save video / log view) is possible only by ID1 (MASTER device). (In case of extension phone (ID2 ~ ID4), only the alarm rings.) <...
- Page 16 When security alarm occurs When a sensor is detected during security mode, an alarm is generated, and the sensor number (Sensor1 or Sensor2) and the time of occurrence are displayed. If the emergency situation is canceled, press 'Stop' button at the bottom. (You can turn off the alarm if the corresponding sensor is recovered to normal status.) When the password input window appears, enter the four-digit password using the key buttons.
- Page 17 : Can be used only with ID1 (MASTER) 7. Installation enable / disable function. elect storage method. - LCD is on for motion detection : During video recording, it shows video on LCD. (for 10 seconds) * Reference - When detecting motion, the photo is saved for 1 scene and the video-clip is saved for 10 seconds.
- Page 18 < 1. SD card inserted> < 2. SD card not inserted> 1. If SD card is inserted: Video recording starts at the same time as monitoring. ① : The camera is changed every set time (CAM1 -> CAM2 -> CCTV1 -> CCTV2 in order) ②...
- Page 19 (It can be different by types of SD card).
- Page 20 9. Specifications and Features (In this case, you can adjust the display of door camera1.) - When you use a one monitor, you cannot use other monitors for monitoring/ CCTV/ Interphone.
- Page 21 If you do not do any action during the setting time, the monitor shows stand-by mode -Enter standby mode : To set up a time to activate stand-by mode (If you deactivate the set-up time, it automatically sets up with 30 seconds.) - Screen timeout: To set amount of time for stand-by mode.
- Page 22 2) ID setting The product set to ID 1 will operated as a master, and individual camera, CCTV and sensors should be connected to the master. Fast: To open the door during calling. 4) Security password: It can be set and used only in ID1 (MASTER) - Set the password (4 digits) to be used to disable the security mode or to dismiss the alarm 1.
-
Page 23: How To Install
* Precautions on using Micro SD Cards 1) Please, do not turn on/off, insert or remove Micro SD card during playing, saving or formatting and so on. It might be caused of malfunction, harm or damage goods. 2) When the saving capacity of Image is over, then it automatically deletes the oldest Image and saving the newest Image instead. -
Page 24: Installation Diagram
5. Installation diagram 9. Specifications and Features... -
Page 25: Wiring Diagram
6. Wiring diagram When wiring(Camera, CCTV, Interphone), please use the core provided in the package to wrap around as shown in the above. -
Page 26: Package Contents
7. Package contents 9. Specifications and Features ① Monitor(CDV-1024MA) ·····················································································································································1EA ② Wall bracket for monitor ·················································································································································1EA ③ User Manual ··········································································································································································1EA ④ Wall bracket mounting screw ········································································································································4EA ⑤ Monitor fixing screw ··························································································································································1EA ⑥ Connector 2P ·······································································································································································4EA Connector 4P ········································································································································································4EA Connecting Device... -
Page 27: Specifications
8. Specifications , Sensor 2 wires(non polarity) Stand-by : 3.5 W Max : 18.5 W 10.1 * Connectable camera : DRC-4CPHD2 (2M pixel) 9. Safe operation guide... - Page 28 513-11, Sangdaewon-dong, Jungwon-gu, Seongnam-si, Gyeonggi-do, Korea Int’l Business Dept. Tel. : +82-31-7393-540~550 Fax. : +82-31-745-2133 Web site : www.commax.com Printed In Korea / 2016.06.104...
Need help?
Do you have a question about the CDV-1024MA and is the answer not in the manual?
Questions and answers