Table of Contents

Subscribe to Our Youtube Channel
Related Manuals for REED SD-8205


Summary of Contents for REED SD-8205
- Page 1 Rich Black - 20/20/20/100 SD-8205 Model Vibration Meter/ Only if you REALLY need them: Datalogger Instruction Manual reedinstruments GlobalTestSupply www. .com Find Quality Products Online at: sales@GlobalTestSupply.com...
-
Page 2: Table Of Contents
Table of Contents Features .................... 3 Specifications ................3-4 Instrument Description ..............5 Operating Instructions ..............6-10 Changing Unit ................6 Function selection ................6 Zero Adjustment ................7 Max hold reset procedures ............7 Data Hold ..................7 Data Record ................7-8 Backlight ON/OFF ................ -
Page 3: Features
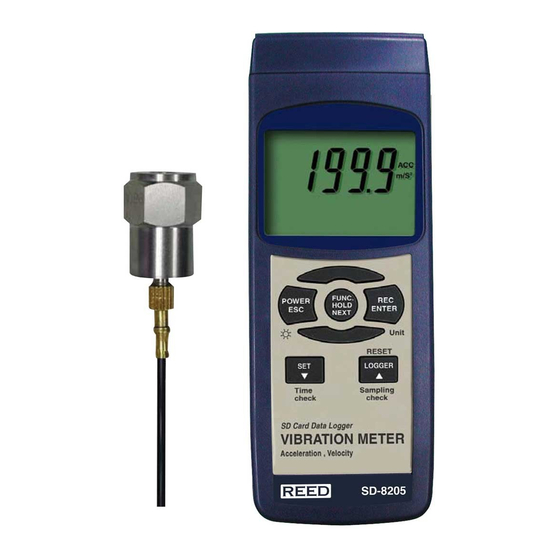
Features • Frequency range meets ISO 2954 standards • Metric & Imperial display units • Separate vibration probe with magnetic base • Measures Velocity & Acceleration • RMS, Peak, & Max Hold functions • Real time SD memory card datalogger with a built-in clock and calendar •... - Page 4 34 Blue Yellow - 0/27/100/0 23 Yellow Red - 10/100/100/5 85 Red Yellow - 0/27/100/0 23 Yellow For service on this or any other REED product or information on other Blue - 100/80/30/5 34 Blue reedinstruments Rich Black - 20/20/20/100 GlobalTestSupply www.
-
Page 5: Instrument Description
REED products, contact REED Instruments at info@reedinstruments.com Instrument Description 12. Battery Compartment/Cover 1. Display 13. Battery Cover Screws 2. Power, ESC, & Backlight Button 14. Stand 3. Hold, Function, & Next Button 15. Tripod Fix Nut 4. REC, Enter, & Unit Button 16. -
Page 6: Operating Instructions
Operating Instructions 1) Turn on the meter by pressing the Power Button. To turn the meter off, hold the Power Button for over 2 seconds. 2) Plug in the BNC Cable into the BNC Socket, and the Mini Cable Plug into the Vibration Sensor Socket. 3) If the surface material of measuring article is not ferrous, hold the Vibration Sensor and touch the Sensor to the surface of the mea- suring article. -
Page 7: Zero Adjustment
Zero Adjustment To make precise measurements, the following zero adjustment procedures should be executed: 1) Connect the Vibration Sensor to the Meter via the Vibration Sensor Socket. 2) Select Acceleration measurement (m/s , g, ft/s 3) Keep the vibration sensor motionless. Be sure there is no signal being picked up. -
Page 8: Backlight On/Off
To delete the minimum value, press the Hold Button once, and the display will show a “REC.” symbol only and execute the memory function continuously. 3) To exit the memory record function, press the REC button for 2 seconds. The display will revert to the current reading. Backlight ON/OFF After powering the meter ON, the LCD Backlight will turn on automati- cally. -
Page 9: Manual Datalogger
tion is being saved in memory. To set the sampling time, and to toggle the beeper sound on or off, refer to the Advanced Settings section of this manual. 2) Pause the Datalogging; while Datalogging, if press the Logger But- ton once. -
Page 10: Sd Card Data Structure
During normal functions (not Datalogging), press the Sampling Button and the lower LCD display will show the Sampling Time Information. SD Card Data Structure 1) The first time the SD card is used in the meter, the SD card will generate a folder: VBA01 2) The first time you use the Datalogger, in the folder VBA01, a new file name VBA01001.XLS will be created. -
Page 11: Advanced Settings
Advanced Settings During normal functions (not Datalogging), press and hold the SET Button for 2 seconds to enter the “Advanced Setting” mode. Press the Next But- ton scroll through eight main functions, shown on the lower display: dAtE Set clock time (Year/Month/Date, Hour/Minute/Second) Set SD card Decimal character PoFF Auto power OFF management bEEP Set beeper sound ON/OFF... -
Page 12: Auto Power Off Management
Enter Button to save the setting as the default. To exit “Advanced Settings”, press the Esc Button. Auto power OFF management 1) When the lower display shows “PoFF”, use the Up or Down But- tons to select the value “yES” (Enable Auto Power Off) or “no” (Disable Auto Power Off. -
Page 13: Pc Serial Interface
ton to confirm. PC Serial Interface The instrument features an PC output via 3.5 mm terminal. The connector output is a 16 digit data stream which can be utilized to the user’s specific application. An USB RS232 lead with the following connection will be required to link the instrument with the PC serial input. -
Page 14: System Reset
End Word D1 to D4 Upper Display reading, D1= LSD, D4= MSB D5 to D8 D5=? D6=? D7=? D8=? Decimal Point ( DP) for display 0 = No DP, 1 = 1 DP, 2 = 2 DP, 3 = 3 DP D10 = 0 D11 = 0 D12 = 0... - Page 15 For service on this or any other REED product or information on other REED products, contact REED Instruments at info@reedinstruments.com Notes _________________________________________ ________________________________________________ ________________________________________________ ________________________________________________ ________________________________________________ ________________________________________________ Blue - 100/80/30/5 34 Blue Yellow - 0/27/100/0 23 Yellow ________________________________________________ Red - 10/100/100/5...
- Page 16 ________________________________________________ ________________________________________________ ________________________________________________ ________________________________________________ ________________________________________________ ________________________________________________ ________________________________________________ ________________________________________________ ________________________________________________ ________________________________________________ Notes _________________________________________ ________________________________________________ ________________________________________________ ________________________________________________ ________________________________________________ ________________________________________________ ________________________________________________ Blue - 100/80/30/5 34 Blue Yellow - 0/27/100/0 23 Yellow ________________________________________________ Red - 10/100/100/5 85 Red Yellow - 0/27/100/0 23 Yellow Blue - 100/80/30/5 34 Blue reedinstruments Rich Black -...
Need help?
Do you have a question about the SD-8205 and is the answer not in the manual?
Questions and answers