
Related Manuals for REED ST-615


Summary of Contents for REED ST-615
- Page 1 ST-615 Model Digital Thermo-Hygrometer with remote or integral probe Pantone 485 & 123 485 = (0/100/100/10) 123 = (0/18/100/0) Instruction Manual reedinstruments...
-
Page 2: Table Of Contents
Table Of Contents Introduction....................2 Features....................... 2 Specifications....................3 Meter.Descriptions..................4 Display.Descriptions..................4 Operation..................... 5 Maintenance....................7 Battery.Replacement................... 7 Introduction This. device. measures. relative. humidity,. air. temperature. (with. probe),. . plus. -
Page 3: Specifications
Specifications Display:.. Dual.LCD.with.Backlight.and.status.Indicators Sensor.Type:..1 - Humidity: . Precision.capacitance.sensor Range & Function Accuracy Resolution Humidity 5.0.to.98.0%.RH ±.3.5%.RH. -20.0.to.199.9°C ±(3.0%.reading.+.4°C) Temperature.(K-type). -20.to.1000°C (probe.accuracy.not. -4.0.to.199.9°F included) ±(3.0%.reading.+.7°F) -4.to.1832°F . 2 - Temperature:.. Thermistor.(probe).and.type.“K”.thermocouple. Response.Time:. Probe.Temperature.and.. Relative.Humidity:.3.minutes Accuracy note: Accuracy is specified for the following ambient . temperature.range:.64.to.82°F.(18.to.28°C) Sampling.Rate:. -
Page 4: Meter.descriptions
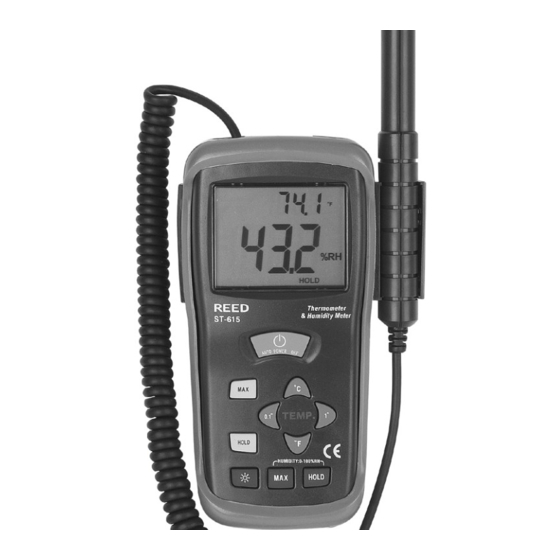
Meter Description 1..“K”.type.thermocouple.input.jack 2..Humidity/Air.Temperature.Probe 3..Temperature.measurement.reading.display 4..Relative.Humidity.measurement.reading.display 5..Power.ON/OFF.button 6..Thermometer.measurement.buttons.(6) 7..Relative.Humidity.function.buttons.(2) 8..Backlight.function.buttons. Display Descriptions Probe.temperature.. °F/°C.measurement.reading. Probe.temperature.. .MAX (1). °F/°C.MAX.Hold. .HOLD (1) . Probe.temperature.. °F/°C.Data.Hold. %.RH.. measurement.reading......MAX (2). %.RH.MAX.Hold .HOLD (2). %..RH.Data.Hold... LOW.battery.indicator reedinstruments... -
Page 5: Operation
Operation Power Press.the . . button.to.turn.power.on.or.off. Probe Humidity & air Temperature Measurements 1..Hold.the.probe.in.the.area.to.be.tested.&.allow.adequate.time.. for.readings.to.stabilize. 2..Read.the.Relative.Humidity.(center.of.LCD).and.. Probe.Temperature.(top.of.LCD)... NOTE:.Do.not.immerse.the.probe.in.liquid;.it.is.intended.. for.use.in.air.on Type- K Thermocouple Temperature Measurements 1..If.you.wish.to.measure.the.temperature.in.°F,.set.the.function.switch.to. the.°F.range..If.you.wish.to.measure.temperature.in.°C,.set.the.function. switch.to.the.°C.range. 2..Insert.the.Temperature.Probe.into.the.Temperature.Socket,.making.sure. to.observe.the.correct.polarity. 3..Touch.the.Temperature.Probe.head.to.the.part.whose.temperature.you. wish.to.measure..Keep.the.probe.touching.the.part.under.test.until.the. reading.stabilizes.(about.30.seconds). Read.the.temperature.in.the.display..The.digital.reading.will.indicate.the. proper.decimal.point.and.value. WARNING:. To. avoid. electric. shock,. be. sure. the. thermocouple. has. been.removed.before.changing.to.another.measurement.function. -
Page 6: Automatic Power Off
Automatic Power OFF To.conserve.battery.life.the.meter.automatically.shuts.off.after.10.minutes. °C or °F buttons 1..The.user.can.select.the.Temperature.units..Press.the.°C.or.°F.button.at. the.center.of.the.meter. 0.1 or 1 buttons 1..0.1.or.1.Temperature.Resolution.buttons.at.the.center.of.the.meter 2..The.thermometer.allows.two.choices.of.resolution:. High.resolution:.0.1°C.or.0.1°F.or.Low.resolution:.1°C.or.1°F Data Hold Buttons 1..Displays.can.be.held.(frozen).at.any.time.by.pressing.the.HOLD.button.. For.Temperature,.use.the.HOLD.button.on.the.left..For.Relative.Humid- ity,.use.the.HOLD.button.on.the.under.the.button.of.the.meter.. 2..Press.HOLD.again.to.exit.the.mode.. MAX Buttons 1..Press.the.MAX.button.to.display.only.the.highest.reading... For.Temperature,.use.the.MAX.button.on.the.left..For.Relative.Humidity,. use.the.MAX.button.on.the.under.the.button.of.the.meter. 2..Press.the.MAX.button.again.to.exit.this.mode. Backlight Display 1..Press.the.backlight button.to.turn.the.display.light.on.. 2..Press.the.button.again.to.turn.it.off. reedinstruments... -
Page 7: Maintenance
Maintenance Cleaning and storage 1..The.meter.should.be.cleaned.with.a.damp.cloth.and.mild.detergent. when.necessary..Do.not.use.solvents.or.abrasives. 2..Store.the.meter.in.an.area.with.moderate.temperature.and.humidity. Battery Replacement The.battery.symbol . . appears.on.the.lower.right.of.the.LCD.when.the.9V. battery.needs.to.be.replaced..Replace.the.9V.battery.as.follows: 1..Turn.the.meter.off.and.disconnect.the.air.temperature.probe. 2. Remove the large flat-head screw on the back of the meter to remove the.probe.holder. 3..Remove.the.rubber.holster.that.surrounds.the.entire.meter.by.pulling.it. over.the.top.of.the.meter. 4..Remove.the.small.Phillips.head.screw.on.the.back.of.the.meter. 5..Open.the.battery.compartment.and.replace.the.9V.battery. 6..Re-assemble.the.meter.before.operating. reedinstruments... - Page 8 Notes _________________________________________ ________________________________________________ ________________________________________________ ________________________________________________ ________________________________________________ ________________________________________________ ________________________________________________ ________________________________________________ ________________________________________________ ________________________________________________ ________________________________________________ ________________________________________________ ________________________________________________ ________________________________________________ ________________________________________________ ________________________________________________ ________________________________________________ ________________________________________________ reedinstruments...
Need help?
Do you have a question about the ST-615 and is the answer not in the manual?
Questions and answers