Table of Contents
Advertisement
Quick Links
Advertisement
Table of Contents

Related Manuals for Adash 4300 VA3Pro


Summary of Contents for Adash 4300 VA3Pro
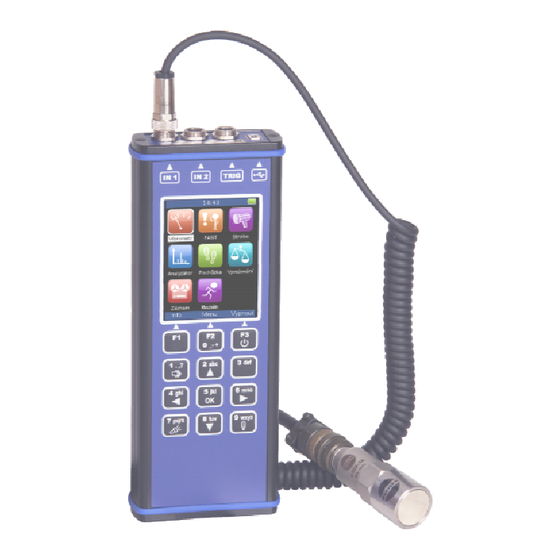
- Page 1 User Manual Adash 4300 VA3Pro Ver.1.08 – September 22, 2016...
-
Page 2: Table Of Contents
Measurement ........................28 Status bar........................28 Measurement screens ..................... 28 Overall (RMS) and Peak (0-P) values Spectrum up to 200Hz – mechanical looseness detection Time signal for roller bearing diagnosis For further technical and contact information visit www.adash.com, email: info@adash.cz... - Page 3 Downloading the route to the computer ................44 Reference values ......................44 Manual entry ........................44 Notes..........................45 Speed in the route ......................45 Speed entered in DDS Measured Speed For further technical and contact information visit www.adash.com, email: info@adash.cz...
- Page 4 Measurement ........................59 Trends..........................60 Deleting trends ........................ 60 Appendix A: Technical Specification ..............61 Inputs ..........................61 Dynamic Channels (AC) Tacho Channel Static Channels (DC) Measurement Functions ....................61 For further technical and contact information visit www.adash.com, email: info@adash.cz...
- Page 5 Appendix C: ACMT bearing and gearbox measurement ........67 Applications........................67 Description ........................67 ACMT is the solution ....................... 67 Example .......................... 67 The ACMT method can do even more................68 For further technical and contact information visit www.adash.com, email: info@adash.cz...
-
Page 6: Before You Read This Manual
We have not changed some pictures in the manual although they have been changed in the instrument already. This has only been done on places where such pictures have no consequence on the new function. For further technical and contact information visit www.adash.com, email: info@adash.cz... -
Page 7: Before Switching On
Use only original cables designed for connection with the sensor. If you are unsure, contact your distributor or the manufacturer. A long push and hold of the POWER button switches the instrument off incorrectly. Data could be lost. For further technical and contact information visit www.adash.com, email: info@adash.cz... -
Page 8: Batteries And Charging
Keep the unit in normal temperature before you begin measurement. Don’t leave the unit uncharged for the long time. The battery could be discharged completely. If you do not use the unit, charge it regularly every 6 months. For further technical and contact information visit www.adash.com, email: info@adash.cz... -
Page 9: General Information
There are 2 signal inputs and 1 tacho/trigger input. Input 2 offers connectivity to a triaxial sensor, therefore all 3 channels can be measured simultaneously. The expert system developed by Adash can automatically detect machine faults such as unbalance, looseness, misalignment and bearing faults. -
Page 10: The Emergency Switch Off
- Flashing green with 0.25 sec time interval (4Hz, four times per sec) - the measurement is running. - Flashing green with 1 sec time interval - STANDBY, the measurement is not running. - Red - the DSP board is not working properly. For further technical and contact information visit www.adash.com, email: info@adash.cz... -
Page 11: The Cpu Status Led
What does this mean? It means that the total required time is not equal to the sum of all individual times, but it is equal to the time required for the longest reading. For further technical and contact information visit www.adash.com, email: info@adash.cz... -
Page 12: How To Work With The Menu
We will describe it with an example - the sensor properties definition. Press the Menu (F2) on the main screen. Select the Sensors item and press OK. The sensors properties menu appears. For further technical and contact information visit www.adash.com, email: info@adash.cz... -
Page 13: User Defined Values
Now you can move the cursor, to use the Delete function. Press F1 again and the buttons functions change back. When the value is correct, press OK. The menu with new value appears. For further technical and contact information visit www.adash.com, email: info@adash.cz... -
Page 14: Input Channels
IN2 input 1 – CH2 AC/DC INPUT 2 – GROUND 3 – CH1 AC/DC INPUT 4 – SHIELDING 5 – CH3 AC/DC INPUT 6 – NOT USED 7 – NOT USED For further technical and contact information visit www.adash.com, email: info@adash.cz... -
Page 15: Trig Input
In the IN2 socket - the signal is measured on CH2. If you want to use the tri-axial sensor, then you should use the IN2 socket (pins 3,1,5) + ground (pin 2). You need a special cable for this purpose. For further technical and contact information visit www.adash.com, email: info@adash.cz... -
Page 16: Main Menu
This option is the combination of speed and time. The next measurement is taken when one of them is changed more then the value Speed change or Time Change. Speed change see Runup Mode: speed (the previous section). For further technical and contact information visit www.adash.com, email: info@adash.cz... -
Page 17: Sensors
Sensors button is displayed on most of the screens and once it is there, it is on the bottom. Push the Menu on the main screen and select Sensors. Push the OK button. In the next menu select the channel sensor you want to define. For further technical and contact information visit www.adash.com, email: info@adash.cz... -
Page 18: Ac Sensors
(selection of required setting accordingly to the sensor type) Sensitivity[mV/unit] usually 1,10,100, user Unit the unit selected from the list or the user unit Position the angle of the sensor (see picture bellow). Usually used for proximity sensors. For further technical and contact information visit www.adash.com, email: info@adash.cz... -
Page 19: Dc Sensors
The used formula: output value in Unit = (input value in mV - Offset) / Sensitivity. Tacho The speed is measured from the tacho channel. The signal contains one or more pulses per one rotation. The pulses can also trigger the measurement. For further technical and contact information visit www.adash.com, email: info@adash.cz... -
Page 20: Global
The correct reference value has to be set for speed measurement. E.g. when the standard tacho level is 0.5V and the pulses reach the 1.5V, then the value 1V should be correct. The negative pulses are not allowed, you need to use the Adash converter for them. Pulses per rotation This value has to be set for correct speed evaluation, when more pulses are generated during one rotation. -
Page 21: Date And Time
The list of update files appears (files, which were saved to VA3). Select required version and press OK (F3). Export Logs It is the tool for firmware development. You can create the log file, which is saved in VA3_DISC/va3/logs. For further technical and contact information visit www.adash.com, email: info@adash.cz... -
Page 22: Screenshot
ADASH Ltd. Adash 4300 – VA3Pro Screenshot Only if enabled on Global. The screenshot image will be saved to disc - VA3_DISC/va3/screenshots. For further technical and contact information visit www.adash.com, email: info@adash.cz... -
Page 23: Update Of The Unit Firmware
Adash 4300 – VA3Pro Update of the unit firmware You can download the updated firmware from the producer’s website www.adash.com. Follow the procedure: - Download the file for update (e.g. A4300_ver0101.up) from website and save it to your computer. - Connect the instrument to the computer. -
Page 24: Info
ADASH Ltd. Adash 4300 – VA3Pro Info If you press Info (F1) on the main screen, the system information will be displayed. For further technical and contact information visit www.adash.com, email: info@adash.cz... -
Page 25: The Main Screen
ADASH Ltd. Adash 4300 – VA3Pro The Main screen After switching the instrument on the Main screen appears. You can select required mode of the unit. For further technical and contact information visit www.adash.com, email: info@adash.cz... -
Page 26: Speed Detection
If the speed value is detected, it is automatically saved to the data header for following measurement in the same way as the speed value measured by tacho probe. If the speed is measured by tacho probe simultaneously, the value from the tacho probe has priority when saving. For further technical and contact information visit www.adash.com, email: info@adash.cz... -
Page 27: Meter Mode
Appendix C: Standards for vibration measurements. The measured values are displayed in traffic light colours. You can select the Adash standards (recommended, default item) or the ISO 10-816 standards which are much more general. Colour indication according to ISO 10-816 standards are as follows: A and B range is displayed in green C range is displayed in orange, D range is displayed in red. -
Page 28: Measurement
FFT analysis of vibrations in the range 2 Hz - 200 Hz in mm/s RMS The 3 maximum peaks found are displayed The peaks are arranged according to the vibration amplitude. For further technical and contact information visit www.adash.com, email: info@adash.cz... -
Page 29: Time Signal For Roller Bearing Diagnosis
5 kHz – 25.6 kHz in g. It also displays the Overall RMS [g] value in the range 0.5 kHz – 25.6 kHz Displacement values The values of displacement in the range 2-100 Hz are displayed. For further technical and contact information visit www.adash.com, email: info@adash.cz... -
Page 30: Temperature
The ranges of colours are as follows: less than 30°C - green, 30-45° C - yellow, 45-60° C - orange, 60-7 5°C – red, more than 75° C – dark red. For further technical and contact information visit www.adash.com, email: info@adash.cz... -
Page 31: Fasit
- g velocity - mm/s imperial: acceleration - g, velocity – in/s Measurement Press Start to initiate the measurement. The speed detection runs first (see chapter Speed Detection). For further technical and contact information visit www.adash.com, email: info@adash.cz... -
Page 32: Fasit Screen
The text message (e.g. Machine is in good condition) or the graph of the velocity spectrum is displayed at the bottom part of the screen. To switch between them press the Shift button. For further technical and contact information visit www.adash.com, email: info@adash.cz... -
Page 33: Strobo
- use the right/left arrow for changing the frequency in Hz, - use the up/down arrow for changing the frequency in RPM. - use the F1/F2 button for divide/multiply frequency by 2 For further technical and contact information visit www.adash.com, email: info@adash.cz... -
Page 34: The Analyzer Mode
(buttons 7 and 9). Press the Cancel button to cancel the New Set procedure (when the option <-> is on, otherwise the Cancel button is not available). When you do not enter the name of set and press OK, the procedure is cancelled as well. For further technical and contact information visit www.adash.com, email: info@adash.cz... -
Page 35: Copy Set
Select one set from Set list (on the Analyzer main screen) and press OK. Press the Menu button (F2). New Meas New Meas (Basic) List of predefined templates appears. You can select one of them. For further technical and contact information visit www.adash.com, email: info@adash.cz... -
Page 36: New Meas (Advanced)
The menu for definition of reading appears. The content of the menu changes according to the measurement Type selection (first row). See next images. For detailed description of parameters see the VA4Pro manual. For further technical and contact information visit www.adash.com, email: info@adash.cz... - Page 37 ADASH Ltd. Adash 4300 – VA3Pro For further technical and contact information visit www.adash.com, email: info@adash.cz...
- Page 38 (constant phase) amplitude every signal for averaging is triggered (constant phase) For further technical and contact information visit www.adash.com, email: info@adash.cz...
-
Page 39: Next Meas Functions
The switch for displaying of last measured data (Actual) and data saved in memory (Trend). Graph Max/Min Maximizes or minimizes the selected graph to the whole screen or returns back to the initial screen with more graphs. For further technical and contact information visit www.adash.com, email: info@adash.cz... -
Page 40: Graph Properties
The Start/S button (F3) can be used for two functions: - press it shortly - then new reading is started - press and keep it for 2 seconds - then the data are saved For further technical and contact information visit www.adash.com, email: info@adash.cz... -
Page 41: The Shift Button
The none value does not mean the DC part measurement. The HP filter on A/D converter is always used. But no additional filter is used. The frequency range with none filtering begins on 0.35 Hz (-3dB point). See the response graph. For further technical and contact information visit www.adash.com, email: info@adash.cz... -
Page 42: The Route Mode
Route readings Select the Route mode in the VA3Pro main screen. The list of routes in the memory is displayed. Select one route and press OK. The list of machines appears. For further technical and contact information visit www.adash.com, email: info@adash.cz... - Page 43 (Sensors properties) the instrument displays a warning. If this happens change the sensor or use a different sensitivity and press Continue. All measurements defined in the point should be taken now. The measured data are displayed on the screen. For further technical and contact information visit www.adash.com, email: info@adash.cz...
-
Page 44: Downloading The Route To The Computer
The measurement with subtype MANUAL in DDS is defined. Before beginning of measurements from sensors (after you press START button) the window for manual input appears ( one for each manual input ). For further technical and contact information visit www.adash.com, email: info@adash.cz... -
Page 45: Notes
There are various ways how to get the speed and transfer it to DDS. The ways are described here in the order from the lowest priority to the highest priority. For further technical and contact information visit www.adash.com, email: info@adash.cz... -
Page 46: Speed Entered In Dds
If the speed is measured by tacho probe, it is saved always with data regardless the fact if there were already defined by one of the previous ways (speed entered in device or DDS). Current entered or detected speed value (if defined) is displayed in information panel For further technical and contact information visit www.adash.com, email: info@adash.cz... -
Page 47: The Balancer
The list of saved projects or the Empty label is displayed on the first screen. Select one project or use the Menu/ New Project. The following functions for managing projects are also enabled (Menu button). For further technical and contact information visit www.adash.com, email: info@adash.cz... -
Page 48: New Project
STOP the measurement. the averaging of more then one measured value is available Resolution read the explanation in the Analyzer mode chapter: Meas functions/ New Advanced section. For further technical and contact information visit www.adash.com, email: info@adash.cz... -
Page 49: Rotor Settings
PC downloading. Vector This shows the drawing of amplitude/phase vector development during the balancing process. The drawing is also included in the balancing report. Description: R1-RUN1, R3-RUN3, T1-T3 -trims 1-3. For further technical and contact information visit www.adash.com, email: info@adash.cz... -
Page 50: Single Plane Balancing
The trial mass reminder message appears. Remove trial mass - if the Remove Trial option is set to yes Do not remove trial mass - if the Remove Trial option is set to no For further technical and contact information visit www.adash.com, email: info@adash.cz... -
Page 51: Run 2 - The Result Screen
When the mass or masses are mounted then it is the time to check the balancing job. The screen is very similar to the RUN 1 screen. Take the reading or manually enter the values. For further technical and contact information visit www.adash.com, email: info@adash.cz... -
Page 52: Trim Screens
Use the up/down arrow buttons to change the selection of the Point. Do the same for the second point. With two sensors you take both points readings at once. You can also enter the values manually. For further technical and contact information visit www.adash.com, email: info@adash.cz... -
Page 53: Run 2 With Trial Mass On Plane 1
When the masses are mounted then it is the time to check the balancing job. The readings on both planes are required. The screen is similar to the screen in single plane balancing. For further technical and contact information visit www.adash.com, email: info@adash.cz... -
Page 54: Trim Screens
An error is displayed when the change is less than 1%. You cannot continue with balancing after this error, because such a small change is not acceptable. You could get incorrect results. For further technical and contact information visit www.adash.com, email: info@adash.cz... -
Page 55: Recorder
Note: Only project settings are copied, no measured data are copied. Rename Project This function renames the selected project. Enter the new name and confirm by pressing OK. Delete Project Deletes the selected project. For further technical and contact information visit www.adash.com, email: info@adash.cz... -
Page 56: Clear Project Data
The recording starts when the signal from the Tacho channel exceeds the amplitude trigger level (see Ampl Trig Level below Pretrig: You can enter the length of the record before the Trigger (in minutes or seconds). For further technical and contact information visit www.adash.com, email: info@adash.cz... -
Page 57: Sensors Settings
The setting of each channel is displayed. In the graph there is a preview of the record from 1 channel. You can change the displayed channel by pressing the up/down arrow buttons. For further technical and contact information visit www.adash.com, email: info@adash.cz... -
Page 58: Record Analysis
Download the Virtual Unit application to the PC and you can analyze the signal in for example Analyzer mode. For more information see the A4400 VA4 manual, which describes the functions of the Virtual Unit. For further technical and contact information visit www.adash.com, email: info@adash.cz... -
Page 59: Run Up
The Runup mode is set to speed and the value is 1Hz. Measurement Start measurement - push Start button. After the final speed is achieved press Stop. The last measured value is on the screen. For further technical and contact information visit www.adash.com, email: info@adash.cz... -
Page 60: Trends
Use the Shift button to change arrow buttons meaning. Set the arrow buttons to trend. Use left and right arrow buttons to change cursor position. Deleting trends When trend list is displayed, use Delete button to delete selected trend. For further technical and contact information visit www.adash.com, email: info@adash.cz... -
Page 61: Appendix A: Technical Specification
Metric, Imperial (English) or user programmable Frequency Units: Hz, CPS, RPM, CPM, Orders Amplitude scale: Acceleration, Velocity, Displacement, User defined Scaling: Linear or Log, both X and Y axes Cursor: Single Triggering: free run For further technical and contact information visit www.adash.com, email: info@adash.cz... -
Page 62: Stroboscope
Li-Ion battery pack (more then 8 hours of measurement) Operating temperature: -10 ° C - +50 ° C, 15° F-120°F Dimensions: 230 x 82 x 32 mm Weight: 780 g For further technical and contact information visit www.adash.com, email: info@adash.cz... -
Page 63: Appendix B: Standards For Vibration Measurements
Adash Limit Values Adash limits are not rewritten from any existing standard. It is a result of more than 20 years of the Adash engineering team's experience. It is difficult to invent a critical value definition which would be simple (which means not many parameters such as speed, power, bearing type, machine type and so on) and reliable. - Page 64 Adash Limit Values of Bearing Vibrations The roller bearing limits are used for acceleration RMS value in 500-25600Hz frequency range. 1000 2000 3000 4000 5000 6000 7000 8000 speed [RPM] ----> For further technical and contact information visit www.adash.com, email: info@adash.cz...
-
Page 65: Iso 10816 Limit Values
Range C: Machines in this range are not acceptable for a long period of operation; they can be operated until the repair time only. Range D: Machines with vibration values in this range should not be operated. There is an acute danger of damage to the machine. For further technical and contact information visit www.adash.com, email: info@adash.cz... -
Page 66: Classification Of Vibration Values For Machines Groups 1 And 3
0,43 Classification of vibration values for machines groups 2 and 4 Foundation class RMS velocity values border zone mm/s in/s Rigid (R24) 0,06 0,11 0,18 Flexible (F24) 0,09 0,18 0,28 For further technical and contact information visit www.adash.com, email: info@adash.cz... -
Page 67: Appendix C: Acmt Bearing And Gearbox Measurement
We use the 19200 Hz sampling frequency. But we can measure only 42ms time signal. The time between the pulses is 114 ms. We need to be lucky and to hit the pulse. For further technical and contact information visit www.adash.com, email: info@adash.cz... -
Page 68: The Acmt Method Can Do Even More
The all short-pulses are held and amplitude is modulated for better view. This result is much better, because Y axis scale corresponds with real pulses amplitude, not with speed sine wave amplitude. For further technical and contact information visit www.adash.com, email: info@adash.cz...
Need help?
Do you have a question about the 4300 VA3Pro and is the answer not in the manual?
Questions and answers