Table of Contents
Advertisement
Advertisement
Table of Contents

Related Manuals for Racelogic VBOX LITE


Summary of Contents for Racelogic VBOX LITE
- Page 1 VIDEO VBOX LITE HARDWARE & SOFTWARE MANUAL Issue 1 22 December 2009...
- Page 2 VIDEO VBOX LITE MANUAL This page intentionally left blank Page | 2 22 December 2009...
-
Page 3: Introduction
The overlay Elements can be set up to display any of the channels logged by the Video VBOX LITE and the resultant video and VBOX data file are time synchronised to allow linked analysis of the data and video in the VBOX Tools software. -
Page 4: Table Of Contents
Video VBOX LITE Overview ............................... 10 Video VBOX LITE Inputs and Outputs ........................... 10 What can you do with the Video VBOX LITE? ....................... 10 What can you customise on the Video VBOX LITE? ...................... 10 Software Installation ..............................11 Video VBOX LITE Registration ............................ - Page 5 Assigning the CAN parameter to an Element ....................... 22 Connecting to the Vehicle CAN Bus ..........................22 Configuring the Video VBOX LITE to use a Micro/Mini Input Module ................23 Selecting Input Module channels for use with the Video VBOX LITE ............... 23 Setting up a MIM for use with the Video VBOX LITE ....................
- Page 6 Ordering Layers in a Scene ............................38 Grouping and Moving Elements/Layers in a Scene ....................39 Saving the Scene ................................41 Uploading a Scene to the Video VBOX LITE ........................42 Using the Software ..............................42 Using the SD Card ..............................42 Downloading a Scene from the Video VBOX LITE ......................
- Page 7 APPENDIX 1: Basic Gauge Creation ........................... 60 APPENDIX 2: Calculating scale and offset of a CAN parameter ..................69 APPENDIX 3: How to upgrade the Video VBOX LITE firmware ..................71 APPENDIX 4: How to install the USB Drivers in VISTA ...................... 72 APPENDIX 5: Troubleshooting Guide ..........................
-
Page 8: Quickstart Guide
Then plug the cigarette lighter adapter into your vehicle. NOTE: The Video VBOX Lite will take about 35 seconds to start, at which point the unit will beep to indicate it has booted up. 4. Securely attach the forward facing camera (marked HI RES) to the windscreen of your car and, if required, place the Picture-in-Picture camera (marked LOW RES) so that it faces the driver. - Page 9 Other leads, for example those supplied with USB card readers, do not have a standard length USB connector and will completely prevent communication between your PC and the Video VBOX LITE and in some cases may cause the USB port on your computer to lock up.
-
Page 10: Video Vbox Lite Overview
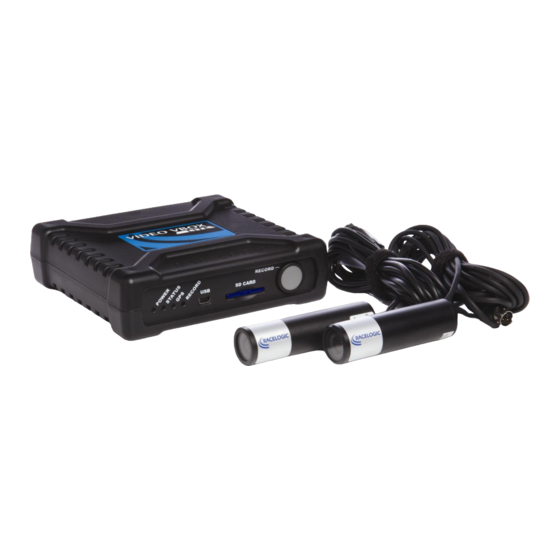
VIDEO VBOX LITE MANUAL Video VBOX LITE Overview Video VBOX LITE Inputs and Outputs What can you do with the Video VBOX LITE? Simultaneously log 2 camera inputs, with user configurable picture in picture and audio input Measure your speed, distance and other parameters ... -
Page 11: Software Installation
NB: The Video VBOX LITE setup software requires Microsoft .NET Framework 3.5 Service Pack 1 or higher to run. The installation CD contains the required .NET installation package. NB: In order to play back the AVI files recorded by the Video VBOX LITE, the XVid Codec pack must also be installed. The installation CD contains the required installation package. -
Page 12: Getting Started With Your Video Vbox Lite
Connections Included with the Video VBOX LITE is a cigar lighter power cable, which is the primary source of power input. This is terminated in a 2-way connector and mates with the 2-way ‘PWR’ socket on the Video VBOX LITE. The supplied GPS antenna with the gold MCX connector at the end of the antenna cable connects directly to the ‘GPS’... -
Page 13: Displaying Data With The Oled Display
NB: If the OLED is to be used in conjunction with the Video VBOX LITE for lap-timing or logging control, make sure the ‘AUX’ cable is connected up to the correct socket on the OLED. -
Page 14: Vvbl Data Logging
DriftBox Parameters If a Racelogic DriftBox or VBOX Mini is available, it is possible to connect the unit to the Video VBOX LITE using a RLCAB090 serial cable and use the Drift Angle and Score parameters as input to elements within a Scene. -
Page 15: Mpeg4 Video
The Video VBOX LITE records interlaced MPEG 4 AVI Files. NB: It is not possible to record video when the Video VBOX LITE is connected to a computer. If the ‘Rec’ button is pressed whilst connected to a computer via USB the Video VBOX LITE will produce a warning beep. -
Page 16: Logging Modes
NB: If the card is removed while the Video VBOX LITE is writing data to it, there is a risk that the data file may be corrupted resulting in loss of video data or a corrupt video file. -
Page 17: Logged File Format
VIDEO VBOX LITE MANUAL Logged File Format Video VBOX LITE files are saved in a Racelogic space delimited text format. This format is compatible with Performance Tools and VBOX Tools and can be easily imported into third party applications such as word processors or spreadsheets. -
Page 18: Logging A Can Channel
Logging a CAN channel To log CAN with the Video VBOX LITE the CAN channel in the Video VBOX Setup Software must first be configured with the relevant CAN parameter field. This can be done by either loading a CAN database into the software and selecting the required channel or by manually setting up the CAN channel fields. - Page 19 CAN database has been saved, select the file and click ‘OK’. 3. Once the CAN database has been selected, the user must then choose the CAN parameter to be used by the Video VBOX LITE. Clicking on the parameter name will list the CAN parameter field information to the right of the window.
-
Page 20: Loading A Can Database From Element Properties
3. Once the CAN database has been selected, the user must then choose which CAN parameter is to be used by the Video VBOX LITE. Clicking on the parameter name will list the CAN parameter field information to the right of the window. -
Page 21: Advanced Can Options
There are two CAN modes available for selection under the Mode dropdown in CAN and Module Configuration: The ‘VCI’ CAN mode should be selected if the Video VBOX LITE is to be connected to a third party CAN bus such as a vehicle CAN bus. ... -
Page 22: Assigning The Can Parameter To An Element
Connecting to the Vehicle CAN Bus If the Video VBOX LITE is to be used to log and display CAN data from the vehicle, the Video VBOX LITE needs to be connected to the vehicles OBD (On-Board Diagnostics) port. Most vehicles have an OBD connector which provides this interface. -
Page 23: Configuring The Video Vbox Lite To Use A Micro/Mini Input Module
Configuring the Video VBOX LITE to use a Micro/Mini Input Module The Video VBOX LITE can be connected directly to a vehicle CAN bus (with the correct cable), if this is not possible you can connect various vehicle sensors such wheel speed sensors, RPM, throttle etc. -
Page 24: Setting Up A Mim For Use With The Video Vbox Lite
Setting up a MIM for use with the Video VBOX LITE To ensure the Mini Input Module has the correct settings for use with the Video VBOX LITE the correct settings must be uploaded into the MIM using the ‘Stand Alone Setup Software’ and loading in the ‘MIMVideo.rms’ configuration file available from the software download section of the VBOX website. -
Page 25: Creating Start / Finish Lines And Splits
VIDEO VBOX LITE MANUAL Creating Start / Finish Lines and Splits To create a ‘Start/Finish and Splits’ file the user must have logged at least 1 lap of the circuit. The VBOX Tools software is used to create the Start/Finish & Splits file. - Page 26 20m. If a split point is set on this section, and the virtual gate has been set too wide, the split point could be registered by the Video VBOX LITE as it passes by in the opposite direction. Track proximity can be checked in Google Earth using the measurement tool if you are in doubt as to how wide the split points should be created.
-
Page 27: Creating Circuit Overlays
Drive to the left hand side of the start of the circuit. Place the antenna on the left hand side of the roof. Power up the Video VBOX LITE and let it acquire satellites. Insert the SD card ready for logging. ... -
Page 28: Displaying Driftbox Parameters
Video VBOX LITE is having trouble locking onto satellites, which typically occurs if it is the first time the Video VBOX LITE has been used, it has not been used for several weeks, or if it was last used a long distance (over one thousand miles) away from the current location. -
Page 29: Software Overview
Created your own gauge? Import it into the software and use it on your next track day. The Video VBOX LITE also comes with VBOX Tools, a data analysis package which allows you to view and process the Video VBOX data in post-processing. -
Page 30: Starting The Video Vbox Lite Setup Software
To get started select one of the default scenes by clicking on the link, the Video VBOX LITE Setup software then opens with the Top level view. -
Page 31: The Main View Window
The Main View Window is a preview of what the overlay will look like when recorded by the Video VBOX LITE once the scene file has been exported to your Video VBOX LITE. What we refer to as a ‘Scene’ is the collection of gauges, images, text, etc. -
Page 32: The Menu Bar
This allows the user to import a previously exported ‘.SCN’ Scene file into the Video VBOX LITE Setup software. The Scene file can then be saved for use at a later date in the software or uploaded to a connected Video VBOX LITE. -
Page 33: Elements
The Elements menu lists all of the options related to creation, saving, and import/export of Elements for the Video VBOX LITE. The user can choose to create new Elements or import elements from another Video VBOX LITE or saved file. -
Page 34: Scenes
VIDEO VBOX LITE MANUAL Scenes Scenes define how the video overlay will look when the Video VBOX LITE is recording the video file. The Scenes tab in the Element browser window contains all of the currently defined Scenes for the Video VBOX LITE. -
Page 35: Modifying Scene Properties
This is the log rate of the Video VBOX LITE, it is fixed at 10Hz. (10 samples a second). Video Settings The Video VBOX LITE is capable of recording video in PAL or NTSC format, the default quality of the video is set to high. The screen resolutions are as follows: PAL:... -
Page 36: Audio Settings
VIDEO VBOX LITE MANUAL Audio Settings The Video VBOX LITE is capable of accepting either a Mono or Stereo source of audio input. If Mono is selected the audio signal from the microphone connected to Camera 1 will be split and recorded on both audio channels of the video file. -
Page 37: Adding Elements To A Scene
VIDEO VBOX LITE MANUAL Adding Elements to a Scene There are currently 8 types of Element that can be displayed in the graphical overlay for the Video VBOX LITE: • Video Picture-in-Picture • Circular Gauge • Single Bar Graph •... -
Page 38: Controlling Layers In A Scene
VIDEO VBOX LITE MANUAL Controlling Layers in a Scene When an Element is added to the scene it creates a layer, with each new element added on top of existing layers. i.e. the most recently added layer will cover any already in the scene. -
Page 39: Grouping And Moving Elements/Layers In A Scene
VIDEO VBOX LITE MANUAL For example dragging the gauge layer to the bottom of the list puts the gauge layer below all the other Elements (see right). It is now underneath the lap-timing elements which can now be selected for editing, or position adjustment. - Page 40 VIDEO VBOX LITE MANUAL A pop-up window will then ask you for a group name. If no groups have been defined you will need to create a new group, or you have the option of adding the layers to an available group.
-
Page 41: Saving The Scene
Theme button. NB: A progress bar will appear when saving or loading a scene or element background, or importing or exporting a scene from a Video VBOX LITE. The Progress bar will disappear during general use. Page | 41 22 December 2009... -
Page 42: Uploading A Scene To The Video Vbox Lite
You can also upload a Scene to the Video VBOX LITE using an SD card. For example if you place an exported Video VBOX LITE .SCN scene file in the top level directory of the SD card and insert the card into a powered Video VBOX LITE the Scene will be uploaded to the Video VBOX LITE. -
Page 43: Elements
VIDEO VBOX LITE MANUAL Elements There are currently 8 types of Element that can be created for use in the graphical overlay for the Video VBOX LITE: • Video Picture-in-Picture • Circular Gauge • Single Bar Graph • Double Bar Graph •... -
Page 44: Video Picture-In-Picture
Video Picture-in-Picture The Video Picture-In-Picture window is a variable sized Element used to display the input from a secondary camera connected to the Video VBOX LITE. The quality of the video displayed in the PIP window is not configurable but is fixed to the current scene quality setting. -
Page 45: Gauge
Gauges can be used to display any of the available GPS or CAN parameters being logged by the Video VBOX LITE such as speed (GPS), Engine Temp (CAN) etc. Associated with the gauge are various properties which allow the user to customise existing Gauges or create entirely new ones. - Page 46 VIDEO VBOX LITE MANUAL 3: Setting Range properties This defines the Minimum and Maximum values to be displayed by the Gauge. In the example on the left the Min = 0 and the Max = 200. NB: The range values set in Element properties govern the range of values the full motion of the needle will move through, it does not change the values on the Gauge face.
- Page 47 VIDEO VBOX LITE MANUAL Click the needle image and move it so that the needle rotation point is over the central rotation point of the Gauge. Now click on the crosshairs to give them focus, then click and drag the crosshairs to the rotation point of the Gauge.
- Page 48 VIDEO VBOX LITE MANUAL 8: Setting Needle Rotation Limits The Lower and Upper rotation limits of the needle now need to be set so that the minimum rotation point of the needle is located at the same point as the zero point of the gauge.
-
Page 49: Single Bar Graph
Single Bar Graphs can be used to display any of the dynamically changing data available in GPS or CAN being logged by the Video VBOX LITE such as Lateral Acceleration (GPS), Engine Temp (CAN) etc. - Page 50 VIDEO VBOX LITE MANUAL 3: Positioning the Bar Once the background has been selected, the position of the Bar on the Bar Graph must be set and the attributes which determine its behaviour, such as the colour, fill direction, parameter and minimum and maximum values used also need to be defined.
-
Page 51: Double Bar Graph
Double Bar Graphs can be used to display two dynamically changing parameters available in GPS or CAN being logged by the Video VBOX LITE such as Lateral and Longitudinal Acceleration. - Page 52 VIDEO VBOX LITE MANUAL 3: Positioning the Bars Once the background has been selected, the position of the Bars on the Bar Graph must be set and the attributes which determine their behaviour, such as the colour, parameter and negative and positive range values used also need to be defined.
-
Page 53: Track Map
Circuit maps of many of the popular tracks are available for download from the Racelogic Driftbox website as a .cir format file. http://www.driftbox.com/dlfiles.html. Also see the Circuit Overlay section for how to create your own Track Maps. -
Page 54: Text
VIDEO VBOX LITE MANUAL Text A Text element is a live textual display of either GPS, CAN, or lap-timing parameters. There are two main components of a Text Display, the parameter displayed by the element and the format of the text displayed. These components have editable properties which allow the user to customise the appearance of existing Text Display or create entirely new ones. -
Page 55: Using Lap-Timing Parameters
Using lap-timing parameters The Video VBOX LITE has the capability of overlaying as a TEXT element any of the lap-timing parameters from the following list: ... - Page 56 To do this a Start/Finish and Splits file for the location the Video VBOX LITE will be used in must first be loaded into the software. The file needs to be in either Split (.spl) or DriftBox Split (.dsf) format. Once the start/finish and splits file has been loaded into the Scene, the VBOX can then calculate the lap parameters of the vehicle and display them as part of the video overlay as a text element.
-
Page 57: Static Label
VIDEO VBOX LITE MANUAL Static Label A Static Text Label. Static Label Creation 1: Starting a New Static Label From the Menu bar select ‘Elements’ ‘New’, this produces a dropdown menu listing the different types of Element it is possible to add to the Scene e.g. -
Page 58: Static Images
VIDEO VBOX LITE MANUAL Static Images A Static Image is user defined PNG, BMP, or JPEG image display. Static images can be opaque or have areas of transparency. Static Image Creation 1: Starting a New Static Image From the Menu bar select ‘Elements’ ‘New’, this produces a dropdown menu listing the different types of Element it is possible to add to the Scene e.g. -
Page 59: Saving Newly Created Elements
VIDEO VBOX LITE MANUAL Saving Newly Created Elements If an Element has been modified or newly created then it must be saved in order to use it in the future. Clicking Save will open a dialogue box where the user can set the Element name and if desired, save the Element under a particular theme. -
Page 60: Appendix 1: Basic Gauge Creation
There are a number of software packages available which are capable of creating images suitable for use with the Video VBOX LITE. One which has been used extensively by Racelogic for the quick and easy creation of gauges is an open source application called Inkscape. - Page 61 VIDEO VBOX LITE MANUAL First select the circle tool from the toolbar on the left, then while holding down the ‘CTRL’ key drag out a circle. (Holding CTRL keeps the circle exactly round) In the width and height boxes in the menu bar enter 550 pixels for the width and height.
- Page 62 VIDEO VBOX LITE MANUAL The fill and stroke menu is used to control the fill and border colour, thickness, and transparency. Left click on the circle and select the ‘Stroke Paint’ tab. Select the ‘Flat Colour’ button at the top of the tab. (box with solid fill). Move all the R, G, B, and Alpha (Opacity) sliders to the far right, or enter 255 in all the text boxes on the right.
- Page 63 VIDEO VBOX LITE MANUAL Now we need to make the Dial markers, we make the marker points first as these give us the exact locations of the numbering when we add those to the gauge face. It is a matter of preference of how big, what colour, and where on the gauge they are. For this example we’ll keep it simple and create a big marker for the numbers, and a smaller marker for the intermediate markers both in black.
- Page 64 VIDEO VBOX LITE MANUAL In the ‘Stroke and Fill’ menu, select the Stroke Style tab and enter a width of 10 and select the rounded Cap. The marker should now look like the picture on the right. So now we have created one marker we need to create the others for the dial. The easiest way to do this is to use the duplicate and rotate feature of the software.
- Page 65 VIDEO VBOX LITE MANUAL The marker can now be duplicated and rotated to create the other markers, the rotation point will also be duplicated so all markers will share the same rotation point. First we need to define how many degrees we want to rotate each gauge marker.
- Page 66 VIDEO VBOX LITE MANUAL When you are finished you should have something which looks similar to the picture below. Now we need to add our intermediate markers. Duplicate the first horizontal marker you made and shorten it by holding the CTRL key and clicking and dragging the right hand arrow to maintain the aspect ratio.
- Page 67 VIDEO VBOX LITE MANUAL Now we need to add the numbering on the gauge. For this example we are going to create a gauge which shows values from 0 – 160, with steps of 20. Select the Text tool from the side bar Left click and drag a box near the marker for the zero point of the gauge.
- Page 68 VIDEO VBOX LITE MANUAL To export the gauge to an image file for use with the Video VBOX LITE, click and drag a window around the gauge to be exported so that all of the elements are selected. Click on ‘File Export Bitmap’...
-
Page 69: Appendix 2: Calculating Scale And Offset Of A Can Parameter
VIDEO VBOX LITE MANUAL APPENDIX 2: Calculating scale and offset of a CAN parameter When reading data from a vehicle using sensor equipment such as the Mini-Input Module or Micro Input Module it is often necessary to convert the data into a more meaningful format, for example converting a voltage from a throttle or brake pedal into something more useful like percentage pedal press. - Page 70 VIDEO VBOX LITE MANUAL 4: Calculating the gradient of the line The gradient of a line is the change in Y divided by the change in X which gives: m = dY/dX dY = 100 – 0 = 100 dX = 5 – 0.5 = 4.5 Therefore the gradient of the line is: dY/dX = (100 - 0)/(5 –...
-
Page 71: Appendix 3: How To Upgrade The Video Vbox Lite Firmware
NB: Before carrying out the firmware upgrade ensure the scene currently loaded into the box has been saved or exported if it needs to be used again as the Video VBOX LITE will revert back to the default scene once the firmware upgrade has completed successfully. -
Page 72: Appendix 4: How To Install The Usb Drivers In Vista
To check if the driver installation has been successful, look under ‘Ports’ in device manager. If the Driver has not been installed correctly an exclamation mark in a yellow triangle will be visible next to ‘Video VBOX LITE’ below:... - Page 73 VIDEO VBOX LITE MANUAL Select 'Locate and install driver software (recommended)', then select 'Continue' In the bottom Right of the screen you will be able to see the following pop-up by clicking on the button. Wait until the driver installation process fails, the following pop-up will then appear.
- Page 74 VIDEO VBOX LITE MANUAL Now select 'Browse my computer for driver software (advanced)' Browse to the following directory which contains the VVB drivers and select 'next': “C:\Program Files\Racelogic\Drivers\General Comms Drivers” You will get a warning message informing you that Windows cannot verify the publisher of this driver software.
- Page 75 Checking in Device Manager you should see that the Video VBOX LITE has been successfully installed on one the COM ports and no longer has the yellow warning triangle next to it. It should now be possible to connect the Video VBOX LITE to the computer and upload and download scenes. Page | 75...
-
Page 76: Appendix 5: Troubleshooting Guide
If the green LED on the front of the Video VBOX LITE is not illuminated then there is no power to the unit; check that battery is fresh or, if using a cigar lighter, check internal cigar lighter fuse. - Page 77 Check the size of the scene you are trying to upload to the box, the scene should not be larger than 12 Mb. If the Video VBOX LITE beeps a warning the next time a scene is uploaded, re-install the firmware on the Video VBOX LITE and try to upload the scene again. The firmware is available for download from the Racelogic website.
- Page 78 A GPS coldstart forces the GPS engine to reset its downloaded almanac of current satellite positions. This can be useful if the Video VBOX LITE is having trouble locking onto satellites, which typically occurs if the Video VBOX LITE has not been used for several weeks or if it was last used a long distance (over one thousand miles) away from the current location.
-
Page 79: Appendix 6: Video Vbox Lite Specification
VIDEO VBOX LITE MANUAL APPENDIX 6: Video VBOX LITE Specification Outputs and Accuracies GPS Parameters The Following parameters can be used to drive gauges, bar graphs, circuit maps and text: Speed Vertical Velocity Time Longitudinal acceleration Track Position Lateral acceleration... - Page 80 VIDEO VBOX LITE MANUAL Heading Resolution 0.01° Accuracy 0.2° Lap-Time Resolution 0.01 s Accuracy 0.1 s Acceleration Accuracy ±0.5% Maximum Resolution 0.01 G Maximum update rate 10 Hz Definitions ** CEP = Circle of Error Probable 95% CEP (Circle Error Probable) means 95% of...
-
Page 81: Graphics, Sound And Storage
VIDEO VBOX LITE MANUAL Graphics, Sound and Storage Recording Options Record only when moving (default) Continuous record Record start/stop via front panel Graphics 24bit colour plus 16 levels of alpha transparency Virtually unlimited number of gauges, g-plots, bar graphs, track maps, text and images Choose from the internal GPS parameters or external CAN/Serial parameters Standard library of gauges, fonts etc. -
Page 82: Inputs
Baud rate and message structures completely user programmable, .dbc files available on request RS232 Custom streams can be accommodated – send enquiries to Racelogic USB 2 Video streaming for camera set-up & preview, SD card reading and setting parameters via a PC... -
Page 83: Can Output
VIDEO VBOX LITE MANUAL CAN Output The Video VBOX LITE has a CAN output which is present on the 5-way CAN connector output. Data format: Motorola Baud rate: 500Kb/s Data Bytes Update Rate 0x301 100ms (1) Sats in (2) Time since midnight UTC (3) Position –... -
Page 84: Unit Dimensions
VIDEO VBOX LITE MANUAL Unit Dimensions 580 TVL Camera: 21mm 420 TVL Camera: 19mm Page | 84 22 December 2009... -
Page 85: Connector Assignments
VIDEO VBOX LITE MANUAL Connector Assignments Connector 1 – PWR Function Power + (9 to 15V) Ground (0V) Connector 2 – CAM1 Function Ground Video input Camera Power (8 – 18V) Connector 3 – CAM2 Function Ground Video input Camera Power (8 – 18V) Connector 4 –... - Page 86 VIDEO VBOX LITE MANUAL Connector 6 – USB Function USB – 5V USB ID Page | 86 22 December 2009...
-
Page 87: Contact Details
VIDEO VBOX LITE MANUAL Contact Details Racelogic Unit 10 Swan Business Centre Osier Way Buckingham Bucks MK18 1TB United Kingdom Email: support@racelogic.co.uk Web: www.racelogic.co.uk Document Updates Changes Date Init Page Change 28-Oct-09 Version 1 of Document Page | 87 22 December 2009...
Need help?
Do you have a question about the VBOX LITE and is the answer not in the manual?
Questions and answers