Glunz & Jensen PlateWriter 3000 Operating Manual
Hide thumbs
Also See for PlateWriter 3000:
- Installation manual (19 pages) ,
- Service manual (152 pages) ,
- Operating manual (98 pages)
Table of Contents
Advertisement
Quick Links
Advertisement
Table of Contents

Subscribe to Our Youtube Channel
Related Manuals for Glunz & Jensen PlateWriter 3000


Summary of Contents for Glunz & Jensen PlateWriter 3000
- Page 1 Operating Manual PlateWriter™ 3000...
- Page 3 Operating Manual PlateWriter™ 3000 T11296 Edition AB, June 2015 This book has part No 10076392...
- Page 4 This man ual is pub lished by: GLUNZ & JENSEN A/S Selandia Park 1 DK-4100 Ringsted Den mark Phone:+45 57 68 81 81 E-mail: gjhq@glunz-jensen.com Internet: www.glunz-jensen.com © 2014 Glunz & Jensen A/S. All rights reserved. Operating Manual - PlateWriter™ 3000 1434...
-
Page 5: Table Of Contents
Creating files for plates ......... . . 2-4 Loading plates on the PlateWriter 3000 ....... 2-4 Adjusting the printer exit wheel guide . - Page 6 Table of contents Additional printer settings and check ....... . 3-10 Finishing unit .
- Page 7 Table of contents Enhanced file management and printing for Mac users ....4-47 Calibrating ........... . . 4-48 Why calibrate .
-
Page 8: Table Of Contents
Table of contents Operating Manual - PlateWriter™ 3000 1434... -
Page 9: Part 1: Introduction
Introduction About this manual Part 1: Introduction About this manual Intended use of this manual This man ual de scribes the com mon use pro ce dures of the PlateWriter sys tem. It is • in tended for the daily user and should be kept with the equip ment for ref er ence at all times. -
Page 10: Important
Introduction Important Important Unintended use of the equipment Glunz & Jensen A/S do not take any re spon si bil ity for any dam age or ac ci dents caused by un in tended use of the equip ment: As the equip ment is cer ti fied by ac cred ited test lab o ra tory (UL In ter na tional Demko •... -
Page 11: The Platewriter System
Introduction The PlateWriter system The PlateWriter system The PlateWriter system is an innovative and patented inkjet Computer-to-Plate (iCtP) device. The PlateWriter System consists of: PlateWriter en gine (1) • A spe cially mod i fied Epson inkjet printer that uses Glunz & Jensen's Liquid Dot fluid to im age the i-plates print ing plates. -
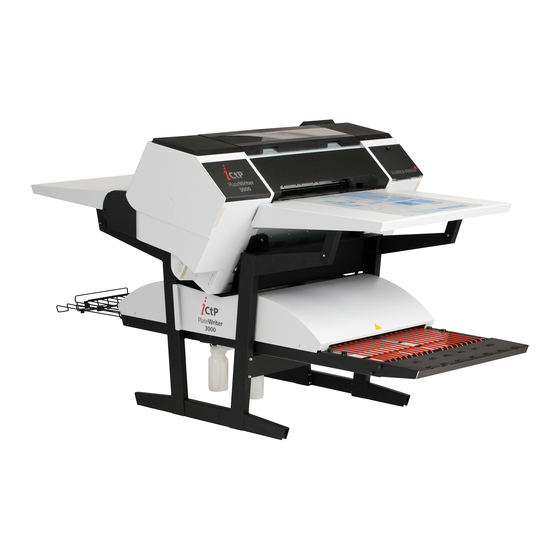
Page 12: Platewriter 3000 Overview
Introduction PlateWriter 3000 overview PlateWriter 3000 overview T11240 Control panel: from here you control the imaging unit. Input table. Exit table. Curing conveyor: leads the printed plate through the curing sections. Curing oven: dries the ink on the plate and cross-links it to the aluminum base. - Page 13 Introduction PlateWriter 3000 overview T11239 20 28 16 Waste ink bottle. 17 Status indicator LED: indicates the current status of the finishing unit. 18 Program selector: for selection of the curing oven program. 19 USB-cable: connects the imaging unit with the RIP workstation.
-
Page 14: Part 2: Daily Use
Daily use Overview Part 2: Daily use Overview The daily use procedures described in this chapter cover the following issues: Daily start-up pro ce dure • Load ing of plates into the PlateWriter for print ing • Print ing of plates •... - Page 15 Daily use Daily start-up Switch on the fin ish ing unit on the main switch (6) un der neath and make sure that • the in di ca tor (7) lights steady green. The unit will run gum fluid through the sys tem for ap prox i mately three min utes to •...
-
Page 16: Making A Proof
Daily use Making a proof Making a proof Creating files for proofs Use your DTP ap pli ca tion to pre pare a com pos ite out put file - please re fer to your • ap pli ca tion man ual for help. Se lect an out put page size suf fi ciently large to ac com mo date your con tent and any reg is tra tion marks or colour bars. -
Page 17: Making Plates
Save the file to a folder, ei ther on the com puter run ning Nav i ga tor RIP or on a server. • Loading plates on the PlateWriter 3000 The input table ensures that plates are fed into the printer correctly. The front and side register pins enable correct and easy alignment prior to entering the printer. -
Page 18: Adjusting The Printer Exit Wheel Guide
Daily use Making plates Adjusting the printer exit wheel guide The printer exit wheel guide pre vents the plates from rais ing upwards, and to avoid the risk of crash and dam age the print head. Press the but ton and slide the rollers to make it fit the edges of the plate. •... -
Page 19: Imaging The Plate
Daily use Imaging the plate Imaging the plate In the Nav i ga tor RIP open the Out put Con trol ler / Mon i tor win dow by ei ther • press ing Ctrl+O or choos ing Out put -> Out put Con trol ler from the RIP menu. Be sure that Dis able Out put is checked. - Page 20 Daily use Imaging the plate Click on Page layout... to open the Page Lay out win dow. • Check that the size of your plate is cor rectly en tered in the Me dia Width [MW] and • Me dia Length [ML] boxes. Most plates will be im aged land scape in the PlateWriter. De pend ing on whether you are load ing the plates in por trait or land scape and whether you have a por trait or land scape press, dif fer ent se lec tion to se lect the Cen - ter page on Me dia Length and set the Left Mar gins have to be made.
-
Page 21: Finishing
Daily use Imaging the plate Finishing Use +/- but tons on the pro gram selec tor • (1) to se lect pro gram: 1 = 0.15 mm plates 2 = 0.20 mm plates 3 = 0.30 mm plates 4 = Gum ming only/gum rinse Pro gram 0 is for tech ni cians only! Make sure that the in di ca tor (2) lights •... -
Page 22: Daily Shut-Down
Daily use Daily shut-down Daily shut-down Switch the unit into OFF-mode by press ing key. All lights turn off and the dis - • play will go blank. Important notes about switching the power on and off Never switch off the main power while the printer is running. The printing heads may be left uncapped. -
Page 23: Part 3: Cleaning And Maintenance
Cleaning and maintenance Overview Part 3: Cleaning and maintenance Overview This section describes the various procedures for care and maintenance such as: Printer Clean ing the printer body • Clean ing the printer ink sys tem • Ad di tional printer set tings and check •... -
Page 24: Inks And Fluids
Cleaning and maintenance Inks and fluids Inks and fluids The PlateWriter requires the use of various inks and fluids for processing, cleaning and maintenance purposes: T11258 Liquid Dot (1) The Liquid Dot ink is supplied in special cartridges and used in the imaging channels to create a hydrophobic image on the printing plate. -
Page 25: Replacing The Ink Cartridges
Cleaning and maintenance Replacing the ink cartridges Replacing the ink cartridges If ink runs out, replace the cartridges as described in the following. Never use any ink other than genuine Liquid Dot ink from Glunz & Jensen. Doing so may result in malfunction or faulty operation. Care and handling of ink cartridges Give attention to the following points when handling ink cartridges. - Page 26 Cleaning and maintenance Replacing the ink cartridges 1. Weigh the Liquid Dot cartridges that are to be moved. 2. Place the cartridges in the new slot positions. 3. Switch the printer off at the operator panel. 4. Press and hold the three buttons: , then switch printer on.
-
Page 27: Cl4 Cleaning
Cleaning and maintenance Replacing the ink cartridges CL4 Cleaning CL4 is an extra power clean, but only on the specific channels. To get in to the Serviceman mode: Turn off the printer. • Keep the three buttons pressed until the menu is displayed. •... -
Page 28: Other Printer Cleaning Tasks
Cleaning and maintenance Other printer cleaning tasks Other printer cleaning tasks General Exposed areas of the machine may become soiled with ink during printing. The cleaning methods described below let you continue printing without affecting the printed media or the machine. When carrying out any cleaning other than cleaning using cleaning sticks, switch off the main power (before turning off the main power, press the key. -
Page 29: Cleaning The Printer Ink System
Cleaning and maintenance Other printer cleaning tasks Cleaning the printer ink system For cleaning the printer ink system we refer to the maintenance video placed on the desktop of the RIP workstation. For this cleaning task is needed the maintenance kit with the 100 ml WB Cleaning Fluid, 8 cleaning sticks and a pipette. - Page 30 Cleaning and maintenance Other printer cleaning tasks T11122 Operating Manual - PlateWriter™ 3000 1434...
- Page 31 Cleaning and maintenance Other printer cleaning tasks Tilt the holder for the wiper, so that the wiper stands in an upraised position. • Moisten a cleaning stick with the WB Cleaning Fluid and clean any residue of ink off the wiper. Then use the same cleaning stick to clean •...
-
Page 32: Additional Printer Settings And Check
Cleaning and maintenance 3-10 Finishing unit After cleaning close the top cover and attached the service hatch and turn the power • on at the imaging unit. The print head will then drive back in the capped position. If the print head is not capped immediately after the maintenance is completed, this could result in damaging the print head. -
Page 33: Cleaning Of Gum/Finisher Rollers
Cleaning and maintenance 3-11 Finishing unit Cleaning of gum/finisher rollers It is recommended to perform this cleaning procedure once a month. (See illustration opposite) Switch off and un plug the fin ishing unit. • Re move the gum dryer (1). •... -
Page 34: Gum/Water Replenishing System
Cleaning and maintenance 3-12 Finishing unit Gum/water replenishing system De pend ing on the size of the plate, the fin ish ing unit sets aside a lit tle wa ter pump • run time (ap prox i mately 1 s for ev ery 60 sec onds that the fin ish ing unit is run ning). Once the plate has passed through the ma chine, the wa ter pump re plen ishes the re - served amount of wa ter and dis trib utes it to clean the rollers. -
Page 35: Part 4: Using The Rip
- which in this case is either the PlateWriter 3000 or a proofing device. In general, a software application or hardware device that performs this task is known as ®... -
Page 36: Basic Concepts And Definitions
Using the RIP Basic concepts and definitions As there is a great deal to set up, we have created the Glunz & Jensen factory default file (found in the C:\Xitron\Navigator 8.3r1\Factory default folder). The file contains a “Basic Set-up” covering all the settings and calibrations required for several plate sizes and can be loaded into the RIP upon start-up. - Page 37 Using the RIP Basic concepts and definitions Print ing Glunz & Jensen fac tory de fault in stalls gen eral press curves de signed to • match res o lu tion and ink for a spe cific re gion and -plates on most com mer cial print - ing presses.
-
Page 38: Setting Up Devices
Using the RIP Setting up devices Setting up devices Make sure that the PlateWriter is on and con nected to your com puter. • Start the Nav i ga tor RIP and se lect Nav i ga tor > De vice Man ager from the ap pli ca - •... - Page 39 Using the RIP Creating separation and progressive styles Predefined separations styles To make things easier, if you printed the Glunz & Jensen factory default file as described earlier, then it will have already installed some separations styles for you. Se lect Color -> Sep a ra tions Man ager from the Nav i ga tor RIP menu. •...
- Page 40 Using the RIP Creating separation and progressive styles The New Style... win dow opens. • Give the new style a name that will be easy to re mem ber and re flects what your • separation style will achieve (e.g. iScreen2 CMYK). Set Color space to CMYK.
- Page 41 Using the RIP Creating separation and progressive styles If you re ceived jobs such as PDF’s from cus tom ers that con tain mul ti ple Spot and • CMYK colours, and you want to force the sep a ra tion to CMYK, then cre ate an ad di - tional sep a ra tion style, set C, M, Y &...
-
Page 42: Creating Page Setups For Platemaking
Using the RIP Creating Page Setups for platemaking Creating Page Setups for platemaking About Page Setups The Navigator RIP allows multiple page setups, each can be used to describe how to handle a job that arrives at the RIP. The page setup identifies which device will be used to output the file, which separation style will be applied and thus the screening used to create the halftone. -
Page 43: Creating Page Setups
Using the RIP Creating Page Setups for platemaking This opens the Page Setup Man ager win dow. • Here are cre ated page set ups for dif fer ent presses, SM52 CMYK and SM74 CMYK based on the de vice PM1414HD 2Ch HDMW14 or al ter na tive for higher res o lu tions. You can use these page set ups as they are or you can sim ply change them to meet your re quire ments (such as larger plate size) or you can cre ate your own. - Page 44 Using the RIP 4-10 Creating Page Setups for platemaking The Page Setup Man ager di a logue ap pears. • Click on New… The New Page Setup win dow opens. • In the Out put De vice sec tion se lect the de vice PM1414HD and check that the val ues •...
- Page 45 Using the RIP 4-11 Creating Page Setups for platemaking The con fig u ra tion win dow for the PlateWriter plug-in opens. • The screenshot shows the set up as made by the Glunz&Jensen fac tory de fault file. • This may be al tered as de scribed on the fol low ing pages.
-
Page 46: Platewriter Plug-In Functionality
Using the RIP 4-12 PlateWriter plug-in functionality PlateWriter plug-in functionality This is a basic description of the functionality for the plug-in used with the Xitron RIP for the PlateWriter. Output Here you can choose the output device. The Plug-in shows installed printers in the Windows system. -
Page 47: Margins
Using the RIP 4-13 PlateWriter plug-in functionality Margins The margins setting can be used to adjust or tune the margins used when printing. This option allows you to choose millimetres or inches for the Adjust top and left margin option. If the image is not correctly placed on the plate, small adjustments can be made to ensure correct centring and gripper edge. - Page 48 Using the RIP 4-14 PlateWriter plug-in functionality Print the file to a printing plate of the correct gauge. • Inspect the printed job and select the row of the seven printed rows which has the • highest quality. Read the bidirectional setting to the left of the row. For further information please refer to the Hardware Installation manual.
-
Page 49: Imaging Mode
Using the RIP 4-15 PlateWriter plug-in functionality Imaging mode Each imaging mode selection contains several settings which controls the print mode speed and quality. There are two selections: Normal and Fast. Each imaging mode is setup by clicking the Setup button. First select e.g. Normal, then click the Setup button to see or change settings for the Normal imaging mode. - Page 50 Using the RIP 4-16 PlateWriter plug-in functionality Two channel printing One double row in double row mode or one single row in single row mode is called a channel. A channel can be used to a print job. A channel can be combined with another channel with a randomly interleaved distribution of the image.
-
Page 51: Print Head Row Selection
Using the RIP 4-17 PlateWriter plug-in functionality Sharpen Sharpen gives the ability to make text and lines sharper/thinner. The default is Off and no sharpen is applied. You can choose to apply Light or Full sharpen. This function works by removing dots on the edges of solid areas. Light version will remove dots only on the one edge. -
Page 52: Screening Linearisation Control
Using the RIP 4-18 PlateWriter plug-in functionality Changes to prolong print head life Changes to the RIP and to the Printer firmware to prolong the life of the print head were made. Before it was possible to print only with the Y and PK channels. Now as you can see on the picture on the previous page it is possible to have multiple choices to print by selecting the channel from the device configuration. - Page 53 Using the RIP 4-19 PlateWriter plug-in functionality The maximum achievable ink coverage increases with resolution. E.g. 2880x1440 dpi can jet twice the amount of ink compared to 1440x1440 dpi. It is therefore necessary to decrease the ink coverage when the resolution increases. Solids entry point This setting controls the internal calibration of iScreen.
-
Page 54: Saving The Page Setup
Using the RIP 4-20 PlateWriter plug-in functionality Saving the page setup When you made all set tings, click OK and re turn to the New Page Setup win dow. • In the Sep a ra tions, Screen ing & Color sec tion of the New Page Setup win dow •... - Page 55 Using the RIP 4-21 PlateWriter plug-in functionality The New Page Setup screen should now look like this (if the Glunz & Jensen fac - • tory de fault file was printed, oth er wise each of the Cal i bra tion & Dot Gain items are set to None).
-
Page 56: Setting The Plate Size
Using the RIP 4-22 PlateWriter plug-in functionality Setting the plate size For print ing plates set the Me dia Width and Me dia Length to the width and length • of your print ing plates. For ex am ple, for a Hei del berg SpeedMaster 52 set Width to 525 mm and Length to 459 mm. -
Page 57: Setting The Gripper And Job Position On The Plate
Using the RIP 4-23 PlateWriter plug-in functionality Setting the Gripper and Job Position on the plate Not all of the plate can be reproduced. Furthermore, to reduce press make ready time, it is desirable to place the job at the same starting point in terms of height, and in the centre of the width of the plate. - Page 58 Using the RIP 4-24 PlateWriter plug-in functionality Example of a Heidelberg SpeedMaster 52: The plate is loaded landscape (the long edge fits into the grip per). • The plate size is 459 mm x 525 mm, so set the Me dia Width to 525 mm and set the •...
- Page 59 Using the RIP 4-25 PlateWriter plug-in functionality Click OK to re turn to the New Page Setup win dow. • Click the Save As... but ton. In the ap pear ing Save Setup di a logue… • ...give your Page Setup a name which re flects the press size, and if nec es sary the Sep a ra tions Style so it will be easy to se lect later.
- Page 60 Using the RIP 4-26 PlateWriter plug-in functionality Click the OK but ton to exit the Page Setup Man ager. • If you click “Cancel” at any point, including to exit the Page Setup Manager above, then any changes you made or new Page Setups will be lost! Setting the Gripper and Job position for portrait printing presses For 4-up portrait presses, the PostScript or PDF file in theory should be centred on the Media Width, and the Top Margin should be set equal to the gripper margin plus the...
- Page 61 Using the RIP 4-27 PlateWriter plug-in functionality Ex am ple of an Hei del berg GTO52 press: • The plate size is 400 mm x 511 mm. • Set the Me dia Width to a plate length of 511 mm and set the Me dia Length to a •...
- Page 62 Using the RIP 4-28 PlateWriter plug-in functionality Click OK to re turn to the New Page Setup win dow. • In the Ef fects sec tion set Ro tate to the re quired ro ta tion that matches de pend ing on •...
- Page 63 Using the RIP 4-29 PlateWriter plug-in functionality In the ap pear ing Save Setup di a logue… • ...give your Page Setup a name which re flects the press size and if nec es sary the Sep a ra tions Style so it will be easy to se lect later. Click the Save button.
-
Page 64: Duplicating And Editing Existing Page Setups
Using the RIP 4-30 PlateWriter plug-in functionality Duplicating and editing existing Page Setups Overview One of the easiest ways to create new page setups is to duplicate an existing one and change the items you require. The most common requirement is to create Page Setups that match different presses and plate sizes. - Page 65 Using the RIP 4-31 PlateWriter plug-in functionality Using “Copy” to create a Page Setup for a different Plate Size Se lect Nav i ga tor -> Page Setup Man ager from the NavigatorRIP menu. • If you already have a Press Setup created, and you wish to add another of a different size, then try to select a Setup with the same orientation (e.g.
- Page 66 Using the RIP 4-32 PlateWriter plug-in functionality The New Page Setup win dow will ap pear. • Click on the Page lay out... but ton. In the Page Lay out di a logue… • ...edit the ex ist ing Me dia Width and Me dia Length set tings to re flect the plate size of your new press page setup.
- Page 67 Using the RIP 4-33 PlateWriter plug-in functionality Click Save As... to save your new page setup with the new plate size. Give your new Page Setup a name to re flect the set ting you have se lected. • In this ex am ple name the Setup GTO52 CMYK Stan dard. Click Save. 1434 Operating Manual - PlateWriter™...
-
Page 68: Printing A Job Using The Rip
Using the RIP 4-34 Printing a job using the RIP In the Page Setup Man ager di a logue... • ...ver ify that your new Page Setup ap pears in the list. Click OK to exit. If you click “Cancel” at any point including to exit the Page Setup Manager above, then any changes you made or new Page Setups will be lost! You have now com pleted cre at ing your new Press Page Setup. -
Page 69: Printing Several Files
Using the RIP 4-35 Printing a job using the RIP If you do not choose a Page Setup, the RIP uses the one that you chose last time you printed a file. If you have not printed a file in this RIP session, the first Page Setup in the drop-down list is used. -
Page 70: Automating Job Input To The Rip
Using the RIP 4-36 Automating job input to the RIP Automating job input to the RIP Printing using managed Input Plug-ins or 'Input Queues' This section describes the different ways in which the Navigator RIP can accept input, and how to configure the RIP to use each type of input. There are several ways of providing input to the Navigator RIP: Us ing the Print File menu com mand, as de scribed pre vi ously. -
Page 71: Managing Input Plugins
Using the RIP 4-37 Automating job input to the RIP Managing Input Plugins You control input plugins using the Input Controller. Before creating new inputs or changing existing ones, check that you have an appropriate page setup which can be associated with each input. -
Page 72: Turning On The Input System
Using the RIP 4-38 Automating job input to the RIP Turning on the input system To start receiving jobs from the configured and enabled inputs, choose the Navigator RIP -> Input Controller menu option or clicking the tool bar button. The tool bar button is the most frequently used way to start or stop the queues, and simply uses icons representing Traffic Lights. -
Page 73: Copying An Input Plugin
Using the RIP 4-39 Automating job input to the RIP Type a name for the In put plugin de vice in the Name text box. • The name is used to identify the source within the RIP. It may also be used by the input plugin itself. -
Page 74: Configuring An Input Plugin
Using the RIP 4-40 Automating job input to the RIP Configuring an input plugin Configuring an input means giving details about how the input is to be handled, and setting up any hardware or software associated with the source. To configure an existing input plugin, select it in the Input Controller and click Edit. -
Page 75: Using The Spoolfolder Input Folder
Using the RIP 4-41 Using the SpoolFolder input folder Using the SpoolFolder input folder The spool folder input is the most popular managed input for Mac and PC users. Use the spool folder to drag and drop PDF files directly. Using NT Print or AppleTalk will result in PostScript language file being generated. -
Page 76: Creating And Configuring A Spoolfolder Input Source
Using the RIP 4-42 Using the SpoolFolder input folder Creating and configuring a SpoolFolder input source To create and configure a new spool folder source do the following: Open the In put Con trol ler di a logue box ei ther by choos ing the Nav i ga tor RIP -> In - •... - Page 77 Using the RIP 4-43 Using the SpoolFolder input folder Se lect the Page Setup you wish to re ceive and pro cess jobs that ar rive in the spool • folder (here we have se lected the SM52 Stan dard Page Setup). Give your in put queue a Name (try to use names that re flect the Page Setup you are •...
- Page 78 Using the RIP 4-44 Using the SpoolFolder input folder The Spool Folder Con fig u ra tion win dow con tains the fol low ing con trol items: • Spool Folder The current spool folder is shown in the text field beside this button. This location is where the RIP detects the arrival of files and considers them as possible jobs, by looking at the type of file and any file names excluded in the Filenames pre-fix list.
- Page 79 Using the RIP 4-45 Using the SpoolFolder input folder Error Folder If a file fails to print, the RIP moves it to the error folder specified unless the Delete on error box is selected. If a file prints successfully, the RIP moves it to the Complete Folder specified unless the Delete on completion box is selected.
- Page 80 Using the RIP 4-46 Using the SpoolFolder input folder Delete on completion Select this box if you want the RIP to delete files that the spool folder succeeds in printing. Otherwise the RIP moves these files to the Complete folder. Generally we recommend deleting jobs after printing successfully.
-
Page 81: Using More Than One Method
Using the RIP 4-47 Using the SpoolFolder input folder If an attempt is made to send a file to a printer attached to a RIP channel that is not currently running (i.e. you have launched the RIP but forgotten to start the Channels) a warning is displayed in Windows that the port is not available and the user is given the chance to retry the job. -
Page 82: Calibrating
Using the RIP 4-48 Calibrating Calibrating Why calibrate The function of Calibration Curves is to linearize output on your plates. There are several approaches on the use of the remaining curves. Generally, if you use the actual press calibration curve to linearize your press then you will be printing with linear plates that will produce flat images. - Page 83 Using the RIP 4-49 Calibrating If nec es sary, open the Out put Con trol ler / Mon i tor win dow by ei ther press ing • Ctrl+O or choos ing Out put -> Out put Con trol ler from the RIP menu. Make sure that Dis able Out put is checked.
- Page 84 Using the RIP 4-50 Calibrating Click on the Info but ton to open the Through Put Info di a logue. • Click on Page lay out..• Check that the Me dia Width, Me dia Length and Mar gins are cor rect for your plate. •...
- Page 85 Using the RIP 4-51 Calibrating Uncheck Dis able Out put in the Out put Con trol ler / Mon i tor win dow. • Once the Through put win dow shows ac tiv ity, re-check the Dis able Out put checkbox.
- Page 86 Using the RIP 4-52 Calibrating Choose Out put -> Cal i bra tion Man ager from the RIP menu. • Choose Print ing Press as the De vice type. • Se lect CMYK as the Col our Space. • Click on New..•...
-
Page 87: Including The Press Calibration In Page Setups
Using the RIP 4-53 Calibrating Including the press calibration in Page Setups Editing the Page Setups Choose Page Setup Man ager from the RIP menu to open the Page Setup Man ager • win dow. Se lect the Page Setup that was used when print ing the uncalibrated tar get and click •... -
Page 88: Why Use Intended Press Or Tone Curves
Using the RIP 4-54 Why use Intended Press or Tone Curves? Why use Intended Press or Tone Curves? The calibration process we have outlined is used to linearize the printing process using the PlateWriter. Linear printing means that a nominal 50% dot (gray level) will print as 50% on press. Typically this will result in light or “washed out”... -
Page 89: Backup & Restore Your Navigator Rip Configuration For Windows
Using the RIP 4-55 Backup & restore your Navigator RIP configuration for Windows Backup & restore your Navigator RIP configuration for Windows It is very simple to backup your configuration of the Navigator RIP. If you follow this simple backup procedure, you will preserve all of your Passwords, Memory settings, Calibrations, Tone Curves, Device and Page Setups etc. -
Page 90: Part 5: Troubleshooting
Troubleshooting General Part 5: Troubleshooting General If the PlateWriter does not work properly, refer to the following pages to find the paragraph that comes closest to your problem. To change a fuse, switch off all power to the machine first. Always ensure that the new fuse is of the correct size and rating according to the electrical diagram placed in the Spare Parts Manual. -
Page 91: Problems With The Registration System/Print Head
Troubleshooting Problems with the registration system/print head Problems with the registration system/print head Indicator status and error codes The registration system's status indicator lamp has several ways to indicate the current status of the system and/or system errors. GREEN - STEADY Plate is registered correctly. - Page 92 Troubleshooting Problems with the registration system/print head In case of FRONT COVER OPEN error: Press the button to release the plate. • Remove the plate from the printer. • Press the button again. This will reset the error and release the front cover •...
Need help?
Do you have a question about the PlateWriter 3000 and is the answer not in the manual?
Questions and answers