Table of Contents
Advertisement
Advertisement
Table of Contents
Troubleshooting

Related Manuals for Sundance Spas Kingston 980 Series


Summary of Contents for Sundance Spas Kingston 980 Series
- Page 1 P.N.:6530-397D Rev. A 980™ Series Owner’s manual Kingston ™ Claremont ™...
- Page 2 Attention New Hot Tub Owner! Congratulations on the purchase of your new Sundance ® Spas hot tub! The following is a list of automated functions performed by your hot tub. These functions are listed below in an attempt to suppress any operational concerns you may have during the first 24 hours of ownership! Also listed below are important maintenance recommendations you should observe on a regular basis to protect your new investment.
-
Page 3: Table Of Contents
Bluetooth® device .............. 38 11.5 Acoustics Settings Menu............39 11.6 CLEARRAY on Demand ............40 11.7 Selecting The Desired Massage Action ........40 11.8 Adjusting Fluidix Reflex, Nex, ST, Intelli-Jets And Focus-Relief ............... 40 © Sundance Spas, Inc. All Rights Reserved... - Page 4 980™ Series 11.9 Air Controls ................41 11.10 Waterfall Control ................ 41 11.11 Fragrance Dispenser ..............41 12.0 Programming and Operation Instructions ....42 12.1 Draining the SunCooler.............. 43 12.2 Programming the Heating Mode ..........45 12.3 Programming the Primary Filtration ........... 46 12.4 Programming the Secondary Filtration ........
- Page 5 980™ Series 18.0 Circuit Board Electrical Wiring Diagram ......75 18.1 North American 60 Hz Electrical Wiring Diagram ...... 75 18.2 Export 50 Hz Electrical Wiring Diagram ........76 18.3 North American 60Hz Dip Switch Settings ......... 77 18.4 Export 50Hz Dip Switch Settings ..........78 18.5 Dual Service 50Hz Connection ..........
-
Page 7: Important Hot Tub Owner Information
Section 4.0 titled, “Locating Your Sundance Hot Tub” (page 8) or as prescribed by your authorized Sundance Spas dealer. Sundance hot tubs constantly strives to offer the finest hot tubs... -
Page 8: Important Safety Instructions For All Spa Owners
980™ Series Important Safety Instructions for all Spa Owners READ AND FOLLOW ALL INSTRUCTIONS CAREFULLY! This spa was manufactured to meet the standards and specifications outlined in the “Virginia Graeme Baker Pool and Spa Safety Act” (VGB Safety Act). When installing and using this spa, basic safety precautions should always be followed, including: DANGER: RISK OF SEVERE INJURY OR DROWNING! - Page 9 980™ Series • A grounding wire connector is provided on this unit to connect a minimum No. 8 AWG (8.4 mm²) solid copper conductor between this unit and any metal equipment, metal enclosures of electrical equipment, metal water pipe, or conduit within 5 feet (1.5m) of the unit.
- Page 10 980™ Series WARNING: RISK OF SEVERE INJURY OR DEATH! • Since excessive water temperatures have a high potential for causing fetal damage during the early months of pregnancy, if pregnant or possibly pregnant, consult your physician before using a spa. •...
- Page 11 980™ Series WARNING: In addition to maintenance of filters and water chemistry, proper ventilation is recommended to reduce the risk of contracting a waterborne illness (e.g. an infection, bacteria or virus) and/or respiratory ailments that could be present in the air or water. Consult a licensed architect or building contractor to determine your specific needs if installing your hot tub indoors.
-
Page 12: Entrapment Risk
980™ Series Entrapment Risk The Consumer Products Safety Commission/USA has reported that users of pools and spas have become entrapped (stuck) to drain and/or suction fittings causing death, drowning, or serious injury (see diagram below). This spa was manufactured to meet the standards and specifica- tions outlined in the “Virginia Graeme Baker Pool and Spa Safety Act”... -
Page 13: Hyperthermia
A Warning Sign is provided in your warranty packet. Please install at a location near your spa, where it is visible to users of the spa. For additional or replacement Warning Signs please contact your local Sundance spas dealer and reference item number #6530-082. Page 7... -
Page 14: Important Additional Csa Safety Instructions (Canada Only)
980™ Series Important Additional CSA Safety Instructions (Canada Only) When using this electrical equipment, basic safety precautions should always be followed, including the following: 1. READ AND FOLLOW ALL INSTRUCTIONS. 2. A green colored terminal or a terminal marked G, Gr, Ground, Grounding or the symbol* is located inside the supply termi- nal box or compartment. -
Page 15: Outdoor Location
980™ Series The spa must be installed in such a manner as to provide drainage away from it. Placing the spa in a depression without provisions for proper drainage could allow rain, overflow and other casual water to flood the equipment and create a wet condition in which it would sit in. -
Page 16: Indoor Location
980™ Series Indoor Location For indoor installations many factors need to be considered before installing a spa indoors: WARNING: In addition to maintenance of filters and water chemistry, proper ventilation is recommended to reduce the risk of contracting a waterborne illness (e.g. an infection, bac- teria or virus) and/or respiratory ailments that could be pres- ent in the air or water. -
Page 17: Location For The Sunsmart™ 2.0 System
980™ Series Location for the SunSmart™ 2.0 System IMPORTANT! Choose an installation site with the front control panel side pointing towards your home’s Wi-Fi router. CAUTION: You must make sure that the spa control panel side has a clear unobstructed line-of-site of the home Wi-Fi router. This action ensures maximum signal strength between the spa and your home’s Wi-Fi router. -
Page 18: General Electrical Safety Instructions
980™ Series General Electrical Safety Instructions Your new Sundance Spas hot tub is equipped with the “state-of- the-art” equipment system. It contains the most advanced safety and self-protective equipment in the industry. Nonetheless, this hot tub must be installed properly to ensure dependable usage. Please contact your local Sundance Spas dealer or local building department should you have any questions regarding your installation. - Page 19 980™ Series • When using wire larger than #6 (10 mm²), add a junction box near the hot tub and reduce to short lengths of #6 (10 mm²) wire to connect to the hot tub. 4. The electrical supply for this product must include a suitably rated switch or circuit breaker to open all ungrounded supply conductors to comply with Section 422-20 of the National Electrical Code, ANSI/ NFPA 70.
- Page 20 980™ Series Figure A Remove Corners (unclip bottom first) DANGER! TURN POWER OFF! DO NOT LOOK AT LIT BULB. SEVERE EYE DAMAGE OR BLINDNESS CAN OCCUR! Power Lamp Unclip across the top DANGER! TURN POWER OFF! DO NOT LOOK AT LIT BULB. SEVERE EYE DAMAGE OR BLINDNESS CAN OCCUR!
- Page 21 980™ Series Figure C Figure D Terminal Block 240V Control Box 60Hz Wire Connection 60Hz 1/4AT 250VAC 1/4AT 250VAC F7 30A F7 30A Black Terminal Block Bonding Lug Electrical Wires Entrance Figure E Terminal Block 230V 50Hz Wire Connection [refer to page 76 for wiring diagram] IMPORTANT NOTE: Wire connections on controller board must be changed depending on the number of breakers being used, page 80.
-
Page 22: Power Requirements
980™ Series Power Requirements Sundance Spas hot tubs are designed to provide optimum performance and flexibility of use when connected to their maximum electrical service. However, they are shipped factory configured for their most common preferred electrical connection. If you prefer, a qualified technician can perform a minor circuit board modification that allows the hot tub to operate on a different electrical service (see table below). -
Page 23: Export 50 Hz Power Options
980™ Series Export 50 Hz Power Options Export 50 Hz (1 Breaker Connection) Main Main Terminal Breaker Terminal Breaker (including Heater)* (including Heater)** Voltage: 230 VAC 230 VAC Max. Current Draw: Wattage: 4.4kW 7.2kW Frequency: 50 Hz 50 Hz Number of Wires: In this configuration, the heater will not operate while any jets pump is running. -
Page 24: Hot Tub Fill Up Procedure
980™ Series Hot Tub Fill Up Procedure For best results, read each step in its entirety before proceeding with that step. 1. Prepare The Hot Tub For Filling • Clear all debris from the hot tub. (Although the hot tub shell has been polished at the factory, you may want to treat it with a specially formulated hot tub cleaner.) Consult your dealer for additional information prior to filling hot tub. - Page 25 980™ Series WARNING: RISK OF POISONING OR DEATH. Never leave chemicals opened and accessible to anyone. Use chemicals according to the vendors instructions. Always store chemicals in a safe and/or locked location. Keep away from and out of reach of children. 6.
- Page 26 980™ Series DANGER: RISK OF PERSONAL INJURY. Check water temperature carefully before entering hot tub! Excessive water temperature can cause burns, welts and body temperature to rise, hyperthermia (over-heating). Decontamination Procedure (Steps 9-15) Steps 9-15 below are only required when sanitizer levels are unstable after performing steps 1-6 above.
- Page 27 Water that is too soft can be corrosive to metal components. 13. Consult your authorized Sundance Spas dealer for chemical recom- mendations, then add chemicals to hot tub water to achieve a con- stant sanitizer reading within the levels recommended on the inside cover of this manual.
- Page 28 980™ Series 15. Establish a sanitizer reading no less than 1.0 ppm free chlorine or 2.0 ppm bromine, then allow the hot tub to set undisturbed for 8 hours. Retest water after 8 hours to determine if sanitizer levels are stable.
-
Page 29: Hot Tub Features
980™ Series Hot Tub Features Claremont™ Hot Tub Features Main Control Panel 15. Fluidix Intelli-Jets (2 ea.) Pillows (3 ea.) 16. Vortex Jets (6 ea.) Massage Selectors (2 ea.) 17. Accu-Pressure Jets (5 ea.) Air Controls (4 ea.) 18. Focus Relief Jets (8 ea.) 19. -
Page 30: Claremont Massage/Waterfall Selector Diagram
980™ Series Claremont Massage/Waterfall Selector Diagram Massage Selector Operation Rotate Massage Selectors 1 and 2 to divert water between designated jet groups. Massage Selectors (1-2) • Massage Selector #1 controls pump #1. • Massage Selector #2 controls pump #2. Waterfall Selector (3) •... -
Page 31: Claremont Air Controls Diagram
980™ Series Claremont Air Controls Diagram Air Control Operation Rotate Air Controls 1-4 to add air to designated jet groups. Turn the Blower on to add air to jets group 5. Jet 6 connects to the Sun- Cooler perimeter drains (always on with pump 1). Spa operation subject to change without notice. -
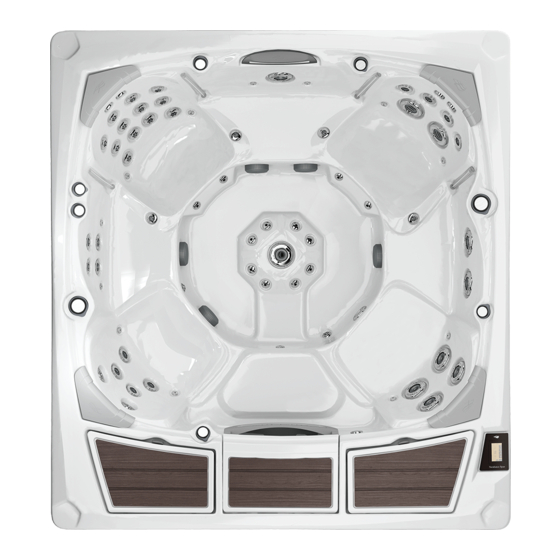
Page 32: Kingston™ Hot Tub Features
980™ Series Kingston™ Hot Tub Features 15. Fluidix Intelli-Jets (2 ea.) Main Control Panel 16. Vortex Jets (7 ea.) Pillows (4 ea.) 17. Accu-Pressure Jets (13 ea.) Massage Selectors (2 ea.) 18. Pulsator Jets (4 ea.) Air Controls (4 ea.) 19. -
Page 33: Kingston Massage/Waterfall Selector Diagram
980™ Series Kingston Massage/Waterfall Selector Diagram Massage Selector Operation Rotate Massage Selectors 1 and 2 to divert water between designated jet groups. Massage Selectors (1-2) • Massage Selector #1 controls pump #2. • Massage Selector #2 controls pump #1. Waterfall Selector (3) •... -
Page 34: Kingston Air Controls Diagram
980™ Series Kingston Air Controls Diagram Air Control Operation Rotate Air Controls 1-4 to add air to designated jet groups. Jet 5 con- nects to the SunCooler perimeter drains (always on with pump 1). Spa operation subject to change without notice. Page 28... -
Page 35: Registration And Start-Up
980™ Series 10.0 Registration and Start-up 10.1 Start-up Sequence During the start-up sequence, the welcome screens will appear, Figure 10.1a. Then a blow out cycle will begin, page 48. After the cycle ends, the hot tub will either display the Registration Menu or the Home Menu. Note: The start-up menu will time out after approximately 3 seconds and then change to the registration display in Section 10.2 (North American models only) or to the Home Menu (page 31). - Page 36 980™ Series Follow these steps to register your spa. 1. Using your home computer or other device, connect to the internet. 2. Go to www.SundanceSpas.com website to register your spa. 3. Click Owner 4. Click Warranty Registration 5. Enter your serial number. 6.
-
Page 37: Home Menu
980™ Series 10.3 Home Menu The new iTouch™ Glass system makes operating your spa a breeze. With vivid color graphics that make operation simple and interactive. You can navigate through the menus and sub-menus with ease. Simply touch the icons on the LCD display to begin operating your new Sundance Spas hot tub. - Page 38 980™ Series = Music Button: Tap to access the menu to operate the audio system and settings, page 37. Note: If the spa does not have the stereo option, there will not be a but- ton on the control panel. = Error Indicator Icon: Displays when there is an error message that needs to be addressed.
-
Page 39: Operating Instructions
980™ Series 11.0 Operating Instructions Your Sundance Spas hot tub has a touch-sensitive control panel, massage selector valves, and air control knobs located on the top rim of the hot tub (Sections 9.1-9.6, pages 23-28). These controls let you operate many of the special functions of your Sundance hot tub. By familiarizing yourself with the following information, you will be able to gain the full benefits afforded by the various functions of your hot tub. -
Page 40: Lights Menu
980™ Series 11.2 Lights Menu From the Home Menu, (Figure 11.2a), tap to enter the Light submenus. The LCD screen will display the Light Submenu (Figure 11.2b). From this menu you can control the hot tub lighting. Note: The lights automatically turn off after 2 hours. They can be reacti- vated if needed. - Page 41 980™ Series = Controls the waterfall light. Press one of the arrows to Above move back and forth from above, below or all. = Controls the entry and seat accent lights. Below = Controls both the waterfall, entry, and seat accent lights. Intensity Control Button: Press to activate and adjust the intensity of the lights.
- Page 42 980™ Series C. Lights Styles Menu Light Styles... From the Lights Submenu, (Figure 11.2b), tap to enter the Light Styles control menu (Figure 11.2d). From this menu you can activate 1 of the 6 lighting styles. When you enter the submenu the lights will be off.
-
Page 43: Music Menu
980™ Series 11.3 Music Menu Models equipped with the optional Audio System offer an enhanced spa experience. The BLUEWAVE® 2.0 Wireless Audio System works with most Bluetooth® wireless devices. An auxiliary device can be connected, via a 3.5 mm plug cable, located behind the front cabinet panel, if a Bluetooth device is not available. -
Page 44: Connecting The Bluewave® System With Your Bluetooth® Device
980™ Series = Acoustic Settings: Tap to access the audio submenu, page = Back Button: Tap to go back to the Home Menu. = Invert Button: Tap to invert the display image. Artist Name = Artist/Track: Will display the artist and track information, if it is available. -
Page 45: Acoustics Settings Menu
980™ Series 11.5 Acoustics Settings Menu To enter the Acoustics Control Menu, tap from the Music submenu, Figure 11.5a. The display will change to Figure 11.5b. The Acoustics Control Menu offers an enhanced audio experience by providing custom or preset listening settings. Auto Auto 6:45... -
Page 46: Clearray On Demand
11.7 Selecting The Desired Massage Action Your Sundance Spas hot tub is equipped to allow you to customize the massage action you desire. Each model incorporates a massage selector(s) that allows you to customize the massage and performance by diverting water between various jet systems. -
Page 47: Air Controls
980™ Series 11.9 Air Controls Each jet system has its own air control. These controls allow you to regulate the amount of air which is mixed with the water entering through the jets. Clockwise rotation adds more air and counter- clockwise rotation reduces air flow. -
Page 48: Programming And Operation Instructions
980™ Series 12.0 Programming and Operation Instructions Your Sundance Spas hot tub is equipped with setting menus that allow you to program and activate different components of the spa. With our iTouch™ Glass control panel, programming your spa has never been easier. -
Page 49: Draining The Suncooler
980™ Series = Back Button: Tap to go back to the Home Menu. = Invert Button: Tap to invert the display image. 12.1 Draining the SunCooler From the Settings Menu (Figure 12.1a) tap to enter the SunCooler ... SunCooler Drain Menu, Figure 12.1b. When water accumulates within the SunCooler bins, draining of the water can be done in one of two ways, internally into the hot tub (Figure 12.1d) or externally out of the hot tub (Figure 12.1f). - Page 50 980™ Series A. SunCooler Bin Draining (Internally) 1. Tap to the enter the menu, Figure 12.1a. SunCooler ... 2. Locate the drain plug inside the SunCooler, Figure 12.1d. Note: You can only drain one bin at a time. 3. Turn the thumb screw counterclockwise to remove, Figure 12.1d Figure 12.1e.
-
Page 51: Programming The Heating Mode
12.2 Programming the Heating Mode Your Sundance Spas hot tub is equipped with 3 modes of heating, Figure 12.2b. An automatic mode called “Auto” where the spa’s temperature is maintained at all times. An energy saving heating cycle called “Econ.” A mode that will only activate the heater during the daytime called “Day”... -
Page 52: Programming The Primary Filtration
980™ Series 12.3 Programming the Primary Filtration To access the “Primary” feature, tap from the Heat and Filter Primary... menu, Figure 12.3a, to enter the “Primary” programming, Figure 12.3b. If the Primary tab does not appear on the LCD display, swipe the screen upward to view additional options. -
Page 53: Programming The Secondary Filtration
980™ Series Summer Logic: In warm weather, the water temperature in the spa may exceed the set temperature. This condition may occur due to heat transference from the filter/circulation pump and jets pumps. If the water temperature is higher than 95°F (35°C) and rises two degrees above the set temperature, a “Summer Logic”... -
Page 54: Cleanup Cycle
980™ Series 12.5 Cleanup Cycle The cleanup cycle occurs once per day at 12:00 PM (noon). This is not user programmable. Turning off the corresponding jets pump that is running can deactivate the feature. Jets Pump 1 and the Circulation Pump turn on for 1 minute and then shut off. - Page 55 980™ Series 1. From the “Water Care” Menu you can to set Auto 6:45 the CLEARRAY UV bulb timer, Figure 12.7c. Water Care 2. Tap and scroll the days timer ( ) to change the CLEARRAY® days in 10-day increments. The range is from OFF 0 Days to 365 days.
- Page 56 980™ Series C. Programming the MicroClean Outer Filter Timer Auto 6:45 A programmable filter timer can be set to remind you Water Care when to clean or replace the MicroClean Outer Filter. MicroClean Outer (Figure 12.7d) until you reach the “MicroClean 179 Days Outer”...
-
Page 57: Sunsmart 2.0 Wi-Fi Setup
980™ Series 12.8 SunSmart 2.0 Wi-Fi Setup From the Settings Menu, tap to enter the programming SunSmart ... options, Figures 12.8a and 12.8b. Make sure that you have downloaded the Wi-Fi App for this setup. Note: A blinking Wi-Fi icon indicates that there is a communication is- sue between the hot tub and router. -
Page 58: Programming The Time And Date
980™ Series • Enterprise access points configured to require certificates or some other form of enterprise authentication (aka “802.1X”, “RA- DIUS”, or “WPA/WPA2 Enterprise”). e. The App is only compatible with Android or Apple Phones. • Always make sure you have the latest operating system for your phone. -
Page 59: Locking The Spa
980™ Series 12.10 Locking the Spa From the Settings Menu, tap to enter the programming Lock... options, Figure 12.10b. You can prevent users from changing certain features of the spa. When a lock feature is active, the lock icon will appear on the Main Menu. -
Page 60: Programming The Language
980™ Series 4. All spa functions are locked to allow for a temporary service mode such as filter cleaning. Note: This mode has a time out of 2 hours. The spa should not be left in this lock mode for an extended period. Especially in colder climate or when freezing conditions exist. -
Page 61: Units Display
980™ Series 12.12 Units Display From the Settings Menu, tap to enter the programming Units... options, Figure 12.12b. Auto Auto 6:45 6:45 SETTINGS Units Time & Date... Fahrenheit Lock... Celsius Language... Units... Information... Figure 12.12b Figure 12.12a 1. Tap the unit of measure that you want to display. 2. -
Page 62: Hot Tub Maintenance
13.0 Hot Tub Maintenance Proper and regular maintenance of your hot tub will help it retain its beauty and performance. Your authorized Sundance Spas dealer can supply you with all the information, supplies, and accessory products you will need to accomplish this. - Page 63 980™ Series All models include a suction cover filter (#6540-213) located directly under the MicroClean Ultra filter cartridge assembly that prevents debris from entering the hot tub plumbing when jets pump 1 is running. This filter should be cleaned every 2 months.
-
Page 64: Removing The Cabinet Panels
980™ Series Procedure: 1. Grasp center filter insert end cap (2) in hand and pull outward from pleated cartridge (1). If filter insert (2) is 6 months old, throw it away and purchase new one. DO NOT install new insert at this time. 2. -
Page 65: Draining And Refilling
980™ Series 2. Remove the center panel. Grab either the top left or top right side of the front center panel, Figure 13.2b. Gently pull the cabinet forward to unsnap it from the holding clips. Make sure to support the cabinet as you work your way down the side to completely unclip it from the hot tub frame. -
Page 66: Cleaning The Hot Tub Interior
If you are not certain as to the suitability of a particular cleanser, consult your authorized Sundance Spas dealer. Regardless of the cleanser used, use extreme care to assure that no soap residue is left on the surface. -
Page 67: Pillow Care
13.7 Cover Care And Maintenance Certain hot tub covers distributed by Sundance Spas, Inc., have a vinyl or SUNSTRONG™/SUNSTRONG™ Extreme encasement. This vinyl or SUNSTRONG/SUNSTRONG Extreme encasement also referred to as the cover “skin” is attractive and durable. Regular monthly cleaning and conditioning (vinyl) is strongly recommended and may increase the longevity of your cover. -
Page 68: Winterizing
6. Use only recommended cover lift systems. 7. Use only chemicals and cleaners recommended by Sundance Spas. 8. Remember to keep spa covered when not in use. Maintaining proper water levels assures efficient operation and efficient electrical usage. -
Page 69: Restarting Your Hot Tub In Cold Weather
10. Re-install cabinet side panels and cover hot tub so that no moisture can enter into it. Consult your Sundance Spas dealer if you have any questions regarding winter use or winterizing. -
Page 70: Ph Control
980™ Series WARNING: FAILURE TO MAINTAIN WATER QUALITY WILL: • Increase risk of contracting a waterborne illness (e.g. an infection bacteria or virus) and/or respiratory ailments. • Damage the equipment, components and spa shell, which are not covered under the hot tub’s warranty. CAUTION: Never store hot tub chemicals inside the hot tub’s equip- ment bay. -
Page 71: Clearray Water Purification System
980™ Series WARNING: RISK OF PERSONAL INJURY, DROWNING OR ENTRAPMENT! Never leave your hot tub unattended for any reason while the cover is open and accessible, especially to small children and animals! CAUTION: RISK OF PERSONAL INJURY OR SPA DAMAGE! Never add chlorine tablets (trichlor) or acid to your hot tub for any reason! These chemical may damage components within your hot tub, burn or irritate your skin, create a rash, and void... -
Page 72: Clearray Bulb Replacement And Quartz Tube Maintenance
980™ Series 14.4 CLEARRAY Bulb Replacement and Quartz Tube Maintenance Important: It is MANDATORY that the UV bulb is replaced and the quartz tube be cleaned every 12 months to maintain optimum performance. FIGURE 1 #3 shown as reference only. It is attached to the #10 metal plate. - Page 73 980™ Series FIGURE 6 FIGURE 5 FIGURE 3 FIGURE 4 3. Disconnect UV bulb socket (6) from the power cord socket (4), Figure 3. 4. Slowly remove the UV bulb (7) out of the quartz tube, Figure 4. 5. Remove the quartz seal compression nut (9) by turning it counterclockwise, Figure 5.
-
Page 74: Other Additives
Many other additives are available for your hot tub. Some are necessary to compensate for out-of-balance water, some aid in cosmetic water treatment and others simply alter the feel or smell of the water. Your Authorized Sundance Spas dealer can advise you on the use of these additives. 14.6 Handrail Maintenance The handrails in your Sundance hot tub are manufactured from a high quality 316 stainless steel alloy. -
Page 75: Troubleshooting - Display Messages
980™ Series 15.0 Troubleshooting - Display Messages There are a number of unique functions designed into your Sundance hot tub to protect it from damage and/or to aid in troubleshooting. The error indicator as well as a screen will notify you when the spa needs immediate attention. - Page 76 980™ Series 8. Frozen on Start-up: Flow switch is non-functional. Shorted flow switch on system start-up (system disabled) and freeze condition detected. Contact your authorized dealer or service organization. 9. Cool Warning: Spa water is more than 20°F/-6.67°C cooler than the temperature set point, the circulation pump and heater will automatically activate to provide freeze protection.
- Page 77 980™ Series 15. Panel Com Error: The topside controller is having trouble communicating to your spa. Contact your authorized dealer or service organization. 16. Stereo Com Error: The stereo is having trouble communicating to your spa. Contact your authorized dealer or service organization. 17.
-
Page 78: Troubleshooting - Procedures
2. If nothing appears on the screen: A. Check the household circuit breaker. B. Contact you Sundance Spas dealer or qualified service technician. Pump does not Depress JETS Button. operate and icon... - Page 79 3. If “heater on” indicator is lit but no temperature rise is experienced after a reasonable period of time, contact your Sundance Spas dealer or qualified service technician. Should checking the above steps fail to correct the problem, please call your authorized dealer so that he may arrange service.
-
Page 80: Typical Hot Tub Wiring Diagrams A-B (North American 60 Hz Models Only)
980™ Series 17.0 Typical Hot Tub Wiring Diagrams A-B (North American 60 Hz Models Only) 2-Pole Circuit Breaker with 2-Wire Grounded Load Connection (3 Wires to Hot Tub, 2-Hot (L1-L2), 1-Ground) 240 VAC Ground/Bonding Lug** White (N) Black (L1) 2-Pole GFCI Red (L2) Breaker... -
Page 81: Circuit Board Electrical Wiring Diagram
980™ Series 18.0 Circuit Board Electrical Wiring Diagram 18.1 North American 60 Hz Electrical Wiring Diagram BLUEWAVE WATER FLOW STEREO SENSOR WI-FI SENSOR (OPTIONAL) LIGHTING CONTROL EXPANSION PANEL SERIAL ADCM WATER TEMP HI-LIMIT SENSOR HI-LIMIT TEMP CIRC see section 18.3 PUMP for dip switch settings PUMP 1... -
Page 82: Export 50 Hz Electrical Wiring Diagram
980™ Series 18.2 Export 50 Hz Electrical Wiring Diagram WATER FLOW BLUEWAVE SENSOR WI-FI SENSOR STEREO (OPTIONAL) CONTROL PANEL LIGHTING EXPANSION SERIAL ADCM 2.7 kW HEATER ZONE 1 COLOR WATER ZONE 2 STEP LIGHT TEMP (OPTIONAL) HI-LIMIT SENSOR HI-LIMIT TEMP see section 18.4 for dip switch settings CIRC PUMP... -
Page 83: North American 60Hz Dip Switch Settings
980™ Series 18.3 North American 60Hz Dip Switch Settings The dip switches are at the S1 location on the board. DOMESTIC DIP SWITCH SETTINGS S1 LOCATION DIP SWITCH NUMBER BREAKER OFF OFF OFF OFF OFF OFF OFF OFF OFF OFF 50A* OFF OFF ON OFF OFF OFF OFF OFF OFF OFF... -
Page 84: Export 50Hz Dip Switch Settings
980™ Series 18.4 Export 50Hz Dip Switch Settings The dip switches are at the S1 location on the board. EXPORT DIP SWITCH SETTINGS S1 LOCATION 1x16A 1x20A 2x16A 1x32A EXPORT DIP SWITCH SETTINGS S1 LOCATION 1x40A or 1x16A/1x20A 3x16A 1x16A/1x32A (default) DIP SWITCH NUMBER BREAKER... -
Page 85: Configuration Settings
980™ Series Configuration Settings Single Phase Service 1x20A This setting will turn the heater off any time either the pumps or blower are activated. 1x32A This setting is for all two pump model spas. Both pumps, the blower and heater will be allowed to operate at the same time. -
Page 86: Dual Service 50Hz Connection
980™ Series 18.5 Dual Service 50Hz Connection Wiring for export models with dual service breakers. The jumper wiring is shown below. Dual Service Jumper Wiring Wire From DUAL SERVICE BREAKER TERMINAL L1 BRN CONNECTIONS N1 BLU L1 = Heater/Blower/Lighting L2 BRN L2 = All other components 18.6 Single Service 50Hz Connection... -
Page 87: Three Service 50Hz Connection
980™ Series 18.7 Three Service 50Hz Connection Wiring for export models with three service breakers. The jumper wiring is shown below. Three Service Jumper Wiring Wire From THREE SERVICE L1 BRN N1 BLU BREAKER TERMINAL L2 BRN CONNECTIONS L1 = Heater/Blower/Lighting L2 = Pump 1/Circ/Ozone L3 = Pump 2/CLEARRAY/Stereo Page 81... - Page 88 980™ Series Page 82...
Need help?
Do you have a question about the Kingston 980 Series and is the answer not in the manual?
Questions and answers