Table of Contents
Advertisement
Available languages
Available languages
Quick Links
Q U I C K S TA R T
Disclaimer
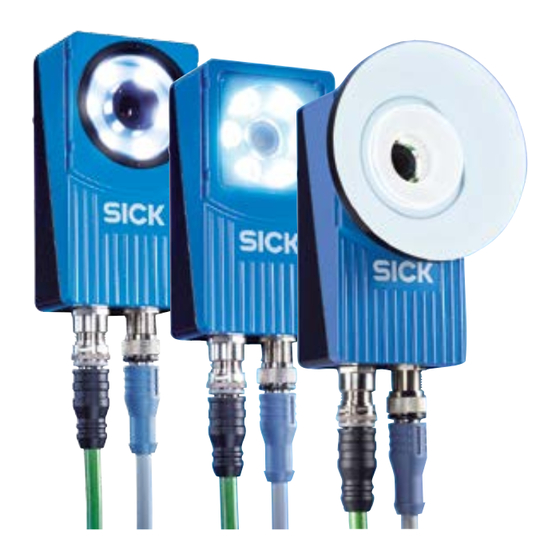
Inspector I10, I20, I40
SICK uses standard IP technology for its products, e.g. IO Link,
industrial PCs. The focus here is on providing availability of
2D vision
products and services.
SICK always assumes that the integrity and confidentiality of
EN
data and rights involved in the use of the above-mentioned
products are ensured by customers themselves.
In all cases, the appropriate security measures, e.g. network
separation, firewalls, antivirus protection, patch management,
etc., are always implemented by customers themselves,
according to the situation.
Safety
b Read the operating instructions before using the Inspector.
b Connection, assembly, and settings must be performed
by competent technicians.
b Do not connect external I/O signals to the Inspector while
it is powered. This may damage the device.
b Make sure that any loose cable ends are properly separated
or isolated before powering the Inspector. Otherwise the
device may be damaged.
b Protect the Inspector from moisture and dirt during
operation.
b Do not use the Inspector in areas with risk for explosion.
b To keep IP 67 classification, open and close the front
window only with the supplied tool. Make sure that the seal
fits properly (Flex)
b To avoid damages, only Inspector accessory lenses offered
by SICK are allowed to be used (Flex)
b Minimize the risk of getting dust into the device by changing
the lenses in a dust-free environment. Do not keep the
device without the front window and wipe off the front
window before you open it (Flex)
Product Features
b High-speed object inspection
b Robust pattern match algorithm to locate objects indepen-
dent of position, rotation and scale
b Multi-feature inspections /object
b Multi-reference object teaching
b Easy-to-use configuration in PC
Australia
Norway
Phone +61 3 9457 0600
Phone +47 67 81 50 00
b Emulator, log, statistics and record for production control
1800 334 802 – tollfree
Poland
Austria
Phone +48 22 539 41 00
b Industrial Ethernet for monitoring over network
Phone +43 22 36 62 28 8-0
Romania
Belgium/Luxembourg
Phone +40 356 171 120
b Exchangeable lens (Flex)
Phone +32 2 466 55 66
Russia
b Outputs by logical expressions (I20, I40)
Brazil
Phone +7 495 775 05 30
Phone +55 11 3215-4900
Singapore
b Input and output extensions via I/O box (I20, I40)
Canada
Phone +65 6744 3732
Phone +1 905 771 14 44
Slovakia
b Store inspected images to remote FTP server (I40)
Czech Republic
Phone +421 482 901201
Phone +420 2 57 91 18 50
Slovenia
b Provide detailed inspection results over EtherNet/IP (I40)
Chile
Phone +386 591 788 49
Phone +56 2 2274 7430
South Africa
b Live image/log/statistics view and reference object change
China
Phone +27 11 472 3733
via external Viewer
Phone +86 20 2882 3600
South Korea
Denmark
Phone +82 2 786 6321
Phone +45 45 82 64 00
Spain
Finland
Phone +34 93 480 31 00
Phone +358-9-2515 800
Sweden
France
Phone +46 10 110 10 00
Phone +33 1 64 62 35 00
Switzerland
Germany
Phone +41 41 619 29 39
Installing
Phone +49 211 5301-301
Taiwan
Hong Kong
Phone +886 2 2375-6288
Phone +852 2153 6300
Thailand
Hungary
Phone +66 2645 0009
1.
Mount the Inspector at an appropriate distance from the
Phone +36 1 371 2680
Turkey
objects to be inspected.
India
Phone +90 216 528 50 00
Phone +91 22 4033 8333
United Arab Emirates
Israel
Phone +971 4 88 65 878
Phone +972 4 6881000
United Kingdom
Italy
Phone +44 1727 831121
Phone +39 02 274341
USA
Japan
Phone +1 800 325 7425
Phone +81 3 5309 2112
Vietnam
Malaysia
Phone +84 945452999
Phone +6 03 8080 7425
Mexico
Phone +52 472 748 9451
Netherlands
Phone +31 30 2044 000
New Zealand
Detailed addresses and additional
An Inspector with ring
Phone +64 9 415 0459
representatives and agencies
light may need to be
0800 222 278 – tollfree
at www.sick.com
mounted at a small angle
to avoid too much reflexes.
2. Connect the Ethernet connector on the Inspector to a
network, or directly to an Ethernet connector on a PC.
8013387/YUV5 ∙ Printed in Germany (2016-06)
All rights reserved. Subject to change without prior notice.
3.
If the input or output signals are used, or if an external
lighting will be used, connect those devices to the
Inspector's Power connector (
).
B
Note: Make sure that the loose ends of the I/O cable
are separated before powering the Inspector.
4. Connect the Inspector to a 24 V DC power supply (
5. If a PC should be used for configuring the Inspector,
install the configuration software SOPAS ET v 3.x. SOPAS
ET is available for download, free of charge, from the
Software finder at www.sick.com.
Overview
The Inspector inspects objects in the following way:
b First, it locates the object in the view.
b After that, it inspects details on the object to find out
whether the object is OK or not.
Object
locator
Detailed
inspection
The Inspector
... and then inspects
first locates the
details on the found
object...
object.
Each inspection gives one of the following results:
The object was not located, or a detailed
Not located
inspection was out of view
The object was located but at least one of the
Detail failed
detailed inspections failed.
The object was located and all detailed inspec-
All passed
tions passed as well.
All passed
Detail failed
The Inspector provides the inspection result in the following
ways, depending on the model:
I10
3 fixed built-in digital
out1 – Not located
outputs
out2 – Detail failed
out3 – All passed
I20,
3 built-in digital outputs
Configurable, using
I40
Outputs by logical
16 additional digital
expressions
outputs with I/O exten-
sion box
(Default same as I10)
I40
EtherNet/IP
Detailed inspection
results
SOPAS ET
SOPAS ET is the PC application that is used for monitoring and
configuring the Inspector. It can be installed on any PC, and
then be used for accessing any Inspector that is connected to
the same network as the PC.
To connect to an Inspector from SOPAS ET.
1.
Make sure that the Inspector is powered, and connected
to the PC or to the same network as the PC.
2. Start SOPAS ET.
3.
In the Device search pane, double-click on the Inspector in
the list of available devices.
An Inspector with Dome
light should be aligned
with the objects, at a
distance of approximately
50 mm to get optimal
The device now appears in the New Project pane. Double-click
effect of the dome lighting.
on the device to open the device window and start the
configuration.
b If the Inspector is not listed in the Device search pane, click
Search settings to fine tune the search criteria.
b If the connection to the device is not working, change the
IP settings of the device via the edit icon on the device tile.
Also make sure that the required SOPAS Device Driver (SDD)
is installed: Select the Device catalog tab and add the SDD via
the Configuration button.
For more information about the connection, see the online
help.
).
B
Teaching with SOPAS ET
1. Switch the Inspector to Edit mode by clicking Edit in the
main view.
2. Place an object in front of the Inspector, and adjust focus
and exposure so that the Live image is sharp and bright.
3.
Click Teach reference object.
The Inspector captures a reference image of the object
and displays it.
4. If necessary, adjust the size and location of the object
locator, and the amount of highlighted contours.
Not located
b Bright contours are more important than dim contours.
b Avoid highlighting contours outside the object.
b It is not necessary to get bright contours everywhere on
the important contours.
5.
Add detailed inspection over the parts of the object to be
inspected.
6. Test the inspection in the Live image and adjust the
settings if necessary.
When the inspections are accurate enough, switch to Run to
put the Inspector in operation. When asked, you should save
the settings in the Inspector's flash memory to assure that
they will be remembered if the power should be disconnected.
Teaching without PC
Object Locator
When teaching an Inspector which has not previously been
An object locator is used when teaching the Inspector to
configured, the resulting reference object will have an object
recognise the objects to inspect. Each reference object can
locator that covers the entire field of view.
not have more than one object locator.
1. Place an object in front of the Inspector and connect in2
The Inspector locates an object by recognising the contours
to +24 V.
of it. The contours that are used are highlighted in green in
SOPAS ET.
After about 3 seconds the Function LED starts to flash.
b Adjust the amount of contours to learn with the Edge
strength slider on the Object locator tab.
b Adjust the size, location, shape, and rotation of the object
locator so that it covers the object properly. Use masks
to mask out areas that normally varies on the object, for
example if they have different labels .
On
2. Adjust focus by turning the focus screw.
The faster the Function LED flashes, the better the focus.
OK
Enough amount
of learned
contours
Match Settings
b If objects are never rotated, deselect Allow rotation to
improve both robustness and speed.
b To verify that objects are not rotated more than a small
amount, select Allow rotation and set the max rotation to a
On
small amount.
b If objects are always of the same size and at the same
distance from the Inspector, deselect Allow scaled objects to
3. Find the field of view with the help of for example a pen.
improve both robustness and speed.
When the Inspector detects movements in the field of
view, the Function LED changes color to blue.
Detailed Inspections
Pixel counter
Counts the number of pixels within the region that has an
intensity (grey scale value) that is within a specified range.
The location of these pixels is not considered, only the
number of pixels.
On
4. Disconnect in2 from the power.
The Inspector will now use the latest captured image as
reference image.
Edge pixel counter
Similar to the Pixel counter, but counts the number of
edge pixels in the region. The location of the edges is not
considered, only the number of pixels.
Off
Contour
Compares the contours in the region with the contours in
5.
The Inspector will then automatically switch to Run mode
the same region on the reference object. The better the two
and start inspecting
contours correspond, the greater is the matching score for
the inspections.
Pattern (I40)
Compares each pixel's value in the region with the
corresponding pixel value in the reference image. The better
the pixels correspond, the greater is the matching score for
the inspections.
Note:
Bad
Bad
Too few
Too many con-
contours
tours, as well as
contours on the
background
±4 px
<4 px
The Edge strength setting for Edge pixel
counter and Contour inspections is common
for all inspections of these types for a reference
object.
Advertisement
Table of Contents

Related Manuals for SICK Inspector I10


Summary of Contents for SICK Inspector I10
- Page 1 IP settings of the device via the edit icon on the device tile. Inspector’s Power connector ( Also make sure that the required SOPAS Device Driver (SDD) Inspector I10, I20, I40 is installed: Select the Device catalog tab and add the SDD via Note: Make sure that the loose ends of the I/O cable the Configuration button.
-
Page 2: Mounting Filters
Full accessory list at www.sick.com Color Description Green No motion in field of view. The Inspector contains no user serviceable parts inside. For more information on the Inspector, please refer to the > 60% transmission Operating Instructions at www.sick.com, or the online help in b Check screw connections and connectors at regular Blue Motion in field of view. Data Yellow Ethernet Data SOPAS ET. License texts are found at www.sick.com/licensetexts. intervals. -
Page 3: Installation
Alle OK Das Objekt wurde gefunden, und alle aktivieren Sie die Option Rotation erlauben, und wählen Sie die als Zubehör zum Inspector von SICK angebotenen und Objektprüfungen sind fehlerfrei abgelaufen. einen kleinen Wert. zugelassenen Objektive (Flex). Zum Ausrichten des Objekts vor der Kamera suchen Sie b Wechseln Sie das Objektiv nur in staubarmer Umgebung, um das Sichtfeld, zum Beispiel mit einem Stift. - Page 4 In dem Inspector sind keinerlei Komponenten unterge- Weitere Informationen über den Inspector finden Sie in der Farbe Beschreibung > 60 % Übertragung Blau Bewegung im Sichtfeld. bracht, die von dem Benutzer gewartet werden können. Betriebsanleitung auf www.sick.com, oder in der Online-Hilfe von SOPAS ET. Lizenztexte finden Sie auf www.sick.com/licensetexts. Data Gelb Ethernet Datenübertr. akt. b Überprüfen Sie Schraub- und Steckanschlüsse in Weiß Gerätedaten werden im Bei Problemstellungen rund um Support wenden Sie sich bitte regelmäßigen Abständen.
-
Page 5: Instalación
4. Conecte el Inspector a una fuente de alimentación b En caso de que la conexión con el dispositivo no funcionase I N I C I O R Á P I D O Exención de responsabilidad Teach/Aprendizaje sin PC Localizador de objeto de 24 V CC ( correctamente, adapte la configuración IP del dispositivo seleccionando el símbolo de edición en el menú del Inspector I10, I20, I40 5. En caso de que desee configurar el Inspector con la dispositivo. Además, asegúrese de que el controlador SOPAS ayuda de un PC, instale el software de configuración Al realizar el Teach a un dsipositivo no configurado previa- Se utiliza un localizador de objeto para enseñar al Inspector SICK utiliza para sus productos tecnología IP estándar, en Device Driver (SDD) necesario se encuentre instalado: SOPAS ET v 3.x. SOPAS ET puede descargarse gratuita- seleccione el registro Catálogo de dispositivos y añada el SDD... - Page 6 Humedad relativa: 35 ... 85%, 95% en almacenamiento En el Inspector no hay piezas que el usuario deba reparar. Podrá encontrar más información sobre el Inspector en las Datos Amarillo Datos Ethernet Lista completa de accesorios en www.sick.com Azul Movimiento en el campo instrucciones de uso, en www.sick.com o en la ayuda en b Compruebe las conexiones y los conectores roscados Enlace Verde Enlace Ethernet de visión. > 60% de transmisión línea de SOPAS ET. Puede encontrar los textos de licencia a intervalos regulares.
-
Page 7: Caractéristiques Produit
Placez un objet devant l’Inspector et connectez l’entrée SOPAS ET peut être téléchargé gratuitement via la via la touche Configuration. E2 sur +24 V. L’Inspector trouve un objet en identifiant ses contours. Les SICK part alors toujours du principe que l'intégrité et la recherche logiciels sur www.sick.com. contours utilisés sont marqués en vert dans SOPAS ET. confidentialité des données et des droits liées à l'utilisation La LED « Function » commence à clignoter au bout Pour des informations supplémentaires au sujet du raccorde- des produits mentionnés ci-dessus sont garanties par le client... -
Page 8: Informations Complémentaires
Data Jaune Données Ethernet > 60 % transmission L’Inspector ne contient aucun élément interne dont la Pour des informations supplémentaires sur l’Inspector, voir Bleue Déplacement dans le maintenance soit réalisable par l’utilisateur. la notice d’instruction sur www.sick.com, ou sous l’aide en Link Verte Liaison Ethernet champ de vision. ligne de SOPAS ET. Vous trouverez des textes de licences b Vérifiez régulièrement que les vis sont bien serrées et les Function Multi Cf. -
Page 9: Installazione
Accertarsi inoltre che sia installato l’SDD (SOPAS Device può essere scaricato gratuitamente tramite software- Driver) necessario: selezionare la voce Catalogo dispositivi e Quando si effettua l’apprendimento con un Inspector che non Una Ricerca oggetto è utilizzata quando si deve far SICK utilizza per i propri prodotti la tecnologia standard IP, finder all’indirizzo www.sick.com. aggiungere l’SDD tramite l’interfaccia Configurazione. è stato precedentemente configurato, l’Oggetto campione avrà apprendere all’Inspector l’oggetto da ispezionare. Ogni compatibile con IO-Link e computer industriali. In particolare si Visione 2D una Ricerca Oggetto grande quanto il campo visivo. -
Page 10: Ulteriori Informazioni
Giallo Ethernet Data Inspector non contiene parti riparabili dall’utente. Ulteriori informazioni su Inspector sono contenute nelle Movimento nel campo istruzioni per l’uso all’indirizzo www.sick.com o nel supporto b Controllare regolarmente il serraggio delle viti e dei connettori. Link Verde Ethernet Link visivo online di SOPAS ET. I testi di licenza si trovano all’indirizzo... - Page 11 Q U I C K S TA R T 免责声明 功能概述 利用SOPAS ET示教 脱离PC的Inspector设定 目标定位: Inspector I10, I20, I40 Inspector通过下面的方式来检查物体 SICK为其产品采用标准IP技术,例如IO-Link和工业计算机。 在主视图中单击“编辑”,将Inspector切换至“编辑” 通过以下步骤,可实现对脱离PC的Inspector进行全视野范围 当Inspector需要识别待检查物体时,有时需要对目标进行 此处特别要强调的是产品的可用性和功能。 b 在视野范围内对目标进行定位捕捉; 模式 中的目标进行学习。 定位操作。每个目标只能使用一次定位工具。Inspector通 2D 视觉 SICK始终认为涉及上述产品使用的数据和权限的完整性和保 b 通过检测目标的细节特征来判断物体是否符合要求。 2. 把需要检测的物体置于Inspector前方的视野范围内,通 1. 在Inspector前放置好物体,并将Inspector的in2引脚连接 过识别其轮廓找到一个对象。所使用的轮廓在SOPAS ET中...
- Page 12 和参考物体切换 b Pentium III、500 MHz或更高 b 570MB可用硬盘存储空间 红色 细节检查不合格 全分辨率,高速模式下的全旋转 仿真模式需要Pentium 4 2.5GHz或者更高频率CPU b 建议的用于将图像存储至FTP的FTP服务器:Filezilla, 相对 湿度:35 ... 85%,存储时为 95% b 512 MB内存(建议1024 MB) Microsoft IIS 绿色 全部合格 完整附件列表可在 www.sick.com 中找到 熄灭 没有检查任务 > 60% 传输 外部自学习 闪烁 图像聚集 维护及其注意事项 更多信息 闪烁频率越高聚集越好 LED指示灯 颜色 说明...
Need help?
Do you have a question about the Inspector I10 and is the answer not in the manual?
Questions and answers