
Related Manuals for LX Navigation Colibri


Summary of Contents for LX Navigation Colibri
- Page 1 Colibri V 4.2 IGC APPROVED FLIGHT RECORDER With SD card interface LX navigation d.o.o. Tkalska 10 tel.: +386 3 4904670 SI - 3000 Celje fax: +386 3 4904671 support@lxnavigation.si http://www.lxnavigation.si...
-
Page 2: Table Of Contents
Basic principles ............................3 Hardware configuration........................... 4 Colibri - Physical Details ........................5 Power requirements..........................5 The Colibri keyboard and display ......................5 1.5.1 The Keyboard and its functionality............................5 Minimum preparation for an IGC flight................. 6 Task declaration ............................6 2.1.1... -
Page 3: Introduction
Note! Colibri v4.0 is able to communicate with a PC via a USB port and for this purpose, a small mini B type connector is situated near the main RJ plug. When connected to a PC via the USB port, the unit is powered from the PC, making an external power supply un-necessary. -
Page 4: Hardware Configuration
CONV-LXN.EXE A DOS program which converts an .LXN file into an .IGC version • VALI-LXN.EXE A DOS program which checks the data integrity of the .IGC file However, LX Navigation strongly recommend that only LXe, See You or ConnectLX are used to download flight records from the Colibri. 1.2 Hardware configuration The Colibri flight recorder contains the following sub-modules: •... -
Page 5: Colibri - Physical Details
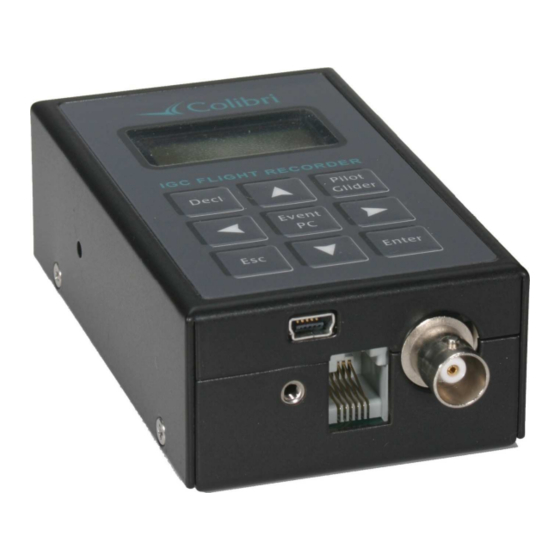
1.3 Colibri - Physical Details At the present time, the Colibri is the smallest IGC approved flight recorder available on the market, and is easily installed. It can also be installed on the instrument panel where it can be used as an in flight GPS navigation aid. -
Page 6: Minimum Preparation For An Igc Flight
Pressing the Decl button will open a dialog allowing the declaration of the task which it is intended to fly. Declaration is only possible if the turn points or task it is intended to declare are already stored in the Colibri memory. -
Page 7: Entering Pilot And Glider Data
Colibri Manual Ver. 4.2 Dec 2006 LX Navigation d.o.o. www.lxnavigation.si A declared IGC task must have the following structure: • Take off • Start • Turn points 0-9 (P) • Finish • Landing The functions SELECT, INSERT and DELETE of turn points will help you to modify an already declared task. -
Page 8: Glider Data
• Switch the unit on approximately 5 minutes before take off 3 Modes of operation This chapter describes the many features of the Colibri . It is recommended that all users read this part carefully. 3.1 Powering up There is no ON/OFF switch on the unit. Immediately after connecting the power, initialisation will follow and will indicate the: •... -
Page 9: Menu Structure
Colibri Manual Ver. 4.2 Dec 2006 LX Navigation d.o.o. www.lxnavigation.si Note! The memory capacity indicator does not show free memory, but the recorder’s total memory capacity in hours that is available for flight records. The total memory capacity depends on settings only, the main one being the recording interval;... - Page 10 Colibri Manual Ver. 4.2 Dec 2006 LX Navigation d.o.o. www.lxnavigation.si After approximately one second the display will change to the first navigation page, where the first 4 characters of the name and basic navigation data will be displayed (t◦…track, b◦….bearing, k/m…. distance).
- Page 11 Colibri Manual Ver. 4.2 Dec 2006 LX Navigation d.o.o. www.lxnavigation.si Note! The tasks stored in the Colibri memory can only be accessed and edited from this menu; the TSK mode is used exclusively for navigation. 3.2.2.2.1 Input of a new TP POINT Enter...
- Page 12 LX 5000/7000. However, it should be noted that if a .da4 file is transferred using a PC, PDA or LX 5000/7000, then the original .da4 file in the Colibri is overwritten and all TPs and tasks will be replaced by those contained in the new file.
-
Page 13: Task Mode (For Navigation Only)
The APT(Airport) database memory of the Colibri can store up to 4200 airfields. The only PC program which is able to transfer APT data to the Colibri is LXe. The APT data base is supplied free of charge and is available at www.lxnavigation.si. -
Page 14: Setup Mode
Colibri Manual Ver. 4.2 Dec 2006 LX Navigation d.o.o. www.lxnavigation.si APT **** AUSTRIA Use the up and down arrows▲▼ to scroll through the countries and once the correct country is displayed, press Enter. APT **** **** Replace the stars with the first letters of the airport name. If more than one airport with the same first letters is found, then use the up and down arrows▲▼... - Page 15 Colibri Manual Ver. 4.2 Dec 2006 LX Navigation d.o.o. www.lxnavigation.si K-RECORD: will select record intervals for additional records when enabled such as J-records, see 3.2.5.1.5. A NOT PROG message means that there are no additional records enabled in the J record setup. This feature is useful for recording of non critical data and therefore longer intervals can be used.
- Page 16 Colibri Manual Ver. 4.2 Dec 2006 LX Navigation d.o.o. www.lxnavigation.si Note! When defining an arc with the 1TPR option selected, a1 has no effect on the resultant zone, r1 will define arc length, a 2 has no effect, and r2 defines sector depth.
-
Page 17: Colibri Manual Ver. 4.2 Dec
Colibri Manual Ver. 4.2 Dec 2006 LX Navigation d.o.o. www.lxnavigation.si Example: Definition of an arc in LXe start point, 1TPR 3.2.5.1.3 OBS.ZONE BEEP The unit will produce a “beep” audio signal once the sector is penetrated. The duration of this audio signal in seconds can be defined and will be the same for every sector. -
Page 18: Time Zone
GPS receiver. The data is sent in the NMEA international format. The most common used data sentences, GGA and RMC, are active by default. This means that each Colibri is automatically sending this data at all times. To simplify the procedure for the pilots, two pre-configured sets of data can be selected; the third... -
Page 19: View Flight Recorder
4800 bps. If problems are experienced transferring data to or from the Colibri, then it is recommended that COM.SPEED is reduced to 9800bps in both the Colibri and the PC. The selected data rate must always be the same in both the Colibri and the PC. -
Page 20: Wiring And Installation
USB mini B to USB cable, if USB port will be used for PC communication (not delivery included) The table below shows the cabling requirements for connection to other devices. When used with the LX 7000/LX 7007, LX 160si and LX 1600, the vario automatically powers the Colibri. Colibri/LX20-2000... - Page 21 Colibri Manual Ver. 4.2 Dec 2006 LX Navigation d.o.o. www.lxnavigation.si COLIBRI WIRING DIAGRAM SUBD 9 M ale RJ 6/6 White GND STATUS LED (Not wired!) Black Rx (DATA IN) LX 5000 - via cross cable Red Tx (DATA OUT) 3 flashes/sec -> GPS BAD IPAQ - via LX IPQ, Power and 1 flash/sec ->...
-
Page 22: Communication
Some modern laptops are not supplied with a dedicated 232 Com port. If this is the case, then one possibility is to use an external USB to Com port adaptor. However, the Colibri has a built in 232 to USB converter that terminates in a Mini Type B USB connector on the bottom side of the unit. - Page 23 The PC has no serial ports. This situation is likely with a Laptop having USB ports only. The solution is to either use an USB to RS232 adapter which is available from most computer shops, or to use the Colibri USB port. If an adaptor is used, it will be necessary to install a driver.
- Page 24 The recommended LXe settings for safe and effective communication are: • Use a fixed baud rate • Use 19200 bps • Keep the Colibri connected during preparation..• If problems are experienced downloading flights, after the selected flight has been highlighted, and the following symptoms are experienced;...
-
Page 25: Communication With Pda
5.3 Using of SD card A card reader suitable to accept a micro size SD card is situated on the right side of Colibri housing. One card with its size adapter is delivery included and ready for operation. Practically all types of SD card may be used, Note! Never use FAT 32 preformatted cards, all other formats are acceptable, also not formatted cards. -
Page 26: Downloading Of Flights
The SD card inserted into PC card reader will be normally recognized like Removable Disc. Bak folder doesn’t mater. 5.3.1 Downloading of flights If the card is inserted during flight an automatic flight download to SD card will happen after the Colibri Security Check procedure will finish. Note! All flights stored on the card correspond to LX navigation original binary format called .LXN. -
Page 27: Tp/Tsk And Flight Info Transfer
See LX 5000/7000 manual for details. Note! The LX 7000/7007 will also power the Colibri at the same time. It is essential that the original cable supplied with the LX 7000 is used as it has certain connections intentionally crossed. -
Page 28: Basic Flight Evaluation
Colibri Manual Ver. 4.2 Dec 2006 LX Navigation d.o.o. www.lxnavigation.si 6 Basic flight evaluation Basic flight evaluation tools are contained in LXe. They include: • Data integrity check • Baro trace (Barogram) • ENL trace • Flight trace (Route) •... -
Page 29: Problems
If it is required to delete all flight records stored in the memory, then select ‘99999’ in the Password option. 7.1 INIT MEMORY procedure • Remove power from the Colibri • Press and hold the◄ ► and EVENT/PC buttons •... -
Page 30: Colibri Usb Port
9 Colibri USB Port 9.1 Installing USB driver When the Colibri is connected using the USB to PC feature for a first time, Windows will detect new hardware. After a few seconds, the installation wizard will appear. Please follow the installation wizard’s instructions. - Page 31 Colibri Manual Ver. 4.2 Dec 2006 LX Navigation d.o.o. www.lxnavigation.si When the USB driver is installed, a new serial port will be detected by the operating system. Please, follow the wizard’s instructions. Note! Additionally help for Win 98 users www.ftdichip.com...
-
Page 32: Data Transfer Through Usb
9.2 Data transfer through USB Note! Always connect the Colibri to the PC with the USB cable, and then run LXe. Never do the opposite. When LXe is running, then select the com port. If the same baud rate is selected on the PC and the Colibri, connection will establish automatically. The program is then ready to transfer data between the Colibri and the PC. -
Page 33: Tree Structure Diagram
Colibri Manual Ver. 4.2 Dec 2006 LX Navigation d.o.o. www.lxnavigation.si 10 Tree structure diagram GPS 2D APT: SETUP VIEW TSK: STA SAT =3 AACHEN M MENU LOGGER BRUNICO LAT N46 LOGGER Flt.: TSK:1.TP 14.25' SETUP 11.10.98 CELJE/AD LON E015 TIME Flt.:... - Page 34 Colibri Manual Ver. 4.2 Dec 2006 LX Navigation d.o.o. www.lxnavigation.si Decl Enter DECL.TSK TSK00 T:007FLE SELECT EDIT 4pt 408k TAKE OFF TPOINT DECL.TSK S:007FLE INSERT COPY START TPOINT DECL.TSK 0:013ALT TSK99 DELETE DELETE 29°126k 4pt 162k TPOINT 30sec F:028CHA DECLARE 139°181k...
- Page 35 Colibri Manual Ver. 4.2 Dec 2006 LX Navigation d.o.o. www.lxnavigation.si Pilot Glider Pilot Glider Pilot Enter Glider Enter NAME PILOT GLIDER GLIDER: JOHN D. MOSQITO SAVE? PILOT001 GLIDER01 REG.NUM: JOHN D. S5-3099 CMP.NUM: CMP.CLS: STANDARD PILOT100 GLIDER30 SAVE?
Need help?
Do you have a question about the Colibri and is the answer not in the manual?
Questions and answers