
Related Manuals for Mindray accutorr plus


Summary of Contents for Mindray accutorr plus
- Page 1 O p e r a t i n g I n s t r u c t i o n s Accutorr ® Datascope Accutorr ® 0070-01-0428-02_revC.indd 1 4/8/10 11:51:13 AM...
- Page 2 O p e r a t i n g I n s t r u c t i o n s Accutorr ® Datascope Accutorr ®...
- Page 3 Velcro is a registered trademark of Velcro Industries B.V. © Copyright Mindray DS USA, Inc., 2008. All rights reserved. Contents of this publication may not be reproduced in any form without permission of Mindray DS USA, Inc. ™ 0070-10-0692-02 Accutorr Plus...
-
Page 4: Table Of Contents
To View and Delete Stored Data (Trend Mode) ....................3 - 14 To View the Stored Measurements on the Accutorr Plus, basic model ............. 3 - 14 To View the Stored Measurements on the Accutorr Plus, advanced models............3 - 14 To Delete the Stored Measurements on the Accutorr Plus................ - Page 5 Thermal Paper Durability ..........................4 - 7 Accutorr Plus Versions and Accessories ................5 - 1 Accutorr Plus Versions ............................. 5 - 1 Accutorr Plus with Lithium Ion Battery ......................5 - 1 ® Accutorr Plus with Nellcor Pulse Oximetry and Lithium Ion Battery..............5 - 1 ®...
- Page 6 Precautions With Using Automatically Cycled Blood Pressure Cuffs ............... 6 - 14 Cuff Size ..............................6 - 14 Other Factors ............................6 - 14 User Verification Of The Accutorr Plus NIBP Measurements .................. 6 - 15 Warranty............................... 6 - 16 Manufacturer’s Responsibility ........................... 6 - 16 Accutorr Plus™...
- Page 7 Table of Contents This page intentionally left blank. 0070-10-0692-02 Accutorr Plus™ Operating Instructions...
-
Page 8: Foreword
Accutorr Plus are prerequisites for its proper use. DO NOT OPERATE THIS UNIT BEFORE READING ALL INSTRUCTIONS. Information for servicing this instrument is contained in the Accutorr Plus Service Manuals: Part Numbers 0070-00-0691 (0998-00-0444-9XX). For additional information or assistance, please contact an authorized representative in your area. -
Page 9: Warnings, Precautions And Notes
A NOTE is provided when additional general information is available. Mindray DS USA, Inc. maintains a policy of continual product improvement and reserves the right to change materials and specifications without notice. Warnings WARNING: Internal Electrical Shock Hazard - This unit does not contain any user-serviceable parts. - Page 10 WARNING: Only connect cuffs with approved quick connect type connectors. WARNING: The Accutorr Plus is not intended for use in a magnetic resonance imaging (MRI) environment and may interfere with MRI procedures. WARNING: Do not incinerate battery, possible explosion may occur.
-
Page 11: Cautions
Use of accessories, transducers and cables other than those specified in the manual may result in increased Electromagnetic Emissions or decreased Electromagnetic Immunity of the Accutorr Plus. It can also cause delayed recovery after the discharge of a cardiac defibrillator. CAUTION: This battery type may be subject to local regulations regarding disposal. - Page 12 Viewing the time or date does NOT cause data to be erased. CAUTION: To avoid loss of patient data (trend), do not replace the battery unless the Accutorr Plus is connected to an AC receptacle. Hospital defaults and the time are unaffected by battery replacement.
- Page 13 CAUTION: Remove the battery if the Accutorr Plus is not likely to be used for an extended period of time. CAUTION: The Communications Connector on the Accutorr Plus is only for use with IEC 60601-1 compliant equipment.
-
Page 14: Safety Designations
Non Protected Equipment (IPX1) as specified in EN 60529. Degree of Electrical Connection Between Equipment designed for direct electrical and Equipment and Patient non-electrical connection to the patient. Degree of Mobility Mobile and/or hand held Accutorr Plus™ Operating Instructions 0070-10-0692-02... -
Page 15: Product Limitations
(peripheral pulses taken only during a measurement cycle). The rate measured by the Accutorr Plus may differ from the rate of an ECG monitor. This is because the ECG is an electrical signal that may not always result in a peripheral pulse. -
Page 16: Symbols And Descriptions
Symbols and Descriptions Introduction Symbols and Descriptions Most of the symbols in the table below are defined in the IEC Publication 878 and ISO Standard 7000. These symbols are used on all models of the Accutorr Plus. SYMBOL DESCRIPTION SYMBOL... - Page 17 Introduction Symbols and Descriptions This page intentionally left blank. 0070-10-0692-02 Accutorr Plus™ Operating Instructions...
-
Page 18: General Description
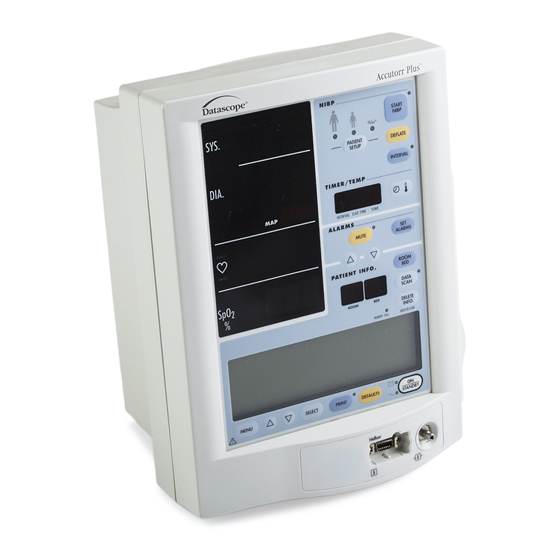
General Description General Description FIGURE 1-1 Accutorr Plus, advanced model (Historical Trend Display and Oximeter optional features) Accutorr Plus™ Operating Instructions 0070-10-0692-02 1 - 1... - Page 19 The Accutorr Plus can store up to 100 measurements in memory. These 100 measurements are shared by the number of patients that are monitored by the Accutorr Plus. When only one patient is monitored, then that one patient can have up to 100 measurements stored. When more than one patient is monitored each patient can have any number of measurements stored as long as the total number of stored measurements for all patients equals 100 or less.
- Page 20 General Description General Description Some key features of the Accutorr Plus are: • Non-Invasive Blood Pressure (NIBP) • Pulse Rate • Nellcor or Masimo SpO (advanced models only) • Alarms • Interval Mode • Large Light Emitting Diode (LED) Displays •...
- Page 21 General Description General Description This page intentionally left blank. 1 - 4 0070-10-0692-02 Accutorr Plus™ Operating Instructions...
-
Page 22: Controls And Indicators
This section of the Operating Instructions identifies and describes each control and display of the Accutorr Plus. For step-by-step operating instructions, see Chapter 3.0, “Operation”. The following is a list of all controls, connectors and indicators, their item number and the page number. -
Page 23: With The Accutorr Plus Advanced Models)
SpO2 Display (optional feature with INTERVAL KEY the Accutorr Plus advanced models) LIQUID CRYSTAL DISPLAY (LCD) Interval Indicator (optional feature with the Accutorr Plus advanced models)) MENU KEY (optional feature with the DEFLATE KEY Accutorr Plus advanced models) LCD Up Arrow Key (optional feature... -
Page 24: Front Panel
Controls and Indicators Front Panel Front Panel FIGURE 2-1 Accutorr Plus, advanced model — NIBP with Trend Screen and SpO with Recorder Module (Historical Trend Display and Oximeter Optional Features) 1. NIBP SYSTOLIC DISPLAY Displays the systolic blood pressure data from NIBP measurements. It is also used to display NIBP error codes and systolic alarm limits. -
Page 25: Pulse Rate Display
4. PULSE RATE DISPLAY Displays the pulse rate information from either the NIBP measurement or the SpO reading (Accutorr Plus advanced model). It is also used to display pulse rate alarm limits. 5. NIBP/SpO PULSE RATE INDICATOR When the pulse rate displayed is based on an NIBP measurement, then NIBP is illuminated. -
Page 26: Print Indicator
21. DELETE INFO. KEY Press the DATA SCAN key to enable the Delete Info. key (Accutorr Plus basic model only). Once enabled, press and hold this key (1 beep tone, approx. 3 seconds) to delete the most recent reading when it is displayed. When displaying any measurement, press and hold this key (2 beep tones, approx. -
Page 27: Data Scan Key
Accutorr Plus and to enable the Delete Info. key (Accutorr Plus NIBP only). The LED indicator next to the key illuminates. On the Accutorr Plus NIBP, use the Patient Info. Up & Down Arrow keys (27 & 28) to scroll through the stored measurements for the selected patient. On all models of the Accutorr Plus, press and hold this key (2 beep tones, approx. -
Page 28: Mute Key
This key is used to switch between viewing the elapsed time or the temperature in the Interval/Elap. Time/Temp Display. When viewing stored measurements on the Accutorr Plus NIBP, press this key to switch between viewing the temperature and time of the measurement. -
Page 29: Patient Setup Key
(30 seconds when in the interval mode). The Start NIBP LED indicator is illuminated when a measurement can begin. 39. Start NIBP Indicator This LED indicator is illuminated when the Accutorr Plus is ready to initiate an NIBP measurement. 40. Patient Size Indicators One of theses LEDs illuminates to indicate the selected patient size. -
Page 30: Rear Panel
44. Communications Connector Provides compatible communications to external devices and hospital’s nurse call and information system. CAUTION: The Communications Connector on the Accutorr Plus is only for use with IEC 60601-1 compliant equipment. 45. Service Connector Used by Technical Service Personnel. -
Page 31: Predictive Thermometer Module (Ptm)
Used to store a box of probe covers. 48. Probe Chamber Used to store the temperature probe when not in use. 49. Probe Connector Used to connect the thermometer probe to the PTM module. 2 - 10 0070-10-0692-02 Accutorr Plus™ Operating Instructions... -
Page 32: Recorder Module
51. Paper Tear Edge The paper tear edge is used to tear off printed recorder strips. The edge can be removed in the event of a paper jam that needs to be cleared. Accutorr Plus™ Operating Instructions 0070-10-0692-02 2 - 11... - Page 33 Recorder Module Controls and Indicators This page intentionally left blank. 2 - 12 0070-10-0692-02 Accutorr Plus™ Operating Instructions...
-
Page 34: Operation
Accutorr Plus. The numbers in parentheses ( ) refer to the items described in section 2.0, “Controls and Indicators”. When a described feature refers to a particular model, it will be noted. When the name Accutorr Plus is used, it refers to all three models. - Page 35 If the time and date need to be set, see section 3.13 for instructions. 7. On Accutorr Plus advanced models, adjust the contrast on the LCD if necessary. To adjust the contrast, press and hold the MENU key (8) (2 beep tones, approx. 3 seconds).
-
Page 36: Patient Setup And Room/Bed Assignment
The initial cuff inflation pressure depends on the Patient Size setting. The initial cuff inflation pressures are listed in the table below. The initial cuff inflation pressures can be modified from the default (custom or factory) settings. When the Accutorr Plus is powered down, these modifications are deleted. -
Page 37: Room Number And Bed Letter
Once measurements have been taken, and the unit is powered off and on, the room number and bed letter will default to the lowest room and bed where data is currently stored. 3 - 4 0070-10-0692-02 Accutorr Plus™ Operating Instructions... -
Page 38: Manual Nibp Measurements And General Nibp Measurement Information
NIBP measurements. Base your selection of the cuff size on the limb circumference of the patient. The table above indicates the available cuffs for use with the Accutorr Plus. The design dimensions of the cuffs and their intended uses are based on recommendations of the American Heart Association. - Page 39 The cuff begins to inflate to the selected cuff pressure. After reaching the selected pressure, the cuff begins to slowly deflate and the Accutorr Plus collects oscillometric pulsations. If the initial cuff inflation is found to be inadequate, the unit retries with a higher inflation pressure (+50 mmHg in the adult mode;...
-
Page 40: Nibp Pressure Limit Fail Safe
6. When required, press the DEFLATE key (36) to interrupt a measurement. The cuff will deflate. NOTE: Once the initial measurement is taken for a room/bed, the Accutorr Plus will continue to use the selected patient size. NOTE: Check the patient’s limb for any indications of circulation impairment. -
Page 41: Automatic Nibp Measurements (Interval Mode)
Operation Automatic NIBP Measurements (Interval Mode) The Accutorr Plus can be set to automatically take NIBP measurements. On initial power up, the interval setting will default to OFF. The User Configuration mode can be used to set custom defaults for the Interval Mode. See section 3.15, User Configuration for details. In this mode, the adaptive inflation is always enabled. -
Page 42: Changing The Interval Setting
Changing the Interval Setting If the interval time is changed while the Accutorr Plus is in the interval mode, the new interval time is used once it is entered. For example: The interval time is set to 60 minutes. Thirty minutes have elapsed since the last timed automatic measurement and the interval time is changed to 10 minutes. -
Page 43: Alarms
Alarms Operation Alarms The Accutorr Plus provides “HI” and “LO” alarm limit settings for systolic, diastolic, MAP, pulse rate and SpO . An alarm violation occurs when one or more patient parameters equals or falls outside the limits that have been specified. - Page 44 Off, 100-245 Pulse Rate Low Adult Off, 35-120 Pediatric Off, 35-150 Neonate Off, 75-200 High Adult Off, 61-99 %SpO Pediatric Off, 61-99 Neonate Off, 61-99 Adult 60-95 %SpO Pediatric 60-95 Neonate 60-95 Accutorr Plus™ Operating Instructions 0070-10-0692-02 3 - 11...
-
Page 45: Alarm Violations
When an alarm limit is violated, the following actions occur: • The LEDs for the parameter in an alarm condition flashes. • The parameter in an alarm condition is in reverse video on the LCD (Accutorr Plus advanced models). - Page 46 CAUTION: It is the user’s responsibility, when changing the room/bed, to assure the patient size and alarm settings are set as required. Accutorr Plus™ Operating Instructions 0070-10-0692-02 3 - 13...
-
Page 47: To View And Delete Stored Data (Trend Mode)
Operation To View and Delete Stored Data (Trend Mode) The Accutorr Plus is capable of storing up to 100 entries of measurement data. Each time a successful NIBP measurement is made, the data is automatically stored in memory. When a temperature measurement is made between two minutes before and two minutes after an NIBP measurement, it is stored as the same entry with the NIBP measurement. -
Page 48: To Delete The Stored Measurements On The Accutorr Plus
(21) (2 beep tones, approx. 6 seconds) to delete all stored measurements for the current patient. When all data is cleared the patient size will be the default selection. 5. On the Accutorr Plus NIBP only, press the DATA SCAN key (22) (1 beep tone) to exit the delete data mode. -
Page 49: Setting The Alarm Volume And Beep Volume
Setting the Alarm Volume and Beep Volume The LCD on the Accutorr Plus advanced models is used to display the Trend List as described in section 3.6. It is also used to display a menu which is used to set the alarm volume and the beep volume. -
Page 50: Setting The Lcd Contrast (View Angle Adjustment)
3 and 15 minutes. The LED display time out can be set between 5 and 60 minutes. Since the Accutorr Plus can be powered from either an AC or DC source, the user configuration allows the setting of separate times for each type of power source. See User Configuration, section 3.15 for more information on setting the time out minutes. -
Page 51: Spo Measurements (Accutorr Plus Advanced Models)
FIGURE 3-5 and FIGURE 3-6). Cable on Top Cable on Bottom FIGURE 3-5 Typical reusable sensor FIGURE 3-6 Typical flexible sensor placement placement B. Sensor Connection to the Accutorr Plus advanced model: 3 - 18 0070-10-0692-02 Accutorr Plus™ Operating Instructions... - Page 52 Accutorr Plus rolling stand using the optional cable retainer. For accessory part number information see section 5.0, “Accutorr Plus Versions and Accessories”.
-
Page 53: Sequence For Establishing Spo With Nellcor Pulse Oximetry
Carefully read the sensor directions for use, the Accutorr Plus operating instructions, and all precautionary information before use. CAUTION: Excessive ambient light may cause inaccurate measurements. -
Page 54: Pulse Oximetry
Operation Measurements (Accutorr Plus advanced models) 3. The digital SpO value and SpO Pulse Rate will be displayed on the SpO and Pulse Rate LED’s. 4. If desired, adjust the beep volume. See section 3.7, “Setting the Alarm Volume and Beep Volume”, for details on adjusting the beep volume. - Page 55 Carefully read the sensor directions for use, the Accutorr Plus operating instructions, and all precautionary information before use. CAUTION: Excessive ambient light may cause inaccurate measurements.
- Page 56 Operation Measurements (Accutorr Plus advanced models) CAUTION: Inaccurate reading may be caused by incorrect sensor application or use; significant levels of dysfunctional hemoglobins, (i.e. carbohemoglobins or methemoglobin); or intra-vascular dyes such as indocyanine green methylene blue; exposure to excessive illumination, such as surgical...
-
Page 57: Special Features
Oximetry Sensitivity Mode and Post Averaging Time The Accutorr Plus sensitivity mode for SpO is set to normal and the averaging of the saturation, pulse rate, and signal strength measurements for SpO is set to 8 seconds. -
Page 58: Temperature Measurement (Optional)
— P/N STPLUS). NOTE: The Welch Allyn thermometers do not report the measurements to the Accutorr Plus trend memory. An optional Predictive Thermometer Module (PTM) is available to connect to the Accutorr Plus. The Predictive Thermometer provides temperature measurements in approximately 30 seconds. -
Page 59: How To Take Oral, Rectal, And Axillary Temperatures
Discard the used probe cover according to standard hospital procedures. 4. After the Accutorr Plus records the patient’s temperature, replace the probe in the probe chamber (50). Wait at least 60 seconds before taking another temperature to allow probe to cool down. - Page 60 (50). Always store in the chamber for the protection of the probe and to reset the temperature module. NOTE: The thermometer will not take a reading if the patient temperature is less than 6°F (3.3°C) above the ambient temperature. Accutorr Plus™ Operating Instructions 0070-10-0692-02 3 - 27...
-
Page 61: Storing Temperature Measurements
AccuTemp IR temperature measurements are stored in the trend memory only if the AccuTemp I.R. thermometer is returned to the Accutorr Plus within 60 seconds of the reading. Welch Allyn Sure Temp Plus Thermometer measurements are not stored in the trend memory. -
Page 62: Recorder (Optional)
3.12 Recorder (Optional) The Accutorr Plus can provide a permanent record of patient data using the PRINT key (12). There are two print modes available. They are Continuous Print or Request Print. In the Continuous Print mode the printer will print each time there is a valid NIBP or Temperature measurement. -
Page 63: How To Set The Clock (Date And Time)
2. Press the PATIENT INFO. Up or Down Arrow key (27 or 28) to change the number. NOTE: The Accutorr Plus always displays time in a 24 hour format. 3. Press the TIMER/TEMP key (32) to activate the minute display. Minute Display... - Page 64 When frozen time is displayed, the colon between the hours and minutes is illuminated continuously. When real-time is displayed the colon between the hours and minutes flashes. Accutorr Plus™ Operating Instructions 0070-10-0692-02 3 - 31...
-
Page 65: Battery Operation
3 and 15 minutes. The LED displays time out can be set between 5 and 60 minutes. Since the Accutorr Plus can be powered from either an AC or DC source, the user configuration allows the setting of separate times for each type of power source. -
Page 66: User Configuration
The User Configuration Mode allows the operator the opportunity to set custom default settings. These custom default settings will be used each time the Accutorr Plus is turned on. Once the User Configuration Mode is entered, the only way to exit this mode is to turn off the Accutorr Plus using the ON/STANDBY key (19). - Page 67 Pediatric Alarm Limits Set the default alarm limit OFF, except values for a Pediatric size patient. See Section 3.5 for which is 86 details on setting alarm limits. 3 - 34 0070-10-0692-02 Accutorr Plus™ Operating Instructions...
- Page 68 Reset to Factory Defaults To change all of the User Configuration items back to the Factory Defaults, while in User Config. #12, press and hold the START NIBP key for 3 seconds. Accutorr Plus™ Operating Instructions 0070-10-0692-02 3 - 35...
-
Page 69: Status And Error Codes
3.16 Status and Error Codes The Accutorr Plus uses the various displays on the front panel to display the operational status. Status and error codes listed below can generally be resolved by the user however, some error codes, which are marked with an asterisk (*), may require resolution by a qualified technical service person. - Page 70 988* TEMP Bad Calibration Thermometer needs calibration. 990* TEMP Illegal Mode Thermometer switch is set wrong. 991* TEMP Module Failed Thermometer internal failure. 995* Uncalibrated fails calibration check. 996* Failure failed self-test. Accutorr Plus™ Operating Instructions 0070-10-0692-02 3 - 37...
-
Page 71: How To Attach Optional Thermometer And Recorder Modules
2. Insert the tab on the Recorder Module into the Recorder Module Connector (48) on the Accutorr Plus. Push firmly to seat properly. 3. Use the 2 screws provided to secure the Recorder Module to the Accutorr Plus. 3.17.2 To Attach the Thermometer Module: Looking at the rear panel of the unit, the Thermometer Module is attached to the left side of the Accutorr Plus. -
Page 72: Placement Of The Quick Reference Card
Quick Reference Guide. FIGURE 3-15 Placement of Quick Reference Label NOTE: The card shown in figure 3-15 is a sample to show how to attach the card. The actual card may differ. Accutorr Plus™ Operating Instructions 0070-10-0692-02 3 - 39... -
Page 73: Placement Of Recorder Paper Loading Label
Placement of Recorder Paper Loading Label The Recorder Paper Loading label is designed to be placed on the recorder module. Attach label as shown in the figure below. FIGURE 3-16 Placement of Recorder Paper Loading Label 3 - 40 0070-10-0692-02 Accutorr Plus™ Operating Instructions... -
Page 74: User Maintenance
This section of the manual outlines routine maintenance that should be performed by the user. The Accutorr Plus is designed for stable operation over long periods of time and under normal circumstances should not require technical maintenance beyond that described in this section. -
Page 75: Sterilization And Cleaning Of Reusable Cuffs
Clean and disinfect the cuff according to the instructions. 4.3.2 Cleaning Bladderless Cuffs Clean cuffs with warm water and a mild detergent. Do not use a detergent containing hand conditioners, softeners, or fragrances. 4 - 2 0070-10-0692-02 Accutorr Plus™ Operating Instructions... - Page 76 Antimicrobial Definition Mindray’s bladderless cuffs are treated with an antimicrobial coating. Antimicrobial technology effectively controls a broad spectrum of bacteria, fungi, algae and yeasts on a wide variety of treated substrates.
-
Page 77: Battery Maintenance And Replacement
4.4.1 Battery Maintenance The Accutorr Plus is available with a lithium ion battery. This battery type may be subject to local regulations regarding disposal. At the end of the battery life, dispose of the battery in accordance with any local regulations. -
Page 78: Battery Replacement
4. Close the battery compartment door. 5. Batteries are shipped partially charged and therefore require charging prior to use. It is recommended that the Lithium ion battery be charged in a Accutorr Plus for 4 hours minimum prior to use. -
Page 79: Recorder Paper Replacement
5. Slide the free edge behind the metal edge at the top of the printer. 6. Press the PRINT key to feed the paper through the printer. 7. Pull through any slack in the roll of paper and then close the recorder door. 4 - 6 0070-10-0692-02 Accutorr Plus™ Operating Instructions... -
Page 80: Thermal Paper Durability
• Store paper in a cool, dry place • Do not subject finished records to exposure to sunlight or storage over 120°F • Finished records may fade if exposed to transparent adhesive tape or clear plastic page protectors Accutorr Plus™ Operating Instructions 0070-10-0692-02 4 - 7... - Page 81 Thermal Paper Durability User Maintenance This page intentionally left blank. 4 - 8 0070-10-0692-02 Accutorr Plus™ Operating Instructions...
-
Page 82: Accutorr Plus Versions And Accessories
Accutorr Plus Versions and Accessories Accutorr Plus Versions 5.1.1 Accutorr Plus with Lithium Ion Battery DESCRIPTION PART NUMBER Accutorr Plus NIBP, Lithium Ion battery, English 0998-00-0444-91A Accutorr Plus NIBP, Lithium Ion battery, German 0998-00-0444-91G Accutorr Plus NIBP, Lithium Ion battery, Spanish 0998-00-0444-91P... -
Page 83: Accutorr Plus With Masimo Set ® Pulse Oximetry And Lithium Ion Battery
5.1.3 Accutorr Plus with Masimo SET Pulse Oximetry and Lithium Ion Battery DESCRIPTION PART NUMBER ® Accutorr Plus NIBP, Trend, Masimo SET 0998-00-0444-94A Lithium Ion battery, English ® Accutorr Plus NIBP, Trend, Masimo SET 0998-00-0444-94G Lithium Ion battery, German ®... -
Page 84: Accessories
Accutorr Plus Versions and Accessories Accessories Accessories 5.2.1 Hoses, Non Invasive Blood Pressure DESCRIPTION PART NUMBER Hose, quick connect to quick connect (1.5 m.) 0683-04-0003 Hose, quick connect to quick connect (3.5 m.) 0683-04-0004 5.2.2 Cuffs, Non Invasive Blood Pressure, Latex Free 5.2.2.1... - Page 85 Accessories Accutorr Plus Versions and Accessories 5.2.2.3 Disposable Neonatal Quick Connect, Latex Free* DESCRIPTION PART NUMBER Neonatal Size 1, 3–6 cm. (box of 10) 0683-23-0001-01 Neonatal Size 2, 5–8 cm. (box of 10) 0683-23-0002-01 Neonatal Size 3, 7–10 cm. (box of 10) 0683-23-0003-01 Neonatal Size 4, 9–13 cm.
-
Page 86: Oximetry Sensors And Accessories
Accutorr Plus Versions and Accessories Accessories 5.2.3 Oximetry Sensors and Accessories ® ® 5.2.3.1 Pulse Oximetry-Masimo SET LNOP DESCRIPTION PART NUMBER ® LNOP DCI Adult/Pediatric starter kit (1 reusable adult 0020-00-0130 sensor, 2 adult and 1 pediatric single patient adhesive sensors, and one 12’... -
Page 87: Recorder Module
Accessories Accutorr Plus Versions and Accessories DESCRIPTION PART NUMBER Neonatal Y starter kit (two neonatal and two preterm 0020-00-0123-02 neonatal Y single patient adhesive sensors and one 3.66 m./ 12’ cable) Clothing clips (pkg of 5) 0600-00-0084 Adhesive squares (12 cards/12 squares per card) 0600-00-0085 ®... -
Page 88: Temperature Modules/Probes
Accutorr Plus Versions and Accessories Accessories 5.2.5 Temperature Modules/Probes 5.2.5.1 Accutemp/IR Infrared Thermometer Module Includes one thermometer and one box of 250 disposable thermometer covers. DESCRIPTION PART NUMBER Adult 0998-00-0128-01 Pediatric 0998-00-0128-02 Neonatal 0998-00-0128-03 5.2.5.2 Stand-Alone AccuTemp/IR Infrared Thermometer Includes one thermometer, operator's manual, wall mount and one box of 250 disposable thermometer covers. -
Page 89: Manuals
Accessories Accutorr Plus Versions and Accessories ® 5.2.5.4 Welch Allyn SureTemp Plus Thermometer Kit Includes wall mount, oral probe 2.7 m., 25 covers, operator's manual and mounting brackets. DESCRIPTION PART NUMBER Welch Allyn SureTemp Plus thermometer kit, locking bracket STPLUSLCK... -
Page 90: Battery
Accutorr Plus Versions and Accessories Accessories 5.2.10 Battery DESCRIPTION PART NUMBER Battery, Lithium-Ion 0146-00-0069 Accutorr Plus™ Operating Instructions 0070-10-0692-02 5 - 9... - Page 91 Accessories Accutorr Plus Versions and Accessories Accutorr Plus Wall Mount Bracket 0436-00-0247 Accutorr Plus (Basic/Advanced) Sample Wall Mount FIGURE 5-1 Universal Wall Mount Kit (P/N: 0436-00-0247) FIGURE 5-2 Universal Rolling Stand (P/N: ACCTROLLSTD) 5 - 10 0070-10-0692-02 Accutorr Plus™ Operating Instructions...
-
Page 92: Appendix
Appendix Phone Numbers and How To Get Assistance Mindray DS USA, Inc. maintains a network of service representatives and factory-trained distributors. Prior to requesting service, perform a complete operational check of the instrument to verify proper control settings. If operational problems continue to exist, contact the Service Department at (800) 288-2121 (U.S.A. -
Page 93: Specifications
Adults, 200mmHg for Pediatrics and 150mmHg for Neonates. If the hardware over pressure circuit is tripped in normal operation then the unit must be turned off and back on to reset the system. 6 - 2 0070-10-0692-02 Accutorr Plus™ Operating Instructions... -
Page 94: Temperature (Predictive)
Accuracy - Nellcor ± 2 digits from 70 - 100% SpO - Adult ±3 digits from 70 -100% SpO - Neonates <70% unspecified Pulse Rate Range - Nellcor 21 - 249 BPM Accutorr Plus™ Operating Instructions 0070-10-0692-02 6 - 3... -
Page 95: Spo 2 - Masimo ® Performance Specifications
This time was measured with post average time at 8 seconds. Low Perfusion Performance >0.02% Pulse Amplitude and %Transmission >5% Saturation (%SpO ) ±2 digits Pulse ±3 digits Wavelengths Emitted: 660nm and 905nm Maximum Emitted Energy: 30mW at 50μA pulsed 6 - 4 0070-10-0692-02 Accutorr Plus™ Operating Instructions... - Page 96 ½ digits, the accuracy shall be rounded to ±4 digits. ® The SpO accuracy during motion conditions is not specified for the LNOP •Ear Sensors. Accutorr Plus™ Operating Instructions 0070-10-0692-02 6 - 5...
-
Page 97: Battery
Battery Voltage: 11.1 VDC nominal Battery Capacity: 4.4 Amp-Hour Battery Run Time: Accutorr Plus basic model - 9.5 hours from ° full charge with new battery at 25 C with 1 NIBP measurement every 5 minutes and recorder not in use. -
Page 98: Physical Characteristics
Weight: <4.95 kg (11 pounds), depending on configuration 6.2.12 Environmental Characteristics • Operating: Temperature: 10°C to 40°C, 50°F to 104°F (Accutorr Plus & Recorder) 10°C to 32°C, 50°F to 90°F (Predictive Thermometer) Humidity: 15 to 90% max, non-condensing. Altitude: 1013 hPa to 697 hPa (0 to 10,000 ft.) -
Page 99: Electrical Ratings
IEC 60601-1. A ground resistance of =0.2 ohm is allowed when measured from the U blade of the supplied AC line cord to any exposed metal part which may become energized. 6 - 8 0070-10-0692-02 Accutorr Plus™ Operating Instructions... -
Page 100: Agency Compliance
Conducted Immunity EN 61000-4-6:1996 +A1:2001 +A2:2006 Radiated Immunity EN 61000-4-3:2006 EN 61000-4-2:1995 +A1:1998 +A2:2001 EN 61000-4-4:2004 Surge EN 61000-4-5:2006 Radiated and Conducted Emissions EN 55011:1998 +A1:1999 +A2:2002 Harmonic Emissions EN 61000-3-2:2000 +A1:2001 +A2:2005 Accutorr Plus™ Operating Instructions 0070-10-0692-02 6 - 9... -
Page 101: Electromagnetic Compatibility
GUIDANCE AND DECLARATION - ELECTROMAGNETIC EMISSIONS The Accutorr Plus is intended for use in the electromagnetic environment specified below. The customer or the user of the Accutorr Plus should assure that it is used in such an environment. EMISSIONS TEST... - Page 102 GUIDANCE AND DECLARATION - ELECTROMAGNETIC IMMUNITY The Accutorr Plus is intended for use in the electromagnetic environment specified below. The customer or the user of the Accutorr Plus should assure that it is used in such an environment. IMMUNITY IEC 60601...
- Page 103 GUIDANCE AND DECLARATION - ELECTROMAGNETIC IMMUNITY The Accutorr Plus is intended for use in the electromagnetic environment specified below. The customer or the user of the Accutorr Plus should assure that it is used in such an environment. IMMUNITY IEC 60601 TEST...
- Page 104 RECOMMENDED SEPARATION DISTANCES BETWEEN PORTABLE AND MOBILE RF COMMUNICATIONS EQUIPMENT AND THE ACCUTORR PLUS The Accutorr Plus is intended for use in an electromagnetic environment in which radiated RF disturbances are controlled. The customer or the user of the Accutorr Plus can help prevent...
-
Page 105: Indirect Blood Pressure Measurements And Associated Errors
Irregular cardiac rhythm changes the stroke volume from beat to beat. This changing stroke volume may increase the time it takes the Accutorr Plus to make a measurement. The Accutorr Plus system will take up to four successive attempts to obtain a measurement. -
Page 106: User Verification Of The Accutorr Plus Nibp Measurements
Regular service to blood pressure equipment will help ensure accurate measurements. Consult your service manual for appropriate information. If you question the accuracy of the Accutorr Plus, check it (the Accutorr Plus) with a manometer. See the Calibration Section of the Accutorr Plus Service Manual. -
Page 107: Warranty
Mindray DS USA, Inc., freight prepaid to Mindray DS USA, Inc., Mahwah, New Jersey 07430 or its authorized representative. Mindray DS USA, Inc. shall not have any responsibility in the event of loss or damage in transit. - Page 108 Appendix Manufacturer’s Responsibility This page intentionally left blank. Accutorr Plus™ Operating Instructions 0070-10-0692-02 6 - 17...
- Page 109 0070-10-0692-02 Rev D July 1, 2010...
- Page 110 Tel: +31 33 25 44 911 • Fax: +31 33 25 37 621 Mindray (UK) Limited • 3 Percy Road • St. John’s Park • Huntingdon • Cambridgeshire PE29 6SZ • United Kingdom • Tel: 01480 416840 • Fax: 01480 436588 Mindray Medical France SARL •...
Need help?
Do you have a question about the accutorr plus and is the answer not in the manual?
Questions and answers