
Related Manuals for Analog way CentriX CTX8022


Summary of Contents for Analog way CentriX CTX8022
- Page 1 MODELS: CTX8022 & CTX8022-D MODELS: EVX8022, EVX8022-D & EVX8022HD-D User’s Manual Manuel Utilisateur ANALOG WAY® CENTRIX™ & EVENTIX™ EDITION : 07/05...
- Page 2 www.liveline.be...
-
Page 3: Table Of Contents
www.liveline.be CENTRIX™ & EVENTIX™ TABLE OF CONTENTS SAFETY INSTRUCTIONS................................4 Chapter 1 : INTRODUCTION...............................7 1-1. SUPPLIED EQUIPMENT..............................7 1-2. GENERAL INFORMATION.............................7 1-3. REFERENCES ...................................8 1-4. OPTIONAL ACCESSORIES.............................8 ™ ™ 1-5. CENTRIX / EVENTIX INSTALLATION........................8 ™ 1-6. CENTRIX FRONT PANEL DESCRIPTION........................9 ™ 1-7. EVENTIX FRONT PANEL DESCRIPTION........................9 1-8. -
Page 4: Safety Instructions
www.liveline.be CENTRIX™ & EVENTIX™ SAFETY INSTRUCTIONS All of the safety and operating instructions should be read before the product is operated and should be retained for further reference. Please follow all of the warnings on this product and its operating instructions. CAUTION: WARNING: To prevent the risk of electric shock and fire, do not expose this device to rain, humidity or intense... -
Page 5: Instructions De Sécurité
www.liveline.be CENTRIX™ & EVENTIX™ INSTRUCTIONS DE SÉCURITÉ Afin de mieux comprendre le fonctionnement de cet appareil nous vous conseillons de bien lire toutes les consignes de sécurité et de fonctionnement de l’appareil avant utilisation. Conserver les instructions de sécurité et de fonctionnement afin de pouvoir les consulter ultérieurement. Respecter toutes les consignes marquées dans la documentation, sur le produit et sur ce document. -
Page 6: Instrucciones De Seguridad
www.liveline.be CENTRIX™ & EVENTIX™ SICHERHEITSHINWEISE Um den Betrieb dieses Geräts zu verstehen, raten wir Ihnen vor der Inbetriebnahme alle Sicherheits und Betriebsanweisungen genau zu lesen. Diese Sicherheits- und Betriebsanweisungen für einen späteren Gebrauch sicher aufbewahren. Alle in den Unterlagen, an dem Gerät und hier angegebenen Sicherheitsanweisungen einhalten. -
Page 7: Chapter 1 : Introduction
www.liveline.be CENTRIX™ & EVENTIX™ ™ ™ CENTRIX / EVENTIX Chapter 1 : INTRODUCTION 1-1. SUPPLIED EQUIPMENT ™ ™ • 1 CENTRIX or 1 EVENTIX • 1 AC power supply cord. • 1 CD-ROM (Remote Control Software). • 1 User’s Manual. Supplied equipment with the OPT-iX-SDTVD1 option and the EVX8022HD-D model: •... -
Page 8: References
www.liveline.be Chapter 1 : INTRODUCTION (continued) CENTRIX™ & EVENTIX™ 1-3. REFERENCES MODELS & DESIGNATIONS OPTIONS ™ CTX8022 CENTRIX ™ CTX8022-D CENTRIX with SDI & DVI inputs. ™ EVX8022 EVENTIX ™ EVX8022-D EVENTIX with SDI & DVI inputs. ™ EVX8022HD-D EVENTIX with SDI &... -
Page 9: Centrix ™ Front Panel Description
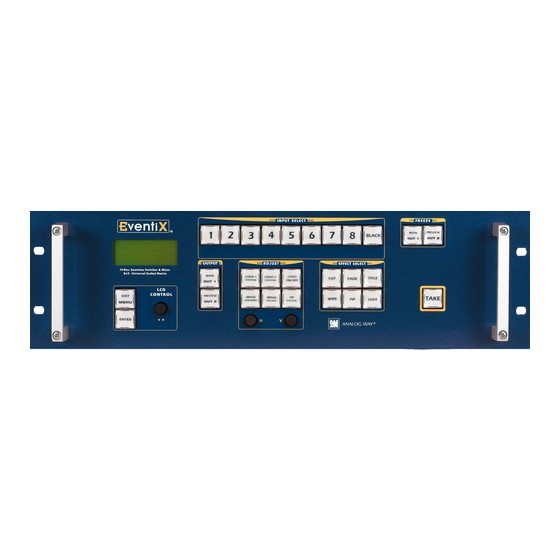
www.liveline.be CENTRIX™ & EVENTIX™ Chapter 1 : INTRODUCTION (continued) ™ 1-6. CENTRIX FRONT PANEL DESCRIPTION POWER: LED ON: device ON. LED OFF: device OFF. LED blinking slowly: update in progress. LED blinking quickly: update/start error. You should restart the device. ™... -
Page 10: Rear Panel Description
www.liveline.be Chapter 1 : INTRODUCTION (continued) CENTRIX™ & EVENTIX™ 1-8. REAR PANEL DESCRIPTION Figure 3 100-240 Vac 3A 50-60Hz: IEC standard power connector. O / I : Power switch (O = OFF, I = ON) INPUTS 1 to 8: 8 Universal Computer & Video Inputs. Each of the 8 inputs can accept both COMPUTER sources (RGBHV, RGBS, and RGsB (SOG) signals), standard TV/VIDEO sources (Composite video, S.VIDEO, Component (YUV), RGBS &... -
Page 11: Chapter 2 : Connecting
www.liveline.be CENTRIX™ & EVENTIX™ Chapter 2 : CONNECTING ™ ™ 2-1. CONNECTING THE CENTRIX / EVENTIX Turn OFF all of your equipment before connecting. Connect your computers (PC, MAC, workstation) and your video sources to the inputs (1 to 8) of the device. Connect your MAIN display device (data projector, plasma screen...) to the "MAIN"... - Page 12 www.liveline.be Chapter 2 : CONNECTING (continued) CENTRIX™ & EVENTIX™ 2-1. CONNECTING THE CENTRIX™ / EVENTIX™ (continued) 2-1-1. UNIVERSAL COMPUTER & VIDEO INPUTS (continued) COMPOSITE VIDEO SOURCES: The Composite Video signal, usually called COMPOSITE or VIDEO, is available on most video equipment (VCR, DVD, CAMCORDER…), but is also the lowest in picture quality.
- Page 13 www.liveline.be CENTRIX™ & EVENTIX™ Chapter 2 : CONNECTING (continued) 2-1. CONNECTING THE CENTRIX™ / EVENTIX™ (continued) 2-1-1. UNIVERSAL COMPUTER & VIDEO INPUTS (continued) COMPONENT VIDEO SOURCES: ™ The Component Video signal, also called YUV (Y, R-Y, B-Y) or BETACAM is widely used in broadcasting and is available on high-quality DVD players.
- Page 14 www.liveline.be Chapter 2 : CONNECTING (continued) CENTRIX™ & EVENTIX™ 2-1. CONNECTING THE CENTRIX™ / EVENTIX™ (continued) 2-1-2. MAIN (OUTPUT 1) AND PREVIEW (OUTPUT 2) OUTPUTS The device is equipped with 2 MAIN outputs on HD15 female connector, and two PREVIEW outputs on HD15 female connector.
-
Page 15: Connecting A Control Device For Using The Remote Control Software
www.liveline.be CENTRIX™ & EVENTIX™ Chapter 2 : CONNECTING (continued) 2-2. CONNECTING A CONTROL DEVICE FOR USING THE REMOTE CONTROL SOFTWARE ™ ™ Your CENTRIX & EVENTIX are shipped with a Windows compatible Remote Control Software (3.5" disk). This software allows you to control and make all adjustments by a simple mouse click. NOTE: Preferably use Windows NT, 2000, or XP for LAN operation. -
Page 16: Chapter 3 : Operating Mode
Turn your computer ON and wait for Windows to completely start. Insert the CD-ROM into your drive: the ANALOG WAY home window will open automatically. Select the language of the CD-ROM menus, then click on "Install a Remote Control Software and select a name of your device. - Page 17 www.liveline.be CENTRIX™ & EVENTIX™ Chapter 3 : OPERATING MODE (continued) 3-1. OPERATING WITH THE REMOTE CONTROL SOFTWARE (continued) 3-1-2. COMMUNICATION SETUP (continued) • CASE OF LAN PORT: ™ ™ Connect the control device to the CENTRIX / EVENTIX with the RS-232 port as indicated in the previous page, then configure the LAN communication port (local address &...
- Page 18 www.liveline.be Chapter 3 : OPERATING MODE (continued) CENTRIX™ & EVENTIX™ 3-1. OPERATING WITH THE REMOTE CONTROL SOFTWARE (continued) 3-1-3. OPERATING IN MIXER MODE (continued) • INPUT SELECTION Pre-select an input with the INPUT SELECT keys. The key starts blinking. Select an effect with the EFFECT keys. Press on TAKE or move the T-BAR to do the transition.
- Page 19 www.liveline.be CENTRIX™ & EVENTIX™ Chapter 3 : OPERATING MODE (continued) 3-1. OPERATING WITH THE REMOTE CONTROL SOFTWARE (continued) 3-1-3. OPERATING IN MIXER MODE (continued) • EFFECT ADJUSTMENTS Click on the Effects tab, then click on the Effect button and select an Effect. Click on the EFFECT ANIMATION button, select an Effect opening and an Effect closing, and select the durations.
- Page 20 www.liveline.be Chapter 3 : OPERATING MODE (continued) CENTRIX™ & EVENTIX™ 3-1. OPERATING WITH THE REMOTE CONTROL SOFTWARE (continued) 3-1-3. OPERATING IN MIXER MODE (continued) • EXAMPLES OF TRANSITION PIP effect: The PIP effect allows to insert an image into another one. •...
- Page 21 www.liveline.be CENTRIX™ & EVENTIX™ Chapter 3 : OPERATING MODE (continued) 3-1. OPERATING WITH THE REMOTE CONTROL SOFTWARE (continued) 3-1-3. OPERATING IN MIXER MODE (continued) Title effect (or shadow title): The TITLE effect allows displaying a text onto the MAIN image. For a better readability you also can display a shadow bar onto your text.
- Page 22 www.liveline.be Chapter 3 : OPERATING MODE (continued) CENTRIX™ & EVENTIX™ 3-1. OPERATING WITH THE REMOTE CONTROL SOFTWARE (continued) 3-1-3. OPERATING IN MIXER MODE (continued) Wipe transition: • Click on the Effects tab. • Assign a WIPE to one of the EFFECT keys: Click on the arrow of an EFFECT key and select a WIPE (for example: hor wipe from left).
- Page 23 www.liveline.be CENTRIX™ & EVENTIX™ Chapter 3 : OPERATING MODE (continued) 3-1. OPERATING WITH THE REMOTE CONTROL SOFTWARE (continued) 3-1-3. OPERATING IN MIXER MODE (continued) Double PIP transition: • Create a frame with 2 black areas with a standard drawing software. The 2 black areas will be receiving the PIP sources.
- Page 24 www.liveline.be Chapter 3 : OPERATING MODE (continued) CENTRIX™ & EVENTIX™ 3-1. OPERATING WITH THE REMOTE CONTROL SOFTWARE (continued) 3-1-3. OPERATING IN MIXER MODE (continued) • VIDEO OUTPUT ADJUSTMENTS Click on the Video tab, and then make the following adjustment: Select the output standard (video standard). Select the video "output rate".
- Page 25 www.liveline.be CENTRIX™ & EVENTIX™ Chapter 3 : OPERATING MODE (continued) 3-1. OPERATING WITH THE REMOTE CONTROL SOFTWARE (continued) 3-1-4. OPERATING IN MATRIX MODE • SETTINGS We recommend resetting the device to its default values (Controls menu > default value) before proceeding. ™...
- Page 26 www.liveline.be Chapter 3 : OPERATING MODE (continued) CENTRIX™ & EVENTIX™ 3-1. OPERATING WITH THE REMOTE CONTROL SOFTWARE (continued) 3-1-4. OPERATING IN MATRIX MODE (continued) • DISPLAY DEVICES ADJUSTMENTS For each OUTPUT: Click on the Output tab and select the centering pattern. Adjust directly the display device itself, using its controls, to fill the centering pattern in full screen.
-
Page 27: Operating With The Front Panel Of The Eventix
www.liveline.be CENTRIX™ & EVENTIX™ Chapter 3 : OPERATING MODE (continued) ™ 3-2. OPERATING WITH THE FRONT PANEL OF THE EVENTIX ™ IMPORTANT: The EVENTIX can be used in two different modes: the MIXER MODE and the MATRIX MODE. The MIXER MODE allows switching seamlessly, fading and titling between all the inputs. The MATRIX MODE allows to display the inputs onto two independents display devices. - Page 28 www.liveline.be Chapter 3 : OPERATING MODE (continued) CENTRIX™ & EVENTIX™ 3-2. OPERATING WITH THE FRONT PANEL OF THE EVENTIX™ (continued) 3-2-1. OPERATING IN MIXER MODE (continued) • DISPLAY DEVICES ADJUSTMENTS Select the MAIN centering pattern with the LCD menu (OUTPUT > test pattern > main > centering pattern). Adjust directly the display device itself, using its controls, to fill the centering pattern in full screen.
- Page 29 www.liveline.be CENTRIX™ & EVENTIX™ Chapter 3 : OPERATING MODE (continued) 3-2. OPERATING WITH THE FRONT PANEL OF THE EVENTIX™ (continued) 3-2-1. OPERATING IN MIXER MODE (continued) • EXAMPLES OF TRANSITION PIP effect: The PIP effect allows to insert an image into another one. •...
- Page 30 www.liveline.be Chapter 3 : OPERATING MODE (continued) CENTRIX™ & EVENTIX™ 3-2. OPERATING WITH THE FRONT PANEL OF THE EVENTIX™ (continued) 3-2-1. OPERATING IN MIXER MODE (continued) Double PIP transition: • Create a frame with 2 black areas with a standard drawing software. The 2 black areas will be receiving the PIP source.
- Page 31 www.liveline.be CENTRIX™ & EVENTIX™ Chapter 3 : OPERATING MODE (continued) 3-2. OPERATING WITH THE FRONT PANEL OF THE EVENTIX™ (continued) 3-2-2. OPERATING IN MATRIX MODE • SETTINGS ™ We recommend resetting the EVENTIX device to its default values, with the LCD menu (CONTROL > default value >...
- Page 32 www.liveline.be Chapter 3 : OPERATING MODE (continued) CENTRIX™ & EVENTIX™ 3-2. OPERATING WITH THE FRONT PANEL OF THE EVENTIX™ (continued) 3-2-2. OPERATING IN MATRIX MODE (continued) • DISPLAY DEVICES ADJUSTMENTS For each OUTPUT: Select the centering pattern with the LCD menu (OUTPUT X > test pattern > centering pattern). Adjust directly the display device itself, using its controls, to fill the centering pattern in full screen.
-
Page 33: Operating With The Remote Keypad
www.liveline.be CENTRIX™ & EVENTIX™ Chapter 3 : OPERATING MODE (continued) 3-3. OPERATING WITH THE REMOTE KEYPAD ™ ™ IMPORTANT: The CENTRIX & EVENTIX can be used in two different modes: the MIXER MODE and the MATRIX MODE. The MIXER MODE allows switching seamlessly, fading and titling between all the inputs. - Page 34 www.liveline.be Chapter 3 : OPERATING MODE (continued) CENTRIX™ & EVENTIX™ 3-3. OPERATING WITH THE REMOTE KEYPAD (continued) 3-3-2. OPERATING IN MIXER MODE (continued) • INPUT SELECTION Pre-select an input with the INPUT SELECT keys. The key starts blinking. Select an effect with the EFFECT keys. Press on TAKE or move manually the T-BAR to do the transition.
- Page 35 www.liveline.be CENTRIX™ & EVENTIX™ Chapter 3 : OPERATING MODE (continued) 3-3. OPERATING WITH THE REMOTE KEYPAD (continued) 3-3-2. OPERATING IN MIXER MODE (continued) • EXAMPLES OF TRANSITION PIP effect: The PIP effect allows to insert an image into another one. •...
- Page 36 www.liveline.be Chapter 3 : OPERATING MODE (continued) CENTRIX™ & EVENTIX™ 3-3. OPERATING WITH THE REMOTE KEYPAD (continued) 3-3-3. OPERATING IN MATRIX MODE • SETTINGS ™ ™ We recommend resetting the CENTRIX / EVENTIX device to its default values, with the LCD menu (CONTROL >...
- Page 37 www.liveline.be CENTRIX™ & EVENTIX™ Chapter 3 : OPERATING MODE (continued) 3-3. OPERATING WITH THE REMOTE KEYPAD (continued) 3-3-3. OPERATING IN MATRIX MODE (continued) • IMAGE ADJUSTMENTS ™ ™ For each input source connected to the CENTRIX / EVENTIX make the following adjustments: Select the source you want to adjust.
-
Page 38: Chapter 4 : Updating
Switch OFF the device (rear panel switch = O). Figure 33: Updating. 4-2. UPDATE INSTRUCTIONS Open the file "iX updater" (in start/Program/ANALOG WAY/iX8022). Click on "START" on the SOFTWARE. Switch ON the device. The POWER LED blinking slowly and the update will start. -
Page 39: Chapter 5 : Using Frame Store And Logo Insertion
www.liveline.be CENTRIX™ & EVENTIX™ Chapter 5 : USING FRAME STORE AND LOGO INSERTION 5-1. USING LOGO INSERTION WITH THE REMOTE CONTROL SOFTWARE This function allows storing up to 8 logos in order to incrust them into the displayed image (up to 2 logos at a same time). IMPORTANT: The output format used when displaying logo should be the same that the output format used during the logo storing. -
Page 40: Using Frame Store With The Remote Control Software
www.liveline.be Chapter 5 : USING FRAME STORE AND LOGO INSERTION (continued) CENTRIX™ & EVENTIX™ 5-1. USING LOGO INSERTION WITH THE REMOTE CONTROL SOFTWARE (continued) 5-1-5. EXAMPLE OF LOGO INSERTION Figure 35 Logo source Video source Video source with inserted logo. (white border = logo area) (logo made with luma key) 5-2. -
Page 41: Using Logo Insertion With The Remote Keypad Or Eventix
www.liveline.be CENTRIX™ & EVENTIX™ Chapter 5 : USING FRAME STORE AND LOGO INSERTION (continued) ™ 5-3. USING LOGO INSERTION WITH THE REMOTE KEYPAD OR EVENTIX This function allows storing up to 8 logos in order to incrust them into the displayed image (up to 2 logos at a same time). IMPORTANT: The output format used when displaying logo should be the same that the output format used during the logo storing. -
Page 42: Using Frame Store With The Remote Keypad Or The Eventix
www.liveline.be Chapter 5 : USING FRAME STORE AND LOGO INSERTION (continued) CENTRIX™ & EVENTIX™ ™ 5-4. USING FRAME STORE WITH THE REMOTE KEYPAD OR THE EVENTIX This function allows memorizing up to 2 frames (images) in order to display it at any time during the show. IMPORTANT: The output format used when displaying the frame should be the same that the output format used during the frame storing. -
Page 43: Chapter 6 : Eventix ™ & Remote Keypad Lcd Screen Description
www.liveline.be CENTRIX™ & EVENTIX™ ™ Chapter 6 : EVENTIX & REMOTE KEYPAD LCD SCREEN DESCRIPTION 6-1. INTRODUCTION The LCD screen is composed of 2 modes: the STATUS MODE and the CONTROL MODE. • The STATUS MODE indicates the input and the output status. •... -
Page 44: Control Mode
www.liveline.be Chapter 6 : EVENTIX™ & REMOTE KEYPAD LCD SCREEN DESCRIPTION (continued) CENTRIX™ & EVENTIX™ 6-4. CONTROL MODE 6-4-1. CONFIGURATION IN MIXER MODE 1 MODE 1 mixer mode 2 matrix mode 2 INPUT 1 input type 1 #1 Comp. HV/C 1 SDTV Composite 1 NTSC/PAL/SECAM 2 #2 Comp. - Page 45 www.liveline.be CENTRIX™ & EVENTIX™ Chapter 6 : EVENTIX™ & REMOTE KEYPAD LCD SCREEN DESCRIPTION (continued) 6-4. CONTROL MODE (continued) 6-4-1. CONFIGURATION IN MIXER MODE (continued) 6 EFFECT 1 current effect 2 USER 1 key 1 cut effect duration 3 USER 2 key 2 fading 1s 3s 5s custom 4 USER 3 key...
- Page 46 www.liveline.be Chapter 6 : EVENTIX™ & REMOTE KEYPAD LCD SCREEN DESCRIPTION (continued) CENTRIX™ & EVENTIX™ 6-4. CONTROL MODE (continued) 6-4-2. CONFIGURATION IN MATRIX MODE 1 MODE 1 mixer mode 2 matrix mode 2 INPUT 1 input type 1 #1 Comp. HV/C 1 SDTV Composite 1 NTSC/PAL/SECAM 2 #2 Comp.
- Page 47 www.liveline.be CENTRIX™ & EVENTIX™ Chapter 6 : EVENTIX™ & REMOTE KEYPAD LCD SCREEN DESCRIPTION (continued) 6-4. CONTROL MODE (continued) 6-4-2. CONFIGURATION IN MATRIX MODE (continued) 7 AUDIO OUT1 1 master volume 2 audio mode 1 mono 8 AUDIO OUT2 2 stereo 3 audio source 1 auto follow 2 input # 1...
-
Page 48: Lcd Functions Description
www.liveline.be Chapter 6 : EVENTIX™ & REMOTE KEYPAD LCD SCREEN DESCRIPTION (continued) CENTRIX™ & EVENTIX™ 6-5. LCD FUNCTIONS DESCRIPTION 1 [MODE] + ENTER. Select a switcher mode between: • [mixer mode]: Set the device in MIXER mode. • [matrix mode]: Set the device in MATRIX mode. 2 [INPUT] + ENTER. - Page 49 www.liveline.be CENTRIX™ & EVENTIX™ Chapter 6 : EVENTIX™ & REMOTE KEYPAD LCD SCREEN DESCRIPTION (continued) 6-5. LCD FUNCTIONS DESCRIPTION (continued) 3-3 [output sync] + ENTER. Select an output between MAIN & PREVIEW with + ENTER. + ENTER. Select the Output Sync. type with •...
- Page 50 www.liveline.be Chapter 6 : EVENTIX™ & REMOTE KEYPAD LCD SCREEN DESCRIPTION (continued) CENTRIX™ & EVENTIX™ 6-5. LCD FUNCTIONS DESCRIPTION (continued) 4 [IMAGE] + ENTER. Select an output between MAIN & PREVIEW with + ENTER. NOTE: The image menu contents will be different in case of computer or video on the input selected. 4-1 [centering] + ENTER.
- Page 51 www.liveline.be CENTRIX™ & EVENTIX™ Chapter 6 : EVENTIX™ & REMOTE KEYPAD LCD SCREEN DESCRIPTION (continued) 6-5. LCD FUNCTIONS DESCRIPTION (continued) [LOGOS/FRAME] + ENTER 5-1 [use logo/frame] + ENTER. + ENTER. Select an item with 5-1-1 [display] + ENTER. This function allows to display ON or OFF the assigned logos of the displayed input. Select an input and press ENTER to display ON or OFF.
- Page 52 www.liveline.be Chapter 6 : EVENTIX™ & REMOTE KEYPAD LCD SCREEN DESCRIPTION (continued) CENTRIX™ & EVENTIX™ 6-5. LCD FUNCTIONS DESCRIPTION (continued) 5-3 [record frame] + ENTER. This mode allows storing up to 2 frames in order to display them at any time during the show. 5-3-1 [H position] + ENTER.
- Page 53 www.liveline.be CENTRIX™ & EVENTIX™ Chapter 6 : EVENTIX™ & REMOTE KEYPAD LCD SCREEN DESCRIPTION (continued) 6-5. LCD FUNCTIONS DESCRIPTION (continued) 6-x-4 [shadow title]: Same function as [title] but a shadow bar appears at the bottom of the image. This function allows increasing the readability of the text on bright images.
- Page 54 www.liveline.be Chapter 6 : EVENTIX™ & REMOTE KEYPAD LCD SCREEN DESCRIPTION (continued) CENTRIX™ & EVENTIX™ 6-5. LCD FUNCTIONS DESCRIPTION (continued) 6-x-8 [Slide]: Allows to switch the pre-selected input onto the MAIN output with a horizontal slide effect. + ENTER between: First select a horizontal wipe effect with •...
- Page 55 www.liveline.be CENTRIX™ & EVENTIX™ Chapter 6 : EVENTIX™ & REMOTE KEYPAD LCD SCREEN DESCRIPTION (continued) 6-5. LCD FUNCTIONS DESCRIPTION (continued) 7 [AUDIO MAIN] + ENTER. This menu is available with the OPT-iX-A option only. The following commands allow controlling the MAIN AUDIO output (OUT 1). 7-1 [master volume] + ENTER.
- Page 56 www.liveline.be Chapter 6 : EVENTIX™ & REMOTE KEYPAD LCD SCREEN DESCRIPTION (continued) CENTRIX™ & EVENTIX™ 6-5. LCD FUNCTIONS DESCRIPTION (continued) 9 [CONTROL] 9-1 [versions] + ENTER. Display the status of the internal firmware. • A = xxxx • B = xxxx •...
- Page 57 www.liveline.be CENTRIX™ & EVENTIX™ Chapter 6 : EVENTIX™ & REMOTE KEYPAD LCD SCREEN DESCRIPTION (continued) 6-5. LCD FUNCTIONS DESCRIPTION (continued) 9-6-2 [fade frame] + ENTER. This function allows switching by a fading image (instead of a color). Then adjust the duration of the transition.
- Page 58 www.liveline.be Chapter 6 : EVENTIX™ & REMOTE KEYPAD LCD SCREEN DESCRIPTION (continued) CENTRIX™ & EVENTIX™ 6-5. LCD FUNCTIONS DESCRIPTION (continued) 10 [CONSOLE] 10-1 [RS232/LAN port] + ENTER. + ENTER. Select the needed communication port with • [RS232]: Enables the RS-232 communication port. (Default setting). •...
-
Page 59: Chapter 7 : Technical Specifications
www.liveline.be CENTRIX™ & EVENTIX™ Chapter 7 : TECHNICAL SPECIFICATIONS 7-1. COMPUTER & VIDEO INPUTS • ANALOG COMPUTER: Connectors: BNC female (inputs #1 to #4) or HD15 female (inputs #5 to #8). Line frequency: Up to 110 kHz. Frame frequency: Up to 130 Hz. Resolution: Up to 1600 x 1200 @ 60 Hz. -
Page 60: Main & Preview Outputs
www.liveline.be Chapter 7 : TECHNICAL SPECIFICATIONS (continued) CENTRIX™ & EVENTIX™ 7-1. COMPUTER & VIDEO INPUTS (continued) • COMPOSITE VIDEO: Connectors: BNC female (inputs #1 to #4) or HD15 female (inputs #5 to #8). Standard: PAL / SECAM: 15.625 kHz - 50 Hz - 625 lines. NTSC (3.58 MHz / 4.43 MHz): 15.735 kHz - 60 Hz - 525 lines. -
Page 61: Optional Video Outputs (Opt-Ix-Sdtvd1)
www.liveline.be CENTRIX™ & EVENTIX™ Chapter 7 : TECHNICAL SPECIFICATIONS (continued) 7-4. OPTIONAL VIDEO OUTPUTS (OPT-iX-SDTVD1) • COMPOSITE VIDEO: Connector: DB9 female. Standard: PAL / SECAM: 15.625 kHz - 50 Hz (625L) NTSC: 15.734 kHz - 60 Hz (525L) Level: 1 Vp/p (0.7 V Luma + 0.3 V Sync.). Impedance: 75 ohms. -
Page 62: Optional Audio Inputs (Opt-Ix-A)
www.liveline.be Chapter 7 : TECHNICAL SPECIFICATIONS (continued) CENTRIX™ & EVENTIX™ 7-5. OPTIONAL AUDIO INPUTS (OPT-iX-A) • 9 Balanced and unbalanced stereo inputs (on 5-pin MCO male connector). • Vi = + 18 dBu (max). • Zi = 20 kΩ unbalanced. •... - Page 63 www.liveline.be CENTRIX™ & EVENTIX™ TABLE DES MATIÈRES INSTRUCTIONS DE SÉCURITÉ..............................5 Chapitre 1 : INTRODUCTION..............................64 1-1. MATÉRIEL FOURNI ..............................64 1-2. INFORMATIONS GÉNÉRALES ............................64 1-3. RÉFÉRENCES .................................65 1-4. ACCESSOIRES OPTIONNELS ............................65 ™ ™ 1-5. INSTALLATION DU CENTRIX / EVENTIX ......................65 ™ 1-6. DESCRIPTION DE LA FACE AVANT DU CENTRIX ....................66 ™...
-
Page 64: Chapitre 1 : Introduction
www.liveline.be CENTRIX™ & EVENTIX™ ™ ™ CENTRIX / EVENTIX Chapitre 1 : INTRODUCTION 1-1. MATÉRIEL FOURNI ™ ™ • 1 CENTRIX ou 1 EVENTIX • 1 cordon secteur. • 1 CD-ROM (Logiciel de contrôle à distance). • 1 Manuel Utilisateur. Fourni avec l'option OPT-iX-SDTVD1 et le modèle EVX8022HD-D: •... -
Page 65: Références
www.liveline.be CENTRIX™ & EVENTIX™ Chapitre 1 : INTRODUCTION (suite) 1-3. RÉFÉRENCES MODÈLES et DÉSIGNATIONS OPTIONS ™ CTX8022 CENTRIX ™ CTX8022-D CENTRIX avec entrées SDI et DVI. ™ EVX8022 EVENTIX ™ EVX8022-D EVENTIX avec entrées SDI et DVI. ™ EVX8022HD-D EVENTIX avec entrées SDI et DVI et sortie HDTV (HD YUV &... -
Page 66: Description De La Face Avant Du Centrix
www.liveline.be Chapitre 1 : INTRODUCTION (suite) CENTRIX™ & EVENTIX™ ™ 1-6. DESCRIPTION DE LA FACE AVANT DU CENTRIX POWER: LED allumée: appareil sous tension. LED éteint: appareil éteint. LED clignotante (lentement): en cours de mise à jour. LED clignotante (rapidement): erreur de mise à jour/démarrage: redémarrez l'appareil. ™... -
Page 67: Description De La Face Arrière
www.liveline.be CENTRIX™ & EVENTIX™ Chapitre 1 : INTRODUCTION (suite) 1-8. DESCRIPTION DE LA FACE ARRIÈRE Figure 40 100-240 Vac 3A 50-60 Hz: Embase d'alimentation au standard CEI. O / I : Interrupteur d'alimentation générale (O = OFF, I = ON). INPUTS 1 à... -
Page 68: Chapitre 2 : Raccordements
www.liveline.be CENTRIX™ & EVENTIX™ Chapitre 2 : RACCORDEMENTS ™ ™ 2-1. RACCORDEMENTS DU CENTRIX / EVENTIX Eteignez tous les appareils avant d'effectuer les raccordements. Raccordez vos ordinateurs (PC, MAC...) et vos sources vidéo aux entrées (1 à 8) de l'appareil. Raccordez votre afficheur principal (projecteur data, écran plasma...) à... - Page 69 www.liveline.be CENTRIX™ & EVENTIX™ Chapitre 2 : RACCORDEMENTS (suite) 2-1. RACCORDEMENTS DU CENTRIX™ / EVENTIX™ (suite) 2-1-1. ENTRÉES UNIVERSELLES INFORMATIQUE ET VIDÉO (suite) SOURCES VIDÉO COMPOSITE: Le signal Vidéo Composite, aussi appelé COMPOSITE ou VIDÉO, est disponible sur la plupart des appareils vidéo (Magnétoscope, DVD, Caméra…), mais c’est aussi celui qui à...
- Page 70 www.liveline.be Chapitre 2 : RACCORDEMENTS (suite) CENTRIX™ & EVENTIX™ 2-1. RACCORDEMENTS DU CENTRIX™ / EVENTIX™ (suite) 2-1-1. ENTRÉES UNIVERSELLES INFORMATIQUE ET VIDÉO (suite) COMPONENT VIDÉO SOURCES: ™ Les signaux vidéo Composantes, aussi appelés COMPONENT, YUV (Y, R-Y, B-Y) ou BETACAM , sont largement utilisés dans le milieu broadcast, mais sont aussi disponibles sur certain lecteur de DVD.
- Page 71 www.liveline.be CENTRIX™ & EVENTIX™ Chapitre 2 : RACCORDEMENTS (suite) 2-1. RACCORDEMENTS DU CENTRIX™ / EVENTIX™ (suite) 2-1-2. SORTIES MAIN (OUTPUT 1) ET PREVIEW (OUTPUT 2) L'appareil est équipé de 2 sorties MAIN sur connecteurs HD15 femelle et de 2 sorties PREVIEW sur connecteurs HD15 femelle.
-
Page 72: Raccordement D'un Appareil De Contrôle Pour Utilisation Du Logiciel
www.liveline.be Chapitre 2 : RACCORDEMENTS (suite) CENTRIX™ & EVENTIX™ 2-2. RACCORDEMENT D'UN APPAREIL DE CONTRÔLE POUR UTILISATION DU LOGICIEL ™ ™ Le CENTRIX et l'EVENTIX sont livrés avec un logiciel de contrôle compatible avec Windows 95 ou supérieur. Ce logiciel permet d'effectuer tous les réglages par un simple clic de la souris. NOTE: Utilisez de préférence Windows NT, 2000, ou XP pour les applications avec le port de communication LAN. -
Page 73: Chapitre 3 : Mode Opératoire
3-1-1. INSTALLATION DU LOGICIEL Allumez votre ordinateur et attendez que Windows démarre complètement. Insérez le cd-rom dans votre lecteur: La page d'accueil ANALOG WAY s'ouvre alors automatiquement. Sélectionnez le langage des menus du CD-ROM, ensuite cliquez sur "Installer un Programme de contrôle à... - Page 74 www.liveline.be Chapitre 3 : MODE OPÉRATOIRE (suite) CENTRIX™ & EVENTIX™ 3-1. FONCTIONNEMENT AVEC LE LOGICIEL DE CONTRÔLE (suite) 3-1-2. CONFIGURATION DE LA COMMUNICATION (suite) • CAS DU PORT LAN: ™ ™ Raccordez l'appareil de contrôle au CENTRIX / EVENTIX avec le port RS-232 comme indiqué page précédente, ensuite configurez le port de communication LAN (local address &...
- Page 75 www.liveline.be CENTRIX™ & EVENTIX™ Chapitre 3 : MODE OPÉRATOIRE (suite) 3-1. FONCTIONNEMENT AVEC LE LOGICIEL DE CONTRÔLE (suite) 3-1-3. FONCTIONNEMENT EN MODE MIXER (suite) • SÉLECTION DES ENTRÉES Présélectionnez une entrée avec les touches INPUT SELECT. La touche va clignoter. Sélectionnez un effet avec la touche EFFECT.
- Page 76 www.liveline.be Chapitre 3 : MODE OPÉRATOIRE (suite) CENTRIX™ & EVENTIX™ 3-1. FONCTIONNEMENT AVEC LE LOGICIEL DE CONTRÔLE (suite) 3-1-3. FONCTIONNEMENT EN MODE MIXER (suite) • RÉGLAGE DES EFFETS Cliquez sur l'onglet Effects, puis cliquez sur le bouton Effect et sélectionnez un Effet. Cliquez sur le bouton EFFECT ANIMATION, sélectionnez un Effect opening et un Effect closing, puis sélectionnez les durées.
- Page 77 www.liveline.be CENTRIX™ & EVENTIX™ Chapitre 3 : MODE OPÉRATOIRE (suite) 3-1. FONCTIONNEMENT AVEC LE LOGICIEL DE CONTRÔLE (suite) 3-1-3. FONCTIONNEMENT EN MODE MIXER (suite) • EXEMPLES DE TRANSITION Effet PIP: L'effet PIP permet d'incruster une image dans une autre. • Cliquez sur l'onglet Effects. •...
- Page 78 www.liveline.be Chapitre 3 : MODE OPÉRATOIRE (suite) CENTRIX™ & EVENTIX™ 3-1. FONCTIONNEMENT AVEC LE LOGICIEL DE CONTRÔLE (suite) 3-1-3. FONCTIONNEMENT EN MODE MIXER (suite) Effet Title (ou shadow title): L'effet TITLE permet d'afficher du texte sur l'image MAIN. Pour une meilleure lisibilité vous pouvez afficher une zone ombragée (shadow title) sous votre texte.
- Page 79 www.liveline.be CENTRIX™ & EVENTIX™ Chapitre 3 : MODE OPÉRATOIRE (suite) 3-1. FONCTIONNEMENT AVEC LE LOGICIEL DE CONTRÔLE (suite) 3-1-3. FONCTIONNEMENT EN MODE MIXER (suite) Transition par volet (WIPE): • Cliquez sur l'onglet Effects. • Attribuez un WIPE à l'une des touches EFFECT: Cliquez sur la flèche d'une touche EFFECT et sélectionnez un WIPE (par exemple: hor wipe from left), sélectionnez une animation d'ouverture et de fermeture, puis sélectionnez une durée dans la fenêtre Effects.
- Page 80 www.liveline.be Chapitre 3 : MODE OPÉRATOIRE (suite) CENTRIX™ & EVENTIX™ 3-1. FONCTIONNEMENT AVEC LE LOGICIEL DE CONTRÔLE (suite) 3-1-3. FONCTIONNEMENT EN MODE MIXER (suite) Effet PIP double: • Créer une frame avec 2 zones noires avec un logiciel de dessin standard. Les 2 zones noires vont recevoir les sources des PIP.
- Page 81 www.liveline.be CENTRIX™ & EVENTIX™ Chapitre 3 : MODE OPÉRATOIRE (suite) 3-1. FONCTIONNEMENT AVEC LE LOGICIEL DE CONTRÔLE (suite) 3-1-3. FONCTIONNEMENT EN MODE MIXER (suite) • RÉGLAGES DE LA SORTIE VIDÉO Cliquez sur l'onglet Video et effectuez les réglages suivants: Sélectionnez le standard vidéo de sortie (video standard). Sélectionnez le signal de référence "output rate".
- Page 82 www.liveline.be Chapitre 3 : MODE OPÉRATOIRE (suite) CENTRIX™ & EVENTIX™ 3-1. FONCTIONNEMENT AVEC LE LOGICIEL DE CONTRÔLE (suite) 3-1-4. FONCTIONNEMENT EN MODE MATRIX • RÉGLAGES Avant chaque nouvelle application, nous conseillons de remettre tous les réglages par défauts de l'appareil (Controls menu >...
- Page 83 www.liveline.be CENTRIX™ & EVENTIX™ Chapitre 3 : MODE OPÉRATOIRE (suite) 3-1. FONCTIONNEMENT AVEC LE LOGICIEL DE CONTRÔLE (suite) 3-1-4. FONCTIONNEMENT EN MODE MATRIX (suite) • RÉGLAGES DES AFFICHEURS Pour chaque sortie: Cliquez sur l'onglet Output et positionnez la mire de cadrage (centering pattern). Réglez la mire de cadrage en plein écran avec les fonctions de réglages de votre afficheur.
-
Page 84: Fonctionnement Avec La Face Avant De L'eventix
www.liveline.be Chapitre 3 : MODE OPÉRATOIRE (suite) CENTRIX™ & EVENTIX™ ™ 3-2. FONCTIONNEMENT AVEC LA FACE AVANT DE L'EVENTIX ™ IMPORTANT: L'EVENTIX peut être configuré en deux modes différent: le MODE MIXER et le MODE MATRIX. Le MODE MIXER, permet de commuter "sans coupure", par fondu ou faire du titrage entre toutes les entrées. - Page 85 www.liveline.be CENTRIX™ & EVENTIX™ Chapitre 3 : MODE OPÉRATOIRE (suite) 3-2. FONCTIONNEMENT AVEC LA FACE AVANT DE L'EVENTIX™ (suite) 3-2-1. FONCTIONNEMENT EN MODE MIXER (suite) • RÉGLAGES DES AFFICHEURS Sélectionnez la mire de cadrage MAIN avec le menu LCD (OUTPUT > test pattern > main > centering pattern).
- Page 86 www.liveline.be Chapitre 3 : MODE OPÉRATOIRE (suite) CENTRIX™ & EVENTIX™ 3-2. FONCTIONNEMENT AVEC LA FACE AVANT DE L'EVENTIX™ (suite) 3-2-1. FONCTIONNEMENT EN MODE MIXER (suite) • EXEMPLES DE TRANSITION Effet PIP: L'effet PIP permet d'incruster une image dans une autre. •...
- Page 87 www.liveline.be CENTRIX™ & EVENTIX™ Chapitre 3 : MODE OPÉRATOIRE (suite) 3-2. FONCTIONNEMENT AVEC LA FACE AVANT DE L'EVENTIX™ (suite) 3-2-1. FONCTIONNEMENT EN MODE MIXER (suite) Effet PIP double: • Créer une frame avec 2 zones noires avec un logiciel de dessin standard. Les 2 zones noires vont recevoir les sources des PIP.
- Page 88 www.liveline.be Chapitre 3 : MODE OPÉRATOIRE (suite) CENTRIX™ & EVENTIX™ 3-2. FONCTIONNEMENT AVEC LA FACE AVANT DE L'EVENTIX™ (suite) 3-2-2. FONCTIONNEMENT EN MODE MATRIX • RÉGLAGES ™ Avant chaque nouvelle application, nous conseillons de remettre tous les réglages par défauts de l'EVENTIX avec le menu LCD (CONTROL >...
- Page 89 www.liveline.be CENTRIX™ & EVENTIX™ Chapitre 3 : MODE OPÉRATOIRE (suite) 3-2. FONCTIONNEMENT AVEC LA FACE AVANT DE L'EVENTIX™ (suite) 3-2-2. FONCTIONNEMENT EN MODE MATRIX (suite) • RÉGLAGES DES AFFICHEURS Pour chaque sortie: Sélectionnez la mire de cadrage avec le menu LCD (OUTPUT X > test pattern > centering pattern). Réglez la mire de cadrage en plein écran avec les fonctions de réglages de votre afficheur.
-
Page 90: Fonctionnement Avec Le Remote Keypad
www.liveline.be Chapitre 3 : MODE OPÉRATOIRE (suite) CENTRIX™ & EVENTIX™ 3-3. FONCTIONNEMENT AVEC LE REMOTE KEYPAD ™ ™ IMPORTANT: Le CENTRIX et l'EVENTIX peuvent être configurés en deux mode différent: le MODE MIXER et le MODE MATRIX. Le MODE MIXER, permet de commuter "sans coupure", par fondu ou faire du titrage entre toutes les entrées. - Page 91 www.liveline.be CENTRIX™ & EVENTIX™ Chapitre 3 : MODE OPÉRATOIRE (suite) 3-3. FONCTIONNEMENT AVEC LE REMOTE KEYPAD (suite) 3-3-2. FONCTIONNEMENT EN MODE MIXER (suite) • SÉLECTION DES ENTRÉES Présélectionnez une entrée avec les touches INPUT SELECT. La touche va clignoter. Sélectionnez un effet avec les touches EFFECT. Appuyez sur TAKE ou actionnez manuellement le T-BAR pour effectuer la transition.
- Page 92 www.liveline.be Chapitre 3 : MODE OPÉRATOIRE (suite) CENTRIX™ & EVENTIX™ 3-3. FONCTIONNEMENT AVEC LE REMOTE KEYPAD (suite) 3-3-2. FONCTIONNEMENT EN MODE MIXER (suite) • EXEMPLES DE TRANSITION Effet PIP: L'effet PIP permet d'incruster une image dans une autre. • Appuyez sur la touche PIP, puis effectuer tous les réglages nécessaire avec et validez avec ENTER.
- Page 93 www.liveline.be CENTRIX™ & EVENTIX™ Chapitre 3 : MODE OPÉRATOIRE (suite) 3-3. FONCTIONNEMENT AVEC LE REMOTE KEYPAD (suite) 3-3-3. FONCTIONNEMENT EN MODE MATRIX • RÉGLAGES ™ Avant chaque nouvelle application, nous conseillons de remettre tous les réglages par défauts du CENTRIX ™...
- Page 94 www.liveline.be Chapitre 3 : MODE OPÉRATOIRE (suite) CENTRIX™ & EVENTIX™ 3-3. FONCTIONNEMENT AVEC LE REMOTE KEYPAD (suite) 3-3-3. FONCTIONNEMENT EN MODE MATRIX (suite) • RÉGLAGES D'IMAGE ™ ™ Pour chaque source raccordée au CENTRIX / EVENTIX effectuez les réglages suivants: Sélectionnez la source que vous souhaitez régler.
-
Page 95: Chapitre 4 : Mise À Jour
Figure 70 : Mise à jour. 4-2. INSTRUCTIONS DE MISE A JOUR Ouvrez le fichier: "iX updater" (Démarrer/Programmes/ANALOG WAY/iX8022). Cliquez sur le bouton "START" du logiciel. Allumez l'appareil. La LED POWER clignote lentement et le téléchargement de la mise à jour commence. -
Page 96: Chapitre 5 : Utilisation Du Frame Store Et De L'incrustation De Logo
www.liveline.be CENTRIX™ & EVENTIX™ Chapitre 5 : UTILISATION DU FRAME STORE ET DE L'INCRUSTATION DE LOGO 5-1. INCRUSTATION DE LOGO AVEC LE LOGICIEL DE CONTRÔLE Cette fonction permet de mémoriser jusqu'à 8 logos afin de les incruster sur l'image de sortie (jusqu'à 2 logos en même temps). -
Page 97: Utilisation Du Frame Store Avec Le Logiciel De Contrôle
www.liveline.be CENTRIX™ & EVENTIX™ 5-1. INCRUSTATION DE LOGO AVEC LE LOGICIEL DE CONTRÔLE (suite) 5-1-5. EXEMPLE D'INCRUSTATION DE LOGO Figure 72 Source du logo Source vidéo Source vidéo avec incrustation d'un logo. (Rectangle blanc = zone du logo) (Logo réalisé avec luma key) 5-2. -
Page 98: Incrustation De Logo Avec Le Remote Keypad Ou L'eventix
www.liveline.be CENTRIX™ & EVENTIX™ ™ 5-3. INCRUSTATION DE LOGO AVEC LE REMOTE KEYPAD OU L'EVENTIX Cette fonction permet de mémoriser jusqu'à 8 logos afin de les incruster sur l'image de sortie (jusqu'à 2 logos en même temps). IMPORTANT: Le format de sortie utilisé lors de la diffusion d'un logo doit être identique au format utilisé lors de la mémorisation du logo. -
Page 99: Utilisation Du Frame Store Avec Le Remote Keypad Ou L'eventix
www.liveline.be CENTRIX™ & EVENTIX™ ™ 5-4. UTILISATION DU FRAME STORE AVEC LE REMOTE KEYPAD OU L'EVENTIX Cette fonction permet de mémoriser jusqu'à 2 frames (images) dans le but de les afficher à tout moment pendant la présentation. IMPORTANT: Le format de sortie utilisé lors de la diffusion d'une frame doit être identique au format utilisé lors de la mémorisation de la frame. -
Page 100: Chapitre 6 : Description De L'écran Lcd De L'eventix
www.liveline.be CENTRIX™ & EVENTIX™ ™ Chapitre 6 : DESCRIPTION DE L'ÉCRAN LCD DE L'EVENTIX ET DU REMOTE KEYPAD 6-1. INTRODUCTION L'écran LCD est composé de 2 modes : le mode ÉTAT et le mode RÉGLAGE. • Le MODE ÉTAT indique l'état des entrées sélectionnées et l'état des sorties. •... -
Page 101: Mode Réglage
www.liveline.be CENTRIX™ & EVENTIX™ Chapitre 6 : DESCRIPTION DE L'ÉCRAN LCD DE L'EVENTIX™ ET DU REMOTE KEYPAD (suite) 6-4. MODE RÉGLAGE 6-4-1. CONFIGURATION EN MODE MIXER 1 MODE 1 mixer mode 2 matrix mode 2 INPUT 1 input type 1 #1 Comp. HV/C 1 SDTV Composite 1 NTSC/PAL/SECAM 2 #2 Comp. - Page 102 www.liveline.be Chapitre 6 : DESCRIPTION DE L'ÉCRAN LCD DE L'EVENTIX™ ET DU REMOTE KEYPAD (suite) CENTRIX™ & EVENTIX™ 6-4. MODE RÉGLAGE (suite) 6-4-1. CONFIGURATION EN MODE MIXER (suite) 6 EFFECT 1 current effect 2 USER 1 key 1 cut effect duration 3 USER 2 key 2 fading 1s 3s 5s custom...
- Page 103 www.liveline.be CENTRIX™ & EVENTIX™ Chapitre 6 : DESCRIPTION DE L'ÉCRAN LCD DE L'EVENTIX™ ET DU REMOTE KEYPAD (suite) 6-4. MODE RÉGLAGE (suite) 6-4-2. CONFIGURATION EN MODE MATRIX 1 MODE 1 mixer mode 2 matrix mode 2 INPUT 1 input type 1 #1 Comp.
- Page 104 www.liveline.be Chapitre 6 : DESCRIPTION DE L'ÉCRAN LCD DE L'EVENTIX™ ET DU REMOTE KEYPAD (suite) CENTRIX™ & EVENTIX™ 6-4. MODE RÉGLAGE (suite) 6-4-2. CONFIGURATION EN MODE MATRIX (suite) 7 AUDIO OUT1 1 master volume 2 audio mode 1 mono 8 AUDIO OUT2 2 stereo 3 audio source 1 auto follow...
-
Page 105: Description Des Fonctions De L'écran Lcd
www.liveline.be CENTRIX™ & EVENTIX™ Chapitre 6 : DESCRIPTION DE L'ÉCRAN LCD DE L'EVENTIX™ ET DU REMOTE KEYPAD (suite) 6-5. DESCRIPTION DES FONCTIONS DE L'ÉCRAN LCD 1 [MODE] + ENTER. Sélectionnez un mode entre: • [mixer mode]: Configure l'appareil en mode MIXER. •... - Page 106 www.liveline.be Chapitre 6 : DESCRIPTION DE L'ÉCRAN LCD DE L'EVENTIX™ ET DU REMOTE KEYPAD (suite) CENTRIX™ & EVENTIX™ 6-5. DESCRIPTION DES FONCTIONS DE L'ÉCRAN LCD (suite) 3-3 [output sync] + ENTER. Sélectionnez une sortie entre MAIN et PREVIEW avec + ENTER. + ENTER.
- Page 107 www.liveline.be CENTRIX™ & EVENTIX™ Chapitre 6 : DESCRIPTION DE L'ÉCRAN LCD DE L'EVENTIX™ ET DU REMOTE KEYPAD (suite) 6-5. DESCRIPTION DES FONCTIONS DE L'ÉCRAN LCD (suite) 4 [IMAGE] + ENTER. Sélectionnez une sortie entre MAIN et PREVIEW avec + ENTER. NOTE: Le contenu du menu image sera différent en fonction de la source d'entrée (informatique ou vidéo).
- Page 108 www.liveline.be Chapitre 6 : DESCRIPTION DE L'ÉCRAN LCD DE L'EVENTIX™ ET DU REMOTE KEYPAD (suite) CENTRIX™ & EVENTIX™ 6-5. DESCRIPTION DES FONCTIONS DE L'ÉCRAN LCD (suite) [LOGOS/FRAME] + ENTER 5-1 [use logo/frame] + ENTER. Sélectionnez une fonction avec + ENTER. 5-1-1 [display] + ENTER.
- Page 109 www.liveline.be CENTRIX™ & EVENTIX™ Chapitre 6 : DESCRIPTION DE L'ÉCRAN LCD DE L'EVENTIX™ ET DU REMOTE KEYPAD (suite) 6-5. DESCRIPTION DES FONCTIONS DE L'ÉCRAN LCD (suite) 5-3 [record frame] + ENTER. Ce mode permet de mémoriser une image (frame) dans le but de l'afficher à tout moment pendant la présentation. 5-3-1 [H position] + ENTER.
- Page 110 www.liveline.be Chapitre 6 : DESCRIPTION DE L'ÉCRAN LCD DE L'EVENTIX™ ET DU REMOTE KEYPAD (suite) CENTRIX™ & EVENTIX™ 6-5. DESCRIPTION DES FONCTIONS DE L'ÉCRAN LCD (suite) 6-x-4 [shadow title]: Fonction identique à la fonction [title], mais avec une barre ombragée qui apparaît en bas de l'image.
- Page 111 www.liveline.be CENTRIX™ & EVENTIX™ Chapitre 6 : DESCRIPTION DE L'ÉCRAN LCD DE L'EVENTIX™ ET DU REMOTE KEYPAD (suite) 6-5. DESCRIPTION DES FONCTIONS DE L'ÉCRAN LCD (suite) 6-x-8 [Slide wipe]: Permet de commuter l'entrée présélectionnée sur la sortie MAIN par un glissement. + ENTER entre: Sélectionnez d'abord un type d'effet avec •...
- Page 112 www.liveline.be Chapitre 6 : DESCRIPTION DE L'ÉCRAN LCD DE L'EVENTIX™ ET DU REMOTE KEYPAD (suite) CENTRIX™ & EVENTIX™ 6-5. DESCRIPTION DES FONCTIONS DE L'ÉCRAN LCD (suite) 7 [AUDIO MAIN] + ENTER. Ce menu est disponible avec l'option OPT-iX-A uniquement. Les commandes suivantes permettent de contrôler la sortie AUDIO MAIN (OUT 1). 7-1 [master volume] + ENTER.
- Page 113 www.liveline.be CENTRIX™ & EVENTIX™ Chapitre 6 : DESCRIPTION DE L'ÉCRAN LCD DE L'EVENTIX™ ET DU REMOTE KEYPAD (suite) 6-5. DESCRIPTION DES FONCTIONS DE L'ÉCRAN LCD (suite) 9 [CONTROL] 9-1 [versions] + ENTER. Affiche les versions internes de l'appareil. • A = xxxx •...
- Page 114 www.liveline.be Chapitre 6 : DESCRIPTION DE L'ÉCRAN LCD DE L'EVENTIX™ ET DU REMOTE KEYPAD (suite) CENTRIX™ & EVENTIX™ 6-5. DESCRIPTION DES FONCTIONS DE L'ÉCRAN LCD (suite) 9-6-3 [clean cut] + ENTER. Cette fonction permet une commutation propre grâce à un gel rapide de l'image affichée. 9-7 [tally] + ENTER.
- Page 115 www.liveline.be CENTRIX™ & EVENTIX™ Chapitre 6 : DESCRIPTION DE L'ÉCRAN LCD DE L'EVENTIX™ ET DU REMOTE KEYPAD (suite) 6-5. DESCRIPTION DES FONCTIONS DE L'ÉCRAN LCD (suite) 10 [CONSOLE] 10-1 [RS232/LAN port] + ENTER. + ENTER. Sélectionnez le port de communication souhaité avec •...
-
Page 116: Chapitre 7 : Spécifications Techniques
www.liveline.be CENTRIX™ & EVENTIX™ Chapitre 7 : SPÉCIFICATIONS TECHNIQUES 7-1. ENTRÉES INFORMATIQUE ET VIDÉO • INFORMATIQUE ANALOGIQUE: Connecteurs: BNC femelle (entrées n°1 à 4) ou HD15 femelle (entrées n°5 à 8). Fréquence ligne: Jusqu'à 110 kHz. Fréquence trame: Jusqu'à 130 Hz. Résolution: Jusqu'à... -
Page 117: Sorties Main & Preview
www.liveline.be CENTRIX™ & EVENTIX™ 7-1. ENTRÉES INFORMATIQUE ET VIDÉO (suite) • VIDÉO COMPOSITE: Connecteurs: BNC femelle (entrées n°1 à 4) ou HD15 femelle (entrées n°5 à 8). Standard: PAL / SECAM: 15,625 kHz - 50 Hz - 625 lignes. NTSC (3,58 MHz / 4,43 MHz ): 15,735 kHz - 60 Hz - 525 lignes. Niveau: 1 Vc/c (0,7 V Luma + 0,3 V Synchro.). -
Page 118: Sorties Vidéo Optionnelles (Opt-Ix-Sdtvd1)
www.liveline.be Chapitre 7 : SPÉCIFICATIONS TECHNIQUES (suite) CENTRIX™ & EVENTIX™ 7-4. SORTIES VIDÉO OPTIONNELLES (OPT-iX-SDTVD1) • VIDÉO COMPOSITE: Connecteur: DB9 femelle. Standard: PAL / SECAM: 15,625 kHz - 50 Hz (625L) NTSC (3,58 MHz / 4,43 MHz): 15,735 kHz - 60 Hz (525L) Niveau: 1 Vc/c (0,7 V Luma + 0,3 V Synchro.). -
Page 119: Entrées Audio Optionnelles (Opt-Ix-A)
www.liveline.be CENTRIX™ & EVENTIX™ 7-5. ENTRÉES AUDIO OPTIONNELLES (OPT-iX-A) • 9 Entrées stéréo symétrique et asymétrique (sur connecteur MCO 5 points mâle). • Vi = + 18 dBu (max). • Zi = 20 kΩ asymétrique. • Zi = 40 kΩ symétrique. 7-6. -
Page 120: Appendix A: Programmer's Guide
www.liveline.be CENTRIX™ & EVENTIX™ APPENDIX A: PROGRAMMER'S GUIDE ANNEXE A: GUIDE DE PROGRAMMATION A-1: INTRODUCTION A-1: INTRODUCTION If you need to use your own Software Control program Si vous souhaitez utiliser votre propre logiciel de from a PC or WORKSTATION with an RS-232 port, the contrôle avec votre PC, MAC ou Station de Travail par device allows communication through an ASCII code un port RS-232, l'appareil peut communiquer par... - Page 121 www.liveline.be CENTRIX™ & EVENTIX™ APPENDIX A / ANNEXE A A-4: COMMANDS AND RESPONSES TABLE A-4: TABLE DES COMMANDES ET RÉPONSES COMMAND RESPONSE COMMAND DESCRIPTION VALUE /VALEUR TYPE COMMANDE RÉPONSE DESCRIPTION DE LA COMMANDE MIN MAX DESCRIPTION SELECTION COMMANDS / COMMANDES DE SÉLECTION MTRX Switching mode selection.
- Page 122 www.liveline.be APPENDIX A / ANNEXE A CENTRIX™ & EVENTIX™ COMMAND RESPONSE COMMAND DESCRIPTION VALUE /VALEUR TYPE COMMANDE RÉPONSE DESCRIPTION DE LA COMMANDE MIN MAX DESCRIPTION IMAGE COMMANDS / COMMANDES DU MENU IMAGE ACAD Automatic centering (M). Rd/Wr 1 = centering action (automatic reset). Rd/Wr Horizontal position (M).
- Page 123 www.liveline.be CENTRIX™ & EVENTIX™ APPENDIX A / ANNEXE A COMMAND RESPONSE COMMAND DESCRIPTION VALUE /VALEUR TYPE COMMANDE RÉPONSE DESCRIPTION DE LA COMMANDE MIN MAX DESCRIPTION EFFECTS COMMANDS / COMMANDES D'EFFET Effect selection. Rd/Wr 0 = CUT. 1 = FADING. 2 = TITLE. 3 = shadow TITLE 4 = PIP.
- Page 124 www.liveline.be APPENDIX A / ANNEXE A CENTRIX™ & EVENTIX™ COMMAND RESPONSE COMMAND DESCRIPTION VALUE /VALEUR TYPE COMMANDE RÉPONSE DESCRIPTION DE LA COMMANDE MIN MAX DESCRIPTION FRAME & LOGOS COMMANDS / COMMANDES DU MENU LOGO & FRAME 0 = use & assignment mode. 1 = logo recording mode.
- Page 125 www.liveline.be CENTRIX™ & EVENTIX™ APPENDIX A / ANNEXE A COMMAND RESPONSE COMMAND DESCRIPTION VALUE /VALEUR TYPE COMMANDE RÉPONSE DESCRIPTION DE LA COMMANDE MIN MAX DESCRIPTION FRAME & LOGOS COMMANDS (continued) / COMMANDES DU MENU LOGOS & FRAME (suite) 0 = use & assignment mode. 1 = logo recording mode.
- Page 126 www.liveline.be APPENDIX A / ANNEXE A CENTRIX™ & EVENTIX™ COMMAND RESPONSE COMMAND DESCRIPTION VALUE /VALEUR TYPE COMMANDE RÉPONSE DESCRIPTION DE LA COMMANDE MIN MAX DESCRIPTION CONTROLS COMMANDS / COMMANDES DU MENU CONTRÔLE TALA Input number for TALLY1 Rd/Wr 1 = input #1..
- Page 127 www.liveline.be CENTRIX™ & EVENTIX™ APPENDIX A / ANNEXE A COMMAND RESPONSE COMMAND DESCRIPTION VALUE /VALEUR TYPE COMMANDE RÉPONSE DESCRIPTION DE LA COMMANDE MIN MAX DESCRIPTION STATUS COMMANDS / COMMANDES D'ÉTATS UNIT Measures unity in tens of kHz. 65535 ex: 14500 = 145 MHz 65535 Line frequency (in kHz) = (UNIT VALUE)x10 Horizontal period of input signal (M) ÷...
- Page 128 www.liveline.be APPENDIX A / ANNEXE A CENTRIX™ & EVENTIX™ COMMAND RESPONSE COMMAND DESCRIPTION VALUE /VALEUR TYPE COMMANDE RÉPONSE DESCRIPTION DE LA COMMANDE MIN MAX DESCRIPTION VIDEO OUTPUTS COMMANDS (OPT-iX-SDTVD1 option) / COMMANDES DE LA SORTIE VIDÉO (option OPT-iX-SDTVD1) Input reference for the frame rate of the SREQ Rd/Wr 0 = internal rate...
- Page 129 www.liveline.be CENTRIX™ & EVENTIX™ APPENDIX A / ANNEXE A COMMAND RESPONSE COMMAND DESCRIPTION VALUE /VALEUR TYPE COMMANDE RÉPONSE DESCRIPTION DE LA COMMANDE MIN MAX DESCRIPTION AUDIO COMMANDS (OPT-iX-A option) / COMMANDES AUDIO (option OPT-iX-A) Audio source selection of the MAIN. Rd/Wr 1 = audio source #1..
-
Page 130: Warranty
In case of any problem, get the serial number of the unit, a description of the problem, and then call your authorized dealer. GARANTIE Analog Way garantie le produit contre les défauts matériels et vices de fabrication, pour une période de 3 ans à partir de la date d'achat (retour en nos locaux).
Need help?
Do you have a question about the CentriX CTX8022 and is the answer not in the manual?
Questions and answers