Table of Contents
Advertisement
Quick Links
Advertisement
Table of Contents

Related Manuals for Analog way PLS300


Summary of Contents for Analog way PLS300
- Page 1 version 4.00 USER MANUAL Pulse...
-
Page 3: Table Of Contents
THANK YOU Thank you for choosing Analog Way. By following these simple steps, you should be able to operate the powerful PLS300. TABLE OF CONTENTS INTRODUCTION 1-1. PLS300 OPERATING MODE 1-2. USEFUL TERMS AND DEFINITIONS HARDWARE INSTALLATION 2-1. SAFETY INSTRUCTION 2-2. - Page 4 OPERATING THE PLS300 4-1. THE PLS300 FRONT PANEL Overview Standby button Menu section Input selection section Preset selection section PIP button Logo button Freeze button Background Frame button Background Live button Effect selection button Take button 4-2. THE PLS300 MENU...
- Page 5 6-4. RK-300 - Ref. RK-300 APPLICATION EXAMPLES AND TIPS 7-1. ABOUT APPLICATION EXAMPLES 7-2. APPLICATION EXAMPLE 7-3. EXTERNAL PROGRAMMING WARRANTY AND SERVICES INFORMATION 8-1. ANALOG WAY LIMITED WARRANTY 8-2. SERVICES AND RMA CONTACT INFORMATION HOW TO CONTACT US INFORMATION ON DISPOSAL...
-
Page 6: Introduction
“Frame” is a full screen image which is selected from one of he seven still frames which you can capture with the PLS300. A Frame can be flash captured and imported from any video or computer source plugged into the machine. -
Page 7: Hardware Installation
HARDWARE INSTALLATION 2-1. SAFETY INSTRUCTIONS SAFETY INSTRUCTIONS All of the safety and operating instructions should be read before the product is operated and should be maintained for further reference. Please follow all of the warnings on this product and its operating instructions. WARNING: To prevent the risk of electric shock and fire, do not expose this device to rain, humidity, intense heat sources (such as heaters and direct sunlight). - Page 8 INSTRUCTIONS DE SECURITE Afin de mieux comprendre le fonctionnement de cet appareil nous vous conseillons de bien lire toutes les consignes de sécurité et de fonctionnement de l’appareil avant utilisation. Conserver les instructions de sécurité et de fonctionnement afin de pouvoir les consulter ultérieurement. Respecter toutes les consignes marquées dans la documentation, sur le produit et sur ce document.
- Page 9 INSTRUZIONI DI SECUREZZA Allo scopo di capire meglio il funzionamento di questa apparecchiatura vi consigliamo di leggere bene tutti i consigli di sicurezza e di funzionamento prima dell’utilizzo. Conservare le istruzioni di sicurezza e di funzionamento al fine di poterle consultare ulteriormente. Seguire tutti i consigli indicati su questo manuale e sull’apparecchiatura.
- Page 10 SICHERHEITSHINWEISE Um den Betrieb dieses Geräts zu verstehen, raten wir Ihnen vor der Inbetriebnahme alle Sicherheits und Betriebsanweisungen genau zu lesen. Diese Sicherheits- und Betriebsanweisungen für einen späteren Gebrauch sicher aufbewahren. Alle in den Unterlagen, an dem Gerät und hier angegebenen Sicherheitsanweisungen einhalten.
- Page 11 INSTRUCCIONES DE SEGURIDAD Para comprender mejor el funcionamiento de este aparato, le recomendamos que le acuidadosamente todas las consignas de seguridad y de funcionamiento del aparato antes de usarlo. Conserve las instrucciones de seguridad y de funcionamiento para que pueda consultarlas posteriormente. Respete todas las consignas indicadas en la documentación, relacionadas con el producto y este documento.
-
Page 12: Unpacking And Inspection
The openings in the side and rear panels of the device are for cooling. Do not cover these openings to avoid cutting air circulation. Be sure that no weight in excess of 2 kg (4.4 Lbs.) is added onto the PLS300. The maximum ambient operating temperature should not exceed 40 °C (104°F) The rack and all mounted equipement in it must be reliably grounded according to national and/or local electrical standards. -
Page 13: Cable & Adaptor Information
2-4. CABLE AND ADAPTOR INFORMATION A large choice of cables and adaptors are compatible with the PLS300. To find which are to be used in your setup, please refer to the Hardware Specifications chapter. Please contact your distributor for a list of available cables and connectors for your PLS300. - Page 14 • HDTV - HD-YUV: Connectors: Inputs #1 to #4: female HD15. DVI Inputs #1 to #2: female DVI-I (analog pins). Formats: 720p/576p (60Hz), 1080i (50/60Hz), EDTV. Levels: Y = 1 Vp/p (0.7 V + sync.). Cr / Pr & Cb / Pb = 1 Vp/p (0.7 V + sync.). Sync.: Tri-level: ±0.3V (positive/negative).
-
Page 15: Output Specifications
Output specifications • ANALOG OUTPUTS Connector: Outputs #1 (Main) & #2 (Preview): female HD15, DVI-I (analog pins). Resolutions: Format Ratio Available Refresh Rates HDTV 720p 50Hz 59.94Hz 60Hz HDTV 1035i 59.94Hz 60Hz HDTV 1080i 50Hz 59.94Hz 60Hz HDTV 1080p 23.97Hz 24Hz 25Hz 29.97Hz 30Hz 50Hz 59.94Hz 60Hz HDTV 1080sF 50Hz 59.94Hz 60Hz 640 x 480... - Page 16 • DVI (Digital Video Interface) OUTPUTS: Connector: Outputs #1 (Main) & #2 (Preview): female DVI-I (digital pins). Signal: Digital Visual Interface (DVI)-TMDS single link. Resolutions: Format Ratio Available Refresh Rates HDTV 720p 50Hz 59.94Hz 60Hz HDTV 1035i 59.94Hz 60Hz HDTV 1080i 50Hz 59.94Hz 60Hz HDTV 1080p 23.97Hz 24Hz 25Hz 29.97Hz 30Hz 50Hz 59.94Hz 60Hz...
-
Page 17: Communication Specifications
Communication specifications • COMMUNICATION PORTS: REMOTE RS232 Connector: DB 9 female Level: RS232. Data Rate: 9600 Bauds, 8 data bits, 1 stop bit, no parity bit, no flow control for normal. DTR & RTS needed for upgrade. • LAN: Connector : RJ45 Protocol: TCP (Transmission Control Protocol) or UDP... -
Page 18: Pin Outs
Pin outs • Standard VGA 1- Red 6- Red Return 11- ID Bit 0 2- Green 7- Green Return 12- ID Bit 1 3- Blue 8- Blue Return 13- H Sync 4- ID Bit 2 9- No Pin 14- V Sync 5- Test (Gnd) 10- Sync Return 15- ID Bit 3... -
Page 19: Hdcp Compliance
This feature is particularly needed when HDCP is used with long cable to be sure that the communication is well handled. NOTE: as part of our policy of continuous improvement, Analog Way reserves the right to make design and specification changes for product improvements without prior notice. The performance specification figures indicated are nominal values of production units. -
Page 20: Connecting The Pls300
CONNECTING THE PLS300 3-1. CONNECTING THE PLS300 PLS300 can be set up with up to 10 different sources, and supports up to 2 digital DVI-D sources, 2 SD- SDI sources and 6 analog computer/video sources simultaneously. The versatility of the... -
Page 21: The Pls300 Rear Panel
Inputs #5 & #6 share a DVI-D signal and a universal analog signal (plug the shipped Analog Way DVI/DB15 adaptor cable to use DVI-D and analog signals simultaneously). The Main and Preview (7) outputs will allow for the... - Page 22 Inputs #1 to #6 UNIVERSAL COMPUTER & VIDEO INPUTS: Universal Inputs accept computer sources (RGBHV, RGBS, and RGsB (SOG) signals), standard TV/VIDEO sources (Composite video, S.VIDEO), Component video (YUV, RGBS & RGsB (SOG)), and HDTV sources (480p, 720p & 1080i). HD15: 1 x Universal Analog input on female HD15 connector.
-
Page 23: Dvi Inputs #1 - #2
RGBS VIDEO SOURCES: This signal is widely used in broadcasting and is available on European DVD player. The RGB/S signal is transmitted with 4 coaxial cables, and also has a better picture quality than COMPOSITE and S.VIDEO signals. The RGB/S connectors are usually BNC connectors for Broadcasting equipment, and SCART connector for DVD players. -
Page 24: Main Outputs
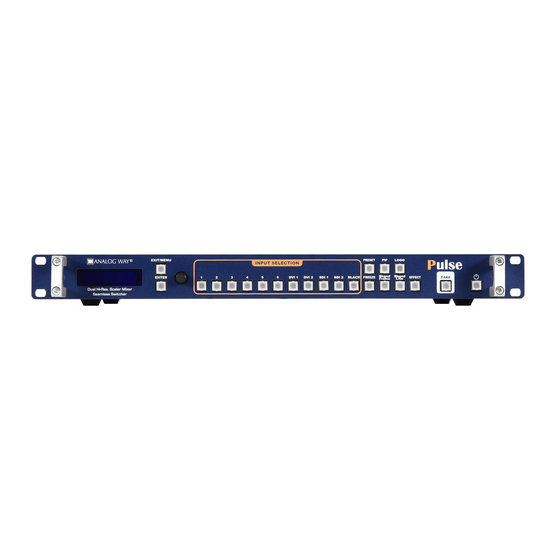
Main Outputs MAIN OUTPUT: ANALOG: 1 x analog output for the main display device on female HD15 connector. DIGITAL/ANALOG: 1 x main output on female DVI-I connector (simultaneous analog and digital). AUDIO SWITCHER: Audio Stereo Switcher card features 6 inputs and 2 outputs. An additional auxiliary input can be mixed with any other input. - Page 25 PLS300 The highly intuitive front panel of the was designed by Analog Way engineers to simply and quickly meet all of your event needs. Within minutes, you will be able to enjoy its full potential and easily parameter most of its functions, without having to be an expert audio-visual engineer, leaving room for what is most important to our users: concentrating on their event.
- Page 26 [EXIT/MENU] button and the [ENTER] button in the Control section of the PLS300, allow users to respectively enter and exit the PLS300 menu, and confirm selected menu items. Input selection section The Input Selection section allows to select which input (#1 to #10) to display in a selected layer.
- Page 27 Effect selection button PLS300 EFFECT SELECTION button is a practical front panel shortcut to the PLS300 Layer Effects menu (Opening and Closing transitions). Preset selection button PLS300 PRESET SELECTION button is a practical front panel shortcut to the PLS300 Preset menu, and will activate the four available Preset Memories (Input Selection section buttons #1 to #4).
- Page 28 4-2. THE PULSE MENU Menu navigation Pulse To access the menu, press the [EXIT/MENU] button in the control section (4). To highlight items in the menu which will appear on the VFD screen (2), turn the scroll knob (3) left or right to the desired menu item.
- Page 29 Analog Way engineers have developped a handy, user friendly way of identifying machine status on the front panel, via the use of color codes on the buttons of the machine. All new Analog Way machines use the same codes, for quick recognition of the status of any device of the range, at any given time.
- Page 30 PLS300. 3/ Press the [EXIT/MENU] button to return to the main menu. 4/ Repeat steps #1 to #3 for every source connected to your PLS300. Source output selection Once your inputs have all been configured, the output settings of PLS300...
- Page 31 * NOTE * : Be sure to turn the test pattern off to display your sources again. Working with PIPs PLS300 allows users to manipulate a PIP (Picture In Picture) which you can move, size, crop or zoom, apply transparency or transitions to.
- Page 32 Frames are mainly used as backgrounds in a typical show or event setup, and can be recorded from any of the PLS300’ 10 sources and called back at the press of a single button. * NOTE * : Frames may be used only one at a time and cannot be placed in a layer.
- Page 33 5/ Select an empty logo memory (empty logos are indicated in the sub-menu) to store the logo into. Press the [ENTER] button. The PLS300 will display a progress status bar on the VFD screen. 6/ In the Layer Selection section, press the [LOGO] button, and select logo number (#1 to #6) you wish to use.
- Page 34 Any setup you have configured on screen, can be stored into one of the 4 available user presets. 1/ After having configured layers, PIP transitions, logos... on your screen (see ‘Working With the PLS300’, p.26), go to the Preset menu by pressing the [EXIT/MENU] button, and select Preset by rotating the scroll knob, or press the PRESET button.
- Page 35 6 stereo inputs, 1 auxilary input, and 2 embedded SDI audio inputs (via the SDI BNC connectors), all accessible via the Audio menu of the PLS300, and which can be affected to the main symetrical/asymetrical output of the device.
- Page 36 HOME MENU [MAIN] Format : 1920 x 1080 Internal : 60Hz Current Layer : Live [MAIN] [PREVIEW] Live : Input 3 Live : Input 3...
- Page 37 (i1) displayed when plug is not SDI (i10) displayed when plug is DVI-D Config status INPUT (i2) displayed when type is analog video (i11) displayed when plug is analog Autoset all (i3) displayed when plug is analog (i4) displayed for input ln1, ln2, DVI1 & DVI2 Synchronized Analog Group 1...
- Page 38 MAIN OUT (o1) Sync w/OUT 1 PREVIEW OUT Output status HDTV 720p Output format HDTV 1035i HDTV 1080i HDTV 1080p HDTV 1080sF 640x480 800x600 848x480 16/9 (o1) only for Preview out/Output2 (o2) depending on output format 1024x768 (o3) computer & HDTV only 1280x720 16/9 (o4) Interlaced output only...
- Page 39 PRESET Preset Layouts Default Bkgnd + TL Pip Bkgnd + TR Pip Bkgnd + BL Pip Bkgnd + BR Pip 2 Pip H Split 2 Pip V Split Step Back Save Preset Save from Main Preview Memory 1 Save to Memory 2 Memory 3 Memory 4...
- Page 40 Layer adjust LAYER (b1) (A3) H Pos V Pos HV Pos HV Size (b2) H Size (b2) V Size (b2) (b1) Not available for Background Frame & Live Layer zoom (b3) H Pos (b2) Not available for Logos V Pos (b3) Not available for Frames &...
- Page 41 LOGOS/FRAMES Capture source Main Preview Record Frames Frame 1 (lf1) Empty if slot is free for a Frame Frame 2 (Empty) (lf1) (lf2) Empty if slot is free for a logo Frame 3 (lf3) Displays only list of valid Frames and Logos (lf4) Displays according to the keying Type chosen Frame 4 Frame 5 (Empty)
- Page 42 AUDIO Mode Breack away TopLayer follow Level Source settings Input 1 Balance Input 2 Input 3 Input 4 DVI 1 DVI 2 SDI 1 SDI 2 Aux. settings Level Balance Audio Main Master Mute Master Volume Stereo Audio Delay Audio Prelist (m1) Master Mute Master Volume...
- Page 43 Sync. loss Enabled Input 1 (L3) Input 2 (L3) Input 3 (L3) Input 4 (L3) Input 5 (L3) Input 7 (L3) DVI 1 (L3) DVI 2 (L3) SDI 1 (L3) SDI 2 (L3) Auto Lock Auto TAKE Preset Toggle V-TBar enable Transp Backgr Dynamic fit Preview Id...
-
Page 44: Software Installation
Windows compatible control software. The RCS software allows you to control your PLS300 in exactly the same way as with the front panel of the device, only using your PC as a remote. Not compatible with Apple computers... - Page 45 The red window of the RCS (3) represents your Main window, and can also be used much like the front panel of the PLS300. Create user presets directly in the RCS main window, by clicking on one of the four available Preset icons (4) and setting up your preset in the Preview window. Clear unwanted steps with the CLEAR button (5), reload a fresh copy of your screen via the Reload Main button (6), make smooth takes directly with your mouse or trackpad with the virtual T-bar (7).
- Page 46 3/ Click on the “Connections” tab and select TCP as the connection type. 4/ In the “Remote Address” field, enter the IP address of the PLS300 you wish to control (see also “Working with the PLS300”). 5/ In the “Remote Port” field, enter the remote port number of the PLS300 you wish to control (see also “Working with the PLS300”).
-
Page 47: Working With The Rcs
3/ In the scroll-down menu of the Type column, select the signal type connected to that input. 4/ Repeat steps #2 to #4 for all sources connected to the rear panel of your PLS300. 5/ Click on the “Inputs” tab to return to the main screen. Source output configuration 1/ Click on the “Outputs”... - Page 48 Main screen. Once the frame is displayed on your Main output, it is then possible to store it to the PLS300 non volatile memory. * NOTE * : Frames may be used only one at a time. A frame may not be used as a Live Background.
- Page 49 Logos work in much the same way as frames, and can be recorded from any of the PLS300’ 10 sources. Logos have more attributes than frames. They can be sized, positionned, but also keyed via color cutout selection or luma key.
- Page 50 6 stereo inputs, 1 auxiliary input, and 2 embedded SDI audio inputs (via the SDI BNC connectors), all accessible via the Audio menu of the PLS300, and which can be affected to the main symetrical/asymetrical output of the device.
- Page 51 Audio Configuration To configure audio settings of the PLS300, plug all audio inputs into the device, and click on the Audio tab of the RCS home page. 1/ Set the Main audio output level and delay (accessible only if Delay Mode is set to Manual Adjust, see also the “Audio Configuration”...
-
Page 52: Optional Remote Control Systems
Ethernet LAN RJ45 connector for easy connection > Double Large VFD display offering high contrast menu and status. 6-4. RK-300 RK-300: Remote Control Keypad designed to control Analog Way’s new Seamless Switchers > Very User-friendly Remote Control Keypad > Controls different Switchers >... -
Page 53: Application Example
7-1. ABOUT EXAMPLES Application examples are intended to make the use of the PLS300 as easy as possible, by providing visual help in setting up your equipment. In an effort to make the use of our machines the most pleasant experience... -
Page 54: External Programming
ASCII code protocol. All commands can be found on www.analogway.com, in the [Technical Support] menu, [User’s Manuals] menu. Analog Way products equipped with an RS232 input are compatible with Crestron, AMX, Medialon, and most major control systems. -
Page 55: Analog Way Limited Warranty
WARRANTY 8-1. ANALOG WAY LIMITED WARRANTY Analog Way products have a 3 year warranty on parts and labor, back to factory. This warranty does not include faults resulting from user negligence, special modifications, electrical surges, abuse (drop/crush), and/or other unusual damage. -
Page 56: Contact Information
If the product is used for business purposes and you want to discard it: Please contact your Analog Way dealer who will inform you about take-back of the product. You might be charged for the costs arising from take-back and recycling. - Page 58 Designs and specifications are subject to change without notice The illustrations and screens described in this manual may be exaggerated or simplified for easy recognition and may be slightly different from the actual unit. ANALOG WAY SAS 33 rue du Saule Trapu Parc du Moulin...
Need help?
Do you have a question about the PLS300 and is the answer not in the manual?
Questions and answers