LXE VX6 Reference Manual
Hide thumbs
Also See for VX6:
- Reference manual (376 pages) ,
- User manual (102 pages) ,
- Read me first (2 pages)

Related Manuals for LXE VX6


Summary of Contents for LXE VX6
- Page 1 VX6 Reference Guide Copyright © November 2004 by LXE Inc. All Rights Reserved E-EQ-VX6RG-A...
- Page 2 Notices Notice: LXE Inc. reserves the right to make improvements or changes in the products described in this manual at any time without notice. While reasonable efforts have been made in the preparation of this document to assure its accuracy, LXE assumes no liability resulting from any errors or omissions in this document, or from the use of the information contained herein.
-
Page 3: Table Of Contents
Manuals and Accessories ..................11 Manuals...........................11 Accessories ..........................11 HAPTER HYSICAL ESCRIPTION AND AYOUT Hardware Configuration ..................13 System Hardware........................13 Central Processing Unit ......................14 I/O Components........................14 System Memory........................14 Video Subsystem ........................14 Power Supply..........................15 Uninterruptible Power Supply....................15 Backup Battery........................15 PCMCIA Slots ........................15 E-EQ-VX6RG-A VX6 Reference Guide... - Page 4 Spread Spectrum RF Antenna Connector Pin ..............29 Vehicle Remote Antenna Mount..................29 The QWERTY Keyboard ..................30 IBM 3270 Overlay........................30 IBM 5252 Overlay........................30 Key Maps..........................31 Custom Key Maps ........................31 NumLock and the VX6......................31 Keyboard Backlight ........................31 Keyboard LEDs ........................32 VX6 Reference Guide E-EQ-VX6RG-A...
- Page 5 UPPLY Introduction ......................45 External Power Supply ................... 45 Specifications..........................46 Environmental Specifications....................47 CMOS Battery......................47 Vehicle 12-80VDC Direct Connection ..............48 VX6 Input Power Specifications ....................49 Power Adapter Cable......................49 Fuse ......................... 50 HAPTER YSTEM ONFIGURATION Introduction ......................51 Windows CE .NET 4.2 ..................... 51 Warmboot ..........................51...
- Page 6 Control Panel Options .................... 67 About ............................68 Radio MAC Address ......................68 Accessibility ...........................69 Administrator Control......................70 Bluetooth Manager .........................70 Certificates..........................70 Date/Time ..........................71 Dialing ............................71 Display............................72 Background ..........................72 Appearance...........................72 Backlight ..........................72 Input Panel ..........................73 Internet Options ........................74 Keyboard..........................74 Mixer............................75 VX6 Reference Guide E-EQ-VX6RG-A...
- Page 7 Double Tap...........................84 Calibration..........................84 System.............................85 General ..........................85 Memory ..........................86 Device Name ........................86 Copyrights ..........................86 Volume and Sounds........................87 Backup VX6 Files using ActiveSync ..............88 Prerequisites..........................88 VX6 and ActiveSync Partnership ..................88 Serial Port Transfer ......................88 USB Transfer........................89 Connect ...........................89 Explore............................89 Disconnect ..........................90 Serial Connection .........................90...
- Page 8 The VX6 Keypad ....................103 Key Map 101-Key Equivalencies................103 IBM 3270 Terminal Emulator Keypad ..............108 IBM 5250 Terminal Emulator Keypad ..............108 Creating Custom Key Maps for the VX6.............. 109 Introduction ..........................109 Keymap Source Format ......................110 COLxROWx Format ......................110 GENERAL Section ......................111...
- Page 9 Administration Mode .................... 134 End User Mode...................... 134 Administration and Configuration............... 135 Configuration........................135 Control Panel........................135 End User Internet Explorer ......................136 Security Panel........................136 Status Panel ........................138 Passwords ......................139 Error Messages ..................... 140 AppLock Registry Settings .................. 149 NDEX E-EQ-VX6RG-A VX6 Reference Guide...
- Page 10 Figure 2-2 The Power (On/Off) Switch ......................16 Figure 2-3 Scanner Serial Connector (COM1) ....................18 Figure 2-4 The Printer/PC Serial Connector (COM3) ..................19 Figure 2-5 VX6 USB Connector and External USB Adapter Cable Connector..........20 Figure 2-6 VX6 Ethernet/USB Dongle Cables ....................21 Figure 2-7 D15 Female Connector........................22 Figure 2-8 Dongle Cable USB Host Port......................23...
- Page 11 Figure 4-29 System / Device Name ........................86 Figure 4-30 Volume and Sounds ........................87 Figure 4-31 Pinout – Serial Cable for Synchronization ..................93 Figure A-1 VX6 QWERTY Keyboard ......................103 Figure A-2 IBM 3270 Specific Keypad......................108 Figure A-3 IBM 5250 Specific Keypad......................108 Figure C-1 Administrator Control panel......................135...
- Page 12 Table of Contents VX6 Reference Guide E-EQ-VX6RG-A...
-
Page 13: Chapter 1 Introduction
Other options Extended temperature version The “VX6 User’s Guide” is directed toward the VX6 user. It is delivered on the LXE Documentation CD. It contains safety warnings, descriptions of the controls and connectors, instruction on installing antennas, and day to day operation. -
Page 14: When To Use This Guide
Use this guide as you would any other source book -- reading portions to learn about the VX6, and then referring to it when you need more information about a particular subject. -
Page 15: Document Conventions
Keyword that indicates a potentially hazardous situation, which, if not avoided, WARNING could result in death or serious injury. Keyword that indicates an imminent hazardous situation, which, if not avoided, DANGER will result in death or serious injury. E-EQ-VX6RG-A VX6 Reference Guide... -
Page 16: Quick Start
1. Install Vehicle Mounting Bracket on vehicle. 2. Secure VX6 in Mounting Bracket Assembly. 3. Connect power cable to the VX6. The power cable can also be connected to a UPS battery pack, which is then connected to the VX6. -
Page 17: Components
Components Components Access Panel Cover (See Following Illustrations for Detail) Antenna Connectors or Hole Plugs Figure 1-1 VX6 Components, Top View 1. Speakers 2. Control Panel (See Following Illustrations for Detail) 3. 2nd Indicator 4. Caps Lock Indicator Figure 1-2 VX6 Components, Front View... -
Page 18: Figure 1-3 Vx6 Components, Bottom View
5. Fuse 6. Audio Connector 7. Power Cable Connector Figure 1-3 VX6 Components, Bottom View Note: COM1 is configured with Pin 9 +5V. COM3 is labeled “COM2/3” and is configured with Pin 9 RI. Please see Chapter 4, “System Configuration”, for details on configuring Pin 9 of the serial ports. -
Page 19: Figure 1-5 Vx6 Control Panel
Components 1. Power LED 2. Power Switch 3. Brightness Increase 4. Brightness Decrease Figure 1-5 VX6 Control Panel 1. SD Memory Card Slot CF ATA PCMCIA A PCMCIA B 2. Compact Flash Hard Drive 3. PCMCIA Slots Figure 1-6 VX6 Access Panel Note: The tethered access panel cover is not shown in the illustration above. -
Page 20: Data Entry
The keyboard is used to manually input data that is not collected otherwise. Almost any function that a full sized computer keyboard can provide is duplicated on the VX6 keyboard but it may take a few more keystrokes to accomplish a keyed task. -
Page 21: Touchscreen Entry
The mouse pointer reappears when the USB mouse is moved or clicked. • When a USB mouse is first attached to the VX6, the mouse pointer may not be visible. However, moving or clicking the mouse causes the pointer to appear. -
Page 22: Activesync - Initial Setup
The appropriate COM port and baud rate This will set up the VX6 to use the USB or designated COM port. Click OK and ensure the check box for “Allow connection with desktop computer when device is attached” is checked. -
Page 23: Getting Help
LXE website. Contact your LXE representative to obtain the LXE Manuals CD. You can also get help from LXE by calling the telephone numbers listed on the LXE Manuals CD, in the file titled “Contacting LXE”. This information is also available on the LXE website www.lxe.com. -
Page 24: Power Supplies
Manuals and Accessories Power Supplies Power Supply, External, AC, W/US Power Cord VX5 VX6 VX7 9000A317PSACUS Power Supply, External, AC, No Power Cord VX5 VX6 VX7 9000A318PSACWW UPS Battery and Cables Battery, UPS Lead Acid, VX5 VX6 VX7 9000A378UPSBATTPACK Cable, UPS Battery, Remote Mount Extender, 6 Ft... -
Page 25: Chapter 2 Physical Description And Layout
Chapter 2 Physical Description and Layout Hardware Configuration System Hardware The VX6 hardware configuration is shown in the following figure. Compact Flash Any Type Hard I, II or III Drive Secure Digital PCMCIA Memory Card Card Antenna Connector Slot Slot Slot A &... -
Page 26: Central Processing Unit
Main system memory is 64 or 182MB DRAM. Video Subsystem The LXE VX6 video subsystem consists of a color TFT display. The video subsystem complies with the VESA VL bus standard. The resolution of this display is 800 by 320 pixels. This resolution complies with the SVGA graphics industry standard. -
Page 27: Power Supply
Hardware Configuration Power Supply Vehicle power input for the VX6 is 12V to 80V DC nominal and is accepted without the need to perform any manual operation within the VX6. If 12V to 60V DC power is not available – for example, in an office environment – an optional external Universal Input Power Supply can be used to convert AC wall power to an appropriate DC level. -
Page 28: Physical Controls
Physical Controls On/Off Switch The power (on/off) switch is a push button switch located on the front control panel of the VX6. The switch is a momentary switch. If the VX6 is Off, pressing the power switch turns the VX6 If the VX6 is On, pressing and releasing the power switch turns the VX6 Off. -
Page 29: External Connectors
Audio connects to a mono or stereo telephone headset/microphone. Other external connectors are located as follows: • Antenna connectors are located on the top of the VX6. VX6’s can be configured for a single antenna or dual antennas. E-EQ-VX6RG-A VX6 Reference Guide... -
Page 30: Scanner Serial Connector (Com1)
RI. Refer to Chapter 4, “System Configuration”, section titled “Serial Port Pin 9” for more information on configuring Pin 9. Figure 2-3 Scanner Serial Connector (COM1) Note: Power the VX6 off before attaching a cable or device to the COM1 serial port. Pinout Signal Description Data Carrier Detect –... -
Page 31: Printer/Pc Serial Connector (Com3)
Chapter 4, “System Configuration”, section titled “Serial Port Pin 9” for more information on configuring Pin 9. Figure 2-4 The Printer/PC Serial Connector (COM3) Note: Power the VX6 off before attaching a cable or device to the COM3 serial port. Pinout Signal Description Data Carrier Detect –... -
Page 32: Ethernet/Usb Connector
USB Host port for connecting a USB device to the VX6 • a USB Client port to connect the VX6 to a USB host or hub. Note: Please refer to the diagrams later in this chapter for details on available ports with the dongle cable options. -
Page 33: Ethernet/Usb Dongle Cables
USB Host Connector 9000A071CBLD15USBETH Figure 2-6 VX6 Ethernet/USB Dongle Cables Note: Power the VX6 off before attaching a cable or device to the Ethernet/USB connector. The connectors and pinouts for the dongle cables are detailed below. E-EQ-VX6RG-A VX6 Reference Guide... -
Page 34: D15 Female Connector
USB-D D – RJ45_45 RJ45, Pins 4 and 5 Connections RJ45_78 RJ45, Pins 7 and 8 Connections 5V_USB_23 USB-H Power, Current Limited USB-D Power Return USB-D D + Transmit – Transmit + Shell CGND Chassis Ground VX6 Reference Guide E-EQ-VX6RG-A... -
Page 35: Usb Host Connector
USB Power Return Shell CGND Chassis Ground USB Client Connector Figure 2-9 Dongle Cable USB Client Port Pinout Signal Description 5V_USB_23 USB Power, Current Limited USB2N_A USB D – USB2P_A USB D + DGND USB Power Return E-EQ-VX6RG-A VX6 Reference Guide... -
Page 36: Rj45 Connector
External Connectors RJ45 Connector Figure 2-10 Dongle Cable Ethernet Port Pinout Signal Description Transmit + Transmit – Receive + – Not Connected – Not Connected Receive – – Not Connected – Not Connected VX6 Reference Guide E-EQ-VX6RG-A... -
Page 37: Audio Connector
External Connectors Audio Connector The VX6 audio connector accepts a headset with a 2.5mm plug, such as a mono telephone headset with microphone or a stereo headset. Please refer to “Mixer” in Chapter 4, “System Configuration” for information on configuring the audio port for either a mono headset with microphone or a stereo headset. -
Page 38: Power Supply Connector
The VX6 internal power supply can accept DC input voltages in the range of 12 to 80 Volts. Figure 2-12 The Power Connector... -
Page 39: Ups Battery Pack Connectors
Not used Chassis Ground Not used DC Negative (–) Output Figure 2-14 The UPS Battery Pack Output Connector Pinout Signal DC Positive (+) UPS Battery Positive (+) Chassis Ground UPS Battery Negative (–) DC Negative (–) E-EQ-VX6RG-A VX6 Reference Guide... -
Page 40: Ups Battery Extension Cable Connectors
Chassis Ground UPS Battery Negative (–) DC Negative (–) Output Figure 2-16 The UPS Battery Extension Cable Output Connector Pinout Signal DC Positive (+) UPS Battery Positive (+) Chassis Ground UPS Battery Negative (–) DC Negative (–) VX6 Reference Guide E-EQ-VX6RG-A... -
Page 41: Antenna Connector
External Connectors Antenna Connector Note: VX6’s are equipped with a radio and require an external antenna. Some VX6’s may be equipped with a dual antenna option. For these VX6’s, an external antenna must be connected to each antenna connector. 1. Antenna 2. -
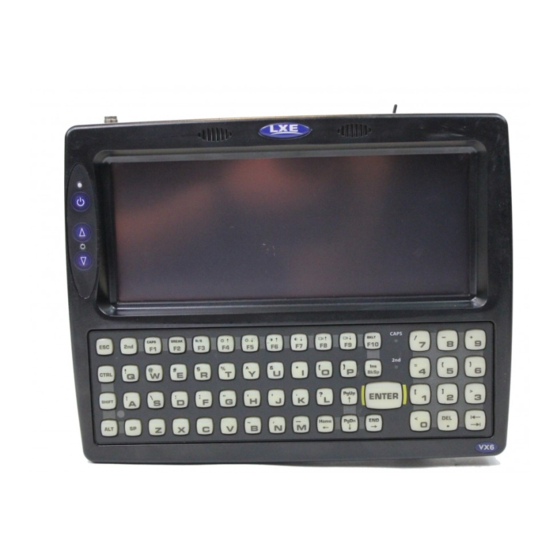
Page 42: The Qwerty Keyboard
The QWERTY Keyboard The QWERTY Keyboard The VX6 has a QWERTY keyboard, available with a standard overlay, an IBM 3270 overlay or an IBM 5250 overlay. These keyboards have 101 keyboard functions, including a numeric keypad. Please refer to Appendix A, “Key Maps”, for keypress combinations. -
Page 43: Key Maps
The keyboard supports all 101 keyboard functions. However, because the keyboard only has 60 keys, all functions are not visible (or printed on the keyboard). Therefore the VX6 keyboard supports what is called hidden keys -- keys that are accessible but not visible on the keyboard. -
Page 44: Keyboard Leds
The QWERTY Keyboard Keyboard LEDs The VX6 keyboard has two (2) LED indicators. CAPS BKLT 1. CapsLock Mode LED CAPS BREAK BKLT CAPS Indicator BKSP & CTRL BKSP > " ’ PgUp ENTER SHIFT 2. Secondary Mode LED ENTER <... -
Page 45: Secondary Keys Led
The QWERTY Keyboard Secondary Keys LED The VX6 keyboard is equipped with several secondary keys. These keys are identified by the superscripted text found on the keyboard keys. The secondary keys are accessible by using two (2) keystrokes: the <2 >... -
Page 46: Control Keys
The QWERTY Keyboard Control Keys The VX6 keyboard has several control keys, some of which are not used on the VX6. Note: The 2 functions of the <F4> and <F5>keys are not used as the display brightness is adjusted via the buttons on the control panel. -
Page 47: General Windows Ce .Net Keyboard Shortcuts
The QWERTY Keyboard General Windows CE .NET Keyboard Shortcuts Use the keyboard shortcuts in the chart below to navigate with the VX6 keyboard. These are standard keyboard shortcuts for Windows CE .NET applications. Press these keys … To … CTRL + C... -
Page 48: Input Panel (Virtual Keyboard)
<Shift> and <áü> keys can be used in combination for capitalized international characters. Note: When the virtual keyboard is displayed, the physical keyboard is still active. Therefore it is possible to input data from both keyboards. VX6 Reference Guide E-EQ-VX6RG-A... -
Page 49: Enabling The Input Panel
The Input Panel is disabled by default. To enable the Input Panel, select Start | Settings | Control Panel |Input Panel icon. Make sure the “Allow applications to change the input panel state” checkbox is checked and warmboot the VX6. Figure 2-27 Input Panel Properties... -
Page 50: The Display
Always use the point of the stylus for tapping or making strokes on the display. Never use an actual pen, pencil or sharp object to write on the touch screen. An extra or replacement stylus may be ordered from LXE. See the “Accessories” section for the stylus part number. -
Page 51: Pcmcia, Cf And Sd Slots
PCMCIA, CF and SD Slots The VX6 has two PCMCIA slots, one Compact Flash slot and one Secure Digital slot. The PCMCIA slots are stacked on top of each other and located on the right hand side of the opening. -
Page 52: Pcmcia Pinout
PCMCIA, CF and SD Slots PCMCIA Pinout Signal Signal 12V_RF_POWER -CDI -CE1 -CE2 n.c. or VS1# -IORD -IOWR RDY/-IREQ SLOT_VCC SLOT_VCC SLOT-VPP SLOT_VPP n.c. or VS2# RESET -WAIT -INPACK -REG BVD2/-SPKR BDV1/-STSCHG WP/A_-IOIS16 -CD2 VX6 Reference Guide E-EQ-VX6RG-A... -
Page 53: Install Pcmcia Cards
PCMCIA cards is similar, except there is no antenna. Install the 2.4GHz Type II PCMCIA Radio The LXE Model VX6 Vehicle Mount Computer is specifically for use with LXE Caution Model 6726 and 6816 2.4GHz Type II PCMCIA radios. Substitution of other... -
Page 54: Figure 2-30 Cisco Antenna Cable Connections
9±1 inch pounds (1.016±.11 N/m). The screws must be fastened to 9 inch pounds each. The screws require a Phillips size 1 driver head. Re-connect the power cord/cable and turn the VX6 on. VX6 Reference Guide E-EQ-VX6RG-A... -
Page 55: Cf Card Slot
The screws are a captive part of the cover and cannot be removed. Remove the card currently installed present in the CF slot and replace it with the new CF card. The replacement CF card must contain the operating system in order for the VX6 to operate. -
Page 56: Sd Card Slot
The slot accepts a Secure Digital (SD) memory card. The card in this slot can be hot swapped. Note: Although cards in the SD slot may be hot swapped, the VX6 is not environmentally sealed while the access panel cover is removed to hot swap cards. -
Page 57: Chapter 3 Power Supply
AC to DC power input for the VX6 is delivered via an optional external power supply. See “External Power Supply”. Vehicle power input for the VX6 is 12V to 80V DC nominal and is accepted without the need to perform any manual operation within the VX6. See “Vehicle 12-80VDC Direct Connection”. An optional uninterruptible power supply (UPS) battery can be used with the vehicle DC power supply. -
Page 58: Specifications
+/- 8%, measured at the end of the output Tolerance power cable Output Current 0 Amps min, 1.87 Amps max Safety and Emissions FCC, Part 15, Radio Frequency Devices, Compliance Class B. EN 55022 UL1950 and IEC 950 VX6 Reference Guide E-EQ-VX6RG-A... -
Page 59: Environmental Specifications
Per IEC 801-1 CMOS Battery The LXE VX6 has a permanent 190 mAh Lithium battery installed to maintain time, date and CMOS setup information. The lithium battery is not user serviceable and should last five years with normal use before it requires replacement. -
Page 60: Vehicle 12-80Vdc Direct Connection
Note: Correct electrical polarity is required for safe and proper installation. Connecting the cable to the VX6 with the polarity reversed will cause the VX6’s fuse to be blown. See the following table for wire color-coding specifics. Wiring color codes for LXE supplied DC input power cabling:... -
Page 61: Vx6 Input Power Specifications
LXE offers an adapter cable (part no. 9000A077CBLPWRADPTR) to adapt certain VX1, VX2 or VX4 DC power supplies to the VX6. Please read and follow all cautions in the “VX6 User’s Guide” to determine if your present power supply can be used with the VX6. -
Page 62: Fuse
Fuse Fuse The VX6 uses a 100V, 10A time delay (slow blow), high current interrupting rating fuse that is externally accessible and user replaceable. Should it need replacement, replace with same size, rating and type of fuse – Littlefuse 0234010 or Optifuse MSC-10A (5x20mm). -
Page 63: Chapter 4 System Configuration
Chapter 4 System Configuration Introduction There are several different aspects to the setup and configuration of the VX6. Many of the setup and configuration settings are dependent upon the optional features such as hardware and software installed on the unit. The examples found in this chapter are to be used as examples only, the configuration of your specific VX6 computer may vary. -
Page 64: Installed Software
Microsoft CE .NET version 4.2. Radio Drivers • Only one radio is installed in the VX6 at any one time. The 2.4GHz type of PC radio card resident on the VX6 determines the type of radio driver running on the VX6. Note: Please contact your LXE representative to get access to CAB files as they are released by LXE. -
Page 65: Desktop
For general use instruction, please refer to commercially available CE .NET user’s guides or the CE .NET on-line Help application installed with the VX6. The VX6 Desktop appearance is similar to that of a desktop PC running Windows 95, 98, NT, 2000 or XP. -
Page 66: My Computer Folders
Mounted network drive Storage Card PCMCIA Media Card Windows Operating System in ROM Program Files Applications Application Data Data saved by running applications My Documents Storage for downloaded files / applications Temp Location for temporary files VX6 Reference Guide E-EQ-VX6RG-A... -
Page 67: Start Menu Program Options
Cisco Set Cisco radio / network parameters Communication Stores Network communication options ActiveSync Transfer files between a VX6 and a desktop computer Connect Run this command after setting up a connection Start FTP Server Stop FTP Server Microsoft File Viewers... -
Page 68: Cisco - Aironet Client Utility (Acu)
Start Menu Program Options Cisco – Aironet Client Utility (ACU) Note: When making changes to profile parameters, the VX6 should be warmbooted afterwards. Access: Start | Programs | Cisco ACU or ACU Icon on Desktop Figure 4-1 Cisco Aironet Client Utility... -
Page 69: Firmware Tab
Select the Receive Stats or Transmit Stats. The data is displayed on the screen. Survey Tab Immediately runs signal strength and quality and link speed. An option is available to Setup parameters for Active Mode reporting. E-EQ-VX6RG-A VX6 Reference Guide... -
Page 70: Symbol
Double Tap the Network Connected Icon in the Status Bar Figure 4-4 Symbol NETWLAN Screen IP Information Tab After the IP Address has been assigned to the VX6, tap the Renew button to renew the IP address if necessary. Tap the Details button to view the Network Connection details. -
Page 71: Wireless Information Tab
Authentication (WPA, Open, Shared, WPA-PSK) Ad hoc network Disabled Key provided automatically Enabled Enable 802.1X authentication Enabled EAP Type (MDF-Challenge, PEAP, TLS) Figure 4-5 Symbol Wireless Information Tab View Log Displays the logon/connection data for the current network connection. E-EQ-VX6RG-A VX6 Reference Guide... -
Page 72: Add A New Connection
If you wish to enter your Authentication key, uncheck the “Key provided automatically” checkbox and enter the Network Key in the Network Key text box. • Tap the OK button to return to the Wireless Information tab. VX6 Reference Guide E-EQ-VX6RG-A... -
Page 73: Select A User Certificate
3. In the IEEE 802.1X Authentication box, enable 802.1X authentication 4. Select an EAP type 5. Tap the Properties button. Validate Server is enabled by default. 6. At the Authentication Settings display, tap the Select button to choose a User Certificate. E-EQ-VX6RG-A VX6 Reference Guide... -
Page 74: Communication
Start | Programs | Communication ActiveSync Once a relationship (partnership) has been established with Connect, ActiveSync will synchronize using the radio link on the VX6. See also: Chapter 1 “Introduction”, section “ActiveSync – Initial Setup”. Requirement: ActiveSync version 3.7 (or higher) must be resident on the host (desktop/laptop) computer. -
Page 75: Connect
Start FTP Server / Stop FTP Server These shortcuts call the Services Manager to start and stop the FTP server. The server defaults to Off (for security) unless it is explicitly turned on from the menu. The COM3 port is labeled “COM2/3”. E-EQ-VX6RG-A VX6 Reference Guide... -
Page 76: Command Prompt
Inbox as it relates to the general desktop Windows PC Microsoft Outlook Inbox options. Click the “?” button to access Inbox Help. ActiveSync can be used to transfer messages between the VX6 inbox and a desktop inbox. Internet Explorer... -
Page 77: Remote Desktop Connection
Experience tabs. Click the “?” button to access Remote Desktop Connection Help. Note: VX6 and Custom Key Maps: before connecting to a host using Remote Desktop Connection, go to Start | Settings | Control Panel | Keyboard and select 0409 from the keymap popup. -
Page 78: Taskbar
Tap the checkbox to have the Control Panel folders appear in drop down menu format from the Settings | Control Panel menu option. Clear Contents of Document Folder Tap the Clear button to remove the contents of the Document folder. VX6 Reference Guide E-EQ-VX6RG-A... -
Page 79: Control Panel Options
Up Options Owner Set VX6 owner details. Password Set VX6 access password properties. PC Connection Control the connection between the VX6 and a local desktop or laptop computer. PCMCIA Manage PCMCIA cards. Power Displays the status of all power managed devices. -
Page 80: About
Current network connection IP and MAC address. User application version information can be shown in the Version window. Version window information is taken from the registry. Modify the Registry using the Registry Editor (see section titled “VX6 Utilities”). LXE recommends caution when editing the Registry and also recommends making a backup copy of the registry before changes are made. -
Page 81: Accessibility
If the SoundSentry option is selected, please note that ScrollLock does not produce a visual warning as the CapsLock and NumLock keys do. This is due to a limitation in the Microsoft Windows CE .NET operating system. E-EQ-VX6RG-A VX6 Reference Guide... -
Page 82: Administrator Control
Start | Settings | Control Panel | Certificates Manage digital certificates used for secure communication. Lists the Stored certificates trusted by the VX6 user. These values may change based on the type of radio security resident in the client, access point or the host system. -
Page 83: Date/Time
Double tapping the time displayed in the Taskbar causes this display to appear. Dialing Access: Start | Settings | Control Panel | Dialing Figure 4-13 Dialing Set dialup properties for internal modems (not supplied/supported by LXE). Tap the “?” and follow the instructions in Help. E-EQ-VX6RG-A VX6 Reference Guide... -
Page 84: Display
Figure 4-14 Display Properties / Backlight Tab Adjust the settings and click the OK box to save the changes. The changes take effect immediately. When the backlight timer expires, the display, display backlight and keyboard backlight are all turned off. VX6 Reference Guide E-EQ-VX6RG-A... -
Page 85: Input Panel
Use this option to make the Soft Keyboard or the keypad primarily available when entering data. Selecting Keyboard enables both. The Input Panel is disabled by default. To enable the input panel, make sure the checkbox for “Allow applications to change input panel state” is checked and warmboot the VX6. E-EQ-VX6RG-A VX6 Reference Guide... -
Page 86: Internet Options
OK box to save the changes. The changes take effect immediately. When new key maps are added to the registry, they will appear in the Key Map dropdown list on the Keyboard Panel. These values do not affect virtual keyboard taps. VX6 Reference Guide E-EQ-VX6RG-A... -
Page 87: Mixer
Set the double-click sensitivity for stylus taps on the touch screen. Network and Dialup Connections Access: Start | Settings | Control Panel | Network and Dialup Connections Create a dialup, direct, or VPN connection on the VX6. E-EQ-VX6RG-A VX6 Reference Guide... -
Page 88: Owner
Control Panel Options Owner Access: Start | Settings | Control Panel | Owner Icon Set VX6 owner details. Factory Default Settings Identification Blank Notes Blank There is no change from general desktop PC Owner Properties display. Enter the information and click the OK box to save the changes. -
Page 89: Password
Control Panel Options Password Access: Start | Settings | Control Panel | Password Icon Set VX6 access/power up password properties. Factory Default Settings Password Blank At Power On Disabled Note: Once a password is assigned, the Owner and Password Control Panel options require the password to be entered before the Control Panel option can be accessed. -
Page 90: Pc Connection
Automatic Connect. This option applies to USB connection only. If this checkbox is checked, when the USB cable is connected, the VX6 will automatically try to start ActiveSync over the USB port. Note that this interferes with processes on the configured port at the same time. -
Page 91: Pcmcia
Figure 4-20 PCMCIA Control Tab, Slot 0 and Slot 1 The Slot 2 Tab provides information on the internal Compact Flash ATA drive. There are no user configurable options. Figure 4-21 Compact Flash ATA Control Tab, Slot 2 E-EQ-VX6RG-A VX6 Reference Guide... -
Page 92: Power
Control Panel Options Power Displays the status of power managed devices. Note that since the VX6 does not support power management, all devices show the “high” power level. There are no user options on this screen. Figure 4-22 Power Properties... -
Page 93: Scanner
If “Send Key Messages …” is checked any data scan is converted to keystrokes and sent to the active window. When this box is not checked, the application will need to use the set of LXE Scanner APIs to retrieve the data from the scanner driver. Note that this latter method is significantly faster than using “Wedge”. -
Page 94: Com Ports
The COM1 display contains the same parameters as the COM3 Tab. Adjust the settings and click the OK box to save the changes. The changes take effect immediately. Note: This panel configures the VX6 for an external scanner. It DOES NOT configure the tethered scanner. Please refer to the documentation for the tethered scanner for information on configuring the tethered scanner. -
Page 95: Storage Manager
LXE recommends caution when formatting or dismounting storage devices and when creating new partitions or deleting partitions on the storage device. Note: Contact LXE Customer Support prior to using management functions on the internal ATA card. E-EQ-VX6RG-A VX6 Reference Guide... -
Page 96: Stylus
Double Tap Follow the instructions on the screen and click the OK box to save the changes. The changes take effect immediately. Calibration Figure 4-25 Stylus Properties / Recalibration Start Figure 4-26 Stylus Properties / Recalibration VX6 Reference Guide E-EQ-VX6RG-A... -
Page 97: System
64 MB may only report 35 MB memory, since 29 MB is used up by the Windows CE .NET operating system. This is actual DRAM memory, and does not include internal flash or the internal ATA card used for storage. E-EQ-VX6RG-A VX6 Reference Guide... -
Page 98: Memory
Move the slider to allocate more memory for programs or storage. If there isn’t enough space for a file, increase the amount of storage memory. If the VX6 is running slowly, try increasing the amount of program memory. Adjust the settings and click the OK box to save the changes. The changes take effect immediately. -
Page 99: Volume And Sounds
Middle of Bar Key click Loud Screen tap Loud Sounds Scheme LOUD! Follow the instructions on the screen and click the OK box to save the changes. The changes take effect immediately. Figure 4-30 Volume and Sounds E-EQ-VX6RG-A VX6 Reference Guide... -
Page 100: Backup Vx6 Files Using Activesync
If the VX6 is connected to a PC by a RS-232 or USB cable, disconnect the cable from the VX6 and reconnect. -
Page 101: Usb Transfer
From the ActiveSync Dialog on the Desktop PC, click on the Explore button, which allows you to explore the VX6 from the PC side, with some limitations. You can copy files to or from the VX6 by drag-and-drop. You will not be allowed to delete files or copy files out of the \Windows directory on the VX6. -
Page 102: Disconnect
An ActiveSync partnership between a unique client can be established to two hosts. If the VX6 is cold booted, the random number is deleted – and the partnership with the last one of the two hosts is also deleted. The host retains the random numbers and unique names of all devices having a partnership with it. -
Page 103: Troubleshooting
ActiveSync indicator on the host turns green and spins, but connection never occurs Baud rate of connection is not supported or detected by host. Try forcing ActiveSync on the desktop PC to use a specific baud rate and set the VX6 to use the same baud rate. -or- Incorrect or broken data lines in cable. -
Page 104: Create A Communication Option
Backup VX6 Files using ActiveSync Create a Communication Option 1. On the VX6, select Start | Settings | Control Panel | Network and Dialup Connections. A window is displayed showing the existing connections. 2. Assuming the one you want does not exist, double-click Make New Connection. -
Page 105: Technical Specifications - Connection Cable
Backup VX6 Files using ActiveSync Technical Specifications – Connection Cable The exact serial cable is crucial. Many commercial null modem cables will not work. LXE recommends the following cable: Serial cable: 9000A054CBL6D9D9 Pinout: DB9 female DB9 female 6, 8 6, 8 no connection Figure 4-31 Pinout –... -
Page 106: Vx6 Utilities
Then, information is added to the registry, if desired, to make the CAB file auto- launch at startup. The registry information needed is under the key HKEY_LOCAL_MACHINE \ Software \ LXE \ Persist, as follows. The main subkey is any text, and is a description of the file. Then 3 mandatory values are added: FileName is the name of the CAB file, with the path (usually \System). - Page 107 Registry information is already in the default image for the following: [HKEY_LOCAL_MACHINE\SOFTWARE\LXE\Persist\Cisco Radio] "FileName"="\SYSTEM\CISCO.CAB" "Installed"=dword:0 "FileCheck"="\WINDOWS\CISCO.DLL" "Order"=dword:01 "Delay"=dword:0 "PCMCIA"=dword:1 [HKEY_LOCAL_MACHINE\SOFTWARE\LXE\Persist\Symbol Radio] "FileName"="\SYSTEM\SYMBOL.CAB" "Installed"=dword:0 "FileCheck"="\WINDOWS\NICTT.EXE" "Order"=dword:01 "Delay"=dword:0 "PCMCIA"=dword:1 [HKEY_LOCAL_MACHINE\SOFTWARE\LXE\Persist\LXE TE] "FileName"="\SYSTEM\RFTERM.CAB" "Installed"=dword:0 "FileCheck"="\WINDOWS\LXE\RFTERM.EXE" "Order"=dword:10 "Delay"=dword:0 E-EQ-VX6RG-A VX6 Reference Guide...
-
Page 108: Launch.exe And Persistent Storage
• Recent • Startup REGEDIT.EXE Registry Editor - LXE recommends caution when editing the Registry and also recommends making a backup copy of the registry before changes are made. REGLOAD.EXE Double-tapping a registry settings file (e.g. REG) causes RegLoad to open the file and make the indicated settings in the registry. -
Page 109: Wavplay.exe
WAVPLAY.EXE Double tapping a sound file (e.g. WAV) causes WavPlay to open the file and run it in the background. VX6 Command-line Utility Command line utilities can be executed by Start | Run | [program name]. COLDBOOT.EXE Command line utility which performs a cold boot (all RAM is erased). -
Page 110: Api Calls
CD, which are the C/C++ include files and the link library for the DLL, respectively. Note that this DLL is installed in VX6 images with a version number of 1.2 or higher (as displayed on the screen during bootup). -
Page 111: Reflash The Vx6
10. Secure the user access cover using the captive screws. The touch screen will need to be re- calibrated. Clearing Persistent Storage The coldboot utility sets all registry settings back to LXE factory defaults. No other clearing is available or necessary. E-EQ-VX6RG-A... -
Page 112: Disabling The Touch Screen
The current status of NumLock can be changed with the <2 > <SHIFT> <F10> keypress sequence, however this method does not change NumLock behavior upon reboot. Note: These utilities affect the behavior of the NumLock on warmboot. After a coldboot, NumLock is enabled. VX6 Reference Guide E-EQ-VX6RG-A... -
Page 113: Network Configuration
Please refer to the appropriate section earlier in this chapter for configuring the Cisco or Symbol radio.. Ethernet Connector When the VX6 is networked using the Ethernet connector, the VX6’s networking options are set via the Microsoft Windows CE .NET Control Panel. For more information on configuring the Microsoft Windows CE .NET network settings, please refer to the Windows CE .NET Help feature or commercially... - Page 114 Network Configuration VX6 Reference Guide E-EQ-VX6RG-A...
-
Page 115: Appendixa Key Maps
“System Configuration”. When NumLock is off, only the numeric 0 through 9 and DOT keys are affected. All other keymaps are unchanged. When the VX6 boots, the default condition of Caps (or CapsLock) is Off. The Caps (or CapsLock) condition can be set toggled with a <2nd>+<F1> key sequence. The CAPS LED on the keyboard is illuminated when CapsLock is On. - Page 116 The Volume Control keys have no function as the volume control is adjusted via the Windows CE .NET Control Panel. The Suspend/Resume key has no function as Windows Power Management controls all power management modes on the VX6. Press <Ctrl> then <2 > then <F2> to produce Ctrl-Break.
- Page 117 Key Map 101-Key Equivalencies Press These Keys and Then To get this key Press this key Shift Ctrl CapsLock E-EQ-VX6RG-A VX6 Reference Guide...
- Page 118 Key Map 101-Key Equivalencies Press These Keys and Then To get this key Press this key Shift Ctrl CapsLock < > VX6 Reference Guide E-EQ-VX6RG-A...
- Page 119 Press this key Shift Ctrl CapsLock / (numeric) / (alpha) - (numeric) - (alpha) + (numeric) + (alpha) * (numeric) * (alpha) : (colon) ; (semicolon) _ (underscore) , (comma) ‘ (apostrophe) ~ (tilde) “ & E-EQ-VX6RG-A VX6 Reference Guide...
-
Page 120: Ibm 3270 Terminal Emulator Keypad
Figure A-3 IBM 5250 Specific Keypad This keypad is designed to allow the user to enter terminal emulator commands when running LXE’s RFTerm program. When running this program please refer to the RFTerm Reference Guide for equivalent keys and keypress sequences. VX6 Reference Guide E-EQ-VX6RG-A... -
Page 121: Creating Custom Key Maps For The Vx6
System Administrator can convert a sample default key map text file into a custom key map text file which, when loaded onto the VX6, can be chosen by the user to replace the default VX6 keymap and then switched back when they are finished using the customized keys. -
Page 122: Keymap Source Format
Case is ignored in section names, value names, and value data. Note: VX6 and Remote Desktop Connection: before connecting to a host using Remote Desktop Connection, go to Start | Settings | Control Panel | Keyboard and select 0409 from the keymap popup. Click OK. -
Page 123: General Section
Creating Custom Key Maps for the VX6 GENERAL Section The first section is the GENERAL section. This contains the keymap name (all numerics), as well as the number of rows and columns in the keymap, and the algorithm for converting rows and columns to a data byte to go into the keymap table. -
Page 124: Map Section
Creating Custom Key Maps for the VX6 MAP Section [Map] MAP=MAP_NORMAL ;;;;;;;;;;;;;;;;;;;;;;;;;;; COL0ROW0=VK_ESCAPE COL0ROW1=VK_F1 There will be several (4 to 7) MAP sections, each defining the keymap for a given combination of modifier keys. The keyboard driver requires keymaps for normal (no modifiers), SHIFT only, 2ND only, and 2ND-SHIFT combined. - Page 125 SCAN1 Scan key 1 (N/A on VX6) SCAN2 Scan key 2 (N/A on VX6) SCAN3 Handle trigger button (unused on VX6, but specified) POWER power button BACKLIGHT backlight on/off function Note that specifying the power button in a different location will affect suspend/resume functions.
-
Page 126: Keycomp Error Messages
Creating Custom Key Maps for the VX6 Keycomp Error Messages Most error messages will specify the line within the keymap source file where the error occurred. Duplicate key A COLxROWx code was found in a MAP table, but that COL/ROW already has a value assigned. - Page 127 Creating Custom Key Maps for the VX6 Invalid scan code The scan code parsed is not recognized. The scan code can take one of the following formats: • VK_code • ‘x’ • SHIFT+VK_code • SHIFT+‘x’ • ACTION+code • CHANGE+mapname •...
- Page 128 Creating Custom Key Maps for the VX6 No definition for map MAP_2ND There is no 2nd keymap defined. The keyboard driver requires this keymap to be defined. This message comes from the post-parse validation, so no line # is specified.
- Page 129 Creating Custom Key Maps for the VX6 No definition for MapHead.keyscan2 No Scan Key 2 definition was found. The keyboard driver requires this key to be defined somewhere in one of the keymaps. This message comes from the post-parse validation, so no line # is specified.
-
Page 130: Sample Input File
Creating Custom Key Maps for the VX6 Sample Input File ;;---------------------------------------------------- ;; keymap file for VX6 default keyboard ;;---------------------------------------------------- ;;---------------------------------------------------- ;; general parms give the size of arrays ;; all numeric values are decimal ;; these numbers are validated with the data below ;;... - Page 131 Creating Custom Key Maps for the VX6 COL2ROW0='A' COL2ROW1=open COL2ROW2='D' COL2ROW3='G' COL2ROW4='J' COL2ROW5='1' COL2ROW6='L' COL2ROW7='3' ;;;;;;;;;;;;;;;;;;;;;;;;;;; COL3ROW0=' ' COL3ROW1=open COL3ROW2='X' COL3ROW3='V' COL3ROW4='N' COL3ROW5='0' COL3ROW6=VK_LEFT COL3ROW7=VK_TAB ;;;;;;;;;;;;;;;;;;;;;;;;;;; COL4ROW0=VK_F9 COL4ROW1='S' COL4ROW2=VK_RIGHT COL4ROW3='F' COL4ROW4='H' COL4ROW5='K' COL4ROW6='2' COL4ROW7=VK_UP ;;;;;;;;;;;;;;;;;;;;;;;;;;; COL5ROW0='6' COL5ROW1='Z' COL5ROW2=VK_BACK COL5ROW3='C' COL5ROW4='B'...
- Page 132 Creating Custom Key Maps for the VX6 ;;---------------------------------------------------- ;; the name of this key doesn't matter ;; the important part is the MAP value ;; codes are defined in docs ;; this is the map for keys with only 2ND ;;----------------------------------------------------...
- Page 133 Creating Custom Key Maps for the VX6 COL5ROW5=SHIFT+VK_HYPHEN COL5ROW6=VK_DELETE COL5ROW7=VK_NEXT ;;;;;;;;;;;;;;;;;;;;;;;;;;; COL6ROW0=ACTION+BACKLIGHT COL6ROW1=SHIFT+'2' COL6ROW2=open COL6ROW3=SHIFT+'4' COL6ROW4=SHIFT+'6' COL6ROW5=SHIFT+'8' COL6ROW6=SHIFT+VK_LBRACKET COL6ROW7=SHIFT+'0' ;;;;;;;;;;;;;;;;;;;;;;;;;;; COL7ROW0=SHIFT+'3' COL7ROW1=open COL7ROW2=open COL7ROW3=open COL7ROW4=CHANGE+MAP_CONTRAST COL7ROW5=VK_SLASH COL7ROW6=CHANGE+MAP_VOLUME COL7ROW7=open ;;---------------------------------------------------- ;; the name of this key doesn't matter ;; the important part is the MAP value ;;...
- Page 134 Creating Custom Key Maps for the VX6 COL3ROW2=open COL3ROW3=open COL3ROW4=open COL3ROW5='0' COL3ROW6=open COL3ROW7=open ;;;;;;;;;;;;;;;;;;;;;;;;;;; COL4ROW0=open COL4ROW1=open COL4ROW2=open COL4ROW3=open COL4ROW4=open COL4ROW5=open COL4ROW6='2' COL4ROW7=open ;;;;;;;;;;;;;;;;;;;;;;;;;;; COL5ROW0='6' COL5ROW1=open COL5ROW2=open COL5ROW3=open COL5ROW4=open COL5ROW5=open COL5ROW6=open COL5ROW7=open ;;;;;;;;;;;;;;;;;;;;;;;;;;; COL6ROW0=open COL6ROW1=open COL6ROW2=open COL6ROW3=open COL6ROW4=open COL6ROW5=open COL6ROW6='5' COL6ROW7=open ;;;;;;;;;;;;;;;;;;;;;;;;;;;...
- Page 135 Creating Custom Key Maps for the VX6 ;;---------------------------------------------------- ;; the name of this key doesn't matter ;; the important part is the MAP value ;; codes are defined in docs ;; this is the map for keys with only SHIFT ;;----------------------------------------------------...
- Page 136 Creating Custom Key Maps for the VX6 COL5ROW5=SHIFT+'M' COL5ROW6=SHIFT+VK_PERIOD COL5ROW7=SHIFT+VK_DOWN ;;;;;;;;;;;;;;;;;;;;;;;;;;; COL6ROW0=SHIFT+VK_F10 COL6ROW1=SHIFT+'W' COL6ROW2=SHIFT+VK_RETURN COL6ROW3=SHIFT+'R' COL6ROW4=SHIFT+'Y' COL6ROW5=SHIFT+'I' COL6ROW6=SHIFT+'5' COL6ROW7=SHIFT+'P' ;;;;;;;;;;;;;;;;;;;;;;;;;;; COL7ROW0=SHIFT+'E' COL7ROW1=open COL7ROW2=SHIFT+VK_F3 COL7ROW3=SHIFT+VK_F4 COL7ROW4=SHIFT+VK_F6 COL7ROW5=SHIFT+'7' COL7ROW6=SHIFT+VK_F8 COL7ROW7=open VX6 Reference Guide E-EQ-VX6RG-A...
-
Page 137: Sample Output File
Creating Custom Key Maps for the VX6 Sample Output File [HKEY_CURRENT_USER\Keyboard Layout\0409] ;; header limits and special keys MAPCNT MAPCOLS MAPROWS # of keys in each map (unused) (unused) scancode value for power key scancode value for up arrow scancode value for down arrow... - Page 138 Creating Custom Key Maps for the VX6 ;; Flag2 is the shift codes for the 2ND-SHIFT key map "Flag2"=hex:\ 00,00,A0,00,00,00,00,A0,00,00,A0,00,00,00,00,A0,\ 00,00,00,00,00,00,00,00,00,00,00,00,00,00,00,00,\ 00,00,00,00,00,00,00,00,00,00,00,00,00,00,00,00,\ 00,00,00,00,00,00,00,00,00,00,00,00,00,00,00,00 ;; Map3 is the scancode values for the SHIFT key map "Map3"=hex:\ 1B,70,DF,71,74,76,38,87,51,39,89,54,55,34,4F,88,\ 41,00,44,47,4A,31,4C,33,20,00,58,56,4E,30,25,09,\ 78,53,27,46,48,4B,32,26,36,5A,08,43,42,4D,BE,28,\ 79,57,0D,52,59,49,35,50,45,00,72,73,75,37,77,00 ;; Flag3 is the shift codes for the SHIFT key map "Flag3"=hex:\...
-
Page 139: List Of Valid Vk Codes For Ce .Net
Creating Custom Key Maps for the VX6 List of Valid VK Codes for CE .NET This is the list of codes parsed by KEYCOMP compiler. Refer to Microsoft Windows documentation for further clarification of the meaning of these key codes. Any VK keys not defined here are not valid for use under Windows CE .NET. - Page 140 Creating Custom Key Maps for the VX6 VX6 Reference Guide E-EQ-VX6RG-A...
-
Page 141: Appendixb Technical Specifications
Dimensions Length: 12.2 in (30.98 cm) Width: 9.6 in (24.38 cm) Depth: 3.7 in (9.39 cm) Battery for CMOS Internal lithium Battery External AC Adapter 120-240VAC to 12VDC Power Supply The COM3 port is labeled “COM2/3”. E-EQ-VX6RG-A VX6 Reference Guide... -
Page 142: Environmental Specifications
Environmental Specifications Environmental Specifications The VX6 will withstand the following environmental characteristics and has been tested in accordance with applicable sections of MIL-STD-810E. Feature Specification Altitude Operational to 10,000 ft. (3048 meters) Operating Temperature Standard version: -4°F to 122°F (-20°C to 50°C) [non-condensing] Extended temperature version: -22º... -
Page 143: Display Specifications
-40 °C to +70 °C (-40 °F to +158 °F) Water, Sand and Dust IP66 per IEC60529 Humidity 10-90% Non-condensing at 40°C (104°F) Vibration Bounce loose cargo for 0.5 hour duration. Common carrier transportation, transit face. 15 kV E-EQ-VX6RG-A VX6 Reference Guide... -
Page 144: Radio Specifications
11 Mbps RF Power Level: 100 mW Channels 11 US, 13 Europe, 4 France, 1 Japan Operating Temperature see VX6 Environmental Specs Storage Temperature see VX6 Environmental Specs Connectivity: Novell, TCP/IP, Ethernet, ODI PCMCIA Symbol 11Mb 2.4GHz Type II Bus Interface: PCMCIA 2.0, Type II slot... -
Page 145: Appendixc App Lock
VX6 user. AppLock also contains a component which sets configuration parameters as specified by the Administrator. If the VX6 is reset to factory default values, the Administrator may need to reconfigure the AppLock application. Note: To reset a VX6 to factory default values, please refer to Chapter 4 “System Configuration”... -
Page 146: Administration Mode
End-user mode locks the end-user into the configured application. The end user can still reboot and respond to dialog boxes. The single application is automatically launched, and runs in full screen mode, when the VX6 boots up. The user cannot unintentionally or intentionally exit the application nor can the end user execute any other applications. -
Page 147: Administration And Configuration
Control Panel Figure C-1 Administrator Control panel Use the Control tab options to select the application to launch when the VX6 boots up. Move the cursor to the Application text box and either type the application path or click the Browse icon (the …... -
Page 148: End User Internet Explorer
The hotkey sequence is displayed in the Hot Key text box with “Shift”, “Alt”, and “Ctrl” text strings representing the shift state keys. The normal keyboard key completes the hotkey sequence. VX6 Reference Guide E-EQ-VX6RG-A... - Page 149 If they do not match, a dialog box is displayed notifying the user of the error. After the user closes the dialog box, the Security Panel is displayed and the password can then be entered and confirmed again. If the passwords match, the password is encrypted and saved. See Also: Passwords E-EQ-VX6RG-A VX6 Reference Guide...
-
Page 150: Status Panel
Process Processing status shows the flow control of AppLock components and is mainly intended for LXE Customer Service when helping customers troubleshoot problems with their AppLock program. Extended Extended status provides more detailed information than that logged by Process Logging. -
Page 151: Passwords
To summarize, if an error occurs that prevents AppLock from switching to user mode, the password will not timeout and AppLock will wait until the correct password is entered. Troubleshooting Forgotten the password that has been set? Enter this LXE back door key sequence: Ctrl+L Ctrl+X Ctrl+E E-EQ-VX6RG-A... -
Page 152: Error Messages
\Windows directory and reboot the unit. Deleting applock.exe triggers the AppLock system to reload. Address of keyboard hook AppLock successfully retrieved the address of the LOG_EX procedure OK keyboard filter initialization procedure. VX6 Reference Guide E-EQ-VX6RG-A... - Page 153 Unable to decrypt password. LOG_ERROR Decrypt acquired context OK Decryption process ok. LOG_EX Decrypt create hash failure Unable to decrypt password. LOG_ERROR Decrypt created hash OK Decryption process ok. LOG_EX Decrypt failure Unable to decrypt password. LOG_ERROR E-EQ-VX6RG-A VX6 Reference Guide...
- Page 154 AppLock launches the application and has to wait until it has created and initialized its main window. This message is logged when the function that waits for the application initialization is entered. Enter DecryptPwd Entering the password decryption process. LOG_PROCESSING VX6 Reference Guide E-EQ-VX6RG-A...
- Page 155 Processing is at the end of the function that retrieved the LOG_PROCESSING application information from the registry. Exit password dialog Exiting password prompt processing. LOG_PROCESSING Exit password dialog-cancel Exiting password prompt w/cancel. LOG_PROCESSING Exit password dialog-OK Exiting password prompt successfully. LOG_PROCESSING E-EQ-VX6RG-A VX6 Reference Guide...
- Page 156 Processing the hotkey and backdoor entry LOG_EX Hot key set event failure When the administrator changes the hotkey LOG_ERROR configuration the hotkey controller must be notified. This notification failed. Hotkey press message received The user just pressed the configured hotkey. LOG_PROCESSING VX6 Reference Guide E-EQ-VX6RG-A...
- Page 157 The keyboard hook uses an embedded default if the value is not set in the registry. Read registry failure-app name AppName registry value does not exist or is empty. LOG_ERROR This constitutes a failure for switching into user mode. E-EQ-VX6RG-A VX6 Reference Guide...
- Page 158 The taskbar is now being made visible and enabled. LOG_PROCESSING Switching to admin-backdoor The system is currently in user mode and is now LOG_PROCESSING switching to admin mode. The switch occurred because of the backdoor key presses were entered by the administrator. VX6 Reference Guide E-EQ-VX6RG-A...
- Page 159 If user mode is being entered via a hotkey press, the LOG_EX line change administrator may have left the configured application open. If so, AppLock does not launch the application again unless a new application or command line has been specified; otherwise, it just locks it. E-EQ-VX6RG-A VX6 Reference Guide...
- Page 160 The window handle that is passed to the enumeration LOG_EX enumwindows=%x function. This message can be used by engineering with other development tools to trouble shoot application lock failures. WM_WINDOWPOSCHG Output the window size after it has been adjusted by LOG_EX adjusted=%x AppLock VX6 Reference Guide E-EQ-VX6RG-A...
-
Page 161: Applock Registry Settings
AppLock Registry Settings AppLock Registry Settings This system application runs at startup via the “launch” feature of LXE Windows CE devices. When the launch feature is installed on the device, the following registry settings are created. The launch feature registry settings are embedded in the VX6 OS image: HKEY_LOCAL_MACHINE\\Software\\LXE\\Persist\\Filename=AppLock.exe... - Page 162 AppLock Registry Settings VX6 Reference Guide E-EQ-VX6RG-A...
-
Page 163: Index
Control Keys, location........... 34 CMOS, Specs..........129 Control Panel options ..........67 Battery Auto Turn Off ........... 72 Controller (Video), Specs........129 Baud Rate .............. 81 Copyrights ............. 86 Beeper, Specs ............129 CPU ..............1, 14 E-EQ-VX6RG-A VX6 Reference Guide... - Page 164 Outlook ............. 64 ACU ..............57 Input Panel............. 73 ATA Compact Flash Slot........79 Install Bluetooth............70 Equipment Needed..........41 Cisco Client............56 Fuse..............50 Date/Time ............71 Type II 2.4GHz Radio Card....41, 43, 44 VX6 Reference Guide E-EQ-VX6RG-A...
- Page 165 Media Player............64 Power Connector ........... 26 Memory ............14, 129 Power Connector, Location ........6 Memory ..............85 Power Connector, Specs........129 allocate for programs or storage......86 Power Port 1 while asleep ........81 E-EQ-VX6RG-E VX6 Reference Guide...
- Page 166 Serial Connector ..........18, 19 USB Connector, Location ........6 Set the double-click sensitivity for stylus taps ..75 USB Mouse ............. 9 Show Clock ............66 User-specific application version information..68 Slot 0 (Left) ............39 VX6 Reference Guide E-EQ-VX6RG-A...
- Page 167 Windows Network Configuration ........101 Video Subsystem ........... 14 View Windows Explorer..........65 Display .............. 38 Windows version........... 85 Wire Color Viewing Area, Specs ........... 131 Cable Wiring............. 48 Virtual Keyboard ........... 73 VK_Code List............127 E-EQ-VX6RG-E VX6 Reference Guide...
- Page 168 Index VX6 Reference Guide E-EQ-VX6RG-A...
Need help?
Do you have a question about the VX6 and is the answer not in the manual?
Questions and answers