LXE MX6 User Manual
Microsoft windows mobile
Hide thumbs
Also See for MX6:
- Programming manual (380 pages) ,
- Reference manual (338 pages) ,
- User manual (60 pages)

Related Manuals for LXE MX6


Summary of Contents for LXE MX6
- Page 1 MX6 User’s Guide (For Microsoft Windows Mobile Equipped MX6’s) ® ® Copyright © March 2006 by LXE Inc. All Rights Reserved E-EQ-MX6OGWW-E...
- Page 2 While reasonable efforts have been made in the preparation of this document to assure its accuracy, LXE assumes no liability resulting from any errors or omissions in this document, or from the use of the information contained herein. Further, LXE Incorporated, reserves the right to revise this document and to make changes to it from time to time without any obligation to notify any person or organization of such revision or changes.
-
Page 3: Revision Notice
Version 7.13 operating systems. Entire Manual Updated graphics to display LXE 2005 logo. Added “LXE recommends all MX6 battery packs be Analyzed on a monthly basis. Introduction Analyzing will reset the internal battery charge indicator circuit, the gas gauge, as well as analyze the battery.”... -
Page 5: Table Of Contents
NTRODUCTION Overview ... 1 Identify Your MX6 Device ... 2 Important Battery Information ... 2 Document Conventions... 3 MX6 Environmental Specifications ... 3 Laser Scanner Warnings and Labels ... 4 UICK TART In General ... 5 Troubleshooting...5 Components ... 6 Insert Fully Charged Battery ... - Page 6 Escape (ESC)...34 Tab...34 Backlight ...34 Alpha Lock (ALPHA) ...34 Backspace (BKSP) ...34 Delete (DEL) ...34 Arrow Keys ...35 Modifier Keys...35 Function Keys...35 The IR Serial Port ... 36 Batteries... 37 Check Battery Status ...37 MX6 User’s Guide Table of Contents E-EQ-MX6OGWW-E...
- Page 7 User Guides ...42 Accessories ...42 Revision History ...44 PPENDIX 35-Key Numeric-Alpha Keypad ... 45 Inactive Keys on the 35-key Keypad...49 56-Key Full Alpha Numeric Keypad... 50 PPENDIX EGULATORY Approvals ... 57 NDEX E-EQ-MX6OGWW-E OTICES AND AFETY NFORMATION MX6 User’s Guide...
- Page 8 Figure 3 CDRH / IEC 825 Caution Label Location – Back ...4 Figure 4 Caution Label – Laser Scanner...4 Figure 5 Front of MX6...6 Figure 6 Back of MX6 ...7 Figure 7 Scanner / Imager Aperture...7 Figure 8 Trigger Handle Installed...8 Figure 9 USB / RS-232 Communications and Charging Port...8...
-
Page 9: Introduction
The MX6 is powered by a 2000 mAh Lithium-Ion main battery pack and an internal backup battery. A stylus is attached to the MX6 to assist in entering data and configuring the unit. The MX6 with a 35-key keypad is slightly different from the MX6 with a 56-key keypad creating differences in keymapping. -
Page 10: Identify Your Mx6 Device
AC adapter, powered cradle. The MX6 must have a main battery installed. • When a new battery is installed in the MX6 for the first time (or when the backup battery is completely depleted), the Time and Date must be re-set. -
Page 11: Document Conventions
Document Conventions Li-Ion Battery When disposing of the MX6 main battery, the following precautions should be observed: The battery should be disposed of properly. The battery should not be disassembled or crushed. The battery should not be heated above 212°F (100°C) or incinerated. -
Page 12: Laser Scanner Warnings And Labels
• Do not stare directly into the laser beam. • Do not remove the laser caution labels from the MX6. • Do not connect the laser barcode window to any other device. The laser barcode aperture is certified for use with the MX6 only. -
Page 13: Quick Start
The sequence of events for a new MX6 is: 1. Insert a fully charged battery. (Always put a fully charged battery in the MX6 at the beginning of the shift or work day.) 2. Turn the MX6 on by pressing the Power key. -
Page 14: Components
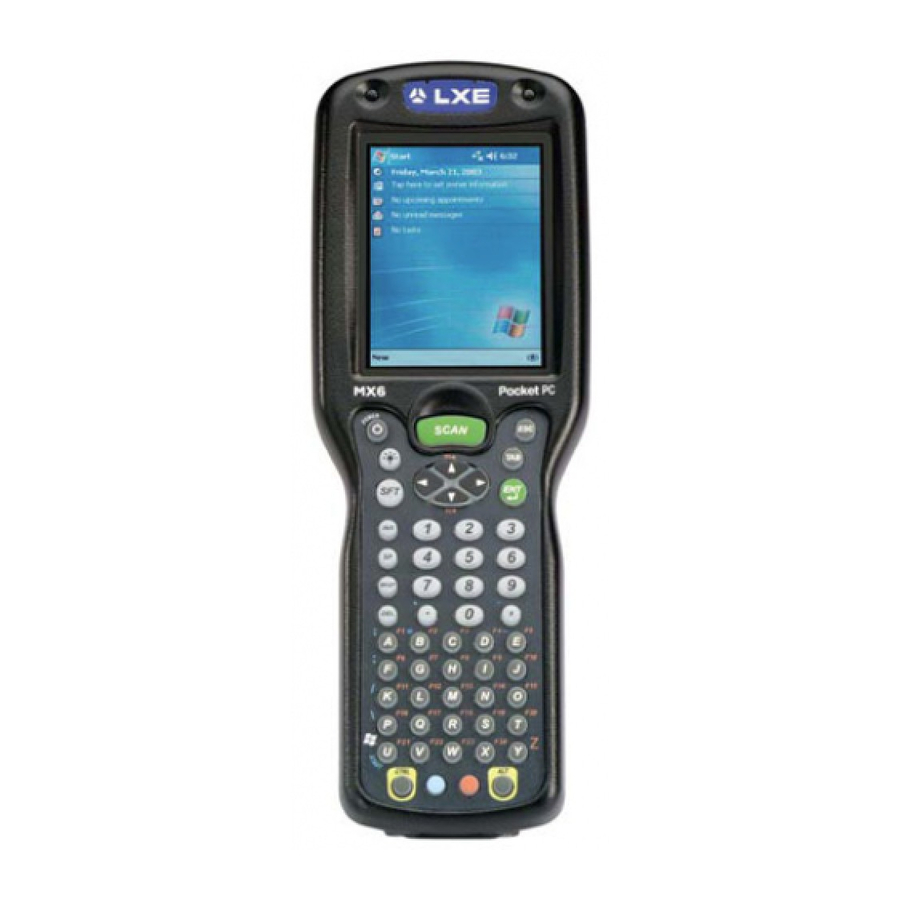
Components MX6 User’s Guide 1. Scan LED 2. Decode LED 3. Touchscreen Display 4. Power key 5. Scan key 6. Cursor keys 7. Backlight Toggle key on the 56-key keypad Figure 5 Front of MX6 Components E-EQ-MX6OGWW-E... -
Page 15: Figure 6 Back Of Mx6
Scanner Aperture E-EQ-MX6OGWW-E 1. Imager / Scanner Aperture 2. Speaker 3. Handstrap Connector 4. Stylus (No Trigger Handle) 5. Microphone 6. Battery Well 7. Battery Figure 6 Back of MX6 Imager Aperture Figure 7 Scanner / Imager Aperture MX6 User’s Guide... -
Page 16: Figure 8 Trigger Handle Installed
Figure 9 USB / RS-232 Communications and Charging Port MX6 User’s Guide Figure 8 Trigger Handle Installed 1. Scanner / Imager Aperture 2. Rubber Nose Bumpers 3. Scan Trigger 4. Rubber Bumper 5. Headphone Jack 6. Secure Digital Access Door 7. -
Page 17: Insert Fully Charged Battery
Note: The battery should not be replaced in a dirty or harsh environment. When the battery is out of the MX6, any dust or moisture that enters the battery compartment can get into the main unit, potentially causing damage. Low Battery Condition When the main battery is low, a dialog box pops up and alerts the user to charge the battery. -
Page 18: About Lithium-Ion Batteries
Li-Ion batteries (like all batteries) gradually lose their capacity over time (in a linear fashion) and never just stop working. This is important to remember -- the MX6 is always 'on' even when in the Suspend state and draws battery power at all times. Tap Start | Settings | System | Power tab to check the battery status and power reading. -
Page 19: Reset Or Reboot
A hard reset erases all the data stored in RAM memory and all applications installed in RAM. See the section titled The IPSM Folder in the MX6 Reference Guide for a list of files that are saved over a hard reset. LXE recommends storing downloaded files in the IPSM folder, if desired. -
Page 20: Using The Stylus
The stylus is located on the back of an MX6 without a handle, and in the back of the handle of an MX6 with a handle. A tether is connected to the stylus in the handle. -
Page 21: General Windows Keyboard Shortcuts
Select more than one item in a window or on the desktop, or select text within a document. Select all. Display the Start menu. Display the corresponding menu. Carry out the corresponding command. Cancel the current task. MX6 User’s Guide... -
Page 22: Entering The Dual Applock Activation Key
Press the Enter key to activate the highlighted choice. Hotkey If the mobile device uses LXE’s Dual AppLock to allow the user to switch between two applications, the default Activation key is Ctrl+Spc. The key sequence switches the focus between one application and another. Data entry affects the application running in the foreground only. -
Page 23: Align The Touchscreen
Use a clean, damp, lint-free cloth. Do not scrub optical surfaces. If possible, clean only those areas which are soiled. Lint/particulates can be removed with clean, filtered canned air. E-EQ-MX6OGWW-E Figure 13 Align the Touchscreen MX6 User’s Guide... -
Page 24: Set The Date And Time
Select OK and select Yes to save your changes or select No to exit without saving your changes and exit Clock & Alarms. Select Cancel to return to Clock & Alarms. MX6 User’s Guide Figure 14 Set the Date and Time Set the Date and Time... -
Page 25: Setting Display Backlight Action
(if Turn on backlight when a button is pressed or the screen is tapped is checked). If the MX6 is in Suspend, pressing the keypad backlight key has no effect – the MX6 remains in the Suspend state. -
Page 26: Dim Backlight If Device Is Not Used For
MX6. Backlight Intensity You can set a different level for the intensity of the display backlight when the MX6 is running on battery power and a different level to use when the MX6 is running on external power. -
Page 27: Set The Power Off Timer
Set the Power Off Timer Set the Power Off Timer Note: Refer to the section titled "Power Modes" in the MX6 Reference Guide for information relating to the power states of the MX6. Tap the Start | Settings | System | Power icon. -
Page 28: Accessing Files In Flash Memory
2. Reset (warm boot) the mobile device. 3. Test the change. 4. Tap Start (or the settings. Refer to the MX6 Reference Guide for more information. MX6 User’s Guide Accessing Files in Flash Memory ) | Utils (or Power Tools) | RegBackup to permanently save the... -
Page 29: Connect The Headset (Optional)
Connect the Headset (Optional) Connect the Headset (Optional) The MX6 audio jack is located on the side of the unit next to the scan aperture and the SDA door (Secure Digital Access). The internal speaker is disabled when the audio jack is connected. -
Page 30: Set The Audio Speaker Volume
Version 7.03 The audio volume can be adjusted to a comfortable level for the user. The MX6 has an internal speaker and a jack for an external headset. The internal speaker is turned off when a headset is connected. -
Page 31: Connect External Power Supply (Optional)
Push the 17-pin power cable connector into the MX6 serial port. When the connector is seated over the pins, twist the cable fasteners to the right to secure the cable to the MX6. Twist to the left to loosen and remove the cable. Insert the barrel end of the AC/DC Power adapter into the short cable end on the power cord connected to the MX6. -
Page 32: Adjust The Handstrap
The MX6 has an integrated elastic handstrap that provides a comfortable, secure grip on the unit. It is attached to the MX6 with a clip on the bottom panel. The handstrap should be disconnected from the bottom clip when the main battery is to be removed or replaced. The handstrap can be removed from the MX6 if desired. -
Page 33: Using The Mx6
USB/RS-232 or the IR port are used to input/output data, and the keypad provides manual entry. MX6's with a touch screen use a stylus to input data, the COM ports and/or the keypad. A virtual keyboard is available in applications that expect keyed input. -
Page 34: Using The Integrated Imager Or Barcode Scanner
Using the Imager / Barcode Scanner To use the scan beam, aim the top of the MX6 at a barcode and press the Scan key or press the trigger on the handle. The decoding engine scans as long as the key or the trigger is held down before the 10 second timeout occurs. -
Page 35: Distance From Label
100 mil reflective barcodes from 66 to 232 in. / 1.67 to 5.9m 13 mil barcodes from 18 to 39 in. / 0.45 to 1m 100 mil reflective barcodes from 102 to 363 in. / 2.6 to 9.2m Figure 24 Laser Decode Zones MX6 User’s Guide... -
Page 36: Aiming At A Barcode
Adjust the aim so that the red aiming beam is centered on the barcode. The red light emitted from the laser scanner must cover every bar and space on the barcode. The laser scanner cannot read/translate a 2D Matrix barcode. Linear Barcode MX6 User’s Guide Correct Scan Angle Incorrect Scan Angles Figure 25 Scan Beam... -
Page 37: Tethered Scanners
Tethered scanners read barcode scans only when the trigger on the tethered scanner is pressed. • To prepare the MX6 to use a tethered scanner, select Start | Settings | System | Scanner | COM1. • Click the checkbox for "Tethered scanner on COM 1" to enable the tethered scanner. -
Page 38: Touch Screen Display
Touch Screen Display The MX6 Touch Screen display is a color TFT VGA display with a user programmable backlight. Display size is 320 x 240 pixels in portrait orientation. The display covering is designed to resist stains. The touch screen allows signature capture and touch input. A pen stylus is included. -
Page 39: Soft Input Panel
Soft Input Panel The Soft Input Panel (SIP) is always available by tapping the SIP icon in the system tray when the MX6 is powered On. It is always available with one exception – when the Today screen is displayed. -
Page 40: Entering Text
To change word suggestion options, such as the number of words suggested at one time, tap Start | Settings | Personal | Input | Word Completion tab. Repeating Keystrokes The Soft Input Panel does not support repeating alphanumeric keystrokes. The MX6 keypads allow repeating alphanumeric keystrokes. International Characters Use the Soft Input Panel and the stylus to add International Characters to data entries. -
Page 41: Keypads
35-key Keypad Figure 29 The 35-key and 56-key Keypads See also: Appendix A “Key Maps”. Keys shown on the 35-key keypad that are inactive: Contrast Up Contrast Down SEND and END E-EQ-MX6OGWW-E 56-key Keypad 56-key 5250 Keypad MX6 User’s Guide... -
Page 42: Special Keys
MX6 from sleep mode. Power Key The Power key puts the MX6 into and wakes the MX6 from suspend mode. Shift (SFT) The Shift key toggles the keypad from upper case alphabet mode to lower case alphabet mode and back. -
Page 43: Arrow Keys
Use <CTRL>+<F1> key sequence to get function key F7, <CTRL>+<F5> key sequence to get function key F11. These “second key” functions bypass the standard windows messaging sequence described above for F7 and F11. E-EQ-MX6OGWW-E Figure 30 Modifier Keys wParam=0x60 wParam=0x60 wParam=0x61 wParam=0x61 wParam=0x62 wParam=0x62 MX6 User’s Guide... -
Page 44: The Ir Serial Port
(specifically, with Zmodem: both must use Xon/Xoff). The COM 3 / 6 port is always the IR port on the lower left side of the MX6. It is accessed as COM3 for Raw Infrared communication and as COM 6 for Infrared communication using IrDA protocol. -
Page 45: Batteries
When the main battery has lost most of its charge, an icon of an “empty” or “half-empty” battery appears. The MX6 also may be programmed to emit a beep at intervals when the battery is low. When you see the empty-battery icon or hear the warning beeps, you should turn the unit off and recharge or replace the main battery as soon as possible. -
Page 46: Backup Battery
Backup Battery The MX6 has a backup battery that is designed to provide limited-duration electrical power in the event of main battery pack failure. The backup battery is a 3.6V NiMH battery that is factory installed in the unit. The need for recharging of the backup battery is automatically detected and controlled by the MX6. -
Page 47: Battery Chargers
The Desk Mount Cradle has an Auxiliary Battery Well that is used to charge a single Li-Ion battery in the charged desk mount docking cradle. The MX6 unit does not have to be in the main charging well because each charger operates independently of the other. The spare battery will charge in four hours. -
Page 48: Docking Cradles
The vehicle docking cradle uses a 12V cigarette lighter adapter or a bare wire 12-48V power supply to transfer power to the internal charging circuitry of the MX6 and, in turn, the MX6 recharges the main battery. A powered vehicle docking cradle gives the MX6 the ability to communicate with a host computer and other equipment. -
Page 49: Powered Vehicle Cradle
MX6 is properly seated in the charging bay and the main battery in the MX6 is charging. Serial data is being sent to the MX6 from the host. Green Serial data is being sent from the MX6 to the host. -
Page 50: Getting Help
Getting Help LXE user guides are now available on CD and they can also be viewed/downloaded from the LXE ServicePass website. Contact your LXE representative to obtain the LXE Manuals CD. You can also get help from LXE by calling the telephone numbers listed on the LXE Manuals CD, in the file titled “Contacting LXE”. - Page 51 Replacement Stylus Kit, w/ Tether, 3-Pack, For with MX6 w/ Handle Universal Vehicle Docking Cradle Mounting Bracket – Clamp Style Replacement US Power Cord MX6 Software Development Kit (Hand Held Products Branded for PC 2002 units) MX6 Software Development Kit (LXE Branded) Power Cable / Cord not included...
-
Page 52: Revision History
• Cover Page -- Added “For Microsoft Windows Mobile Equipped MX6’s” to differentiate this device from the MX6 running Pocket PC 2002 (Note: WPA cannot run on PPC2002). • Entire Manual -- Removed Pocket PC 2002 information. Retained Windows Mobile information. -
Page 53: Appendixa Key Maps
Press These Keys and Then … Blue Ctrl Alpha Press This Key Caps Lock Power Bksp Backlight Up Arrow Down Arrow Blue Ctrl Scan Space double-tap the Sft Bksp Up Arrow Down Arrow Right Arrow Left Arrow MX6 User’s Guide... - Page 54 Delete Home Page Up Page Down Pressing F6, F7 or F11 produces Windows messages. Refer to section titled “Function Keys” for explanation and instruction. MX6 User’s Guide Press These Keys and Then … Blue Ctrl Alpha 35-Key Numeric-Alpha Keypad Press This Key...
- Page 55 Either press SFT or activate CapsLock when capital letters are needed. E-EQ-MX6OGWW-E Press These Keys and Then … Blue Ctrl Alpha Press This Key Caps Lock 7,7,7 7,7,7,7 8,8,8 9,9,9 9,9,9,9 2,2,2 3,3,3 4,4,4 5,5,5 6,6,6 7,7,7 7,7,7,7 8,8,8 MX6 User’s Guide...
- Page 56 To Get This Key / Function < > : (colon) ; (semicolon) . (period) _ (underscore) , (comma) ‘ (apostrophe) ~ (tilde) MX6 User’s Guide Press These Keys and Then … Blue Ctrl Alpha 35-Key Numeric-Alpha Keypad Press This Key Caps Lock 9,9,9...
-
Page 57: Inactive Keys On The 35-Key Keypad
Inactive Keys on the 35-key Keypad Contrast Up Contrast Down Send and End E-EQ-MX6OGWW-E Press These Keys and Then … Blue Ctrl Alpha Press This Key Caps Lock Use Soft Keypad Use Soft Keypad 2 or Blue+F6 MX6 User’s Guide... -
Page 58: 56-Key Full Alpha Numeric Keypad
Right Arrow Left Arrow Insert Delete ALT and CTRL are not “sticky” keys. Press and hold these keys while pressing the next key. MX6 User’s Guide Press These Keys and Then … Blue Ctrl Shift 56-Key Full Alpha Numeric Keypad... - Page 59 56-Key Full Alpha Numeric Keypad To Get This Key / Function Home Page Up Page Down Pressing F6, F7 or F11 produces Windows messages. Refer to the MX6 Reference Guide. E-EQ-MX6OGWW-E Press These Keys and Then … Blue Ctrl Shift...
- Page 60 To Get This Key / Function MX6 User’s Guide Press These Keys and Then … Blue Ctrl Shift 56-Key Full Alpha Numeric Keypad Press This Key Caps Lock E-EQ-MX6OGWW-E...
- Page 61 Press These Keys and Then … Blue Ctrl Shift Press This Key Caps Lock , (comma) Use Soft Keypad Use Soft Keypad . (DOT) Use Soft Keypad Use Soft Keypad Use Soft Keypad Use Soft Keypad , (comma) . (DOT) MX6 User’s Guide...
- Page 62 : (colon) ; (semicolon) . (period) _ (underscore) , (comma) ‘ (apostrophe) ~ (tilde) “ & MX6 User’s Guide Press These Keys and Then … Blue Ctrl Shift 56-Key Full Alpha Numeric Keypad Press This Key Caps Lock . (DOT)
-
Page 63: Appendixb Regulatory Notices And Safety Information
Connect the equipment into an outlet on a circuit different from that to which the receiver is connected. • Consult the dealer or an experienced radio/TV technician for help. Warning: Changes or modifications to this device not expressly approved by LXE, Inc., could void the user’s authority to operate this equipment. RF Safety Notice... - Page 64 Electronic Equipment (WEEE) appropriately, per Directive 2002-96-EC. In most areas, this product can be recycled, reclaimed and re-used when properly discarded. Do not discard labeled units with trash. For information about proper disposal, contact LXE through your local sales representative, or visit www lxe com.
-
Page 65: Approvals
EN 55022 Class B EN55024 Transceiver Transceiver MX6 with 802.11b The following is the required safety label that appears on the back panel of the MX6 RF terminal equipped with an 802.11 radio. E-EQ-MX6OGWW-E Safety Standards RF Standards FCC 15.247... - Page 66 Safety Standards: EN60950: 2000 The product carries the CE Mark: We, LXE Inc., declare that the equipment specified above complies with all Essential Health and Safety Requirements of the above Directives and Standards, as amended. Date of issue: October 20, 2003 LXE Inc.
- Page 67 Safety Standard: EN60950: 2000 The product carries the CE Mark: We, LXE Inc., declare that the equipment specified above complies with all Essential Health and Safety Requirements of the above Directives and Standards, as amended. Date of issue: October 20, 2003 LXE Inc.
-
Page 68: Lithium Battery Safety Statement
Pila de litio adentro. Peligro de explosión si la pila se reemplaza incorrectamente. Reemplace solamente con el mismo tipo o equivalente recomendado por el fabricante. (ES) Oppassen: Bevat Lithium-batterij. Incorrrecte plaatsing van batterij kan leiden tot explosiegevaar. Alleen vervangen door hetzelfde of door fabrikant aanbevolen gelijkwaardig type. (NL) MX6 User’s Guide E-EQ-MX6OGWW-E... - Page 69 Regulatory Notices and Safety Information Lithium Battery Safety Statement Dikkat: İçinde lityum bataryası bulunur. (TR) Legend: Chinese Danish Dutch English Finnish French German Greek E-EQ-MX6OGWW-E (KR) (GR) (JP) Italian Japanese Korean Norwegian Portuguese Spanish Swedish Turkish (CN) MX6 User’s Guide...
-
Page 70: Laser Light Safety Statement
Este producto usa luz de láser. Las etiquetas se proveen en la máquina exploradora. Por favor, lea detenidamente la explicación para las precauciones. (ES) Waarschuwing: Dit product gebruikt laserlicht. Een van de volgende labels is op de scanner aangebracht. Lees a.u.b. de waarschuwing onder Oppassen. (NL) MX6 User’s Guide E-EQ-MX6OGWW-E... - Page 71 Laser Light Safety Statement Aþaðýdaki etiketlerden bir tanesi tarayýcýnýn üstünde saðlanýr. Lütfen Dikkat ifadesini okuyun. (TR) (KR) (CN) E-EQ-MX6OGWW-E (JP) Legend: Chinese-CN; Danish-DK; Dutch-NL; English-US; Finnish- FI; French-FR; German-DE; Greek-GR; Italian-IT; Japanese-JP; Korean-KR; Norwegian-NO; Portuguese-PT; Spanish-ES; Swedish-SE; Turkish-TR MX6 User’s Guide (GR)
- Page 72 Regulatory Notices and Safety Information Labels – MX6 Hand Held Computer Class 2 MX6 User’s Guide E-EQ-MX6OGWW-E...
- Page 73 Regulatory Notices and Safety Information Labels – MX6 Hand Held Computer Class 3A E-EQ-MX6OGWW-E MX6 User’s Guide...
- Page 74 Regulatory Notices and Safety Information MX6 User’s Guide E-EQ-MX6OGWW-E...
-
Page 75: Index
Flow Control, IR Serial Port...36 Four Bay Charger-Analyzer ...39 Function keys F6 F7 and F11 ...35 Getting Help ...42 Getting Started...5 Handstrap...24 Hard reset ...11 Hard reset key presses ...11 Headset Controls, How to...21 Headset jack location...21 MX6 User’s Guide... - Page 76 Power key ...34 Power key, location ...10 Power off timer...19 Programs and files in flash memory ...20 Programs and files stored in the IPSM folder...20 MX6 User’s Guide Quick Start Instructions...5 Reboot ...11 red aiming beam ...28 Red key...35 Regulatory Notices and Safety Information ...55 Reset, hard ...11...
- Page 77 Turn off device if not used for...19 Use the imager...26 Virtual keyboard, soft input panel ...31 Volume adjust audio volume ...22 E-EQ-MX6OGWW-E Warning beeps, battery...37 Warnings and Labels Laser Scanner...4 Waste Electrical and Electronic Equipment (WEEE) ...56 Word completion program ...31 MX6 User’s Guide...
- Page 78 Index MX6 User’s Guide E-EQ-MX6OGWW-E...
Need help?
Do you have a question about the MX6 and is the answer not in the manual?
Questions and answers