
Related Manuals for Vecow EMBC-1000


Summary of Contents for Vecow EMBC-1000
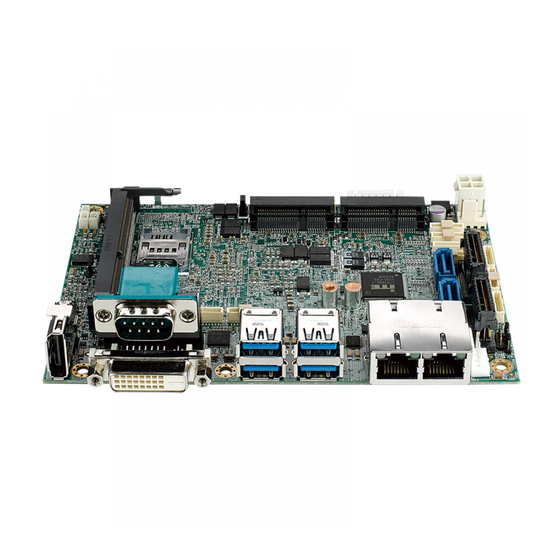
- Page 1 USER USER EMBC-1000 Manual Manual 3.5” Embedded Single Board Computer w/ Intel ® Core™ i7/i5/i3 SoC (Skylake-U), 2 GbE LAN, 4 USB 3.0, 5 COM, SUMIT, Extended Temp 1.5.0 Edition 20170509...
- Page 2 Record of Revision Version Date Page Description Remark 04/12/2016 Preliminary Release 05/05/2016 Official Release 05/20/2016 69-71 Update 07/11/2016 Update 07/26/2016 Update 07/28/2016 10-12 Update 05/09/2017 Update...
-
Page 3: Declaration Of Conformity
This manual is released by Vecow Co., Ltd. for reference purpose only. All product offerings and specifications are subject to change without prior notice. It does not represent commitment of Vecow Co., Ltd. Vecow shall not be liable for direct, indirect, special, incidental, or consequential damages arising out of the use of the product or documentation or any infringements upon the rights of third parties, which may result from such use. - Page 4 Order Information Part Number Description ® EMBC-1000- EMBC-1000 Embedded Single Board Computer, onboard Intel 600U Core™ i7-6600U Processor (Skylake-U), 2 GbE LAN, 5 COM, 4 USB 3.0, 4 USB 2.0, 2 Mini PCIe, 16 GPIO ® EMBC-1000- EMBC-1000 Embedded Single Board Computer, onboard Intel 300U Core™...
-
Page 5: Optional Accessories
Optional Accessories Part Number Description 61-1301009-0DA COM Port Cable 61-13B0707-386 SATA Data Cable 61-13P0430-08A SATA Power Cable 61-193102U-156 USB 2.0 Cable 61-13T10LM-3CG Audio Cable 61-13S33KM-3CG KB/MS Cable 62-A110100-011 Heat Sink 62-A210100-011 Heat Spreader... -
Page 6: Table Of Contents
1.5.1 EMBC-1000 Mechanical Drawing (Main Board) 1.5.2 EMBC-1000 Heat Sink Mechanical Drawing 1.5.3 EMBC-1000 Heat Spreader Mechanical Drawing 1.5.4 EMBC-1000 Mechanical Drawing (Main Board + Heat Sink) 1.5.5 EMBC-1000 Mechanical Drawing (Board + Heat Spreader) CHAPTER 2 GETTING TO KNOW YOUR EMBC-1000 2.1 Packing List... - Page 7 CHAPTER 4 BIOS SETUP 4.1 Entering Setup 4.2 Main Menu 4.3 Advanced Function 4.4 Chipset 4.5 Security 4.6 Boot 4.7 Save & Exit APPENDIX A : ISOLATED DIO GUIDE APPENDIX B : WDT Functions APPENDIX C : Power Consumption...
-
Page 8: Chapter 1 General Introduction
® With 6th generation Intel Core™ i7/ i5/ i3 processor (Skylake-U), dual channel DDR4 2133MHz up to 16GB memory, EMBC-1000 serves up to 10% CPU ® performance enhanced than the former generation Intel SoC solution with ®... -
Page 9: Features
• Supports full function SUMIT A, B expansion • 9V to 36V DC Power Input • Easy to customize for low-profile system applications • One-stop SUMIT Expansion Design and Manufacturing Services 1.3 Product Specification 1.3.1 Specifications of EMBC-1000-600U System ® Processor Intel Core™... - Page 10 I/O Interface Front I/O • 1 DVI-D Connector • 1 DisplayPort Connector • 4 USB 3.0 Connector • 2 RJ45 Connector • 1 COM RS-232/ 422/ 485 DB9 Connector Internal I/O • 1 ATX 4-pin Power Connector • 4 COM RS-232/ 422/ 485 Connector •...
-
Page 11: Specifications Of Embc-1000-300U
-40°C to 85°C (-40°F to 185°F) Storage Temperature -40°C to 85°C (-40°F to 185°F) Humidity 5% to 95% Humidity, non-condensing Relative Humidity 95% at 70°C CE, FCC 1.3.2 Specifications of EMBC-1000-300U System ® Processor Intel Core™ i5-6300U Processor (Skylake-U, up to 4M Cache, 3.4GHz) ®... - Page 12 Internal I/O • 1 ATX 4-pin Power Connector • 4 COM RS-232/ 422/ 485 Connector • 2 Mini PCIe Connector • 1 SIM Card Socket • 1 DDR4 SO-DIMM Socket • 1 LVDS Connector • 1 LVDS Backlight Connector • 2 SATA Connector •...
-
Page 13: Specifications Of Embc-1000-955U
1.3.3 Specifications of EMBC-1000-955U System ® ® Processor Intel Celeron 3955U Processor (Skylake-U, up to 4M Cache, 3.4GHz) ® Chipset Intel SoC (Skylake) BIOS IT8786E Memory 1 DDR4 2133MHz SO-DIMM, up to 16GB Graphics ® Graphics Processor Intel HD Graphics 520 Interface •... -
Page 14: Specifications Of Embc-1000E-600U
Expansion Mini PCIe 2 Mini PCIe Socket : • 1 Mini PCIe for PCIe/ USB/ SIM Card • 1 Mini PCIe for PCIe/ USB/ Optional mSATA SUMIT (Optional) • 1 SUMIT Connector A (Internal) • 1 SUMIT Connector B (Internal) Power Power Input 9V to 36V, DC-in... - Page 15 • 1 Mini PCIe for PCIe/ USB/ Optional mSATA SUMIT (Optional) • 1 SUMIT Connector A (Internal) • 1 SUMIT Connector B (Internal) Power Power Input 9V to 36V, DC-in Power Interface ATX Power Connector ©Vecow EMBC-1000 User Manual GENERAL INTRODUCTION...
-
Page 16: Supported Cpu List
Others Watchdog Timer Reset : 1 to 255 sec./min. per step Smart Management Wake on LAN, PXE supported HW Monitor Monitoring temperature, voltages. Auto throttling control when CPU overheats. Software Support Microsoft Windows 10, Windows 8.1, Windows 7 Linux Fedora 19, Ubuntu 10.04 LTS, or Linux Kernel 3.0 above Mechanical Dimension (W x H) 146mm x 102mm (5.75”... -
Page 17: Mechanical Dimensions
1.5 Mechanical Dimensions 1.5.1 EMBC-1000 Mechanical Drawing (Main Board) 146 (5.75”) 146 (5.75”) 141.9 (5.6”) 56.2 (2.2”) 11.8 (0.5”) 5.0 (0.2”) Unit: mm (inch) 1.5.2 EMBC-1000 Heat Sink Mechanical Drawing 150.4 (5.92”) Unit: mm (inch) ©Vecow EMBC-1000 User Manual GENERAL INTRODUCTION... -
Page 18: Embc-1000 Heat Spreader Mechanical Drawing
1.5.3 EMBC-1000 Heat Spreader Mechanical Drawing 148.0 (5.82”) Unit: mm (inch) 1.5.4 EMBC-1000 Mechanical Drawing (Main Board + Heat Sink) 150.4 (5.9”) Unit: mm (inch) GENERAL INTRODUCTION... -
Page 19: Embc-1000 Mechanical Drawing (Board + Heat Spreader)
1.5.5 EMBC-1000 Mechanical Drawing (Board + Heat Spreader) 148.0 (5.8”) Unit: mm (inch) ©Vecow EMBC-1000 User Manual GENERAL INTRODUCTION... -
Page 20: Chapter 2 Getting To Know Your Embc-1000
GETTING TO KNOW YOUR EMBC-1000 2.1 Packing List Item Description EMBC-1000 SBC Driver/ User Manual DVD Cable Kit ● COM Port Cable ● SATA Data Cable ● SATA Power Cable ● USB 2.0 Cable ● Audio Cable 2.2 Connector/ Jumper Locations 2.2.1 Top Side... - Page 21 The pinouts of Miscellaneous port are listed in following table: Group Pin No. Description JPWBTN FP_PWR_BTN_IN JRESET FP_RST_BTN_N PWR_LED_N JSTATUS PWR_LED_P HDD_LED_N JHDD HDD_LED_P ©Vecow EMBC-1000 User Manual GETTING TO KNOW YOUR EMBC-1000...
- Page 22 2.2.3 Battery Battery The EMBC-1000’s real-time clock is powered by a lithium battery. It is equipped with Panasonic BR2032 190mAh lithium battery. It is recommended that you not replace the lithium battery on your own, but if the battery needs to be changed, please contact the Vecow RMA service team.
- Page 23 2.2.4 CN9 : Audio Connector There are three audio connectors, mic-in, line-in, and line-out, in the top side of EMBC-1000. Onboard Realtek ALC892 audio codec supports 5.1 channel HD ® audio and fully complies with Intel High Definition Audio (Azalia) specifications.
- Page 24 2.2.5 JUSB1, JUSB2 : Internal USB2.0 Connector JUSB2 JUSB1 The EMBC-1000 main board provides maxima eight expansion USB ports. The USB interface supports 480 Mbps transfer rate which comply with high speed USB specification Rev. 2.0. The USB interface is accessed through one 10-pin JST 1.0mm connector. You will need an adapter cable if you use a standard USB connector.
- Page 25 1. When a Mini PCIe device is inserted, its pin-43 forces the respective pin on the socket to ground, or logic 0. ©Vecow EMBC-1000 User Manual GETTING TO KNOW YOUR EMBC-1000...
- Page 26 Reserved Status Reserved +3.3Vaux Reserved +3.3Vaux USB_D+ USB_D- PETp0 PETn0 SMB_DATA SMB_CLK +1.5V PERp0 PERn0 +3.3Vaux PERST# Reserved reserved Reserved Mechanical Key UIM_VPP REFCLK+ UIM_RESET REFCLK- UIM_CLK UIM_DATA CLKREQ# UIM_PWR Reserved 1.5V Reserved WAKE# 3.3Vaux GETTING TO KNOW YOUR EMBC-1000...
- Page 27 The pin assignments of CN3 are listed in the following table: Pin No. Signal Name Pin No. Signal Name Reserved +3.3Vaux Reserved Reserved +1.5V Reserved Reserved Reserved +3.3Vaux Reserved +3.3Vaux USB_D+ USB_D- PETp0 PETn0 SMB_DATA ©Vecow EMBC-1000 User Manual GETTING TO KNOW YOUR EMBC-1000...
- Page 28 SMB_CLK +1.5V PERp0 PERn0 +3.3Vaux PERST# Reserved reserved Reserved Mechanical Key UIM_VPP REFCLK+ UIM_RESET REFCLK- UIM_CLK UIM_DATA CLKREQ# UIM_PWR Reserved 1.5V Reserved WAKE# 3.3Vaux GETTING TO KNOW YOUR EMBC-1000...
- Page 29 RS-422 or RS-485, you can find the setting in BIOS. Group Description RS-232 RS-422 (5-wire) COM1 (CN11)/ COM2 (JCOM2)/ COM3 (JCOM3)/ COM4 (JCOM4)/ RS-422 (9-wire) COM5 (JCOM5) RS-485 RS-485 w/z auto-flow control ©Vecow EMBC-1000 User Manual GETTING TO KNOW YOUR EMBC-1000...
- Page 30 GND_ GND_ GND_ GND_ EARTH EARTH EARTH EARTH ----------- CTS- RXD- RXD- ----------- 2, 3 ----------- CTS+ ----------- 4, 5 RXD+ RXD+ ----------- ----------- RTS+ ----------- TXD+ TXD+ DATA+ ----------- RTS- ----------- TXD- TXD- DATA- GETTING TO KNOW YOUR EMBC-1000...
- Page 31 CN14 There are 4 USB 3.0 connections available supporting up to 5GB per second data rate in the top side of EMBC-1000. They are also compliant with the requirements of SuperSpeed (SS), high speed (HS), full speed (FS) and low speed (LS).
- Page 32 Moreover, both LAN 1 and LAN 2 supports Wake on LAN and Pre-boot functions. The pinouts of LAN 1 and LAN 2 are listed as follows: Pin No. 10/ 100Mbps 1000Mbps E_TX+ MDI0_P E_TX- MDI0_N E_RX+ MDI1_P ---- MDI2_P ----- MDI2_N E_RX- MDI1_N ----- MDI3_P ------ MDI3_N GETTING TO KNOW YOUR EMBC-1000...
- Page 33 Yellow 2.2.12 CON1, J3 : LVDS CON1 EMBC-1000 supports dual-channel 24-bit LVDS display, up to 1920 x 1200 pixels resolution. The pin assignments of CON1 are listed in the following table: ©Vecow EMBC-1000 User Manual GETTING TO KNOW YOUR EMBC-1000...
- Page 34 The LCD inverter is connected to J3 via a JST 7-pin, a 2.5mm connector providing +5V/ +12V power to LCD display. The pin assignments are listed in the following table: Pin No. Definition Pin No. Definition +12V +12V LBKLT_EN LBKLT_CTL GETTING TO KNOW YOUR EMBC-1000...
- Page 35 2.2.14 CN5, CN8 : SATA III Connector There are two high performance Serial ATA III (SATA III) on the EMBC-1000. They support higher storage capacity with less cabling effort and smaller required space. The pin assignments of CN5 and CN8 are listed in the following table: ©Vecow EMBC-1000 User Manual...
- Page 36 Definition 2.2.15 J1: SATA Power Connector The EMBC-1000 is also equipped with one SATA power connector. It supports 5V (Up to 2A) and 12V (Up to 1A) currents to the hard drive or SSD. The pin assignments of J1 is listed in the following table: Pin No.
- Page 37 Function +5V_AUX +12V +3.3V SMB_DATA +3.3V XMB_CLK Reserved Reserved Reserved SPI_MISO USB_OC# SPI_MOSI Reserved SPI_CLK SPI_CS10 USB_3+ SPI_CS1# USB_3- Reserved LPC_DRQ1# USB_2+ LPC_AD0 USB_2- LPC_AD1 LPC_AD2 USB_1+ LPC_AD3 USB_1- LPC_FRAME# SERIRQ# ©Vecow EMBC-1000 User Manual GETTING TO KNOW YOUR EMBC-1000...
- Page 38 CN6 Pin Out Pin No. Function Pin No. Function B_PET_P0 B_PER_P0 B_PET_N0 B_PER_N0 C_CLKP B_CLKP C_CLKN B_CLKN CPRSNT#/C_ PE_CLKREQ# C_PER_P0 C_PET_P0 C_PER_N0 C_PET_N0 Reserved C_PER_P1 C_PET_P1 C_PER_N1 C_PET_N1 C_PET_P2 C_PER_P2 C_PET_N2 C_PER_N2 C_PET_P3 C_PER_P3 C_PET_N3 C_PER_N3 GETTING TO KNOW YOUR EMBC-1000...
- Page 39 WAKE# Reserved Reserved Reserved +3.3V +3.3V +3.3V +5V_AUX 2.2.17 SYS FAN1 : Connector SYS FAN1 Fan power connector supports higher thermal requirements. Pin No. Definition Pin No. Definition +12V FAN_TAC FAN_CTL ©Vecow EMBC-1000 User Manual GETTING TO KNOW YOUR EMBC-1000...
- Page 40 2.2.18 JPMS, JPKB : PS/2 Mouse Keyboard Pin Head JPKB JPMS JPMS Mouse Pin assingment JPMS Keyboard Pin assingment as the following table: as the following table: Pin No. Definition Pin No. Definition SIO_MCLK SIO_KCLK SIO_MDAT SIO_KDAT VCC5_KBMS 2.2.19 Bottom Side GETTING TO KNOW YOUR EMBC-1000...
- Page 41 JDIO1 and JDIO2 pins are defined in the following table: Pin No. JDIO1 Definition JDIO2 Definition SIO_GPIO80 SIO_GPIO84 SIO_GPIO81 SIO_GPIO85 SIO_GPIO82 SIO_GPIO86 SIO_GPIO83 SIO_GPIO87 SIO_GPIO70 SIO_GPIO74 SIO_GPIO71 SIO_GPIO75 SIO_GPIO72 SIO_GPIO76 SIO_GPIO73 SIO_GPIO77 ©Vecow EMBC-1000 User Manual GETTING TO KNOW YOUR EMBC-1000...
-
Page 42: Jumper Settings
GIOP DC Electrical Characteristics: 2.3 Jumper Settings 2.3.1 Front View of EMBC-1000 Main Board With Jumper Location The figure below is the top view of the EMBC-1000 main board. It shows the location of the jumpers. JP10 You may configure your card to match the needs of your application by setting jumpers. - Page 43 LVDS power input; closing Pin 2 and Pin 3 is for 5V LVDS power input. Pin No. Definition Pin No. Definition +3.3V (Default) 2.3.3 JP2(CMOS), JP10(ME) JP10 CMOS Header Header Normal Normal Clear CMOS Clear ME ©Vecow EMBC-1000 User Manual GETTING TO KNOW YOUR EMBC-1000...
- Page 44 2.3.4 JP5 : External USB 3.0/ 2.0 Power Select Header Power Header Power +5V Standby Power +5V System Power 2.3.5 JP9 : Backlight Control Level Select Dimming Header On/ Off Header 3.3V 3.3V GETTING TO KNOW YOUR EMBC-1000...
-
Page 45: Chapter 3 Installation
INSTALLATION 3.1 Installing Heat Sink Step 1 Ensure the screw locations on EMBC-1000 fit the ones on the heat sink. ©Vecow EMBC-1000 User Manual INSTALLATION... - Page 46 Step 2 Fasten five PH-M3x6 screws (circled in red). INSTALLATION...
-
Page 47: Installing Heat Spreader
3.2 Installing Heat Spreader Step 1 Place the motherboard and heat sink in position. Step 2 Fasten six PH-M3x6 screws (circled in red). ©Vecow EMBC-1000 User Manual INSTALLATION... -
Page 48: Installing Ddr4 So-Dimm Module
3.3 Installing DDR4 SO-DIMM Module Step 1 Install DDR4 RAM module into SO-DIMM slot. INSTALLATION... -
Page 49: Installing Mini Pcie Card
Step 2 Make sure the RAM module is locked by the memory slot. 3.4 Installing Mini PCIe Card Step 1 Install Mini PCIe card into the Mini PCIe slot. ©Vecow EMBC-1000 User Manual INSTALLATION... -
Page 50: Installing Sim Card
Step 2 Fasten one M2.5 screw. 3.5 Installing SIM Card Step 1 Open the SIM card cover. INSTALLATION... - Page 51 Step 2 Install SIM card into the SIM card slot and then close and lock the SIM card cover. ©Vecow EMBC-1000 User Manual INSTALLATION...
-
Page 52: Chapter 4 Bios Setup
BIOS SETUP 4.1 Entering Setup BIOS provides an interface for users to check and change system configuration. The BIOS setup program is accessed by pressing the <Del> key when POST display output is shown. Figure 4-1 : Entering Setup Screen BIOS SETTING... -
Page 53: Main Menu
Main menu. Figure 4-2 : BIOS Main Menu System Date Set the Date. Use Tab to switch between Date elements. System Time Set the Time. Use Tab to switch between Time elements. BIOS SETTING ©Vecow EMBC-1000 User Manual... -
Page 54: Advanced Function
4.3 Advanced Function Select Advanced tab to enter advanced BIOS Setup options such as CPU configuration SATA configuration, and USB configuration. Figure 4-3 : BIOS Advanced Menu 4.3.1 ACPI Setting Figure 4-3-1 : ACPI Settings Enable Hibernation Enables or disables system's ability to hibernate (OS/S4 Sleep State). This option may be not effective with some OS. -
Page 55: Amt Configuration
4.3.3 PCH-FW Configuration Figure 4-3-3 : PCH-FW Settings ME Unconfig on RTC Clear State Disabling this option will cause ME not to unconfigure on RTC clear. ME State Set ME to soft temporarily disabled. BIOS SETTING ©Vecow EMBC-1000 User Manual... -
Page 56: Smart Settings
4.3.4 SMART Settings Figure 4-3-4 : SMART Settings SMART Self Test Run SMART Self Test on all HDDs during POST. 4.3.5 IT8786 Super IO Configuration Figure 4-3-5 : Super IO Settings Serial Port 1 Configuration Set parameters of serial port 1 (COM 1). Serial Port 2 Configuration Set parameters of serial port 2 (COM 2). -
Page 57: Hardware Monitor
Console redirection enable or disable. Console Redirection Settings The settings specify how the host computer and the remote computer (which the user is using) will exchange data. Both computers should have the same or compatible settings. BIOS SETTING ©Vecow EMBC-1000 User Manual... - Page 58 4.3.8 CPU Configuration Display CPU-related related information and features supported. Figure 4-3-8 : CPU Function Settings Hyper-threading Enabled for Windows XP and Linux (OS optimized for Hyper-Threading Technology) and disabled for other OS (OS not optimized for Hyper-Threading Technology). When disabled only one thread per enabled core is enabled. Active Processor Cores Number of cores to enable in each processor package.
- Page 59 C-State. Package C State limit Package C State limit. Intel TXT(LT) Suppor Enables or disabled Intel TXT(LT) support. 4.3.9 Intel TXT Information Display Intel TXT information. Figure 4-3-9 : Intel TXT Information BIOS SETTING ©Vecow EMBC-1000 User Manual...
- Page 60 4.3.10 SATA Configuration Figure 4-3-10 : SATA Devices Settings Hyper-threading Enabled for Windows XP and Linux (OS optimized for Hyper-Threading Technology) and disabled for other OS (OS not optimized for Hyper-Threading Technology). When disabled only one thread per enabled core is enabled. SATA Controller(s) Enable or disable SATA Device.
-
Page 61: Acoustic Management Configuration
Enable Ipv6 PXE Boot Support. If disabled IPV6 PXE boot option will not be created. PXE boot wait time Wait time to press ESC key to abort the PXE boot. Media detect count Number of times presence of media will be checked. BIOS SETTING ©Vecow EMBC-1000 User Manual... - Page 62 4.3.13 CSM Configuration Figure 4-3-13 : CSM Settings Network Stack Enable/disable UEFI Network Stack. CSM Support Enable/disable CSM Support. GateA20 Active UPON REQUEST - GA20 can be disabled using BIOS services. ALWAYS - do not allow disabling GA20; this option is useful when any RT code is executed above 1MB.
- Page 63 DISABLE option will keep USB devices available only for EFI applications. XHCI Hand-off This is a workaround for OS-es without XHCI hand-off support. The XHCI ownership change should be claimed by XHCI driver. USB Mass Storage Driver Support Enable/disable USB Mass Storage Driver Support. BIOS SETTING ©Vecow EMBC-1000 User Manual...
-
Page 64: Chipset
Port 60/64 Emulation Enables I/O port 60h/64h emulation support. This should be enabled for the complete USB keyboard legacy support for non-USB aware OSes. USB transfer time-out The time-out value for control, bulk, and interrupt transfers. Device reset time-out USB mass storage device Start Unit command time-out. Device power-up delay Maximum time the device will take before it properly reports itself to the host controller. - Page 65 If enable, it will not scan for External Gfx Card on PEG and PCH PCIE Ports. Primary Display Select which of IGFX/PEG/PCI graphics device should be primary display or select SG for Switchable Gfx. BIOS SETTING ©Vecow EMBC-1000 User Manual...
- Page 66 GTT Size Select the GTT Size. Aperture Size Select the Aperture Size. Note: Above 4GB MMIO BIOS assignment is automatically enabled when selecting 2048MB aperture. To use this feature, please disable CSM Support. DVMT Pre-Allocated Select DVMT 5.0 Pre-Allocated (Fixed) Graphics Memory size used by the Internal Graphics Device.
- Page 67 Specify what state to go to when power is re-applied after a power failure (G3 state). S0 State: Always turn-on the system when power source plugged-in. S5 State: Always turn-off the system when power source plugged-in 4.4.5 PCI Express Configuration of PCH-IO Figure 4-4-5 : PCH-IO Settings BIOS SETTING ©Vecow EMBC-1000 User Manual...
- Page 68 DMI Link ASPM Control Enable/disable the control of Active State Power Management on SA side of the DMI Link. Intel Ethernet Controller I210 Intel Ethernet Controller I210 Settings. Mini PCIe Slot with SIM Mini PCIe Slot with SIM Settings. Mini PCIe\ mSATA Slot Mini PCIe\ mSATA Slot Settings.
-
Page 69: Security
4.4.8 LVDS Configuration Figure 4-4-8 : LVDS Panel Settings LCD Panel Type Select LCD Panel Resolution. 4.5 Security Figure 4-5 : BIOS Security Menu Administrator Password Set Administrator Password. User Password Set User Password. BIOS SETTING ©Vecow EMBC-1000 User Manual... -
Page 70: Boot
4.5.1 HDD Security Configuration Figure 4-5-1 : HDD Security Settings Set User Password Set HDD user password. Advisable to Power Cycle System after Setting Hard Disk Passwords. Discard or save changes option in setup does not have any impact on HDD when password is set or removed. -
Page 71: Save & Exit
Controls the placement of newly detected UEFI boot options. Hard Drive BBS Priorities Set the order of the legacy devices in this group. 4.7 Save & Exit Figure 4-7 : Bios Save and Exit Menu BIOS SETTING ©Vecow EMBC-1000 User Manual... - Page 72 Save Changes and Exit Exit system setup after saving the changes. Discard Changes and Exit Exit system setup without saving any changes. Save Changes and Reset Reset the system after saving the changes. Discard Changes and Reset Reset system setup without saving any changes. Save Changes Save changes done so far to any of the setup options.
-
Page 73: Appendix A : Isolated Dio Guide
DIO 1 Input A.2 Function Description The EMBC-1000 offers a 16-bit DIO (8-DI / 8-DO) on two wafer connector. There is a 16-bit GPIO connector in the top side. Each GPIO channel can be configuration GPI or GPO. Please refer to below table to see the pin definition in details. - Page 74 GIOP DC Electrical Characteristics: A.3 Software Package contain There are three folders as follows: Driver folder includes x86 and x64 version. DLL and head file for software developer or System Integration. C# and C++ sample program. A.4 Driver Install This driver only supports 32-bit version that are WinXP and Win7 32-bit version. Please make sure your OS before you install it.
- Page 75 Please execute “64bit_driver.bat” on console window as administrator. While executing the driver install process, a security window will pop-up. Please check "Always trust software from: 'Vecow Ltd. Co.'" and click install button to go to the next step. In the 64-bit version, there will be a window for driver certification. Please agree to this license to finish the install process.
-
Page 76: Appendix B : Wdt Functions
APPENDIX B : WDT Functions B.1 Function Description The WDT are using internal Super I/O function. However, you must entry super I/O configuration mode to set it. Super I/O special address port = 0x2E Super I/O special data port = 0x2F GPIO Logical device is 0x07 B.2 Entry Functions 1. -
Page 77: Appendix C : Power Consumption
Chroma 62006P-100-25 C.1 CPU : Intel® Core™ i7-6600U@2.6GHz (4M Cache, up to 3.40 GHz) Standby Mode Input Power Max Current Max Consumption i7-6600U 0.327A 03.92W i7-6600U 0.279A 06.70W i7-6600U 0.274A 07.67W i7-6600U 0.258A 09.29W Appendix C ©Vecow EMBC-1000 User Manual... - Page 78 Power-on and boot to Win 8.1 64-bit Idle Status : Run 100% CPU usage CPU usage less 3% Input Power Current Consumption Current Consumption i7-6600U 0.874A 10.49W 1.993A 23.92W i7-6600U 0.571A 13.70W 1.121A 26.90W i7-6600U 0.504A 14.11W 1.002A 28.06W i7-6600U 0.443A 15.95W 0.796A...
- Page 79 CPU usage less 3% Input Power Current Consumption Current Consumption Celeron 3955U 0.894A 10.73W 1.712A 20.54W Celeron 3955U 0.570A 13.68W 0.976A 23.42W Celeron 3955U 0.532A 14.90W 0.843A 23.60W Celeron 3955U 0.456A 16.42W 0.734A 26.42W Appendix C ©Vecow EMBC-1000 User Manual...
- Page 80 No part of this publication may be reproduced in any form or by any means, electric, photocopying, or recording, without prior authorization from the publisher. The rights of all the brand names, product names, and trademarks belong to their respective owners. © Vecow Co., Ltd. 2016. All rights reserved.
Need help?
Do you have a question about the EMBC-1000 and is the answer not in the manual?
Questions and answers