Table of Contents
Advertisement
Quick Links
Advertisement
Table of Contents

Related Manuals for Lyngdorf Audio MP-50


Summary of Contents for Lyngdorf Audio MP-50
- Page 1 MP-50 SURROUND SOUND PROCESSOR OWNER’S MANUAL April, 2017...
-
Page 2: Table Of Contents
Operating Voltage.................... 5 Ventilation Requirements ................5 Home Automation System Integration..............6 Preparing the MP-50 for Mounting in a Rack ............6 Rear Panel ......................7 Remote Control ....................8 How to Pair Remote Control in RF Mode ............9 Setup Procedure .................... - Page 3 Dolby Atmos Example: 7.1.4 ................. 34 Hybrid Auro-3D and Dolby Atmos Example ........... 35 RoomPerfect™ ....................37 How to Set Up RoomPerfect™ ................. 37 RoomPerfect™ Preparations ................. 38 Placing the Microphone in the Focus Position ..........38 Measuring the Focus Position ............... 39 Measuring Random Room Positions .............
-
Page 4: Compliance
Compliance WEEE The European Parliament and the Council of the European Union have issued the Waste Electrical and Electronic Equipment Directive. The purpose of the Directive is to prevent waste of electrical and electronic equipment and to promote reuse, recycling, and other forms of waste recovery. -
Page 5: Pre-Installation
It should be placed in an environment free of excessive heat. • In a rack system, the MP-50 should be placed at the bottom of the rack, still with at least one inch / 25mm free space on all sides. -
Page 6: Home Automation System Integration
1. Turn the MP-50 upside-down and place it on a stable, even surface. 2. The screws used to fasten the rack brackets to the bottom of the MP-50 are in the holes designated for the brackets when the product leaves the factory. -
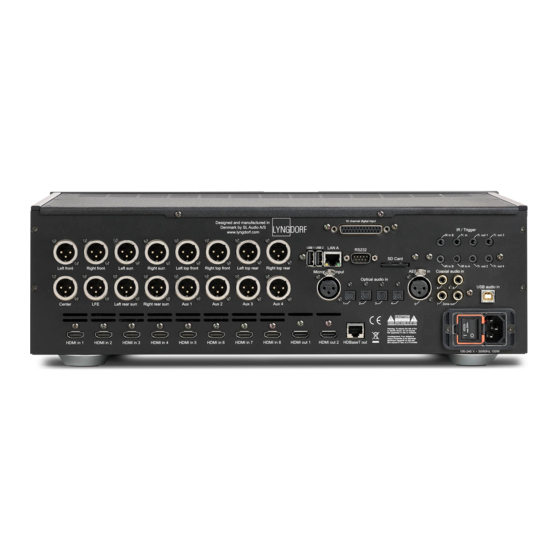
Page 7: Rear Panel
Rear Panel On the back of the MP-50, you will find a range of inputs and outputs: • 16 x balanced audio outputs (configured for 11.1 plus 4 auxiliary) • 8 x HDMI inputs and 4 x HDMI outputs, all 4K compatible •... -
Page 8: Remote Control
Remote Control The MP-50 comes with a dedicated remote control, which can operate both with radio frequencies (RF) and infrared control (IR) Setup Access the installation menu. Standby Turn the MP-50 on and into standby. Audio Access the post-processing menu. -
Page 9: How To Pair Remote Control In Rf Mode
2. Hold down Play/Pause and OK until the remote control´s green LED flashes. 3. Release the buttons. 4. Point the remote control at the MP-50 and hold it within 30cm / 1 foot of the front panel; when the green LED stops blinking, the remote is connected. -
Page 10: Installation Via Osd
Installation Via OSD Connect a screen to the MP-50 using any of the video output sockets on the back. Access the menu system by pressing the Setup button on the remote control. There are some differences between how the web interface and the OSD function. -
Page 11: Source Management
Source Management In the Source menu, you can register the individual sources connected to the MP-50 by the audio and/or video input sockets they use. Add Source Source name Input the name for the source. Lipsync offset (ms) Set delay time in milliseconds to ensure that the video and audio signals are played back simultaneously. - Page 12 Edit Edit all enabled sources. For a description of the menu items, see the Source -> Create chapter. To save changes, you must press “Accept” after making changes to a single input. Do not go to the next input before saving changes. Arrange Change the order of a source by: •...
-
Page 13: Speaker And Room
Speaker and Room The purpose of the speaker setup is to tell the system which speakers and subwoofers are available and how big they are, which in turn reveals how much bass they are capable of reproducing. References to “speakers” in this document are specific to “normal” speakers and do not include subwoofers. - Page 14 subwoofers and with all XL speakers. Since there is no redirected bass, the system can handle this without XXL speakers, but in such a system, the LFE channel will not be played by any speakers. Front and Rear Subwoofers The front and rear subwoofers in the speaker setup provide a way to add more than a single sub to the system.
- Page 15 Natural roll-off When natural roll-off is used, the main speaker will receive the full range signal and will be allowed to roll-off naturally. The bass cutoff frequency will still be used to send the bass to a subwoofer or XXL speaker, but it will not be applied to the main (high pass) output. Assignment of speakers to bass positions When XXL or front/rear subwoofers are used, the redirected bass from speakers will be distributed to the left or right side, and when rear subwoofers or XXL surround or rear speakers...
-
Page 16: Lfe Sub, All Xl Speakers
7.1, LFE Sub, All XL Speakers Height Left Height Center Height Right SUB L SUB R Subwoofer Left Wide Left Center Right Right Wide Subwoofer Left Right Size: XL Size: XL Size: XL SUB LFE Subwoofer LFE Left Top Right Top Front Front Left Top... -
Page 17: Lfe Sub
7.1, LFE Sub Height Left Height Center Height Right SUB L SUB R Subwoofer Left Center Right Subwoofer Left Wide Right Wide Left Size: L Size: L Size: L Right SUB LFE Subwoofer LFE Left Top Right Top Front Front Left Top Right Top Middle... -
Page 18: Lfe Sub, Front Xxl Speakers
7.1, LFE Sub, Front XXL Speakers Height Left Height Center Height Right SUB L SUB R Subwoofer Left Center Right Subwoofer Left Wide Right Wide Left Size:XXL Size:L Size:XXL Right SUB LFE Subwoofer LFE Left Top Right Top Front Front Left Top Right Top Middle... -
Page 19: Lfe Sub, Front Xxl Speakers, Surround Xl Speakers
7.1, LFE Sub, Front XXL Speakers, Surround XL Speakers Height Left Height Center Height Right SUB L SUB R Subwoofer Left Center Right Subwoofer Left Wide Right Wide Left Size:XXL Size:L Size:XXL Right SUB LFE Subwoofer LFE Left Top Right Top Front Front Left Top... -
Page 20: Lfe Sub, Front Xl Speakers
5.1, LFE Sub, Front XL Speakers Height Left Height Center Height Right SUB L SUB R Subwoofer Left Center Right Subwoofer Left Wide Right Wide Left Size:XL Size:L Size:XL Right SUB LFE Subwoofer LFE Left Top Right Top Front Front Left Top Right Top Middle... -
Page 21: Front Subwoofers
7.1, Front Subwoofers Height Left Height Center Height Right SUB L SUB R Subwoofer Left Center Right Subwoofer Left Wide Right Wide Left Size:M Size:M Size:M Right SUB LFE Subwoofer LFE Left Top Right Top Front Front Left Top Right Top Middle Middle Height Left... -
Page 22: 4, Front Subwoofers
7.1.4, Front Subwoofers Height Left Height Center Height Right SUB L SUB R Subwoofer Left Center Right Subwoofer Left Wide Right Wide Left Size:L Size:M Size:L Right SUB LFE Subwoofer LFE Left Top Right Top Front Front Size:S Size:S Left Top Right Top Middle Middle... -
Page 23: Front Subwoofers, Xl Front Speakers
5.1, Front Subwoofers, XL Front Speakers Height Left Height Center Height Right SUB L SUB R Subwoofer Left Center Right Subwoofer Left Wide Right Wide Left Size:XL Size:L Size:XL Right SUB LFE Subwoofer LFE Left Top Right Top Front Front Left Top Right Top Middle... -
Page 24: Lfe Sub And Front Subwoofers
7.1 LFE Sub and Front Subwoofers Height Left Height Center Height Right SUB L SUB R Subwoofer Left Center Right Subwoofer Left Wide Right Wide Left Size: L Size:L Size:L Right SUB LFE Subwoofer LFE Left Top Right Top Front Front Left Top Right Top... -
Page 25: 4, Lfe Sub, Front And Rear Subwoofers
7.1.4, LFE Sub, Front and Rear Subwoofers Height Left Height Center Height Right SUB L SUB R Subwoofer Left Center Right Subwoofer Left Wide Right Wide Left Size:L Size:L Size:L Right SUB LFE Subwoofer LFE Left Top Right Top Front Front Size:M Size:M... -
Page 26: 4, Lfe Sub, Front And Rear Subwoofers And Xl Front Speakers
7.1.4, LFE Sub, Front and Rear Subwoofers and XL Front Speakers Height Left Height Center Height Right SUB L SUB R Subwoofer Left Center Right Subwoofer Left Wide Right Wide Left Size:XL Size:L Size:L Right SUB LFE Subwoofer LFE Left Top Right Top Front Front... -
Page 27: 4, Lfe Sub And Xxl Front And Surround Speakers
7.1.4, LFE Sub and XXL Front and Surround Speakers Height Left Height Center Height Right SUB L SUB R Subwoofer Left Center Right Subwoofer Left Wide Right Wide Left Size:XL Size:L Size:XL Right SUB LFE Subwoofer LFE Left Top Right Top Front Front Size:M... -
Page 28: 4, Xxl Front And Surround Speakers
7.1.4, XXL Front and Surround Speakers Height Left Height Center Height Right SUB L SUB R Subwoofer Left Center Right Subwoofer Left Wide Right Wide Left Size:XXL Size:L Size:XXL Right SUB LFE Subwoofer LFE Left Top Right Top Front Front Size:M Size:M Left Top... -
Page 29: Xxl Front Speakers
5.1, XXL Front Speakers Height Left Height Center Height Right SUB L SUB R Subwoofer Left Center Right Subwoofer Left Wide Right Wide Left Size:XXL Size:L Size:XXL Right SUB LFE Subwoofer LFE Left Top Right Top Front Front Left Top Right Top Middle Middle... -
Page 30: Xxl Front Speakers And Xl Surrounds
7.1, XXL Front Speakers and XL Surrounds Height Left Height Center Height Right SUB L SUB R Subwoofer Left Center Right Subwoofer Left Wide Right Wide Left Size:XXL Size:L Size:XXL Right SUB LFE Subwoofer LFE Left Top Right Top Front Front Left Top Right Top... -
Page 31: Lfe Sub
11.1, LFE Sub Height Left Height Center Height Right Size:M Size:M Size:M SUB L SUB R Subwoofer Left Center Right Subwoofer Left Wide Right Wide Left Size:XL Size:L Size:XL Right SUB LFE Subwoofer LFE Left Top Right Top Front Front Left Top Right Top Middle... - Page 32 Dolby Atmos and Auro-3D The system supports Dolby Atmos as well as Auro-3D. The speakers supported for those two systems are: Auro-3D: • HL (Height Left) • HC (Height Center) • HR (Height Right) • HLS (Height Left Surround) • HRS (Height Right Surround) •...
-
Page 33: Auro-3D Example: 11.1
Auro-3D Example: 11.1 If Dolby Atmos material is played on the above Auro-3D setup, the system will match the speakers, so the LTF/RTF channels are played through the HL/HR speakers and the LTR/RTR channels are played through the HLS/HRS speakers. The HC and TOP speakers will not be used. Height Left Height Center Height Right... -
Page 34: Dolby Atmos Example: 7.1.4
Dolby Atmos Example: 7.1.4 Height Left Height Center Height Right SUB L SUB R Subwoofer Subwoofer Left Wide Left Center Right Right Wide Left Right SUB LFE Subwoofer LFE Left Top Right Top Front Front Left Top Right Top Middle Middle Height Left Height Right... -
Page 35: Hybrid Auro-3D And Dolby Atmos Example
Hybrid Auro-3D and Dolby Atmos Example Height Left Height Center Height Right SUB L SUB R Subwoofer Subwoofer Left Wide Left Center Right Right Wide Left Right SUB LFE Subwoofer LFE Left Top Right Top Front Front Left Top Right Top Middle Middle Height Left... - Page 36 Notice that playback of Auro-3D material will not make use of Dolby-enabled speakers. Verify speakers Press the Verify Speakers button to verify your setup. Adjust Sub With the RoomPerfect™ microphone at the listening position, push “Start.” Adjust the volume according to the instruction and push “Next.” This will assist you in having the optimal level setting for the subs in order to have the correct RoomPerfect™...
-
Page 37: Roomperfect
The RoomPerfect™ microphone is a very sensitive and finely calibrated device which must be treated with utmost care. If the microphone has been dropped on the floor, it may be damaged. If this is the case, obtain a new microphone from your Lyngdorf Audio representative before performing the system calibration. -
Page 38: Roomperfect™ Preparations
Adjust Sub With an active subwoofer connected to the MP-50, this menu will guide you into setting the volume level on the subwoofer controls. Follow the instructions on the display to 1. Find the correct system volume to do the Subwoofer calibration 2. -
Page 39: Measuring The Focus Position
Volume Setting Press Enter and a test signal will start from the left speaker. The system will give an estimated optimal volume for calibrating the system or will accept the current volume. Adjust the volume if required and retry the measurement. The calibration volume should not be so loud that it is inconvenient to you, or that it causes damage to your loudspeakers. - Page 40 Side view of room • the microphone should not be closer than 0.5m/1.5ft from the floor, ceiling, and walls. • the microphone should be at least 1m/3ft from the front of the loudspeakers. • there should be at least 50cm/1.5ft between each measurement. •...
-
Page 41: Room Measurements Above 90% Roomknowledge
When room measurements are complete, the system will calculate the focus and global filters automatically. NOTE: We recommend that you ALWAYS take a backup of MP-50 settings after having performed a RoomPerfect™ calibration (see Manage Software in the Setup section) -
Page 42: Video Setup
Video Setup The Video Setup menu allows you to register the video system settings for the MP-50’s video inputs and outputs, which in turn dictates which video formats can be shown on the screen when these inputs and outputs are activated. -
Page 43: Video Input
Content Protection) • Sink – the MP-50 will look like a TV to the source. As some sources have very bad repeater support, they do not function properly with a processor like the MP-50, and this setting will bring the source to output a picture. -
Page 44: Audio Setup
This equalization is an addition to the RoomPerfect™ corrections. Voicings can be edited, deleted, added, or loaded in the MP-50. Editing and adding voicings In the web interface, you can edit or add a voicing by combining up to eight filter sections. For each section, you can choose between parametric or high and low shelves as well as high and low-pass filters. -
Page 45: System Configuration
Set a max volume for the device (dB). This setting is a safety precaution. • Set startup volume o Use last volume – Sets the volume to be the same as when the MP-50 was turned off. o Use fixed volume – Sets the default volume at startup. HDMI CEC settings Set enable CEC and use ARC channel as audio input to Off or On. -
Page 46: Trigger In Setup
Allows you to set up the system so that it can be switched on via an external device in the system. Trigger Out Setup Allows you to set up the system so that the MP-50 can control other devices in the system. Off – No action Source –... -
Page 47: Manage Software
When the backup is complete, the MP-50 will go into standby mode. Restore Restore the system from a backup. Factory Reset Restore the system to the default factory settings. Note: All user preference settings, system data, and RoomPerfect™ data are lost when the MP-50 is restored to the default settings. -
Page 48: Software Update
Please don’t unzip or change the name of the software file. Simply save it and upload it to the MP-50. If you are using a Mac, please right-click and “save as,” rather than downloading the file, to avoid automatic unzipping. -
Page 49: Troubleshooting
• Check the measuring signal volume. If none of these measures solve the error, request a replacement microphone from Lyngdorf Audio. Fault – Signal clipping Either the incoming signal has been classified as too loud, resulting in clipping or distortion, or a loud noise in the immediate environment has corrupted the measurement results. - Page 50 Restart the player to fix the problem. Remote Control Doesn´t Work The remote control is paired to the MP-50 at the factory; you need to pair it again only if you have a new MP-50 or remote. To pair the RF remote control to a MP-50: 1.
-
Page 51: Network Setup
Network Setup Connecting to MP-50 with a Network Cable It is possible to get access to the MP-50´s web interface via a direct cable connection between the MP-50 and a computer, or a connection via a hub or switch. If you have a direct cable connection to a laptop (with no switch or router between the two) the network cable must be a crossover type. - Page 52 Click Use the following IP address and enter the following: IP address: 192.168.1.2 Subnet mask: 255.255.255.0 Default gateway: 192.168.1.1 Click OK to close the configuration windows, and you should now be able to access the MP-50 via your Internet browser.
- Page 53 Click Use the Following IP address and enter the following: IP address: 192.168.1.2 Subnet mask: 255.255.255.0 Default gateway: 192.168.1.1 Click OK to close the configuration windows, and you should now be able to access the MP-50 via your Internet browser.
-
Page 54: Trademarks
HDBaseT™ and the HDBaseT Alliance logo are trademarks of the HDBaseT Alliance. Service Information In order to obtain warranty service, you must contact your original dealer or the Lyngdorf Audio distributor of the region or country where you are located.
Need help?
Do you have a question about the MP-50 and is the answer not in the manual?
Questions and answers