
Related Manuals for TSI Instruments HM685


Summary of Contents for TSI Instruments HM685
- Page 1 HYDRONIC MANOMETER MODEL HM685 OWNER’S MANUAL P/N 6006820, REVISION D FEBRUARY 2016...
- Page 3 HYDRONIC MANOMETER MODEL HM685 OWNER’S MANUAL P/N 6006820, REVISION D FEBRUARY 2016 SHIP TO/MAIL TO: E-mail address: TSI Incorporated answers@tsi.com 500 Cardigan Road Shoreview, MN 55126-3996 Website: http://www.tsi.com U.S. INTERNATIONAL Technical Support: Technical Support: (800) 874-2811/(651) 490-2811 (001 651) 490-2811...
-
Page 4: Manual History
M a n u a l H i s t o r y The following is a manual history of the Hydronic Manometer Model HM685 Owner’s Manual (P/N 6006820). Revision Date May 2013 January 2014 June 2015 February 2016 Hydronic Manometer Model HM685... -
Page 5: Warranty
W a r r a n t y Part Number 6006820 / Revision D / February 2016 Copyright ©TSI Incorporated / 2013–2016 / All rights reserved. Address TSI Incorporated / 500 Cardigan Road / Shoreview, MN 55126 / USA Fax No. 651-490-3824 E-mail Address answers@tsi.com... - Page 6 Officer of Seller. Trademarks CompuDat is a trademark of TSI Incorporated. TSI and the TSI logo are registered trademark of TSI Incorporated. Microsoft, Excel, Windows, and Vista are registered trademarks of Microsoft Corporation. Hydronic Manometer Model HM685...
-
Page 7: Table Of Contents
C o n t e n t s Manual History .................... ii Warranty ..................... iii About This Manual ..................ix Formatting and Typography ..............ix Technical Assistance—Help! ..............ix Safety Information ..................xi Labels ....................xi Description of Caution/Warning Symbols ..........xii Caution .................... - Page 8 Inputs ..................... 5-10 Output .................... 5-11 Pump Law Brake Power ..............5-12 Inputs ..................... 5-12 Output .................... 5-13 CHAPTER 6 Settings Menu..............6-1 Beeper ....................6-2 Select Units ..................6-2 Differential Pressure and Gauge Pressure ......... 6-3 Hydronic Manometer Model HM685...
- Page 9 Installing the USB Software ..............9-1 Connecting the Manometer to the Computer ........9-2 First Time Connection ..............9-2 Software Interface ................9-6 HM685 Data Download Steps ............9-7 HM680 Download Instructions ............9-9 Downloading Data ................9-10 APPENDIX A Specifications ..............A-1 APPENDIX B Compliance ..............
- Page 10 (This page intentionally left blank) viii Hydronic Manometer Model HM685...
-
Page 11: About This Manual
T e c h n i c a l A s s i s t a n c e — H e l p ! For technical assistance or questions about the instrument or this manual, or if the HM685 Hydronic Manometer needs repair or recalibration, call Technical Support at (651) 490-2811 or (800) 874-2811. - Page 12 (This page intentionally left blank) Hydronic Manometer Model HM685...
-
Page 13: Safety Information
S a f e t y I n f o r m a t i o n Carefully read each of the following safety warnings prior to using the HM685 Hydronic Manometer. This section gives instructions to promote safe and proper handling of the HM658 Hydronic Manometer. -
Page 14: Description Of Caution/Warning Symbols
HM685 Hydronic Manometer. W A R N I N G S Never use the HM685 Hydronic Manometer or accessories on potable water systems or other systems which may be used to convey fluids for human or animal consumption. - Page 15 C a u t i o n s Never use the HM685 Hydronic Manometer to measure the pressure of volatile, flammable, or otherwise hazardous fluids or gasses. The instrument is not designed to be intrinsically safe, nor is it designed for use with caustic or corrosive chemicals.
- Page 16 (This page intentionally left blank) Hydronic Manometer Model HM685...
-
Page 17: Chapter 1 Introduction
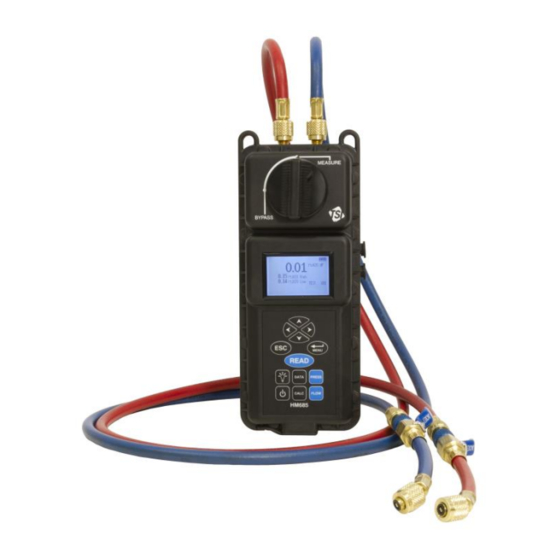
C H A P T E R 1 I n t r o d u c t i o n The HM685 Hydronic Manometer is an easy-to-use instrument designed for the accurate measurement of pressure and calculation of flow in non- potable water and air systems. -
Page 18: Instrument Description
I n s t r u m e n t D e s c r i p t i o n The HM685 Hydronic Manometer includes: Meter (2) ¼” Flare male × AC adapter ¼” male NPT ... -
Page 19: Unpacking
4 in. (10 cm) long, 0.125 in. (3.175 mm) dia. Temperature probe 801290 External battery charger with (4) AA NiMH batteries (USA only) 801093 Please register your HM685 promptly through our website at http://register.tsi.com. Registration of your product allows us to notify you of product updates. Introduction... - Page 20 (This page intentionally left blank) Hydronic Manometer Model HM685...
-
Page 21: Keypad
Press the PRESS key from the Flow Measurement screen to access the Pressure Measurement screen. Press the key to turn the HM685 Hydronic Manometer on or off. Pressing the CALC key from either the Pressure or Flow CALC Measurement screens provides access to the Calculations Menu. -
Page 22: Powering The Instrument
P o w e r i n g t h e I n s t r u m e n t The HM685 Hydronic Manometer is equipped to power either by four (4) AA-size batteries (alkaline or rechargeable NiMH) or the AC adapter. - Page 23 5. Set the battery-type selection switch to indicate the type of batteries to be used (alkaline or rechargeable NiMH). Battery Type Selection Switch Figure 2-1 Location of Battery-Type Selection Switch W A R N I N G Do not use Lithium batteries in this instrument. Fire, explosions, or other hazards may result.
-
Page 24: Battery Charging
Never use Alkaline and NiMH batteries together on the same instrument. The HM685 Hydronic Manometer allows for internal charging of AA-size type NiMH (only) batteries. Charging of the batteries is initiated as follows: 1. Turn the manometer off and locate the battery cover on the back of the unit. -
Page 25: Instrument Start-Up
I n s t r u m e n t S t a r t - u p Upon turning the HM685 Hydronic Manometer on, the meter engages in a brief self-check while displaying the serial number, model number, and revision of the instrument being used. -
Page 26: Zeroing The Differential Pressure Sensor
Zeroing the Differential Pressure Sensor To ensure the most accurate differential pressure (dP) measurements and calculated flow (Flow) values, the HM685 differential pressure sensor should be zeroed prior to taking readings on each new system. The differential pressure sensor is zeroed as follows: 1. -
Page 27: Connecting The Manometer To The Test Points
C o n n e c t i n g t h e M a n o m e t e r t o t h e T e s t P o i n t s Attaching the Hoses to the Manometer 1. -
Page 28: Attaching The Hoses To The Test Points
P e r f o r m i n g P r e s s u r e M e a s u r e m e n t s The HM685 Hydronic Manometer allows for simultaneous measurement and display of the High-side gauge and Differential pressure. The calculated Low-side gauge pressure is also displayed. -
Page 29: Continuous Pressure Measurements
±300 psi (±2068 kPa). Continuous Pressure Measurements The HM685 Hydronic Manometer continuously measures and displays pressure readings whenever the manometer is in the Pressure Measurement or Flow Measurement screen, with the exception of when the READ key is pressed. -
Page 30: Performing Flow Measurements
P e r f o r m i n g F l o w M e a s u r e m e n t s The HM685 Hydronic Manometer allows for continuous calculation and display of flow. While in the Flow Measurement screen, the manometer... -
Page 31: Continuous Flow Measurements
P e r f o r m i n g T e m p e r a t u r e M e a s u r e m e n t s The HM685 Hydronic Manometer accessory temperature probe is a 1/8”... -
Page 32: Setting Units Of Measure
2. Allow the manometer to stand undisturbed until the reading is complete (time of completion is dependent on the time constant setting). Note: Discrete measurements stored from the Pressure Measurement screen will not contain flow data. 2-12 Hydronic Manometer Model HM685... -
Page 33: Disconnecting The Manometer From The Test Points
Water spray associated with purging or disconnecting hoses presents a potential risk of damage to such equipment. Thoroughly drain and dry the HM685 Hydronic Manometer hoses and internal piping after each use. This will help in limiting the potential for growth of hazardous microorganisms. - Page 34 (This page intentionally left blank) 2-14 Hydronic Manometer Model HM685...
-
Page 35: Zero Gauge Pressure
C H A P T E R 3 M a i n M e n u The Main Menu is accessed by pressing the ENTER key from either the Pressure or Flow Measurement screens. Z e r o G a u g e P r e s s u r e Zero Gauge Pressure zeros the manometer’s gauge pressure sensor. -
Page 36: Flow Setup
Within Flow Setup 100 user-programmed valve flow coefficients (Cv or Kv) that are stored within the instrument are selectable. The most recent selected Cv (Kv) factor is the default when entering the Flow Measurement screen. Hydronic Manometer Model HM685... -
Page 37: Select Factor Type
Select Factor Type Enter Cv/Kv Value A known Cv/Kv Value is required of the measured valve to obtain accurate flow readings. Main Menu... -
Page 38: Edit Cv/Kv Name
100 stored Cv (Kv) values. To leave the edit mode and resume using your originally selected Cv (Kv) value, press the ESC key. The edit mode is also canceled whenever you enter the Flow Setup menu. Hydronic Manometer Model HM685... -
Page 39: Select Fluid
Select Fluid Defines the fluid for the manometer to account for the fluid’s specific gravity when calculating flow. The fluid type of the system being measured is Water or Other. Water Select Water to automatically determine the specific gravity based upon the measured temperature of the fluid (Tprobe). Note: If the accessory temperature probe is not connected, the user will have the option of manually entering the fluid temperature (T-entered). - Page 40 Entered Temperature Hydronic Manometer Model HM685...
-
Page 41: Menu
Access the Data Logging Menu by pressing the DATA key from either the Pressure or Flow Measurement screens or from the Main Menu. L o g M o d e The HM685 is programmable to store measurement to memory in the following logging formats: ... -
Page 42: Log Settings
Note: It is recommended that the logging interval must be set at a time period that is greater than or equal to the current setting of the time constant. Hydronic Manometer Model HM685... -
Page 43: Choose Test
Choose Test Use the Choose Test screen to choose the Test where the samples (readings) will be stored. N a m e T e s t Name Test screen allows customizing the Test ID name of the selected test using 10 characters maximum. Use the arrow keys to move the cursor to a desired location, press Enter to accept. -
Page 44: Choose Test
Displays the total number of readings to be stored as part of the continuous unattended data logging. Note: The instrument can store a maximum of 4000 different samples. These samples can be distributed over one or all of the available Test IDs. Hydronic Manometer Model HM685... -
Page 45: Delete Data
D e l e t e D a t a Delete discrete samples, an entire Test ID, or all data stored to the instrument at this menu. Note: Deleted data cannot be retrieved. Delete All Delete all samples stored to the instrument, as well as restoring the factory set default names to each of the Test IDs. -
Page 46: % M E M O R Y
% M e m o r y % Memory displays the total memory available. Delete All, under Delete Data, clears memory and resets to 100 percent. Hydronic Manometer Model HM685... - Page 47 C H A P T E R 5 C a l c u l a t i o n s M e n u The HM685 Hydronic Manometer is capable of performing a variety of calculations useful in evaluating hydronic system performance. The Calculations Menu is accessed by pressing the CALC key from either the Pressure or Flow Measurement screens.
- Page 48 READ key. The field will begin updating with measured values of differential pressure. Press the READ key again to discontinue real-time updates. Press READ button to auto calculate differential pressure Hydronic Manometer Model HM685...
-
Page 49: Chapter 5 Calculations Menu
Efficiency The pump efficiency (as a percent). Notes: The pump efficiency should be provided by the manufacturer. If the pump efficiency is not known, allowing for an efficiency factor of 70 % is a good rule-of-thumb. Power Units The calculated pump brake power (BP) automatically updates as the input parameters are changed. -
Page 50: Inputs
Note: The flow rate through the device can be entered as a real-time measurement. With the value for flow highlighted, press the READ key. The field will begin updating with calculated values of flow. Press the READ key again to discontinue real-time updates. Hydronic Manometer Model HM685... - Page 51 Specific Heat The specific heat of the system fluid. Note: The unit of measure for specific heat is driven by that selected for heat flow as follows: Heat flow in Btu/hr → specific heat in Btu/lb°F Heat flow in W or kW → specific heat in kJ/kg°C The default specific heat is that of water: 1.00 Btu/lb°F (4.19 kJ/kg°C) Specific Gravity...
-
Page 52: Calculating Cv/Kv
Available units for heat flow are: Btu/hr, W, and kW. C a l c u l a t i n g C v / K v This Calculations Menu option allows for determination of a valve flow coefficient (Cv or Kv). Differential Pressure Flow Coefficient Hydronic Manometer Model HM685... - Page 53 Inputs The following inputs are necessary for calculating the flow coefficient. Use the ▲ and ▼ keys to select the parameter to be updated, and the ◄ and ► keys to change the value of the highlighted field. Units for the inputs are driven by what was last set in the Pressure and Flow Measurement screens.
-
Page 54: Inputs
◄ and ► keys to change the value of the highlighted field. Units for the inputs are driven by what was last set in the Flow Measurement screen (with the exception of impeller diameter). Flow1 The actual system flow rate. Hydronic Manometer Model HM685... - Page 55 Diam1 The actual pump impeller diameter. Flow2 The desired system flow rate. Impeller Dia Units The impeller diameter in inches or millimeters. Output The calculated required impeller diameter (Diam2) to achieve the desired flow will automatically update as the input parameters are changed. Using the ▲...
-
Page 56: Inputs
◄ and ► keys to change the value of the highlighted field. Units for the inputs are driven by what was last set in the Pressure and Flow Measurement screens. Flow1 The actual system flow rate. 5-10 Hydronic Manometer Model HM685... -
Page 57: Output
The actual pump pressure drop. Flow2 The desired system flow rate. Output The calculated required pump pressure drop (dP2) to achieve the desired flow will automatically update as the input parameters are changed. The units for pump pressure drop are driven by what was last set in the Pressure and Flow Measurement screens. -
Page 58: Inputs
◄ and ► keys to change the value of the highlighted field. Units for the inputs are driven by what was last set in the Pressure and Flow Measurement screens (with the exception of brake power). Flow1 The actual system flow rate. 5-12 Hydronic Manometer Model HM685... -
Page 59: Output
The actual pump brake power. Flow2 The desired system flow rate. Output The calculated required pump brake power (BP2) to achieve the desired flow will automatically update as the input parameters are changed. Using the ▲ and ▼ keys to scroll, and the ◄ and ► keys to change the selected field, the unit of measure for pump brake power may be adjusted. - Page 60 (This page intentionally left blank) 5-14 Hydronic Manometer Model HM685...
-
Page 61: Chapter 6 Settings Menu
C H A P T E R 6 S e t t i n g s M e n u The Settings menu allows customization of the instrument display. General settings include: Beeper Select Units Differential Pressure and Gauge Pressure ... -
Page 62: Beeper
Disable provides no audible beep S e l e c t U n i t s Select Units adjusts the format of the delimiter in both displayed and stored data for differential pressure, gauge pressure, flow, and temperature. Hydronic Manometer Model HM685... -
Page 63: Differential Pressure And Gauge Pressure
D i f f e r e n t i a l P r e s s u r e a n d G a u g e P r e s s u r e Highlight either differential pressure or gauge pressure and press the Enter key. -
Page 64: Temperature
Example: with the time constant equal to ten (10) seconds, the displayed reading represents the average of measurements taken over the previous ten (10) seconds. Increasing the time constant will serve to improve measurement stability, particularly when measuring systems with fluctuating pressures. Hydronic Manometer Model HM685... -
Page 65: Contrast
C o n t r a s t The Contrast menu allows contrast adjustment to the manometer display based on the surrounding lighting environment. Setting selections range from 0 to 10. The higher the settings number, the darker the contrast of the display. -
Page 66: Set Date
Press the Enter key to confirm. T i m e F o r m a t The time format displays the time in a 12 or 24 hour format. Hydronic Manometer Model HM685... -
Page 67: Date Format
D a t e F o r m a t Three date settings are selectable based on user preference and include: Month/Date/Year Date/Month/Year Year/Month Date N u m b e r F o r m a t Settings Menu... -
Page 68: Backlight
(30) minutes. Shutoff options include: Disable (instrument does not power off after inactivity) Enable (instrument powers off after 30 minute inactivity) Note: The automatic shutoff feature is disabled whenever data logging is active. Hydronic Manometer Model HM685... -
Page 69: Chapter 7 Calibration
C H A P T E R 7 C a l i b r a t i o n On the calibration screen, the user can either adjust the factory calibration value so their measurements meet another standard or can restore factory calibration settings to the instrument in case they believe the calibration of the instrument has changed. -
Page 70: Calibration Differential Pressure And Calibration Gauge Pressure
Example - If the user determines that differential pressure is reading 2.3% too low, they enter a Span Factor of 1.023 and afterward all differential pressure values will be multiplied by 1.023. Hydronic Manometer Model HM685... -
Page 71: Calibration Temperature 1 And 2
C a l i b r a t i o n T e m p e r a t u r e 1 a n d 2 The temperature User Offset is added to temperature measurements to yield the displayed temperature value. Example - If the user determines that temperature probe 1 is reading 0.5°C too high, they enter a User Offset of -0.5°C and afterward all temperature values from probe 1 will be shifted down by 0.5°C... - Page 72 (This page intentionally left blank) Hydronic Manometer Model HM685...
-
Page 73: Routine Maintenance
M a i n t e n a n c e a n d Tr o u b l e s h o o t i n g The HM685 Hydronic Manometer has been designed to provide long-term field use with minimum required maintenance. As with any precision electronic device, proper care, maintenance, and handling will ensure its accurate and reliable operation. -
Page 74: In-Line Flow Restrictor
4. Turn the valve handle on the manometer to the MEASURE position. 5. Hold the manometer with the pressure ports directed downward to allow liquid to drain from the unit. Note: The HM685 Hydronic Manometer should be stored with the valve handle in the MEASURE position. In-Line Flow Restrictor The blue and red hose assemblies include flow restrictors. -
Page 75: Calibration
C a l i b r a t i o n TSI recommends that the HM685 Hydronic Manometer receive an annual calibration. TSI will verify calibration of the instrument and re-issue a certificate of calibration with traceability to NIST. This “annual checkup”... - Page 76 & date format, decimal setting (commas or periods), beeper enable setting and auto power-down setting "Saved Pressure Zero” There was a problem with a pressure zero reading read from memory. Differential pressure and gauge pressure should both be re-zeroed. Hydronic Manometer Model HM685...
-
Page 77: Technical Contacts
52068 Aachen GERMANY Telephone: +49 241-52303-0 Fax: +49 241-52303-49 E-mail: tsigmbh@tsi.com Web: www.tsiinc.de TSI Instruments Ltd. Stirling Road Cressex Business Park High Wycombe, Bucks HP12 3ST UNITED KINGDOM Telephone: +44 (0) 149 4 459200 Fax: +44 (0) 149 4 459700 E-mail: tsiuk@tsi.com... - Page 78 (This page intentionally left blank) Hydronic Manometer Model HM685...
-
Page 79: Installing The Usb Software
C H A P T E R 9 U S B D o w n l o a d i n g t o a C o m p u t e r The HM685 Hydronic Manometer allows for downloading of stored data to ® –USB ™... -
Page 80: Connecting The Manometer To The Computer
C o n n e c t i n g t h e M a n o m e t e r t o t h e C o m p u t e r The HM685 Hydronic Manometer is connected to the computer using the provided USB interface cable. The meter must be powered on in order to properly establish communication. - Page 81 Figure 9-2 Windows 7 Found New Hardware Wizard ® ® 2. Click Continue Anyway for Windows XP system. Windows 7 system will install the driver automatically. Figure 9-3 Hardware Installation USB Downloading to a Computer...
- Page 82 ® 3. Click Finish for Windows XP system. No action needed for ® Windows 7 system. Figure 9-4 Completing the Found New Hardware Wizard Figure 9-5 Windows 7 Installation Notification Hydronic Manometer Model HM685...
- Page 83 4. Verify that the meter driver has installed successfully by checking the device manager. Go to Device Manager using the following steps: a. Click on the Windows Start button. b. Go to Control Panel, then Administrative Tools then select Computer Management c.
-
Page 84: Software Interface
S o f t w a r e I n t e r f a c e With the HM685 meter connected to the computer, double-click on the CompuDat-USB 2.0 icon on computer’s desktop. All downloadable data stored to the instrument will be presented in a form similar to as follows: When launching the software with more than one supported meter connected, the following screen appears. -
Page 85: Hm685 Data Download Steps
Download All button to download all tests. 3. The following screen is shown when downloading starts. Figure 9-9 HM685 Download Test Data Screen 4. When download finishes, a dialog similar to the following appears. Figure 9-10 HM685 Data Download Screen 5. - Page 86 Figure 9-11 HM685 Download Test Screen 7. Test/tests will be saved to one file. Hydronic Manometer Model HM685...
-
Page 87: Hm680 Download Instructions
8. If HM680 is selected and OK is clicked, the screen shown below will display. Follow instructions for downloading data from HM680. Figure 9-12 HM680 USB Folders and Files HM680 Download Instructions The All TestIDs file contains all data stored to each of All TestIDs the instrument’s 100 available Test IDs. -
Page 88: Downloading Data
TSI recommends that you do not save data files in the C:\Program ® Files directory when running on a Windows 7 operating system in a multi-user environment. 9-10 Hydronic Manometer Model HM685... - Page 89 A P P E N D I X A S p e c i f i c a t i o n s Model HM685 Hydronic Manometer specifications are as follows (specifications are subject to change without notice). Range Differential Pressure ....
- Page 90 (Cv or Kv), and fluid specific gravity. Accuracy statement applies from -15 to 250 psi (-103 to 1724 kPa). The minimum battery life stated will occur after the NiMH batteries have been recharged 2 to 3 times after initial charge. Hydronic Manometer Model HM685...
- Page 91 A P P E N D I X B C o m p l i a n c e CE Marking EN61326 / EN 55011, Class B: Radiated Emissions EN61326 / EN 55011, Class B: Conducted Emissions EN61000-4-2: Electrostatic Discharge Immunity EN61000-4-3: Electromagnetic Field Immunity EN61000-4-4: Burst Immunity EN61000-4-5: Surge Immunity...
- Page 92 (This page intentionally left blank) Hydronic Manometer Model HM685...
- Page 93 TSI Incorporated – Visit our website www.tsi.com for more information. Tel: +1 800 874 2811 India Tel: +91 80 67877200 Tel: +44 149 4 459200 China Tel: +86 10 8219 7688 France Tel: +33 1 41 19 21 99 Singapore Tel: +65 6595 6388 Germany Tel: +49 241 523030...
Need help?
Do you have a question about the HM685 and is the answer not in the manual?
Questions and answers