
Related Manuals for Varian TriScroll 300 Series


Summary of Contents for Varian TriScroll 300 Series
- Page 1 vacuum technologies TriScroll MAJOR MAINTENANCE MANUAL Series Dry Scroll Vacuum Pump Manual No. 699904260 Revision H May 2004...
- Page 2 ™ TriScroll 300 Series Dry Scroll Vacuum Pump TriScroll is a trademark of Vacuum Technologies. Loctite and PST are registered trademarks of Loctite Corporation. Krytox, Teflon and Viton are registered trademarks of E. I. du Pont de Nemours and Company. Copyright 2004 Vacuum Technologies...
-
Page 3: Table Of Contents
TriScroll 300 Dry Scroll Vacuum Pump Table of Contents Declaration of Conformity Inboard Housing Assembly ....35 Inboard Housing Exploded View ... . 35 Preface . - Page 4 TriScroll 300 Dry Scroll Vacuum Pump This page intentionally left blank.
-
Page 5: Declaration Of Conformity
Declaration of Conformity Declaration of Conformity Konformitätserklärung Déclaration de Conformité Declaración de Conformidad Verklaring de Overeenstemming Dichiarazione di Conformità Varian, Inc. Vacuum Technologies Nous 121 Hartwell Avenue Nosotros Lexington, MA, 02421-3133 USA declare under our sole responsibility that the product, erklären, in alleniniger Verantwortung, daß... -
Page 6: Preface
TriScroll 300 Dry Scroll Vacuum Pump Preface This manual provides the information you need to successfully perform scheduled maintenance on your Vacuum Technologies TriScroll Dry Vacuum Pump. The time to perform major rebuild is typically 18,000 hours. If you have questions that are not addressed in this manual, please contact the nearest Vacuum Technologies service facility listed on the rear cover of this manual. - Page 7 TriScroll 300 Dry Scroll Vacuum Pump All warnings and cautions must be read carefully, fully understood, and strictly observed. Consult local, state/province, and national agencies regarding specific requirements and regulations. Address any safety, operation, and/or maintenance questions to the nearest Vacuum Technologies location. WARNING Disconnect power from the TriScroll 300 before performing any mainte- nance procedure.
-
Page 8: Related Triscroll Manuals
TriScroll 300 Dry Scroll Vacuum Pump Related TriScroll Manuals Manuals related to the installation and operation, tip seal and pump module replacement for TriScroll 300 series pumps are listed in the following table: Title Applicable TriScroll Model Part Number Pump Module Replacement... -
Page 9: Factory Service Options
Service/Rebuild TriScroll 310 Pump Module Only PTS0310SCRP Serial Number Notes This manual applies to TriScroll 300 series with serial numbers beginning with LP, and ascending from LPB80124. For service on TriScroll series pumps with serial numbers J7000001 to A8000108, contact your nearest Varian, Inc. office. - Page 10 TriScroll 300 Dry Scroll Vacuum Pump This page intentionally left blank.
-
Page 11: Major Maintenance
Major Maintenance General Information Vacuum Technologies TriScroll 300 series pumps are designed to provide years of trouble-free service if maintenance procedures and intervals are observed. Bearing grease replenishment and tip seal replacement are recommended when the pump base pressure has risen to an unacceptably high level for your application. -
Page 12: Maintenance Tool Kit
TriScroll 300 Dry Scroll Vacuum Pump Maintenance Tool Kit... - Page 13 TriScroll 300 Dry Scroll Vacuum Pump Maintenance Tool Kit (continued)
-
Page 14: Major Maintenance Tool Kit
TriScroll 300 Dry Scroll Vacuum Pump Major Maintenance Tool Kit Nylon Sleeve Shaft Seal 24x32x4... - Page 15 TriScroll 300 Dry Scroll Vacuum Pump Major Maintenance Tool Kit (continued) TS-300 O-rings O-ring Inside Cross-Section Part Number Quantity Diameter (in.) (in.) 2-016 0.614 0.070 2-111 0.424 0.103 2-115 0.674 0.103 2-118 0.862 0.103 2-121 1.049 0.103 2-137 2.050 0.103 2-152 3.237 0.103...
-
Page 16: Tip Seal Tool Kit
TriScroll 300 Dry Scroll Vacuum Pump Tip Seal Tool Kit... -
Page 17: Triscroll 300 Disassembly
TriScroll 300 Dry Scroll Vacuum Pump TriScroll 300 Disassembly Remove and Disassemble the Outboard Housing 1. Remove the three M5x16 screws that attach the cowling to the module. 2. Remove the cowling. 3. Remove the six M5x22 screws that attach the outboard cover to outboard housing. - Page 18 TriScroll 300 Dry Scroll Vacuum Pump TriScroll 300 Disassembly (continued) 4. Remove the outboard cover. 5. Remove and discard the O-ring. 6. Remove the six M5x10 screws that attach the three sync crank covers to the outboard housing.
- Page 19 TriScroll 300 Dry Scroll Vacuum Pump TriScroll 300 Disassembly (continued) 7. Remove the sync crank covers. 8. Remove and discard the O-rings. 9. Remove the two M5x16 screws that attach the intake clamp to the outboard housing.
- Page 20 TriScroll 300 Dry Scroll Vacuum Pump TriScroll 300 Disassembly (continued) 10. Remove the intake clamp and intake fitting. 11. Remove and discard the O-ring. 12. Remove the six M6x45 screws that attach the outboard housing to inboard housing. 13. Remove the outboard housing.
- Page 21 TriScroll 300 Dry Scroll Vacuum Pump TriScroll 300 Disassembly (continued) 14. Remove and discard the O-ring. 15. Remove and discard the three sync crank assemblies.
- Page 22 TriScroll 300 Dry Scroll Vacuum Pump TriScroll 300 Disassembly (continued) 16. Remove and discard the tip seals from the outboard housing.
-
Page 23: Remove And Disassemble The Orbiting Plate
TriScroll 300 Dry Scroll Vacuum Pump TriScroll 300 Disassembly (continued) Remove and Disassemble the Orbiting Plate 17. Remove the snap ring that is holding the orbiting cup in the orbiting plate. 18. Remove the orbiting cup. 19. Remove and discard the O-ring. - Page 24 TriScroll 300 Dry Scroll Vacuum Pump TriScroll 300 Disassembly (continued) 20. Use the locking nut wrench to hold the locking nut. 21. Loosen the four M4x12 screws in the locking nut. 22. Remove the locking nut.
- Page 25 TriScroll 300 Dry Scroll Vacuum Pump TriScroll 300 Disassembly (continued) 23. Remove the orbiting plate from the crankshaft. 24. Remove and discard the tip seals from both sides of the orbiting plate.
- Page 26 TriScroll 300 Dry Scroll Vacuum Pump TriScroll 300 Disassembly (continued) 25. Remove the six M5x5 set screws from the orbiting plate. Set screws are held in with NOTE Loctite. 26. Remove the three snap rings holding the needle bearings and shaft seals in the orbiting plate.
- Page 27 TriScroll 300 Dry Scroll Vacuum Pump TriScroll 300 Disassembly (continued) 27. Push out and discard the three needle bearings and shaft seals. 28. Remove and discard the six O-rings from the three sync bearing bores in the orbiting plate.
- Page 28 TriScroll 300 Dry Scroll Vacuum Pump TriScroll 300 Disassembly (continued) WARNING This step requires the use of heat resistant gloves. Do not proceed without them! 29. Heat the orbiting plate for a minimum of 1 hour in a 350 F oven. 30.
- Page 29 TriScroll 300 Dry Scroll Vacuum Pump TriScroll 300 Disassembly (continued) The parts removed from the orbiting plate are: ➀ Wave washer ➁ Nylon sleeve ➂ 7305WN SU bearing ➃ J9104P bearing ➄ Orbiting spacer 31. Allow the orbiting plate to air cool until it can be handled with bare hands.
- Page 30 TriScroll 300 Dry Scroll Vacuum Pump TriScroll 300 Disassembly (continued) 33. Remove and discard the tip seal from the inboard housing.
-
Page 31: Remove And Disassemble The Inboard Housing
TriScroll 300 Dry Scroll Vacuum Pump TriScroll 300 Disassembly (continued) Remove and Disassemble the Inboard Housing 1. Remove the four M6x16 screws that attach the inboard housing to the frame. 2. Remove the inboard housing from the frame. - Page 32 TriScroll 300 Dry Scroll Vacuum Pump TriScroll 300 Disassembly (continued) 3. Remove the M8x12 screw and washer that attach the fan assembly to the crankshaft, then remove the fan assembly. 4. Remove the three M5x10 screws that hold the seal housing to the inboard housing.
- Page 33 TriScroll 300 Dry Scroll Vacuum Pump TriScroll 300 Disassembly (continued) 5. Remove the seal housing. 6. Remove and discard the O-rings and the shaft seal from seal housing. 7. Remove the shaft seal spacer from the crankshaft.
- Page 34 TriScroll 300 Dry Scroll Vacuum Pump TriScroll 300 Disassembly (continued) 8. Push the crankshaft out of the inboard housing. 9. Remove the key from slot in the crankshaft. 10. Remove and discard the O-ring from the crankshaft. 11. Remove the two pipe plugs from the inboard housing.
- Page 35 TriScroll 300 Dry Scroll Vacuum Pump TriScroll 300 Disassembly (continued) 12. Remove the snap ring that is holding the check valve plug in the inboard housing. 13. Remove the check valve plug by installing an M4 screw and then pulling out the plug. 14.
- Page 36 TriScroll 300 Dry Scroll Vacuum Pump TriScroll 300 Disassembly (continued) 15. Using the hemostat pliers, remove the two check valves, two small springs, one large spring, two plunger guides and one spacer from the port in the inboard housing. 16. Remove the snap ring that is holding the exhaust fitting in the inboard housing.
- Page 37 TriScroll 300 Dry Scroll Vacuum Pump TriScroll 300 Disassembly (continued) 17. Remove the exhaust fitting. 18. Remove and discard the O-ring. NOTE The next step applies to all models except the 310. 19. Using the hemostat pliers, remove the large spring, plunger guide, small spring and check valve from the exhaust port in the inboard housing.
- Page 38 TriScroll 300 Dry Scroll Vacuum Pump TriScroll 300 Disassembly (continued) The parts removed from the exhaust are: ➀ Large spring ➁ Plunger guide ➂ Small spring ➃ Check valve WARNING This step requires the use of heat resistant gloves. Do not proceed without them! 20.
- Page 39 TriScroll 300 Dry Scroll Vacuum Pump TriScroll 300 Disassembly (continued) 21. Immediately after removing the inboard housing from oven, remove the two bearings, bearing spacer and wave washer from inboard housing. 22. Use the main bearing extractor tool to push bearings out if the bearings do not fall out.
- Page 40 TriScroll 300 Dry Scroll Vacuum Pump TriScroll 300 Disassembly (continued) 23. Allow the inboard housing to air cool until it can be handled with bare hands. 24. Remove and discard the shaft seal from the inboard housing. 25. Carefully scrape with a chisel to loosen the tip seal dust from the orbiting plate, inboard and outboard housing.
-
Page 41: Crankshaft Assembly
TriScroll 300 Dry Scroll Vacuum Pump Crankshaft Assembly Crankshaft Exploded View Callout Part Number Description Quantity ➀ ® 2-115 Viton O-ring ➁ 7305WN SU Bearing ➂ S4770001 VDS4- Bearing Spacer ➄ S4769001 Wave Washer - Crank ➅ 7205W SU Bearing ➆... -
Page 42: Assemble The Crankshaft
TriScroll 300 Dry Scroll Vacuum Pump Assemble the Crankshaft Tools required: ❑ Allen wrench ❑ Bearing pre-load tool ❑ Arbor press ❑ Krytox GPL 224 grease, included in maintenance kit Locate the following parts shown in the photo to the left: ➀... - Page 43 TriScroll 300 Dry Scroll Vacuum Pump Assemble the Crankshaft (continued) 2. Install 7205W SU bearing on crankshaft. Observe Proper Orientation Toward Wave Washer 3. Install bearing spacer on crankshaft. Observe Proper Orientation 4. Install 7305WN SU bearing on crankshaft. Observe Proper Orientation Toward Wave Washer...
- Page 44 TriScroll 300 Dry Scroll Vacuum Pump Assemble the Crankshaft (continued) O-RING 5. Lightly grease the O-ring and install it in the groove on the crankshaft. 6. Install the key in the slot. 7. Install the seal spacer over the O-ring. 8.
-
Page 45: Inboard Housing Assembly
TriScroll 300 Dry Scroll Vacuum Pump Inboard Housing Assembly Inboard Housing Exploded View... - Page 46 TriScroll 300 Dry Scroll Vacuum Pump Quantity PTS03101UNIV, PTS03001UNIV, PTS03103UNIV PTS03003UNIV Callout Part Number Description NSS* Snap Ring N500-62 S4735001 VDS4- Check Valve Plug O-ring, Viton 2-111 S4737001 VDS4- Check Valve Spacer S4723001 VDS4- Check Valve Assembly 660285573 Spring, S/S, .18 OD x .75 L x .014 Wire OD S4720001 VDS4- Plunger Guide 660285565...
- Page 47 TriScroll 300 Dry Scroll Vacuum Pump Quantity PTS03101UNIV, PTS03001UNIV, PTS03103UNIV PTS03003UNIV Callout Part Number Description O-ring, Viton 2-205 NSS* Snap Ring, N5000-75 Shaft Seal, 32mm x 42mm x 4mm NSS* VDS4- Crankshaft Assembly S4727001 VDS4- Seal Spacer O-ring, Viton 2-152 S4712001 VDS4- Seal Housing NSS*...
-
Page 48: Inboard Housing Assembly
TriScroll 300 Dry Scroll Vacuum Pump Inboard Housing Assembly Insert the Shaft Seal Tools required: ❑ Arbor press ❑ Seal installation tool ❑ Krytox GPL 224 grease Locate the following parts shown in the photos to the left: ➀ Shaft seal, 32x42x4, included in maintenance kit ➁... - Page 49 TriScroll 300 Dry Scroll Vacuum Pump Inboard Housing Assembly (continued) 1. Using Krytox GPL 224, grease the inner diameter of the shaft seal between its lips. 2. Using the seal insertion tool, press the shaft seal (32x42x4) into the bore of inboard housing from the fin side.
-
Page 50: Insert The Crankshaft
TriScroll 300 Dry Scroll Vacuum Pump Inboard Housing Assembly (continued) Insert the Crankshaft Tools required: ❑ Cooling stand ❑ Gloves Locate the following items: ❑ Crankshaft assembly ❑ Inboard housing WARNING This step requires the use of heat resistant gloves. Do not proceed without them! 1. - Page 51 TriScroll 300 Dry Scroll Vacuum Pump Inboard Housing Assembly (continued) WARNING Assembly is hot. Use heat resistant gloves for this step. 2. Immediately after removing the inboard housing from oven, push the crankshaft assembly into the inboard housing, external threads first. 3.
-
Page 52: Insert The Seal Housing
TriScroll 300 Dry Scroll Vacuum Pump Inboard Housing Assembly (continued) Insert the Seal Housing Tools required: ❑ Allen wrench ❑ Seal installation tool ❑ Krytox GPL 224 grease ® ❑ Locite Locate the following parts shown in the photo on the left: ➀... - Page 53 TriScroll 300 Dry Scroll Vacuum Pump Inboard Housing Assembly (continued) 2. Press the shaft seal into the seal housing. Observe Proper Orientation 3. Using Krytox GPL 224, grease the inner diameter of the shaft seal between lips. 4. Remove the screw, washer and bearing pre-load tool from crankshaft.
- Page 54 TriScroll 300 Dry Scroll Vacuum Pump Inboard Housing Assembly (continued) 7. Secure the seal housing to the inboard housing with three M5x10 screws. 8. Tighten the screws to 75 in-lb. CAUTION Avoid damage to the seal. Carefully rocking the seal housing onto the crank- shaft will avoid damage to the seal during installation.
-
Page 55: Install The Vents And Plugs
TriScroll 300 Dry Scroll Vacuum Pump Inboard Housing Assembly (continued) Install the Vents and Plugs Tools required: ❑ 14 mm wrench ❑ Loctite PST 567 pipe sealant, included in maintenance kit Locate the following parts: ➀ Breather Vent, PTS03001UNIV and PTS03003UNIV, 1 required ➁... - Page 56 TriScroll 300 Dry Scroll Vacuum Pump Inboard Housing Assembly (continued) PTS03001UNIV and PTS03003UNIV only 1. Apply a small amount of Loctite PST 567 pipe sealant to the first few threads of breather vent. 2. Insert and tighten the breather vent into the air ballast port.
-
Page 57: Exhaust Port Reassembly
TriScroll 300 Dry Scroll Vacuum Pump Inboard Housing Assembly (continued) Exhaust Port Reassembly PTS03001UNIV and PTS03003UNIV only Tools required: ❑ Right angle snap ring pliers ❑ Krytox GPL 224 grease Locate the following parts: ➀ Spring, large ➁ Plunger guide ➂... - Page 58 TriScroll 300 Dry Scroll Vacuum Pump Inboard Housing Assembly (continued) PTS03001UNIV and PTS03003UNIV only ❑ Insert the larger spring into the exhaust port, pushing against the plunger guide. PTS03101UNIV and PTS03103UNIV only Tools required: ❑ Right angle snap ring pliers ❑...
-
Page 59: Bypass Port Reassembly
TriScroll 300 Dry Scroll Vacuum Pump Inboard Housing Assembly (continued) 3. Push the exhaust fitting into the exhaust port and against the spring. 4. Secure it by inserting the snap ring into the groove in the exhaust port. Bypass Port Reassembly Tools required: ❑... - Page 60 TriScroll 300 Dry Scroll Vacuum Pump Inboard Housing Assembly (continued) 5. Place the small spring onto the plunger guide. 6. Place the check valve onto the plunger guide. 7. Insert the check valve assembly, check valve first, into the exhaust port on the inboard housing.
- Page 61 TriScroll 300 Dry Scroll Vacuum Pump Inboard Housing Assembly (continued) 14. Insert the check valve spacer into bypass port around the check valve assembly until it pushes against plunger guide. 15. Lightly grease the two O-rings and install them in the grooves on the check valve plug.
- Page 62 TriScroll 300 Dry Scroll Vacuum Pump Inboard Housing Assembly (continued) 19. Secure the check valve plug by inserting the snap ring into the bypass port groove.
-
Page 63: Orbiting Plate Assembly
TriScroll 300 Dry Scroll Vacuum Pump Orbiting Plate Assembly Orbiting Plate Exploded View... - Page 64 TriScroll 300 Dry Scroll Vacuum Pump Callout Part Number Description Quantity 7304WN SU Bearing S4729001 VDS4- Orbiting Spacer VDS4- Nylon Sleeve J9104P x1527 Bearing S4758001 Wave Washer - Nested NSS* VDS4- Center Orbiting Plate NSS* DIN472-0150 Snap Ring Shaft Seal, 8x15x3 NK 8/12 Needle Bearing 2-016 Viton O-ring NSS*...
-
Page 65: Orbiting Plate Assembly
TriScroll 300 Dry Scroll Vacuum Pump Orbiting Plate Assembly Install the Bearing Assembly Tools required: ❑ Heat resistant gloves ❑ Orbiting plate fixture Locate the following parts: ➀ J9104P bearing, included in maintenance kit ➁ Nylon sleeve, included in maintenance kit ➂... - Page 66 TriScroll 300 Dry Scroll Vacuum Pump Orbiting Plate Assembly (continued) WARNING Assembly is hot, use heat resistant gloves. 3. Immediately after removing the orbiting plate from the oven, insert the J9104P bearing, sealed side toward the bore. WARNING Assembly is hot, use heat resistant gloves.
- Page 67 TriScroll 300 Dry Scroll Vacuum Pump Orbiting Plate Assembly (continued) WARNING Assembly is hot, use heat resistant gloves. 6. Using an arbor press, press against the orbiting spacer until it is flush with the open end of the J9104P bearing. WARNING Assembly is hot, use heat resistant gloves.
-
Page 68: Install The Wave Washer And Shaft Seal
TriScroll 300 Dry Scroll Vacuum Pump Orbiting Plate Assembly (continued) 8. Immediately, while the orbiting plate is still hot, place the orbiting plate onto the post of the orbiting plate fixture that has the larger bottom disk. 9. Place the large seal and the locking nut onto the post and tighten the entire assembly. - Page 69 TriScroll 300 Dry Scroll Vacuum Pump Orbiting Plate Assembly (continued) 1. Apply a small amount of Loctite 242 to the lower threads of the six M5x5 screws, then install one screw into each threaded hole in the orbiting plate. 2. Tighten the screws until they are slightly below the surface.
- Page 70 TriScroll 300 Dry Scroll Vacuum Pump Orbiting Plate Assembly (continued) 4. Apply a thin film of Loctite 242 to the outer edge of the shaft seal. 5. Place the shaft seal onto the shaft seal installation tool. 6. Using the shaft seal installation tool, press the shaft seal into the orbiting plate.
-
Page 71: Install The Needle Bearings
TriScroll 300 Dry Scroll Vacuum Pump Orbiting Plate Assembly (continued) Install the Needle Bearings Tools required: ❑ Right angled snap ring pliers ❑ Krytox GPL 224 grease Locate the following part in the photo on the left: ➀ Orbiting plate Locate the following parts in the photo on the left: ➀... - Page 72 TriScroll 300 Dry Scroll Vacuum Pump Orbiting Plate Assembly (continued) 1. Lightly grease the O-rings, then insert them into the two grooves in each of three sync crank bearing bores in the orbiting plate. 2. Push one needle bearing into each bearing bore.
- Page 73 TriScroll 300 Dry Scroll Vacuum Pump Orbiting Plate Assembly (continued) 5. Coat the lips of the three shaft seals with grease. 6. Insert one shaft seal into each bore against the needle bearing. Observe Proper Orientation Toward Bore 7. Secure the sync crank by inserting the snap ring into the bearing bore groove.
- Page 74 TriScroll 300 Dry Scroll Vacuum Pump This page intentionally left blank.
-
Page 75: Triscroll 300 Assembly
TriScroll 300 Dry Scroll Vacuum Pump TriScroll 300 Assembly TriScroll 300 Exploded View - 303 only 35 36 21 22 23... - Page 76 TriScroll 300 Dry Scroll Vacuum Pump Quantity Callout Part Number Description PTS03103UNIV PTS03101UNIV PTS03003UNIV PTS03001UNIV S4744001 TriScroll Pump Front Label NSS* M5x22 SHCS, Black Steel NSS* M5x16 SHCS, Black Steel S4703001 VDS4 - Outboard Cover 2-157 Viton O-ring S4705001 VDS4 - Cowling NSS* M5x10 SHCS, Black Steel...
- Page 77 TriScroll 300 Dry Scroll Vacuum Pump Quantity Callout Part Number Description PTS03103UNIV PTS03101UNIV PTS03003UNIV PTS03001UNIV S4708001 VDS4- Intake Clamp NSS* M6x16 Steel Dowel Pin MK* & TSK* VDS4 - Tip Seal NSS* N5000-225 Snap Ring S4719001 VDS4- Orbiting Cup MK* & TSK* 2-137 Viton O-ring 617919032 Spieth Locknut...
- Page 78 TriScroll 300 Dry Scroll Vacuum Pump Quantity Callout Part Number Description PTS03103UNIV PTS03101UNIV PTS03003UNIV PTS03001UNIV S4739002 VDS4-3/4 HP 3 Phase Motor S4704001 VDS4- Transition Frame 648099055 Rubber Foot NSS* M6x12 Socket Head Button Screw NSS* Arrow Decal 660288087 SSB-0087, Wave Spring S4707002 VDS4- NW16 Pipe...
-
Page 79: Final Assembly
TriScroll 300 Dry Scroll Vacuum Pump Final Assembly Tools required: ❑ Allen wrench Locate the following items: ➀ Inboard housing assembly ➁ Spider coupling ➂ M6x16 screws (4) - Page 80 TriScroll 300 Dry Scroll Vacuum Pump Final Assembly (continued) 1. Insert the spider into the motor coupling. 2. Install the inboard assembly into the TriScroll frame, aligning the fingers on the fan assembly with the fingers on the coupling. Ensure that the dowel pins fit properly on the mating holes in frame.
- Page 81 TriScroll 300 Dry Scroll Vacuum Pump Final Assembly (continued) 3. Secure the inboard assembly to the frame with the four M6x16 screws.
-
Page 82: Install The Orbiting Plate
TriScroll 300 Dry Scroll Vacuum Pump Final Assembly (continued) Install the Orbiting Plate Tool required: ❑ Locking nut wrench ❑ Snap ring pliers ❑ Allen wrench ❑ Depth Gauge ❑ Krytox GPL 224 grease Locate the following parts: ❑ Orbiting plate assembly Locate the following parts: ➀... - Page 83 TriScroll 300 Dry Scroll Vacuum Pump Final Assembly (continued) 1. Slide the orbiting plate assembly onto the crankshaft and into the inboard housing. The balance fin on the NOTE orbiting plate should be ori- ented in the downward position when sliding the orbiting plate onto the crankshaft and into the inboard housing.
- Page 84 TriScroll 300 Dry Scroll Vacuum Pump Final Assembly (continued) 2. Remove the four M4x12 locking screws from the locking nut. 3. Secure the orbiting plate with the locking nut. 4. Tighten snugly with locking nut wrench. CAUTION Do not overtighten. Overtightening can cause bearing damage.
- Page 85 TriScroll 300 Dry Scroll Vacuum Pump Final Assembly (continued) 8. Insert the tip seal into the scroll tip grooves on the inboard housing. 9. Cut to the correct length at the end of each groove. 10. Insert the tip seal into the scroll tip grooves on the inboard side of orbiting plate.
- Page 86 TriScroll 300 Dry Scroll Vacuum Pump Final Assembly (continued) 12. Repeat steps 1 through 3 to reassemble the orbiting plate assembly and locking nut on the inboard assembly. 13. Using the locking nut wrench, tighten the locking nut until the distance from the face of the locking nut to the crankshaft end equals the distance noted in step 6 on page 74, plus 0.007 inch.
- Page 87 TriScroll 300 Dry Scroll Vacuum Pump Final Assembly (continued) 19. Lightly grease the O-ring and place it onto the orbiting cup. 20. Insert the orbiting cup into the center of the orbiting plate. 21. Push the orbiting cup into place and hold it securely while engaging the snap ring CAUTION If the orbiting cup slips out...
-
Page 88: Install The Outboard Housing
TriScroll 300 Dry Scroll Vacuum Pump Final Assembly (continued) 22. Lightly grease the large O-ring and install it O-RING around the lip of the inboard housing. Install the Outboard Housing Tools required: ❑ Snap ring pliers ❑ Allen wrench ❑ Krytox GPL 224 grease Locate the following items shown in the photo to the left:... - Page 89 TriScroll 300 Dry Scroll Vacuum Pump Final Assembly (continued) Locate the following items shown in the photo to the left: ➀ Tip seal, included in maintenance kit ➁ M6x45 screws (6) Outboard housing (not shown in photo) 1. Lightly grease the O-ring and insert it in the groove on the intake fitting.
- Page 90 TriScroll 300 Dry Scroll Vacuum Pump Final Assembly (continued) 2. Place the intake fitting over the intake hole in the outboard housing. 3. Slide the intake clamp around the intake fitting. 4. Secure it with two M5x16 screws. 5. Tighten to 75 in-lb. 6.
- Page 91 TriScroll 300 Dry Scroll Vacuum Pump Final Assembly (continued) 8. Install the outboard housing over the orbiting plate and against the inboard housing, engaging the dowel pins. 9. Secure the outboard housing to the inboard housing with the six M6x45 screws. 10.
-
Page 92: Install The Sync Crank Into The Outboard Housing
TriScroll 300 Dry Scroll Vacuum Pump Final Assembly (continued) Install the Sync Crank into the Outboard Housing Tools required: ❑ Allen wrench ❑ Krytox GPL 224 grease Locate the following parts shown in the photo at the left: ➀ O-ring, 2-118 (3) included in maintenance kit ➁... - Page 93 TriScroll 300 Dry Scroll Vacuum Pump Final Assembly (continued) 3. Lightly grease the three O-rings and insert them into the grooves on the three sync crank covers. 4. Install one sync crank cover over each sync crank bore. 5. Secure each cover with two M5x10 screws. 6.
-
Page 94: Replace The Cowling And Cover
TriScroll 300 Dry Scroll Vacuum Pump Final Assembly (continued) Replace the Cowling and Cover Tools required: ❑ Allen wrench ❑ Krytox GPL 224 grease Locate the following parts: ➀ Cowling ➁ Outboard cover ➂ O-ring, 2-157, included in maintenance kit ➃... - Page 95 TriScroll 300 Dry Scroll Vacuum Pump Final Assembly (continued) 2. Secure the outboard cover to the outboard housing with the six M5x22 screws.
-
Page 96: Put The Pump Back Into Service
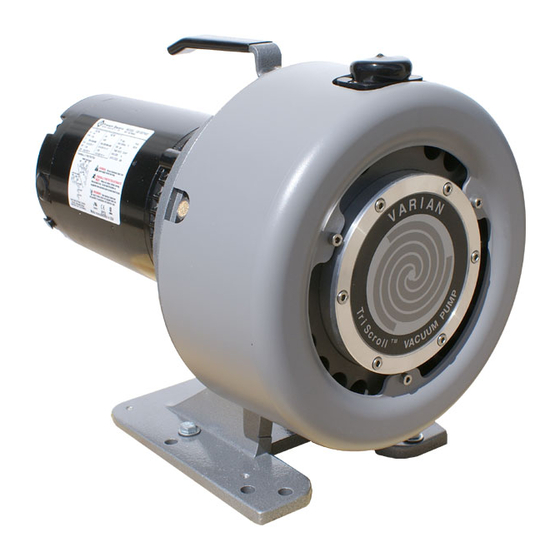
TriScroll 300 Dry Scroll Vacuum Pump Final Assembly (continued) 3. Install the cowling over the pump module. 4. Secure it with the three M5x16 screws. This figure illustrates a fully reassembled TriScroll 300 pump. Put the Pump Back into Service The TriScroll 300 pump can be placed into service immediately after maintenance is complete. -
Page 97: Return For Request Health And Safety Certification
4. If a product is received at Varian, Inc. in a contaminated condition, the customer is held responsible for all costs incurred to ensure the safe handling of the product, and is liable for any harm or injury to Varian, Inc. employees occurring as a result of exposure to toxic or hazardous materials present in the product. - Page 98 9001 Request for Return R E G I S T E R E D Health and Safety Certification FAILURE REPORT (Please describe in detail the nature of the malfunction to assist us in performing failure analysis): URBO UMPS AND URBOCONTROLLERS Claimed Defect Position Parameters...
- Page 100 Tel(39) 011 997 9 111 Tel:(39) 011 997 9 111 Fax(39) 011 997 9 350 Brazil Fax:(39) 011 997 9 350 Varian Industria e Comercio Ltda. Japan Varian Vacuum Technologies Avenida Dr. Cardoso de Mello 1644 Customer Support and Service:...
Need help?
Do you have a question about the TriScroll 300 Series and is the answer not in the manual?
Questions and answers