Table of Contents
Advertisement
Quick Links
General information. ................................................................................................................................................................... 2
Purpose of the manual. ............................................................................................................................................................... 2
Identification of manufacturer and equipment. ............................................................................................................................ 3
Safety information. ...................................................................................................................................................................... 3
Safety regulations. ...................................................................................................................................................................... 3
Safety devices. ............................................................................................................................................................................ 4
Safety signals. ............................................................................................................................................................................. 5
Technical information. ................................................................................................................................................................ 6
Technical specifications............................................................................................................................................................... 6
General description of the appliance........................................................................................................................................... 7
Main parts. .................................................................................................................................................................................. 8
Installation. ................................................................................................................................................................................... 9
Packing and unpacking. .............................................................................................................................................................. 9
Planning of system installation. ................................................................................................................................................... 9
Preparation and marking the boundaries of the work areas. .................................................................................................... 10
Slopes. ...................................................................................................................................................................................... 13
Steep slopes. ............................................................................................................................................................................ 13
Possible elements inside the work area and relative safety distances. .................................................................................... 14
Adjustments. .............................................................................................................................................................................. 15
Adjustment recommendations................................................................................................................................................... 15
Adjustment of cutting height. ..................................................................................................................................................... 15
Use and operation. .................................................................................................................................................................... 16
oblIGatIons foR Use. ................................................................................................................................................................. 16
Description of robot commands. ............................................................................................................................................... 16
Meaning of led combinations. ................................................................................................................................................... 16
Start-up. .................................................................................................................................................................................... 17
Operation with delayed start. .................................................................................................................................................... 18
Starting the robot with the sensors turned off. .......................................................................................................................... 18
Robot safety stop. ..................................................................................................................................................................... 20
Robot stop. ................................................................................................................................................................................ 21
Prolonged inactivity and restarting. ........................................................................................................................................... 21
Battery recharge after prolonged inactivity. ............................................................................................................................... 22
Operating tips. ........................................................................................................................................................................... 22
Ordinary maintenance............................................................................................................................................................... 23
Maintenance recommendations. ............................................................................................................................................... 23
Scheduled maintenance table. .................................................................................................................................................. 23
Robot cleaning. ......................................................................................................................................................................... 23
Troubleshooting guide. ............................................................................................................................................................. 24
Troubleshooting. ....................................................................................................................................................................... 24
Part replacement. ...................................................................................................................................................................... 26
Recommendations for replacing parts. ..................................................................................................................................... 26
Battery replacement. ................................................................................................................................................................. 26
Blade replacement. ................................................................................................................................................................... 26
Robot disposal. ......................................................................................................................................................................... 27
Ec declaration of conformity. ................................................................................................................................................... 28
Reproduction, even partial, of this document without written permission by the manufacturer is strictly forbidden. The
manufacturer assumes a policy of continual improvement and reserves the right to modify this document without prior notice
on condition that the changes do not constitute health and safety risks.
© 2008 - Text, illustrations and page layout by Tipolito La Zecca. The text may be reproduced, in whole or in part, on condition
that the author is mentioned.
MD-CT-RO-01-R5.0 - EN - 10-2016
TABLE OF CONTENTS
1
EN
User's manual
Advertisement
Table of Contents

Related Manuals for AMBROGIO 6060BA0


Summary of Contents for AMBROGIO 6060BA0
-
Page 1: Table Of Contents
TABLE OF CONTENTS General information..................................2 Purpose of the manual................................2 Identification of manufacturer and equipment..........................3 Safety information..................................3 Safety regulations..................................3 Safety devices..................................... 4 Safety signals....................................5 Technical information................................. 6 Technical specifications................................ -
Page 2: General Information
GENERAL INFORMATION PURPOSE OF THE MANUAL • This manual forms an integral part of the appliance and was produced by the Manufacturer to provide the necessary information to people authorised to interact with it during its working life. • Operators of the appliance must adopt correct working practices and must carefully read and follow all the instructions contained in this manual. -
Page 3: Identification Of Manufacturer And Equipment
IDENTIFICATION OF MANUFACTURER AND EQUIPMENT The nameplate shown here is applied directly onto the appliance. DATA PLATE It contains references and all the information essential for safely operating the device. (A) Name of manufacturer For any technical requirements, please contact the Manufacturer’s (C) Model Technical Service Centre or an authorised dealer. -
Page 4: Safety Devices
• Never allow people to sit on the robot. Never lift the robot to inspect the blade or to carry it while it is running. Do not place hands and feet under the robot when it is in operation. • Do not use the robot when a sprinkler system is running. In this case, program the robot and the sprinkler system so that they do not operate at the same time. -
Page 5: Safety Signals
SAFETY SIGNALS Keep an adequate safe distance from the machine while it is running. Read user instructions carefully to understand meanings before While the robot is working, using the machine. make sure there are no people in the working area (especially children, elderly or disabled people) and pets. -
Page 6: Technical Information
TECHNICAL INFORMATION TECHNICAL SPECIFICATIONS Model Description 6060BA0 - 7060BA0 6060DE0 - 7060DE0 Maximum recommended surface that can be mowed 200 ( 2150') Robot (*) (sq ' ) Features 409x199x335 Dimensions (W x H x D) Robot weight (incl. battery) Cutting height (Min-Max) mm (") -
Page 7: General Description Of The Appliance
Equipment / Accessories / Functions Grass detection sensor (patented) Curb drop-off sensors (Step) optional standard Blade modulation and intelligent standard spira Mowed lawn detection sensors standard Specifically for early season rapid growth and for lawns that need greater mowing power. 8-pronged blade optional (*) Depending on the condition of the grass and lawn surface... -
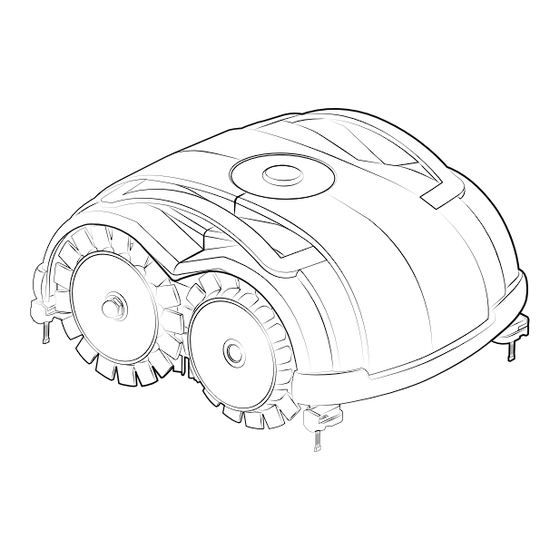
Page 8: Main Parts
MAIN PARTS MODEL 6060BA0 - 7060BA0 6060DE0 - 7060DE0 Version Robot � � Battery � � Power Supply Unit � � Mother board � � Control keyboard � � Cutting blade � � Electric motor � � Electric motor �... -
Page 9: Installation
INSTALLATION PACKING AND UNPACKING The equipment is delivered suitably packaged. When unpacking, carefully remove and check the integrity of the parts. Warning – Caution Keep plastic wrapping and plastic containers away from infants and children: risk of suffocation! Important Keep the packaging materials for future use. PLANNING OF SYSTEM INSTALLATION The robot is not difficult to install, but requires some preliminary planning in order to define the best area for installing the power supply unit. -
Page 10: Preparation And Marking The Boundaries Of The Work Areas
PREPARATION AND MARKING THE BOUNDARIES OF THE WORK AREAS preparation of the lawn to be mowed 1. Make sure that the lawn to mow is even and does not contain holes, stones or other obstacles. Otherwise, prepare the lawn by filling in any holes and removing any obstacles. If some obstacles cannot be removed, it is necessary to properly define and protect the interested areas. - Page 11 Hedging The work area can also be effectively delimited by hedges. Holes The work area cannot be delimited by ditches or holes which must not be present inside the grassy area to mow. Before starting the robot, check that there are no objects on the lawn such as toys, small stones, branches or sprinklers protruding from the ground which could impede correct functioning or cause damage to the blade.
- Page 12 Roots Do not, under any circumstance, leave areas which have not been delimited by barriers inside the work area, as these will prevent the robot from functioning properly (roots, external pipes, work tools, etc.). Fine gravel Danger - Attention If fine gravel, leaves or small stones are used to border the lawn, they are not detected correctly by the robot.
-
Page 13: Slopes
SLOPES Check that all the areas of the lawn do not exceed the admissible slopes (see “Technical Specifications”). Areas with steeper slopes or that are incompatible with the correct functioning of the robot (see following points) cannot be mowed. Steeper slopes must be delimited. Important The sensors of the robot can detect slopes greater than the robot can manage. -
Page 14: Possible Elements Inside The Work Area And Relative Safety Distances
Important Areas with slopes greater than those specified cannot be mowed with the robot. POSSIBLE ELEMENTS INSIDE THE WORK AREA AND RELATIVE SAFETY DISTANCES APPROPRIATE POOL PREPARATION minimum width of non-grassy ground of 100 cm / 39,37 " Minimum pavement width of 70 cm. -
Page 15: Adjustments
ADJUSTMENTS ADJUSTMENT RECOMMENDATIONS Important The user must follow the procedures described in this manual when making any adjustments. Do not make any adjustment which is not expressly indicated in this manual. Any special adjustments, not expressly indicated in this manual, must only be carried out by personnel from the Manufacturer’s Authorised Service Centres. -
Page 16: Use And Operation
USE AND OPERATION OBLIGATIONS FOR USE Important When using the robot for the first time, it is recommended to carefully read the entire manual and to fully understand it, especially the safety information. Only use the robot for the uses intended by the Manufacturer and do not tamper with any device to obtain different performances. -
Page 17: Start-Up
RECHARGING ROBOT A. HIGH BATTERY: (GREEN LED STEADY ON) P LAY full battery level. PAU SE (GREEN LED 1 FLASH) medium battery level. B. LOW BATTERY: (RED LED STEADY ON) STOP low battery level. C. ON/OFF: (GREEN LED STEADY ON) robot in operation. -
Page 18: Operation With Delayed Start
OPERATION WITH DELAYED START If necessary, the robot can be delayed to start by up to 24 hours. Press the “OFF/ON” button. After a few seconds the robot switches completely on. Press briefly the “OFF/ON” button at intervals of 1 second, as many times as the hours of delay of departure. On completion of the sequence, wait for the robot to confirm the delay setting with the sound of a beep. - Page 19 GRASS SENSOR OFF - CURB DROP-OFF SENSOR ON Keep the “PLAY/PAUSE” button pressed Release the button Wait for for 4 seconds. 2 beeps 2 flashes 4 sec. Grass Sensor On – Curb drop-off sensor Off: GRASS SENSOR Press the “PLAY/PAUSE” button and keep it pressed for 8 seconds until 3 consecutive beeps are heard and the PAUSE led flashes three times.
-
Page 20: Robot Safety Stop
Grass Sensor Off – Curb drop-off sensor Off: LAWN PROTECTION Press the “PLAY/PAUSE” button and keep it pressed for 12 seconds until 4 consecutive beeps are heard and the PAUSE led flashes 4 times. This mode allows working without any sensors. It is useful in particular with poor lawn conditions. -
Page 21: Robot Stop
ROBOT STOP the robot stops automatically if the following conditions are detected: • lawn mowed: the sensor has detected that the lawn has been mowed and therefore, does not require further mowing. Recharge the batteries and start the robot again after one or two days based on the growth of the grass. •... -
Page 22: Battery Recharge After Prolonged Inactivity
Restarting Follow these procedures before restarting the robot after a long period of inactivity: 1. Connect the plug of the power supply unit to the electrical outlet. 2. Reactivate the main electrical power supply. 3. Recharge the batteries of the robot for at least 4 hours. 4. -
Page 23: Ordinary Maintenance
ORDINARY MAINTENANCE MAINTENANCE RECOMMENDATIONS Important During maintenance operations, use personal protection equipment indicated by the Manufacturer, especially when working on the blade. Before carrying out any maintenance, make sure the robot is turned OFF (see “Robot Safety Stop”). SCHEDULED MAINTENANCE TABLE Frequency Part Type of maintenance... -
Page 24: Troubleshooting Guide
TROUBLESHOOTING GUIDE TROUBLESHOOTING The information below is designed to help identify and correct any faults and/or malfunctions which may occur during operation. Some failures can be resolved by the user; others require specific technical skills or special abilities and therefore must only be resolved by qualified personnel with certified experience gained in the specific field of intervention. - Page 25 P LAY Problem Cause Remedy PA U SE The flashing of the LEDs Check that the lawn to mow is even and does signals a “wheel motor not have any holes, stones or other obstacles. Uneven ground or ground with error”...
-
Page 26: Part Replacement
INSERTING BLADE WITH SCREWS For replacement, use only the original blade suitable for the device. check that the slope of the blade, MODEL: 6060BA0 - 6060DE0 - 7060BA0 - 7060DE0 with the robot in the start position, is facing downwards. -
Page 27: Robot Disposal
ROBOT DISPOSAL • At the end of its useful lifespan, this product is classified as WEEE (waste electrical and electronic equipment). It must therefore not be disposed of as normal domestic waste, as mixed urban waste (undifferentiated) or as separated urban waste (differentiated). •... -
Page 28: Ec Declaration Of Conformity
ZUCCHETTI Centro Sistemi S.p.A. Via Lungarno 305/A Terranuova B.ni (AR) ITALY declares and assumes liability that the product: battery-powered automatic lawnmower robot, model 6060BA0 - 6060DE0 - 7060BA0 - 7060DE0, complies with the basic requisites for safety, health and environmental protection provided for by the following European Union directives: Machinery directive 2006/42/EC, electromagnetic compatibility directive 2014/30/UE, RoHS directive 2011/65/EC, WEEE directive 2012/19/EU, directive for noise emission in the environment 2005/88/EC;... - Page 29 User’s manual...
- Page 30 NOTES User’s manual...
Need help?
Do you have a question about the 6060BA0 and is the answer not in the manual?
Questions and answers