Table of Contents
Advertisement
Quick Links
Advertisement
Table of Contents

Subscribe to Our Youtube Channel
Related Manuals for Jetson J2000-BLK


Summary of Contents for Jetson J2000-BLK
- Page 1 ELECTRIC MOUNTAIN BIKE USER MANUAL MODEL#: J2000-BLK...
- Page 2 Congratulations on purchasing your brand new Jetson Electric Mountain ® Bike. The Jetson Electric Mountain Bike is stylish and reliable, and with a ® long range of 30-40 miles per charge it can take you anywhere you want to go.
-
Page 3: Table Of Contents
Table of Contents: Jetson Electric Bike Specifications ...….…………………..…………….………3 ® Warnings & General Information ..............4-5 For Your Safety ..................4 About Your Electric Bike ................5 Assembling the Electric Bike ..………......………..……..………...…6-7 Front Wheel ....................6 Steering Handle ..................6 Assembly Requirements .................7 Operation and Adjustment ………………………………………..…………………...8-14 Speed Boosting System ................8... -
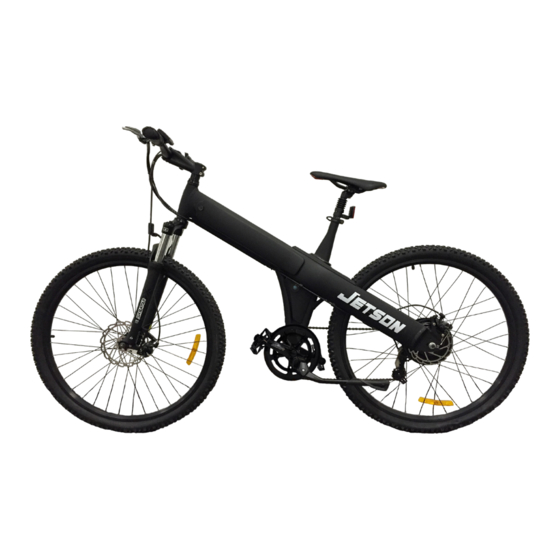
Page 5: Jetson ® Electric Bike Specifications
SPECIFICATIONS 1. Frame 10. Disc Brake 2. Seat Post 11. Crank 3. Saddle 12. Pedal 4. Vertical Handle Stem 13. Speed Sensor 5. Battery 14. Motor 6. LCD 15. Rear Derailleur 7. Brake Lever 16. Rim and Tire 8. Damping Coefficient 17. -
Page 6: Warnings & General Information
WARNINGS & GENERAL INFORMATION FOR YOUR SAFETY... The Jetson Electric Mountain Bike is designed to hold a maxi- ® mum load of 265 pounds, and run for between 30 and 40 miles per charge (depending on road conditions and driving factors). -
Page 7: About Your Electric Bike
WARNINGS & GENERAL INFORMATION ABOUT YOUR ELECTRIC BIKE... The Jetson Electric Mountain Bike has many special functions ® and uses that help bring your riding experience to the next level. Please be sure the cyclists using the electric bike know the re- quired driving techniques before taking the electric bike on the road. -
Page 8: Assembling The Electric Bike
ASSEMBLING THE ELECTRIC BIKE Installation of the Front Wheel 1. Take out the front wheel, and loosen the nut and hook on the front wheel axis. 2. Make sure the disc plate is inserted into the disc brake notch. Place the front wheel axis into the front fork contact pin, as seen in the image to the right. -
Page 9: Assembly Requirements
ASSEMBLING THE ELECTRIC BIKE Assembly Requirements In order to ensure safety and continued performance, tighten all fastenings to the following torque specifications: 1. Front Wheel Nut: no less than 18N.m 2. Rear Motor Nut: 35 to 45N.m 3. Middle Axis Component Lock: no less than 50N.m 4. -
Page 10: Operation And Adjustment
OPERATION AND ADJUSTMENT Speed Boosting System The Speed Boosting System (also known as the 1:1 Boosting System) assists with manual operation of the electric bike. When pedaling, it will automatically sense your riding speed and assist accordingly, to make your ride easier. The boosting system is comprised of three parts: a Controller, a Sensor, and an Induced Cartridge. -
Page 11: Display Adjustments
OPERATION AND ADJUSTMENT Display Adjustments MODEL: 861-A | Operating Voltage: DC36V The LCD Display helps you control many features on your elec- tric bike, including adjusting the Assistance Level (the amount of motor assistance during normal riding), tracking your speed and distance, and setting the cruise control on your bike. -
Page 12: Vertical Handle Stem Position
OPERATION AND ADJUSTMENT Vertical Handle Stem Position 1. Stem Extension 4. Bearing Assembly 2. Extended Fork-Stem 5. Head Tube 3. Spacer Rings 6. Stem Extension to Stem Clamp The position and adjustment of the Vertical Handle Stem is very important, as it allows for full mobility with the steering system. Make sure that the distance of “G”... -
Page 13: Understanding The Brake System
OPERATION AND ADJUSTMENT Understanding the Brake System The brake system is a necessary part of any bike, and is key to the overall safety of the rider. Before using this electric bike, you must understand the brake system, and feel confident when inspecting it and doing any adjustments that are necessary. -
Page 14: Disc Brakes
OPERATION AND ADJUSTMENT Disc Brake 1. Stoke Adjusting Bolt 2. Position Adjusting Bolt 3. Rocker Arm 4. Permanent Seat 5. Brake Shoe Block 6. Shoe Block Adjusting Bolt 7. Permanent Seat of Brake Line To adjust the brake shoe block: 1. -
Page 15: Speed Control System
OPERATION AND ADJUSTMENT Speed Control System The Speed Control System is made to help you travel through various terrains and conditions easily by adjusting based on the strength of your pedaling. The Speed Control System is comprised of a Derailleur, a Front and Back Fender, a Chain Plate, a Flywheel, and Shift Cables. -
Page 16: Bike Chain
OPERATION AND ADJUSTMENT Bike Chain The chain must maintain a slight sag to be able to switch be- tween gears when shifting. It is important to make sure that the chain is the proper length, or the cycling performance will be affected negatively. -
Page 17: Care And Maintenance
CARE AND MAINTENANCE Routine Inspection Before Use Regular maintenance and inspection helps lengthen the lifespan of your electric bike. Before riding, it is important to check the following: • Make sure the battery box is secured in the slot of the battery box. -
Page 18: Charger Care And Maintenance
CARE AND MAINTENANCE Charger Care and Maintenance • Prior to your first ride, charge the battery fully as described earlier in this manual. • Make sure the charger is at least 3 feet away from computers, televisions, refrigerators, washing machines, and other electric devices while charging. •... -
Page 19: Regular Cleaning
CARE AND MAINTENANCE Regular Cleaning • Remove the battery box from the electric bike before cleaning. • Do not use water to clean the electric bike. • Delicately wipe any painted or plastic parts with a soft cloth and a neutral cleaning solution. Carefully dry the parts with a soft, dry cloth to finish. -
Page 20: Riding Techniques
RIDING TECHNIQUES A proper cycling posture is important to your safety while op- erating the electric bike. Good posture is based on the height and size of the cyclist, so it’s important to adjust the electric bike when changing cyclists. To adjust the bike to fit your needs, fol- low these three steps: 1. -
Page 21: Troubleshooting
TROUBLESHOOTING Issue Potential Cause Solutions Failed speed • Low Battery Voltage. • Charge the battery. change, or very • Bad governor handle. • Replace the governor low velocity. • Bad controller. handle or controller. Motor does not • Bad governor handle. •... -
Page 22: Limited 1 Year Warranty
For any issue regarding your Jetson product, call toll ®... -
Page 23: Product Registration
Home Phone: __________________ Work Phone: ________________________________ Purchase Date: ___________ Purchased from: _________________________________ Serial Number: _____________________________________________________________ Product: ___________________________________________________________________ Gender: _______________ Occupation: ________________________________________ Is this your first Jetson product? _____________________________________________ Other similar product owned before: _________________________________________ How did you hear about the Jetson Electric Mountain Bike? ®... - Page 24 A LEADER IN ELECTRIC MOBILITY 888-976-9904 WWW.JETSONBIKE.COM...
Need help?
Do you have a question about the J2000-BLK and is the answer not in the manual?
Questions and answers