Table of Contents

Subscribe to Our Youtube Channel
Related Manuals for Jetson JBYOD-3KIK


Summary of Contents for Jetson JBYOD-3KIK
- Page 1 3-Wheel Light-Up Kick Scooter. A guide for your ride. IMPORTANT: READ CAREFULLY AND RETAIN FOR FUTURE REFERENCE. MODELS: JBYOD-3KIK; JCARS-3KIK; JFRZN-3KIK; JFRZ2-3KIK; JPRNS-3KIK; JPRNS2-3KIK JMCKY-3KIK; JGABY-3KIK; JMRMD-3KIK...
- Page 3 Jetson's top two riding rules: Be safe. Have fun!
-
Page 5: Table Of Contents
Contents Safety Warnings ......................4 Product Overview ......................6 Specs & Features . -
Page 6: Safety Warnings
Safety Warnings • Before use, please read the user manual and safety warnings carefully, and make sure you understand and accept all the safety instructions. The user will be responsible for any loss or damage caused by improper use. • Before each cycle of operation, the operator shall perform the preoperation checks specified by the manufacturer: That all guards and pads originally supplied by the manufacturer are in proper place and in serviceable condition;... - Page 7 • Prolonged exposure to UV rays, rain and the elements may damage the enclosure materials, store indoors when not in use. MODIFICATIONS Do not attempt to disassemble, modify, repair, or replace the unit or any components of the unit without instruction from the Jetson Care Team. This will void any warranty, and can lead to malfunctions which may cause injury.
-
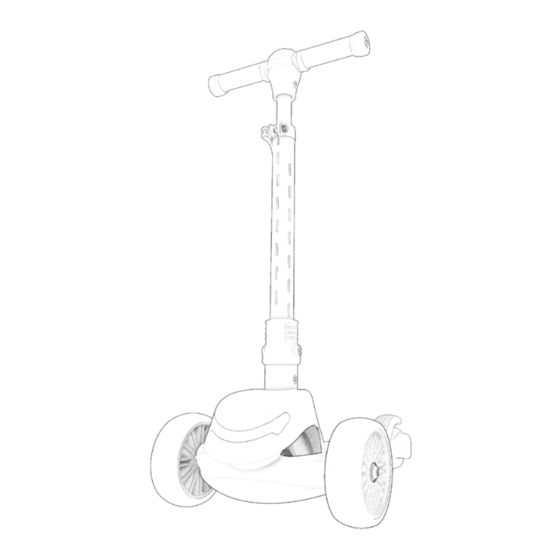
Page 8: Product Overview
Product Overview 1. HANDLEBAR 2. LIGHTING BUTTON 3. STEM CLAMP 4. STEM (LED LIGHT-UP) 5. FOLDING MECHANISM 6. HEADLIGHT 7. FRONT WHEEL (MOTION-ACTIVATED LED LIGHT-UP) 8. DECK 9. BATTERY COMPARTMENT 10. REAR FOOT BRAKE 11. REAR WHEEL (MOTION-ACTIVATED LED LIGHT-UP) TOOL INCLUDED: 2-BIT PHILLIPS-HEAD SCREWDRIVER (A) AND 5MM ALLEN KEY TOOL (B) - Page 9 NOTE: IMAGES MAY NOT REFLECT EXACT APPEARANCE OF ACTUAL PRODUCT.
-
Page 10: Specs & Features
Specs & Features · WHEELS: 4.7” (FRONT), 3.1” (REAR) · UNFOLDED DIMENSIONS: 22.0” (L) × 10.4” (W) × 23.5” (H) · FOLDED DIMENSIONS: 22.0” (L) × 10.4” (W) × 5.9” (H) · DECK SIZE: 21.7” (L) × 5.2” (W) · HANDLEBAR HEIGHT: 23.5”... -
Page 11: Online Resources
Online Resources Scan for our most updated scooter onboarding materials and support resources. WARNING FAILURE TO COMPLY WITH THE FOLLOWING INSTRUCTIONS MAY RESULT IN INJURY TO THE CHILD OR OTHERS. • KEEP SMALL PARTS AWAY FROM CHILDREN DURING ASSEMBLY. • ACCESSORY MUST BE ASSEMBLED AND REMOVED BY AN ADULT. •... -
Page 12: Getting Started
1. Getting Started Unfolding & Folding Your Scooter · TO UNFOLD OR FOLD, FIRST SLIDE THE FOLDING MECHANISM UP THE STEM TOWARDS THE HANDLEBAR. HANDLEBAR STEM FOLDING MECHANISM... - Page 13 STEM FOLDING MECHANISM · TO UNFOLD: WHILE HOLDING THE FOLDING MECHANISM CLOSER TO THE HANDLEBAR, RAISE THE STEM UNTIL IT IS VERTICAL AND CLICKS INTO PLACE. · TO FOLD: WHILE HOLDING THE FOLDING MECHANISM CLOSER TO THE HANDLEBAR, LOWER THE STEM DOWN TOWARDS THE REAR WHEEL UNTIL IT CLICKS INTO PLACE.
-
Page 14: Adjusting The Handlebar
KNOB STEM CLAMP LATCH Adjusting the Handlebar 1. USING THE ALLEN KEY TIP OF THE 2-BIT TOOL, ALLEN KEY TIP LOOSEN THE STEM CLAMP KNOB BY TURNING IT COUNTERCLOCKWISE. 2. PULL OPEN THE LATCH. - Page 15 3. PRESS IN THE STEM PIN AND RAISE OR LOWER THE HANDLEBAR UNTIL THE PIN CLICKS INTO ANOTHER STEM PIN HOLE. STEM PIN HOLE STEM PIN...
- Page 16 KNOB STEM CLAMP LATCH 4. CLOSE THE STEM CLAMP LATCH AND TIGHTEN THE KNOB BY TURNING IT CLOCKWISE WITH THE ALLEN KEY. 5. CHECK THAT THE HANDLEBAR IS SECURE. IMPORTANT: THE STEM PIN ALONE WILL NOT KEEP THE STEM SECURE. ALWAYS MAKE SURE THE STEM CLAMP LATCH IS ALLEN KEY TIP TIGHTENED AND CLOSED PRIOR TO RIDING.
-
Page 17: Inserting The Batteries
Inserting the Batteries YOU WILL NEED 3 AA BATTERIES IN ORDER TO POWER ON THE FRAME LIGHTS. 1. USE THE SCREWDRIVER TIP OF THE 2-BIT TOOL TO LOOSEN AND REMOVE THE SCREW ON THE BATTERY COMPARTMENT BY TURNING IT COUNTERCLOCKWISE. 2. -
Page 18: Making Moves
2. Making Moves Riding Your Scooter 1. PLACE ONE FOOT AT THE FRONT OF THE DECK FACING FORWARD. 2. PUSH THE OTHER FOOT OFF THE GROUND TO PROPEL THE SCOOTER FORWARD. REPEAT AS NECESSARY TO ACHIEVE OR MAINTAIN DESIRED SPEED. 3. -
Page 19: Using The Brake
Using the Brake PRESS DOWN GENTLY WITH YOUR REAR RIDING FOOT TO SLOW DOWN. APPLY MORE PRESSURE TO COME TO A COMPLETE STOP. -
Page 21: Using The Lights
Using the Lights WHEEL LIGHTS: THE WHEEL LIGHTS ARE MOTION-ACTIVATED AND WILL ILLUMINATE AUTOMATICALLY WHENEVER THE WHEELS ARE ROLLING. STEM LIGHTS AND HEADLIGHT: SOME MODELS OF THIS SCOOTER HAVE LIGHTS IN THE STEM WITH A SINGLE ILLUMINATION STYLE AND OTHERS HAVE MULTIPLE STYLES PREPROGRAMMED IN. -
Page 23: Helmet Safety
Helmet Safety A HELMET SHOULD BE WORN BY THE RIDER AT ALL TIMES. PROPER POSITIONING: IMPROPER POSITIONING: THE FOREHEAD IS COVERED THE FOREHEAD IS EXPOSED. BY THE HELMET. A FALL COULD RESULT IN SERIOUS INJURY. * WEAR A HELMET, APPROPRIATE CLOTHING, SHOES, AND SAFETY GEAR. AVOID CLOTHING THAT CAN GET CAUGHT INTO OR UNDER THE WHEELS. -
Page 25: Care & Maintenance
Your new Jetson product is warranted against defects in materials and workmanship as indicated on ridejetson.com/warranty for a period of time from the date of original retail purchase when used in accordance with Jetson's user manuals (refer to ridejetson.com/support). Under this warranty, you will be able to direct your claims to Jetson even in situations where you purchased the Jetson Product from one of our authorized retailers. - Page 26 Stay connected. Be sure to follow @ridejetson on social media to learn about fantastic offers, giveaways, and all the latest Jetson news. Loving your ride? Then be sure to leave a review at ridejetson.com/reviews. We can’t wait to hear from you!
- Page 28 Date Code: 09/2023 Document Edition: v1.1 © 2023, JETSON. ALL RIGHTS RESERVED. Manufactured by JETSON ELECTRIC BIKES LLC. No portion of this document, including shape, copy, graphics, and design, may be reproduced or transmitted in any form or by any means.
Need help?
Do you have a question about the JBYOD-3KIK and is the answer not in the manual?
Questions and answers
Spring in front wheel assembly broke