
Related Manuals for Alfa IN aXe 400 IN


Summary of Contents for Alfa IN aXe 400 IN
- Page 1 WELDING MACHINES aXe 400 IN aXe 500 IN OPERATING MANUAL ALFA IN a.s. © www.alfain.eu aXe 400 500 IN manual EN 6...
-
Page 2: Table Of Contents
REMOTE CONTROL ................ 18 ELECTRODE METHOD ..............19 ERROR MESSAGES ................ 20 GETTING STARTED ................. 20 GETTNG STARTED – COATED ELECTRODE ........ 25 ROUTINE MAINTENANCE & INSPECTION ........26 STATEMENT OF WARRANTY ............27 DISPOSAL ..................27 ALFA IN a.s. © www.alfain.eu... -
Page 3: Introduction
2. aXe 500 IN COMPACT (H2O) - compact welding machine and the option of a water cooled torch 3. aXe 400 IN (H2O) - welding machine with separate wire feeder and the option of a water cooled torch 4. aXe 500 IN (H2O) - welding machine with separate wire feeder and the option of a water cooled torch ALFA IN a.s. -
Page 4: Safety Precautions
Do not thaw frozen waterpipes or conductions with this unit. In high electrical risk areas (in confined spaces) it is only allowed to use machines with –sign S. Switch off the machine at breaks and close the valve of the gas cylinder. ALFA IN a.s. © www.alfain.eu... - Page 5 5. The affected area can be bigger than your premises/ property depends of the building etc. 6. Please use the unit conform to the instructions of the manufacturer. The user is responsible for installation and use of the machine. Furthermore ALFA IN a.s. © www.alfain.eu...
-
Page 6: Technical Data
6/28 the user is responsible to eliminate the disturbances caused by electromagnetic fields. 3. TECHNICAL DATA Technical data aXe 400 IN aXe 500 IN Method MIG/MAG MIG/MAG Mains voltage V/Hz 3 x 400/50 Fuse 32 @ Max. effective 29,8 30,3... -
Page 7: Main Parts Of The Machine
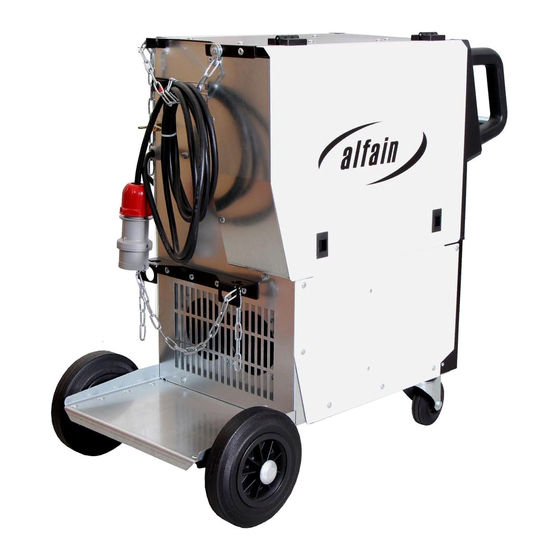
Given the size of the installed capacity, the connection of the device to the power supply must be approved by distribution companies. Attention Users are reminded that they are responsible for any interference from welding. 4. MAIN PARTS OF THE MACHINE ALFA IN a.s. © www.alfain.eu... - Page 8 8/28 Picture 1 - The main part of the machine aXe 400/500 IN ALFA IN a.s. © www.alfain.eu...
- Page 9 A16 Connector male A17 Quick Connector male A18 Clamp for the cable Bundle A19 Clamp for the cable Bundle A20 Cable Bundle Inlet Feeder A21 Cable Bundle A26 Quick connector W (red) A27 Quick connector W (blue) ALFA IN a.s. © www.alfain.eu...
-
Page 10: Accessories
8. Connecting cables 2, 5, 10, 15, 20 m 9. Rolls 0,6-0,8, 1,0-1,2, 1,4-1,6, 1,6-2,4 Welding cables for coated electrodes TORCH ON REQUEST 1. torch PUSH-PULL up to 25 m 2. torch PARKER DIGIMIG 501W 3 m – 5 m ALFA IN a.s. © www.alfain.eu... -
Page 11: Control Panel
Control light TIG – not active Control light Coated electrode - MMA Control light MIG/MAG Synergy Control light MIG/MAG Manual Control light Pre Gas Time (s) Control light Start Current (A) Control light Upslope (s) – not active yet ALFA IN a.s. © www.alfain.eu... -
Page 12: Basic Settings
3. If you keep the button pressed for less than 4 s, when you release it the gas valve will switch off the gas supply. WIRE FEEDING- BUTTON T24 The wire feeder starts feeding at the speed 15 m/min. ALFA IN a.s. © www.alfain.eu... -
Page 13: Save And Load Welding Programs - Flash Memory
2. By means of turning the encoder T2 select your synergy curve and confirm by pressing the encoder T2. P.00 - Material: SG / Fe wire diameter: 1.0 mm, gas: ArCO2 (82/18). P.01 - Material: SG / Fe wire diameter: 1.2 mm, gas: ArCO2 (82/18). ALFA IN a.s. © www.alfain.eu... -
Page 14: Mode 2T/4T/Steps
1. Press the buton T34 to switch the mode 2T / 4T / steps (synergy only). / steps (only in synergy mode) 2. In steps mode it is possible to set values of the current and pre and post ALFA IN a.s. © www.alfain.eu... -
Page 15: Secondary Parameters Menu
A ≠ B (MAIN CURRENTS ARE DIFFERENT) BILEVEL The difference from A = B is in the second tact, quickly pressing and releasing the torch switches between two main welding currents. 12. SECONDARY PARAMETERS MENU ALFA IN a.s. © www.alfain.eu... -
Page 16: Reset
1. Pressing T34+T19 at the same time more than 4 s makes RESET – default parameters will be restored. 2. It will delete saved JOBs! ”SMALL RESET“ Pressing T34+T1[5] at the same time more than 4 s makes RESET – default parameters will be restored. Saved JOB remain. ALFA IN a.s. © www.alfain.eu... -
Page 17: Job Menu
If an error occurs during the loading (e.g. JOB is empty), the display will show JOB Err. When the JOB is saving, display blinks several times. JOBs are stored as inactive (n.). ALFA IN a.s. © www.alfain.eu... -
Page 18: Remote Control
MAN: Wire speed, Voltage/Choke, JOB (See How to switch on the remote control of JOBs on below) SYN: Power, Correction/Choke, JOB Torch button LOCK lock/unlock the buttons UP/DOWN and M The UP/DOWN and M buttons get automatically locked when the torch trigger is pressed. ALFA IN a.s. © www.alfain.eu... -
Page 19: Electrode Method
3. During welding, the display shows measured values of welding current 4. After welding, on the display will remain measured value (HOLD) for 4 secs. 5. If the torch with a remote control is connected, is shown on the display ALFA IN a.s. © www.alfain.eu... -
Page 20: Error Messages
Picture 5 – Torch INSTALATION COOLING SYSTEM OF WATER TORCH 1. CU aXe Cooling unit A30 is located in the lower part of the machine. ALFA IN a.s. © www.alfain.eu... - Page 21 C4 (-), secure it thoroughly by turning it clockwise. Attach the earthing clamp to weldment C2. EARTHING CLAMP CONNECTION Attach the earthing clamp near the weld. It is important to ensure that the connection with workpiece is as strong as possible. ALFA IN a.s. © www.alfain.eu...
- Page 22 3. Cut off the curved or damaged end of welding wire and lead it through the inlet liner E3, and the roll into the liner inside the EURO torch connector (about 5 cm). Make sure, that you use the suitable groove. ALFA IN a.s. © www.alfain.eu...
- Page 23 Picture 9 – Wire feed 4-roller Picture 10 – Roller impact on the welding wire FEED ROLLS aXe 400/500 IN 4-roller a = 32 mm b = 40 mm Type of roller Wire diameter Order number of the rollers groove ALFA IN a.s. © www.alfain.eu...
- Page 24 5. Press the button Gas test T23 for more then 4 s 6. Adjust the amount of gas on the reduction gas valve (it is not a part of the welding machine) by the F7 adjusting screw ALFA IN a.s. © www.alfain.eu...
-
Page 25: Gettng Started - Coated Electrode
EURO connector Rolls Liner terminal O - ring Liner tefl. Sustainpipe for teflon and plastic liner 19. GETTNG STARTED – COATED ELECTRODE 1. Disconnect the MIG / MAG torch. If it is left connected, the welding ALFA IN a.s. © www.alfain.eu... -
Page 26: Routine Maintenance & Inspection
5. The person carrying out the servicing needs and repairs must know ALFA IN a.s. © www.alfain.eu... -
Page 27: Statement Of Warranty
3. ALFA IN will repair or replace, at its discretion, any warranted parts or components that fail due to defects in material or workmanship within the warranty period. - Page 28 28/28 service life must be collected separately and returned to an environmentally compatible recycling facility. ALFA IN a.s. © www.alfain.eu...
Need help?
Do you have a question about the aXe 400 IN and is the answer not in the manual?
Questions and answers