Advertisement
Advertisement

Subscribe to Our Youtube Channel
Related Manuals for Life Fitness FS4


Summary of Contents for Life Fitness FS4
- Page 1 FS4 & FS6 CROSS-TRAINER ASSEMBLY INSTRUCTIONS 1004104-0001 REV AB...
- Page 2 Marketing/Sales Email: Operating Hours: 9.00h-17.00h (JAPAN) Service Email: kundenberatung@lifefi tness.com customersupport@lifefi tness.com Hong Kong Operating Hours: 08:30-16.30.h (MEZ) Life Fitness Asia Pacifi c LTD Sales/Marketing Email: consumerproducts@lifefi tness.com Spain 32/F, Global Trade Square Life Fitness IBERIA Operating Hours: 7:00am-6:00pm (CST)
- Page 3 Operation Manuals and other Product Information available at https://www.lftechsupport.com/web/document-library/documents عقوملا ىلع ةحاتم زاهجلا نع ىرخأ تامولعمو ليغشتلا ةلدأhttps://www.lftechsupport.com/web/document-library/documents 操作マニュアルおよびその他の製品情報については、 https://www.lftechsupport.com/web/document-library/documents をご覧く ださい。 如需操作手册和其他产品信息,请登录:https://www.lftechsupport.com/web/document-library/documents 操作手冊和其他產品資訊請見 https://www.lftechsupport.com/web/document-library/documents 작동 설명서 및 기타 제품 정보는 https://www.lftechsupport.com/web/document-library/documents 에서 찾을 수 있습니다. Trobareu el manual de funcionament i altra informació de producte a https://www.lftechsupport.com/web/document-library/documents Mae Llawlyfrau Gweithredu a Gwybodaeth Arall am Beiriannau ar gael yn https://www.lftechsupport.com/web/document-library/ documents Die Betriebsanleitung und andere Produktinformationen erhalten Sie unter https://www.lftechsupport.com/web/document-library/...
-
Page 4: Table Of Contents
Table of Contents 1 Important Safety Instructions 2 FS4 & FS6 Cross-Trainer Overview 3 Initial Setup 4 Service & Technical Data 5 Specifi cations 6 Assembly... - Page 5 Never operate a Life Fitness product if it has a damaged power cord or electrical plug, or if it has been dropped, damaged, or even partially immersed in water. Contact Life Fitness Customer Support Services.
- Page 6 If warnings are missing or damaged, please contact Life Fitness immediately for replacement warning labels. Warning labels are shipped with every product and should be installed before product is used. Life Fitness is not responsible for missing or damaged warning labels.
- Page 7 être arrêté instantanément. Ne jamais faire fonctionner un produit Life Fitness dont la fi che ou le cordon d’alimentation est endommagé, ni aucun appareil qui serait tombé ou aurait été endommagé ou même partiellement plongé dans l’eau. Appeler le service clientèle de Life Fitness.
- Page 8 Lisez tous les avertissements sur chaque produit avant de démarrer un exercice. Si les avertissements sont absents ou endommagés, veuillez contacter immédiatement Life Fitness afi n de les faire remplacer. Les étiquettes d’avertissement sont livrées avec chaque produit et doivent être installées avant leur utilisation.
-
Page 9: Fs4 & Fs6 Cross-Trainer Overview
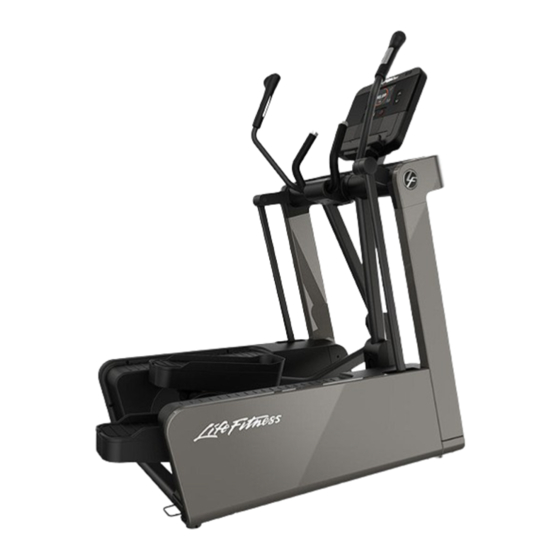
FS4 & FS6 CROSS-TRAINER OVERVIEW Pedal & Pedal Insert Stationary Platform Resistance Band Attachment Loop Power Adapter Jack Stride Controls (FS6 only) Resistance Controls Contact Heart Rate Sensor Console Contact Heart Rate Sensor Accessory Tray Water Bottle Holder Transport Wheel... -
Page 10: Initial Setup
Electrical Power Requirements Most Life Fitness Cross-Trainers are intended for use on a normal 120 volt circuit in the United States and Canada or a normal 230V circuit international. Below is a table that provides the current rating for this product based on supply volt- age. - Page 11 Powering Up the Total-Body Elliptical Cross-Trainer Your Life Fitness Total-Body Elliptical Cross-Trainer may come with either a U.S. line cord or one of several international line cords. Insert and screw in the appropriate power adapter jack into the connector on the front of the Total-Body Elliptical Cross-Trainer and tighten locking nut to ensure good connection.
-
Page 12: Service & Technical Data
SERVICE & TECHNICAL DATA 4.1 Preventive Maintenance Tips The Life Fitness Total Body Elliptical Cross-Trainer is backed by the engineering excellence and reliability of Life Fitness and is one of the most rugged and trouble-free pieces of exercise equipment on the market today. -
Page 13: Preventive Maintenance Schedule
Inspect 4.3 How to Obtain Product Service 1. Please contact your dealer or Life Fitness Customer Service at 1-800-351-3737. 2. Verify the symptom and review the operating instructions and troubleshooting matrix. 3. Locate and document the serial number of the unit. The serial number plate is located on the rear stabilizer. -
Page 14: Specifi Cations
Home Max User Weight 400 lbs. / 181 kg Resistance System Eddy Current FS4 22 in. (56 cm) (Fixed Stride) Stride Length FS6 18 - 26 in. (46 - 66 cm) (Adjustable Stride) Contact Heart Rate On moving handles Accessories 1 water bottle holder &... -
Page 15: Assembly
ASSEMBLY M10 X 20MM HEX HEAD BOLT M10 X 75MM HEX HEAD BOLT FLAT WASHER 8MM ID M4 X 12MM PHILLIPS PAN HEAD SCREW M5 X 8MM PAN HEAD SCREW M8 X 16MM BUTTON HEAD CAP SCREW M5 X 14MM PAN HEAD SCREW M10 HEX NUT Tools Required: ... - Page 16 Base assembly out of the box. 1. Remove left and right outer shrouds. SAVE HARDWARE! 2. Secure the bridge assembly to the base assembly. 18 - 20 ft. lbs. Description Qty. (24.4 - 27.1 Nm) Bridge Assembly M10 X 20MM Hex Bolt 17mm Socket Wrench with Extension...
- Page 17 3. Install vertical uprights. Description Qty. 1 Vertical Upright 2 M8 X 16MM Hex Button Head Cap Screw 3 Flat Washer 8MM ID 4 End Cap 5 Grommet 5mm Allen Wrench 16 -18 ft. lbs. (21.7 - 24.4 Nm)
- Page 18 4. Install handlebars. Description Qty. Right Handlebar Left Handlebar M8 X 16MM Button Head Cap Screw 5mm Allen Wrench 16 - 18 ft. lbs. (21.7 - 24.4 Nm) ONE CABLE REMAINS UNCONNECTED! 16 - 18 ft. lbs. (21.7 - 24.4 Nm)
- Page 19 5. Install bullhorn. Description Qty. Bullhorn M8 X 16MM Button Head Cap Screw Use 5mm Allen Wrench with extension 16 - 18 ft. lbs. (21.7 - 24.4 Nm) 6. Install console mounting bracket. Description Qty. Console Mounting Bracket M8 X 16MM Button Head Cap Screw 5mm Allen Wrench with extension or 5mm T-handle 16 - 18 ft.
- Page 20 7. Attach bullhorn cover. Description Qty. Bullhorn Cover M4 X 12MM Phillips Pan Head Screw Phillips Screwdriver 10 - 12 in. lbs. (1.1 - 1.3 Nm) 8. Install upper plastics to bridge assembly. Description Qty. Left Upper Plastic Right Upper Plastic M4 X 12MM Phillips Pan Head Screw Phillips Screwdriver 10 - 12 in.
- Page 21 10. Install pedal levers. 18 - 20 ft. lbs. (24.4 - 27.1 Nm) Description Qty. M10 X 75MM Bolt M10 Hex Nut Left Rocker Arm Left Pedal Lever Right Rocker Arm Right Pedal Lever 17mm Socket Wrench and 17mm Open End Wrench 11.
- Page 22 12. Attach console. Description Qty. Console Console Bracket Cover M5 X 6MM Grounding Screw M5 X 14MM Phillips Pan Head Screw Phillips Screwdriver 14 - 16 in. lbs. (1.5 - 1.8 Nm) Make the following connections. Base Signal Heart Rate Base Switches Base Power Jumper...
- Page 23 13. Attach left and right inner front shrouds. 10 - 12 in. lbs. (1.1 - 1.3 Nm) Description Qty. 1 Left inner shroud 2 Right inner shroud 3 M4 X 12 MM Phillips Pan Head Screw Phillips Screwdriver 14. Reinstall right and left side outer shrouds. Note: Use previously saved hardware and three additional screws per shroud.
Need help?
Do you have a question about the FS4 and is the answer not in the manual?
Questions and answers