Table of Contents
Advertisement
Advertisement
Table of Contents

Subscribe to Our Youtube Channel
Related Manuals for Fluke 9009


Summary of Contents for Fluke 9009
- Page 1 9009 Industrial Dual-Block Calibrator User’s Guide PN 2673808 February 2013 © 2013 Fluke Corporation. All rights reserved. Specifications are subject to change without notice. All product names are trademarks of their respective companies. Fluke-Direct .com info@Fluke-Direct.com 1.888.475.5235...
- Page 2 Fluke authorized resellers shall extend this warranty on new and unused products to end-user customers only but have no authority to extend a greater or different warranty on behalf of Fluke. Warranty support is available only if product is purchased through a Fluke authorized sales outlet or Buyer has paid the applicable international price.
-
Page 3: Table Of Contents
7.3.1 Scan Control ........22 Fluke-Direct .com info@Fluke-Direct.com... - Page 4 11 Maintenance ......41 12 Troubleshooting......43 Fluke-Direct .com info@Fluke-Direct.com...
- Page 5 EMC Directive ....... . . 43 12.2.2 Low Voltage Directive (Safety) ......44 Fluke-Direct .com info@Fluke-Direct.com...
- Page 6 Controller Operation Flowchart ..... 20 Figure 4 Serial Cable Wiring ......29 Fluke-Direct .com info@Fluke-Direct.com...
- Page 7 International Electrical Symbols ..... 1 Table 2 9009 Controller Communications Commands ....32 Table 2 9009 Communication Commands Continued .
-
Page 8: Before You Start
Table 1 International Electrical Symbols Symbol Description AC (Alternating Current) AC-DC Battery CE Complies with European Union Directives Double Insulated Electric Shock Fuse PE Ground Hot Surface (Burn Hazard) Read the User’s Manual (Important Information) Fluke-Direct .com info@Fluke-Direct.com 1.888.475.5235... -
Page 9: Safety Information
9009 Industrial Dual-Block Calibrator User’s Guide Symbol Description Canadian Standards Association OVERVOLTAGE (Installation) CATEGORY II, Pollution Degree 2 per IEC1010-1 re- fers to the level of Impulse Withstand Voltage protection provided. Equipment of OVERVOLTAGE CATEGORY II is energy-consuming equipment to be supplied from the fixed installation. - Page 10 Use extreme care when removing hot inserts, DO NOT operate near flammable materials. Extreme temperatures could ignite the flammable material. Use of this instrument at HIGH TEMPERATURES for extended periods of time requires caution. Fluke-Direct .com info@Fluke-Direct.com 1.888.475.5235...
-
Page 11: Cautions
9009 Industrial Dual-Block Calibrator User’s Guide ELECTRICAL HAZARD These guidelines must be followed to ensure that the safety mechanisms in this instrument will operate properly. This instrument must be plugged into a 115 VAC (± 10%) or 230 VAC (± 10%) 50/60 Hz only electric outlet as indicated on the serial label. -
Page 12: Authorized Service Centers
Otherwise, the probe may become stuck in the well. Authorized Service Centers Please contact one of the following authorized Service Centers to coordinate service on your Hart product: Fluke Corporation, Hart Scientific Division Fluke-Direct .com info@Fluke-Direct.com 1.888.475.5235... - Page 13 9009 Industrial Dual-Block Calibrator User’s Guide When contacting these Service Centers for support, please have the following information available: Model Number Serial Number Voltage Complete description of the problem Fluke-Direct .com info@Fluke-Direct.com 1.888.475.5235...
-
Page 14: Introduction
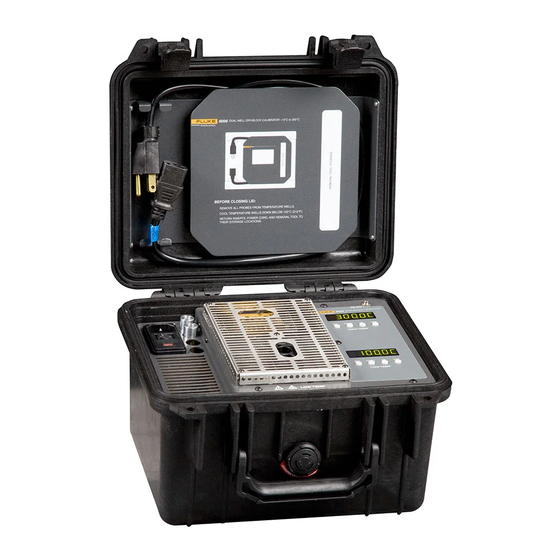
The Hart Scientific 9009 Industrial Dual-Block Calibrator may be used as a portable instrument or bench top temperature calibrator for calibrating thermo- couple and RTD temperature probes. The 9009 is small enough to use in the field, and accurate enough to use in the lab. Calibrations may be done over a range of –15°C to 350°C (5°F to 622°F). -
Page 15: Specifications And Environmental Conditions
Maintenance and clean- ing recommendations can be found in the Maintenance Section of this manual. The instrument operates safely under the following conditions: ambient temperature range: 5 - 45°C (41 - 113°F) Fluke-Direct .com info@Fluke-Direct.com 1.888.475.5235... - Page 16 9009 Industrial Dual-Block Calibrator User’s Guide ambient relative humidity: maximum 80% for temperature <31°C, de- creasing linearly to 50% at 40°C pressure: 75kPa - 106kPa mains voltage within ± 10% of nominal vibrations in the calibration environment should be minimized...
-
Page 17: Quick Start
Unpack the calibrator carefully and inspect it for any damage that may have oc- curred during shipment. If there is shipping damage, notify the carrier immediately. Verify that the following components are present: 9009 Dry-well Two 3102-3 ( 3/16”) and two 3102-4 (1/4”) Inserts Power Cord Report of Calibration with calibration label User’s Guide... -
Page 18: Setting The Temperature
15 to 20 minutes more of stabilization time. Changing Display Units The 9009 can display temperature in Celsius or Fahrenheit. The instrument is shipped from the factory set to Celsius. To change to Fahrenheit or back to Cel- sius perform the following: 1. -
Page 19: Parts And Controls
PEM. Insert Storage - Four inserts may be stored here. Constant Temperature Block Assembly - Calibrate two sensors at once or use one well for a reference thermometer. See Section 5.2 for additional details. Fluke-Direct .com info@Fluke-Direct.com 1.888.475.5235... -
Page 20: Constant Temperature Block Assembly
9009 Industrial Dual-Block Calibrator User’s Guide Serial Port - A three-conductor jack is present for interfacing the calibrator to a computer or terminal with serial RS-232 communications. Controller Display - The digital display is an important part of the temperature controller because it not only displays set and actual temperatures but also vari- ous calibrator functions, settings, and constants. -
Page 21: Accessories
5 Parts and Controls Accessories Accessories The following inserts are available for the 9009 calibrator. Inserts may be used with either the hot or cold temperature wells. Figure 2 Constant Temperature Block Assembly Model Description 3102-0 Blank Insert 3102-1 1/16” (1.6 mm) Insert 3102-2 1/8”... -
Page 22: General Operation
Changing Display Units General Operation Changing Display Units The 9009 can display temperature in Celsius or Fahrenheit. The temperature units are shipped from the factory set to Celsius. To change to Fahrenheit or back to Celsius there are two ways: 1-Press the “SET”... -
Page 23: Controller Operation
To set the temperature one must first select the set-point memory. This function is accessed from the temperature display function by pressing “SET”. The number of the set-point memory currently being used is shown at the left on the display followed by the current set-point value. Fluke-Direct .com info@Fluke-Direct.com 1.888.475.5235... -
Page 24: Figure 3 Controller Operation Flowchart
9009 Industrial Dual-Block Calibrator User’s Guide Figure 3 Controller Operation Flowchart Fluke-Direct .com info@Fluke-Direct.com 1.888.475.5235... -
Page 25: Set-Point Value
Celsius (°C) or Fahrenheit (°F). The units are used in displaying the well tem- perature, set-point, and proportional band. Press “SET” after adjusting the set-point value to change display units. Un= C Scale units currently selected Press “UP” or “DOWN” to change the units. Fluke-Direct .com info@Fluke-Direct.com 1.888.475.5235... -
Page 26: Scan
9009 Industrial Dual-Block Calibrator User’s Guide Un= F New units selected Press “SET” to accept the present setting and to continue. Scan The scan rate can be set and enabled so that when the set-point is changed the calibrator heats or cools at a specified rate (degrees per minute) until it reaches the new set-point. -
Page 27: Secondary Menu
To exit out of the secondary menu press and hold “EXIT”. To continue on to the proportional band setting function press “SET”. Proportional Band In a proportional controller such as this the heater output power is proportional to the well temperature over a limited range of temperatures around the Fluke-Direct .com info@Fluke-Direct.com 1.888.475.5235... - Page 28 9009 Industrial Dual-Block Calibrator User’s Guide set-point. This range of temperature is called the proportional band. At the bot- tom of the proportional band the heater output is 100%. At the top of the pro- portional band the heater output is 0. Thus as the temperature rises the heater power is reduced, which consequently tends to lower the temperature back down.
-
Page 29: Controller Configuration
These controls only apply to instruments fitted with the serial interface. The parameters in the menu are — BAUD rate, sample period, duplex mode, and linefeed. Press “SET” to enter the menu. Fluke-Direct .com info@Fluke-Direct.com... -
Page 30: Baud Rate
9009 Industrial Dual-Block Calibrator User’s Guide 7.9.1 BAUD Rate The BAUD rate is the first parameter in the menu. The BAUD rate setting de- termines the serial communications transmission rate. Flashes and then displays the current setting bAUd Current BAUD rate setting... -
Page 31: Linefeed
The calibration parameter name flashes on the display and then the current value is displayed. The value of the parameter may be changed using the “UP” and “DOWN” buttons. After the desired value is reached press “SET” to set the Fluke-Direct .com info@Fluke-Direct.com... -
Page 32: Alpha
9009 Industrial Dual-Block Calibrator User’s Guide parameter to the new value. Pressing “EXIT” causes the parameter to be skipped ignoring any changes that may have been made. 7.10.1 This probe parameter refers to the resistance of the control probe at 0°C. The value of this parameter is set at the factory for best instrument accuracy. -
Page 33: Digital Communication Interface
RxD line on the other and vice-versa. To reduce the possi- bility of electrical interference, the serial cable should be shielded with low re- sistance between the connector and the shield. Figure 4 Serial Cable Wiring Fluke-Direct .com info@Fluke-Direct.com 1.888.475.5235... -
Page 34: Setup
The baud rate is the first parameter in the menu. The display will prompt with the baud rate parameter by showing “bAUd”. The current baud rate value is displayed. The baud rate of the 9009 serial communications may be pro- grammed to 300, 600, 1200, 2400, 4800, or 9600 baud. The baud rate is pre-programmed to 2400 baud. -
Page 35: Serial Operation
Characters are shown in lower case although upper case may be used. Spaces may be added within command strings and will simply be ignored. Backspace (BS, ASCII 8) may be used to erase the previous character. A termi- nating CR is implied with all commands. Fluke-Direct .com info@Fluke-Direct.com 1.888.475.5235... - Page 36 9009 Industrial Dual-Block Calibrator User’s Guide Table 2 9009 Controller Communications Commands Command Command Returned Acceptable Command Description Format † Example ‡ Returned Example Values Display Temperature Read current set-point s[etpoint] set: 9999.99 {C or F} set: 150.00 C Set current set-point to n...
- Page 37 8 Digital Communication Interface Interface Commands 9009 Communication Commands Continued Command Command Returned Acceptable Command Description Format † Example ‡ Returned Example Values Calibration Parameters Menu Read R0 calibration parameter r[0] r0: 999.999 r0: 100.578 Set R0 calibration parameter to n r[0]=n r=100.324...
-
Page 38: Test Probe Calibration
300°C takes 5 minutes to be within 0.1°C of its settled point and takes 10 min- utes to achieve maximum stability. Speeding up the calibration process can be accomplished by knowing how soon to make the measurement. It is recommended that typical measurements be Fluke-Direct .com info@Fluke-Direct.com 1.888.475.5235... - Page 39 9009 Industrial Dual-Block Calibrator User’s Guide made at the desired temperatures with the desired test probes to establish these times. Fluke-Direct .com info@Fluke-Direct.com 1.888.475.5235...
-
Page 40: Calibration Procedure
3. Repeat step 2 for the other two set-points recording them asT , and R respectively. 4. Using the recorded data, calculate new values for R0, ALPHA, DELTA, BETA parameters using the equations given below: 10.2.1 Compute DELTA Fluke-Direct .com info@Fluke-Direct.com 1.888.475.5235... -
Page 41: Compute R0 & Alpha
User’s Guide delta DE CF Where: - Measured temperature using thermometer. - Value of R from display of 9009 (Press SET and DOWN at the same time.) where and R are the measured temperature and resistance at –15 °C and R are the measured temperature and resistance at 0 °C... -
Page 42: Accuracy & Repeatability
3. Repeat step 2 for ALPHA, DELTA, and BETA (cold side only). 10.2.4 Accuracy & Repeatability Check the accuracy of the calibrator at various points over the calibrated range. If instrument does not pass specification at all set-points, repeat the Calibration Procedure. Fluke-Direct .com info@Fluke-Direct.com 1.888.475.5235... -
Page 43: Maintenance
If the instrument is used in a manner not in accordance with the equip- ment design, the operation of the instrument may be impaired or safety hazards may arise. Fluke-Direct .com info@Fluke-Direct.com 1.888.475.5235... -
Page 44: Troubleshooting
12.2.1 EMC Directive Hart Scientific’s equipment has been tested to meet the European Electromag- netic Compatibility Directive (EMC Directive, 89/336/EEC).The Declaration of Conformity for your instrument lists the specific standards to which the unit was tested. Fluke-Direct .com info@Fluke-Direct.com 1.888.475.5235... -
Page 45: Low Voltage Directive (Safety)
9009 Industrial Dual-Block Calibrator User’s Guide 12.2.2 Low Voltage Directive (Safety) In order to comply with the European Low Voltage Directive (73/23/EEC), Hart Scientific equipment has been designed to meet the IEC 1010-1 (EN 61010-1) and IEC 1010-2-010 (EN 61010-2-010) standards.
Need help?
Do you have a question about the 9009 and is the answer not in the manual?
Questions and answers