
Related Manuals for CAIRE Companion Series


Summary of Contents for CAIRE Companion Series
- Page 1 IQUID XYGEN YSTEMS Feder al (U .S.) law restricts these devices to sale by or on the order of a physician. B-701417-00 Rev. D...
-
Page 3: Table Of Contents
Companion Liquid Oxygen Systems TABLE OF CONTENTS General Safety Precautions ..............1 Companion Liquid Oxygen Systems ............. 4 Stationary Units .................. 4 Portable Units ..................5 Companion Stationary Units..............6 Sationary Unit Components..............6 Using the Stationary Units..............8 Companion Portable Units ..............11 Companion 1000/1000 Transport Unit Components...... - Page 4 Liquid Oxygen system and to ensure maximum benefit from its use. If you have any questions about the operation of the equipment, please consult your liquid oxygen supplier. Companion is a registered trademark of CAIRE Inc. Velco is a registered trademark of Crown Packaging. ©2009 CAIRE Inc. All rights reserved.
-
Page 5: General Safety Precautions
General Safety Precautions Throughout this manual you will see three kinds of special information: warnings, cautions, and notes. Make sure you carefully read and understand this information. Each is important and related to the surrounding text. A warning identifies a hazard and is boxed in and accompanied by a symbol. - Page 6 Do not smoke near this equipment. Keep cigarettes or burning tobacco away from the area where equipment is operated. Keep flammable materials away from this equipment. Oils and grease, including facial creams and petroleum jelly, ignite easily and may burn rapidly in the presence of oxygen.
- Page 7 Keep this equipment away from electrical appliances. Use and store Stationary and Portable units at least five feet from electrical appliances that may cause heat or sparks. Keep oxygen equipment away from open flames. Equipment such as furnaces, water heaters, and stoves may contain open flames.
-
Page 8: Companion Liquid Oxygen Systems
COMPANION LIQUID OXYGEN SYSTEMS The Companion Liquid Oxygen System is designed to store and deliver oxygen at a prescribed rate. The system consists of two units: the Stationary and the Portable. Stationary Units Each Stationary is a liquid oxygen reservoir you may use to fill your Portable unit. -
Page 9: Portable Units
Portable Units: The Companion Portable is a compact, lightweight device that provides you with a portable supply of oxygen. You will fill the Portable from the Companion Stationary unit. Portable units include the Companion 1000 (a one-liter model with a maximum flow rate of 6 liters per minute [L/min]) and the Companion 1000 Transport (a one-liter model with a maximum flow rate of 15 L/min). -
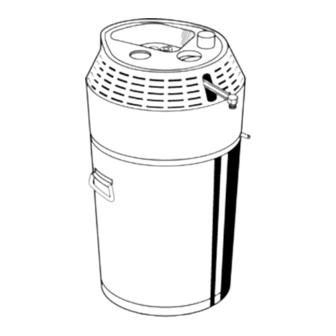
Page 10: Companion Stationary Units
COMPANION STATIONARY UNIT Stationary Unit Components Become familiar with the various parts of the Stationary unit shown in Figure 3, Figure 4, and Figure 5. • Contents Indicator: (optional) displays the amount of liquid oxygen remaining in the Stationary unit. The contents indicator is visible through the top of the unit. - Page 11 • Fill Connector: located in the top center of the Stationary unit. When filling a Portable, attach the female fill connector in the bottom of the Portable (Figure 8 and Figure 10) to the male fill connector on the Stationary. Note: On Dual-Fill Stationary units, a second connector on the side of the unit allows you to fill a side-fill type Portable unit.
-
Page 12: Using The Stationary Units
Using the Stationary Unit Your liquid oxygen supplier will deliver a filled Stationary unit to you and then refill or exchange your unit as required by your individual usage. You may then use the Stationary unit to fill your Portable oxygen unit. - Page 13 Figure 6: Attaching a Nasal Cannula 3. Turn the flow control knob on the top of the Stationary to the setting prescribed by your physician. Note: Use only marked settings; oxygen will not flow if the control is set between flow settings. If you use a humidifier, check for a steady stream of bubbles.
- Page 14 Figure 7: Drain Bottle Attachment B-701417-00 Rev D...
-
Page 15: Companion Portable Units
COMPANION PORTABLE UNITS C1000/C1000 Transport Unit Components Become familiar with the various parts of the unit described below and shown in Figure 8 and Figure 9. • Vent Valve: used to fill the unit. Pull down the vent valve lever to fill the Portable when it is connected to a Stationary unit. - Page 16 • Contents Indicator: located on top of the Portable. Unsnap the plastic buckle and lift the unit by the end of the carrying strap that is closest to the indicator. The pointer indicates approximately how much oxygen remains in the unit. •...
-
Page 17: Companion 500/550 Unit Components
Companion 500/550 Unit Components Become familiar with the various parts of the Portable described below and shown in Figure 10. • Vent Valve: a lever-operated valve used to fill the unit. Upon connecting the Companion 500/550 to the Stationary, begin the filling sequence by opening the vent valve and end the fill by closing the valve. -
Page 18: Companion 550 Portable Unit Components Only
Companion 550 Portable Unit Components ONLY • Continuous/Demand Flow Switch: a toggle switch that sets the Portable for either continuous flow or flow only when you inhale. • Sensor Connector: used to sense your inhalation effort. Attach either tube of the dual-lumen cannula to this connector. •... -
Page 19: Filling The Portable Units
Filling the Portable Unit Fill the Companion Portable unit from the Stationary as follows: Clean and dry the fill connectors on both the Stationary and Portable units to prevent freezing and possible equipment failure. 1. Check the contents indicator on the Stationary to ensure there is enough liquid oxygen for filling purposes. - Page 20 4. Carefully lower the Portable into place, ensuring that the fill connectors are properly engaged. 5. Place one hand on top of the Portable directly over the fill connector and press straight down. This will lower the Portable unit approximately inch (10 mm) and ensure the fill connectors engage correctly.
- Page 21 7. When you notice a change in the sound of venting gas followed by a dense, white vapor coming from the Stationary cover, close the vent valve. Fill times may vary according to the temperature of the container being filled. Note: If the vent valve fails to close and the hissing continues, remove the Portable unit by depressing the Portable release button (Figure 12 and Figure 13) on the...
- Page 22 If a minor liquid oxygen leak occurs when you disengage the Portable, re-engage and disengage the unit to help dislodge any ice or other obstruction. If the liquid leak persists, re-engage the unit and notify your liquid oxygen supplier. If a major liquid oxygen leak occurs when you disengage the Portable unit (that is, a steady stream of liquid oxygen), stay away from the unit and immediately notify your liquid oxygen supplier.
- Page 23 Figure 14: Checking Contents Indicator Note: For shorter planned use times, you can partially fill the Portable by closing the vent valve sooner than normal. The Portable will then be lighter and you will waste less oxygen. For Companion 1000 Transport only: Attach the moisture cup by inserting the fastener and rotating the thumb nut clockwise until it snaps into position.
- Page 24 Figure 15: Adjusting the Nasal Cannula For Companion 550 only: (See Figure 10) Place one of the tubes from the dual-lumen oxygen cannula on the Companion 550 oxygen outlet connector (upper connector). Place the other tube on the unit’s sensor connector (lower connector). Adjust the cannula to comfort- ably fit your face.
-
Page 25: For Companion 550 Only
Figure 16: Flow Control Knob Set for 2 L/min Note: Do not set the flow above the flow rate prescribed by your physician. Do not attempt to set the flow control between settings. Oxygen will flow from the unit only when the flow control is set to one of its marked settings. -
Page 26: Using The Portable Units
At flow settings of 1 to 6 L/min, the demand flow mode can significantly increase the planned use time while reducing the drying effect that continuous flow oxygen has on the nasal passages. Note: Use the demand flow mode at flow settings of 1 to 6 L/min only. -
Page 27: Cleaning And Maintenance
CLEANING AND MAINTENANCE Do NOT use alcohol, solvents, polishes, or any oily substance on oxygen equipment. if cleaning is necessary, use only warm water and a mild dish washing detergent. Dampen a cloth in the detergent and water solution and wipe the outside surface of the equipment until clean. Do not allow water into any of the controls, the fill connector, or the oxygen supply connector. - Page 30 B-701417-00 Rev D...
Need help?
Do you have a question about the Companion Series and is the answer not in the manual?
Questions and answers
Will.the companion 1000 operate on its side?