Table of Contents
Advertisement
Quick Links
Download this manual
See also:
User Manual
Advertisement
Table of Contents

Related Manuals for Compex readylink CGX3224


Summary of Contents for Compex readylink CGX3224
- Page 1 Quick Install Guide Compex 24-Port 10/100Mbps SNMP Managed Switch with 2 Optional Modules CGX3224 Version 1.3...
- Page 2 This page is intentionally left blank...
-
Page 3: Table Of Contents
3. Software Installation........................3 3.1. FreedomView Pro SNMP Manager Software Installation............3 3.2. Hyper Terminal Configuration ....................6 4. Physical Setup for Compex CGX3224 ....................7 5. Configuration of Compex CGX3224....................7 5.1. Access to Web Management Interface ...................7 5.2. Access to Hyper Terminal ......................9 5.3. - Page 4 This page is intentionally left blank...
-
Page 5: Introduction
It comes with 2 slots that allow insertions of 2 Gigabit modules or Fiber Optics modules. Compex CGX3224 is integrated with an Aggregating Router supporting up to 4 broadband channels for Internet sharing, providing Load Balancing and Fail-Over Redundancy to the Internet. -
Page 6: Hardware Installation
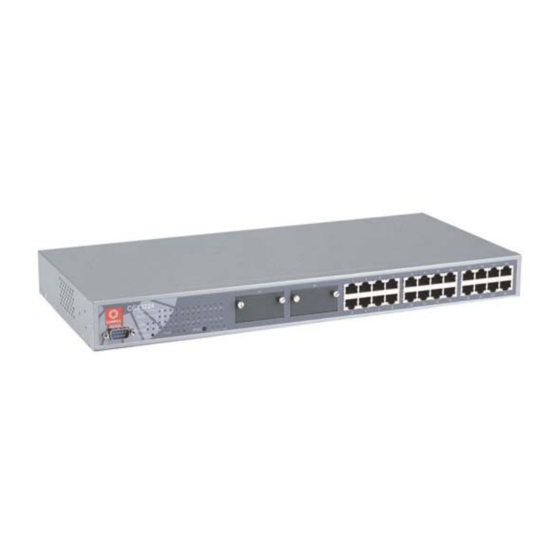
2. Hardware Installation Compex CGX3224 is suitable for office environment usage, which can either be placed on a flat surface or mounted on a 19-inch rack. The following steps illustrate the proper installation. 2.1. Desktop Installation 1. Unpack the switch. -
Page 7: Expansion Module Installation
2.3. Expansion Module Installation A series of optional expansion modules are available for Compex CGX3224. You need to install the modules before turning on Compex CGX3224. 1. Unscrew and remove the metal plate from the expansion slot. 2. Insert the Module carefully into the expansion module window and push it along the module rail until it stops. - Page 8 4. Your system will start activating setup.exe of the FreedomView Pro program. Click Next> button to proceed. NOTE It is important that you exit all programs before installation begins. Compex 24-Port 10/100 Mbps SNMP Managed Switch English with 2 Optional Modules CGX3224...
- Page 9 7. An authentication page will appear, prompting you to enter the password. The default password is set to password. Click OK button to access to the main page of FreedomView Pro. English Compex 24-Port 10/100 Mbps SNMP Managed Switch with 2 Optional Modules CGX3224...
-
Page 10: Hyper Terminal Configuration
Hyper Terminal Configuration We can configure Compex CGX3224 through Hyper Terminal by connecting one end of RS232 straight console cable to a PC, and the other end to Compex CGX3224. 1. Go to Start, Programs, Accessories, Communications and select Hyper Terminal icon. -
Page 11: Physical Setup For Compex Cgx3224
Plug the female end of the attached power cable into the power socket which is located at the rear of Compex CGX3224 chassis, and plug the other end into the nearby AC power point. Once the device is connected to the AC power supply, the POWER LED will turn on immediately. - Page 12 Figure 5.1 Authentication Page Upon entering the correct password, the web based management screen will be displayed as shown in Figure 5.2. Login to the Management System and the Main Page of Compex CGX3224 will appear: Figure 5.2 Main Configuration Menu of Compex CGX3224 Kindly refer to User’s Manual for configuration details.
-
Page 13: Access To Hyper Terminal
Access to Hyper Terminal A Hyper Terminal screen will appear to list out all configurations. 1. To access to the main configuration page of Compex CGX3224, enter the password as password and press the ENTER key from the keyboard. You can modify the configuration on the screen itself, such as changing the IP Address after you have upgraded the firmware. - Page 14 2. Go to File Menu and select “New Net Map” option. 3. Compex CGX3224 node will appear if you have connected it to the network. Double click the node and the device view will pop out. Device...
- Page 15 If you have failed to do so, you can simply go to Rediscover option at the Network Map Menu to refresh the screen after connecting to the network. In order to configure Compex CGX3224 using FreedomView Pro Program, you may proceed to CGX MultiSwitch Menu as shown below: After changing the configuration of Compex CGX3224, you can select Save Switch Config to save your configuration.
-
Page 16: Troubleshooting
6.1. LED Indications Compex CGX3224 is designed with LED indicators to indicate the operating status such as Power Status, Port Activity Status (Transmit/and Receive), Duplex status, and 10/100Mbps connection Status that can be found on the front panel. The LEDs indicators are useful for troubleshooting. - Page 17 Compex, Inc. may make improvements and/or changes to the product and/or specifications of the product described in this guide, without prior notice. Compex, Inc will not be liable for any technical inaccuracies or typographical errors found in this guide. Changes are periodically made to the information contained herein and will be incorporated into later versions of the guide.
- Page 19 +49 (0) 6074 - 93974 (24-hour access) Support Email: readylink@compex.com.sg Asia, Australia, New Zealand, Middle East and the rest of the World Write Compex Systems Pte Ltd 135, Joo Seng Road #08-01, PM Industrial Building Singapore 368363 Call Tel: (65) 6286-1805 (8 a.m.-5 p.m. local time) Tel: (65) 6286-2086 (Ext.
- Page 21 +49 (0) 6074 - 93974 (rund um die Uhr) Support Email: readylink@compex.com.sg Asien, Australien, Neu Seeland, Mittlerer Osten und für den Rest der Welt schriftlich Compex Systems Pte Ltd 135, Joo Seng Road #08-01, PM Industrial Building Singapore 368363 telefonisch Tel:...
- Page 23 +49 (0) 6074 - 93974 (круглосуточный доступ) Support Email: readylink@compex.com.sg Азия, Австралия, Новая Зеландия, Средний Восток и остальные страны мира Адрес Compex Systems Pte Ltd 135, Joo Seng Road #08-01, PM Industrial Building Singapore 368363 Тел. Тел.: (65) 6286-1805 (08:00 - 17:00, местное время) Тел.:...
- Page 25 This page is intentionally left blank...
-
Page 27: Warranty Registration Card
[M-0088-V2.3C] You can register via Internet at: http://www.cpx.com or http://www.compex.com.sg Or E-mail: support@compex.com.sg with the following information: To activate the warranty, please complete this card and return to Compex within ninety (90) days of purchase date. Product: Purchase Date: Revision:... - Page 29 Sie können sich über das Internet registrieren unter: http://www.cpx.com oder http://www.compex.com.sg Oder E-mail: support@compex.com.sg mit den folgenden Informationen: Bitte füllen Sie diese Karte aus und senden Sie sie innerhalb von neunzig (90) Tagen nach dem Kaufdatum an Compex, um Anspruch auf Garantie zu erhalten: Produkt:...
-
Page 31: Russian Version
Учет ресурсов используемые в CAD/CAM Электронные таблицы Управление базами данных сети (Отметьте E-mail Другое: все нужные позиции): Как вы узнали Работа Друзья Интернет Дилер Журнал Выставка о компании Другое: Compex? Note: Please fax to Compex Systems Pte Ltd at (65) 6280-9947... - Page 33 This page is intentionally left blank...
- Page 35 This page is intentionally left blank...
- Page 36 Manual Number: M-0355-V1.3C M-0355-V1.3G M-0355-V1.3R Version 1.3 July 2004...
Need help?
Do you have a question about the readylink CGX3224 and is the answer not in the manual?
Questions and answers